Security Administration
Managing security is perhaps your most important job as an administrator. The Aventail Management Console (AMC) makes it easy for you to manage the fundamental elements of security administration: resources and access control rules.
: •: Creating and Managing Resources on page 221
: •: Access Control Rules on page 256
Creating and Managing Resources
This section explains how to create and manage individual resources, resource groups, and configuration settings for resources. You can define a resource before referencing it in an access control rule, or define it directly from the access control rule interface. (For more information about the latter, see Adding Users and Resources From Within Access Control Rules on page 268.)
There’s a tool you can use on the appliance command line to see whether you reference any hosts that cannot be resolved in DNS, or whether your access control rules contain any unreferenced resources. See Validating Hosts on page 694 for more information.
: •: Resource Types on page 221
: •: Resources and Resource Groups on page 224
: •: Using Variables in Resource and WorkPlace Shortcut Definitions on page 239
: •: Creating and Managing Resource Groups on page 247
: •: Web Application Profiles on page 249
: •: Creating Forms-Based Single Sign-On Profiles on page 254
Resource Types
The E-Class SRA appliance provides access to a wide variety of corporate resources, which fall into three categories: Web, client/server, and file share resources.
: •: Built-In Resources on page 222
: •: Web Resources on page 222
: •: Client/Server Resources on page 223
: •: File Share Resources on page 224
Built-In Resources
There are several resources that are built into your appliance to help you get a WorkPlace portal set up quickly. These built-in resources cannot be deleted—access to some of them is granted through WorkPlace shortcuts:
Aventail WorkPlace (Resource Type: URL)
The WorkPlace portal gives users access to Web-based resources. This particular resource is used by another built-in item, which you can modify: an access “permit all” rule that allows any user from any zone to have access to the default WorkPlace portal.
Value: http://127.0.0.1:8085/workplace/
Connect Tunnel (Resource Type: URL)
Connect Tunnel is an application that provides broad access to network resources. You determine how users access the Connect Tunnel client:
: •: Allow users to download the Connect Tunnel client and activate it from a link (shortcut) in WorkPlace. Keep in mind that when you give users access to this resource, you allow them to both install and use the client: a user without access to this resource cannot use Connect Tunnel for access to network resources. The WorkPlace shortcut for this resource (Install Connect Tunnel) can be modified or deleted; the resource itself cannot.
: •: Deploy the Connect Tunnel client setup package without requiring users to log in to Aventail WorkPlace.
Value: http://127.0.0.1:8085/ctdownload/
Network Explorer (Resource Type: Network Share)
Network Explorer is a Web-based extension, accessible from WorkPlace, that provides access to any Windows file system resources that the user has permission to use (even from desktop browsers on non-Windows platforms). These resources can include servers, computers, workgroups, folders, and files. The WorkPlace shortcut for this resource (Network Explorer) can be modified or deleted; the resource itself cannot.
Value: smb://127.0.0.1/networkexplorer/
Web Resources
Web resources include Web-based applications or services that are accessed using HTTP or HTTPS. Examples include Microsoft Outlook Web Access and other Web-based email programs, Web portals, corporate intranets, and standard Web servers.
Web traffic is proxied through the Web proxy service, a secure gateway through which users can access private Web resources from the Internet. When you define a Web resource as a destination in an access control rule, make sure that Web browser is among the client software agents available for the rule. For more information, see Resolving Invalid Destination Resources on page 271.
A Web resource can be defined in various ways:
|
URL Type
|
Example
|
|
Standard URL
|
http://host.example.com/index.html
|
|
Standard URL with port number
|
http://host.example.com:8445/index.html
|
|
URL for secure site
|
https://host.example.com/index.html
|
|
URL containing IP address
|
http://192.0.34.0/index.html
|
|
Matching URL
|
Use wildcards to refer to a group of Web resources:
http://mailserver*.company.com/
|
|
URL with path and query string matching
|
Block email attachments, or prevent a Web-based application from displaying restricted data by matching a path element or query string value to a particular URL:
http://www.patient-records.com/reports.aspx?last_name=
|
|
Note: Some Web-based applications use Java applets or other browser extensions using protocols other than HTTP. Although these applications are accessed using a Web browser, they must be defined as client/server (not Web resources), and they must be accessed using either a network tunnel client or client/server proxy agent. Examples of such applications include Citrix NFuse, Oracle J-Initiator, and certain versions of SAP and PeopleSoft.
Client/Server Resources
Client/server resources are enterprise applications that run over TCP/IP (including applications that use UDP). Examples include thin-client applications such as Citrix; full client/server applications such as Microsoft Outlook; Lotus Notes; SAP; and terminal servers.
You define these types of client/server applications by specifying a host name, an IP address or IP range, a subnet IP address, or a DNS domain. These resources can also be used to define a network object containing multiple Web resources (such as a domain), or to define a network object that can be used to control access based on the source of a connection request.
The following table explains the syntax used to define each of these resource types. Host names can be fully qualified or unqualified.
|
Resource type
|
Example
|
|
Domain
|
private.example.com
|
|
Host name
|
bart.private.example.com
|
|
Host IP address
|
192.0.34.72
|
|
IP range
|
192.0.34.72 - 192.0.34.74
|
|
Subnet
|
192.0.34.0 / 255.255.255.0
|
|
Example
In this example, a Web development team has a single Web server with three virtual Web servers, one for each stage in their development process. Each virtual Web server listens on a different port.
Rather than creating three different URL resources, the Web development team can define the Web server, which proxies traffic on all ports, as a resource type of Host name or IP (for example, webdev.yourcompany.com). In addition, they attach a single sign-on Web application profile to it, and now all three of the virtual Web servers are defined at once, and they share the same SSO profile:
webdev.yourcompany.com
webdev.yourcompany.com:8080
webdev.yourcompany.com:8443
Note: Microsoft Outlook connects to Microsoft Exchange using an unqualified host name. When defining a Microsoft Exchange server as a resource, define it as an unqualified name (for example, CorpMail).
To use Exchange on Symbian, Android, iPad and iPhone devices, create a URL resource of the type ActiveSync for Exchange.
File Share Resources
When users log in to WorkPlace, they have access to file system resources that you set up. These can include computers containing shared folders and files and Windows network servers.
You can define a specific file system share by typing a UNC path, or you can define an entire Windows domain:
: •: A specific file system resource can be an entire server (for example, \\ginkgo), a shared folder (\\john\public), or a network folder (\\ginkgo\news).
: •: Defining an entire Windows domain gives authorized users access to all the network file resources within the domain. These resources are the same ones you would see if you were to browse the network using Windows Explorer (My Network Places > Entire Network > Microsoft Windows Network).
You can use resource variables to dynamically reference multiple folders on the network. For example, to give each user access to a personal folder, create a resource using a variable for the user name, and then use that variable when you create a shortcut on WorkPlace. See the example in Using Session Property Variables on page 240 for more information.
Resources and Resource Groups
This section describes how to work with resources and resource groups.
: •: Viewing Resources and Resource Groups on page 225
: •: Adding Resources on page 226
: •: Example: Specifying a URL Alias on page 232
: •: Example: Blocking Email Attachments on page 233
: •: Example: Supporting Exchange on iPhones on page 235
: •: Example: Restricting Access to Sensitive Data on page 236
: •: Editing Resources on page 237
: •: Deleting Resources on page 237
: •: Using the Resource Exclusion List on page 238
Viewing Resources and Resource Groups
You can view and define individual resources or groups of them in AMC.
To view the list of available resources and resource groups
1. From the main navigation menu in AMC, click Resources.
2. On the Resources tab, review the list of available individual resources. (The Resource Groups tab displays collections of resources.)
3. Use the Filters settings at the top of the page to filter the resources that are displayed here. For information about using filters, see the “Filters” section under A Quick Tour of the AMC Interface on page 109.
The Type column displays the type of each resource (Domain name, Host name, etc.). Remember that a client/server resource can contain both Web and client/server applications.
The Used column indicates whether a resource has been specified in a shortcut on WorkPlace.
4. For an overview of a particular resource, click the plus sign (+) next to it. This shows the resource type, its value, and whether it is used by a WorkPlace shortcut or access rule.
To edit a resource, click its link in the resource list.
By default, there are some read-only resource definitions included with the appliance, for example, Aventail WorkPlace and Connect Tunnel Download. These definitions are required by the appliance services and cannot be deleted (a read-only resource has no check box next to it).
Adding Resources
Creating application resources—Web, client/server, and file share resources—is the first step in forming access policies for your users.
To add a resource
1. From the main navigation menu in AMC, click Resources.
2. Click New and then choose a resource type from the drop-down list:
The options you see on the Add Resource page depend on the resource type you selected. The following options are shared across the specified resource types:
|
Option
|
Description
|
Resource type
|
|
Name
|
Resource name
|
All
|
|
Description
|
Resource description
|
All
|
|
Variable
|
Use a variable to define dynamic resources; see Using Variables in Resource and WorkPlace Shortcut Definitions on page 239.
|
• Citrix server farm
• Domain
• Host name or IP
• Matching URL
• Network share
• URL
|
|
Create shortcut in WorkPlace
|
Add a shortcut to a Web resource in WorkPlace. The name you assign to the resource will appear in the list of Shortcuts on the Aventail WorkPlace page. You can add the shortcut to a new or existing shortcut group in order to keep shortcuts with similar usage requirements together on the WorkPlace portal page.
|
• Domain
• Network share
• URL
|
|
Web application profile
(Web proxy options or Advanced area)
|
This list contains preconfigured Web profiles that are recommended for several popular Web applications, custom Web profiles, and a default Web profile. If you are unsure about which profile to select, choose Default. To see a profile, click View selected profile. Also see Adding Web Application Profiles on page 250.
|
• Domain
• Host name or IP
• IP range
• Matching URL
• Subnet
• URL
|
|
The following options are unique to the URL resource type:
|
Option
|
Description
|
|
URL
|
If you do not enter a protocol identifier, AMC automatically inserts http:// before the URL. If this is a URL for a secure site, you must include the https:// protocol identifier. For example, type https://example.domain.com.
|
|
Custom access area
(Web Proxy Options)
|
You can choose to Translate this resource or Access this resource on a custom port or Access this resource using a custom IPv4 or IPv6 FQDN.
Translation uses URL rewriting, but the other alternatives provide clientless Web application access and do not incur the limitations of URL rewriting. URL rewriting can have problems with Web programming technologies such as AJAX.
The options below will vary according to your choice.
|
|
Alias name
(Web proxy)
|
Specify a public alias to represent a private URL. The alias name is visible to users—make it short and descriptive so that it is easy to remember. You should specify an Alias name if:
• You want to obscure the internal host name for this resource.
• The URL resource is not contained within a search domain configured for Name resolution on the Network Settings page.
• You normally redirect traffic through a network agent, but in this case you want to force the resource to be proxied using translated Web access. See Adding Web Shortcuts on page 403 for more information.
Notes
• The private URL that you are representing with the alias must point to a directory on the back-end server, not a particular file.
• Use ASCII characters when specifying an alias. Users who connect to WorkPlace using translated Web access will see an error message if non-ASCII characters are used.
• Creating an alias works only for URLs (addresses with an http or https prefix); you cannot specify an alias for a UNC path or FTP resource (ftp://), for example.
Also see Example: Specifying a URL Alias on page 232 for a detailed description of how an alias is used.
|
|
Port
(Web proxy)
|
The Port option is available when you select Access this resource on a custom port under Custom access. Enter the custom port number. The resource becomes available at that port on each WorkPlace site. The port must be open on any firewalls and must not be already in use on the external side of the appliance. Actual delivery of Web content depends on policy checks in accordance with normal appliance operation.
|
|
Custom FQDN
(Web proxy)
|
The Custom FQDN option is available when you select Access this resource using a custom FQDN under Custom access. Type the Custom FQDN name (such as custom.mydomain.com) to be hosted by an externally accessible Web server on the appliance. By default, AMC listens on all interfaces for all services and connects the request to the correct service based on the FQDN being requested.
The host name cannot be relative to any WorkPlace site. A maximum of 32 IPv4 or IPv6 addresses for externally defined host names are allowed between independently hosted Web application names and WorkPlace sites, supporting up to 64 total host names.
Custom FQDN mapped Web access provides single sign-on support.
If the host name or IP address on the certificate does not match the Custom FQDN or IP address that you specified for this site, a security warning is displayed when users access the site.
Custom FQDNs are handled similar to configuring a WorkPlace site, as explained in To add a WorkPlace site on page 418.
|
|
Listen on an additional IP address
IP address
(Web proxy)
|
(Migrated/imported configurations only) https://10.4.124.222/workplace/assets/help/index.html. An additional listening address can be specified if AMC was upgraded from a previous version where a virtual IP address is configured for the WorkPlace site or the CEM is used. To listen on an additional address, check the Listen on an additional IP address check box and type the IP address.
For new installations, the Listen on an additional IP address fields are hidden. On a partial import, virtual IP address information is lost, and applying pending changes forces the Administrator to fix any WorkPlace site or URL resource configured to use a different IP address. In this case, the Listen on an additional IP address fields are visible, with the check box checked to enable listening on an additional address. Either enter an IP address or uncheck the check box.
For migrated/imported configurations with existing virtual hosts, the UI section is visible, but the Administrator cannot create new virtual addresses. If necessary, use CEM to create virtual host addresses in a new or migrated/imported configuration.
If the host name or IP address on the certificate does not match the IP address that you specified for this site, a security warning is displayed when users access the site.
|
|
IP address
(Web proxy)
|
(Migrated/imported configurations only)
Select an existing IP address or select (New) to add an IP address in the New IP address field.
|
|
New IP address
(Web proxy)
|
Type in the IP address of the resource in dotted decimal form (w.x.y.z). This address must be on the same subnet as the appliance interface.
|
|
SSL certificate
(Web proxy)
|
Select an existing SSL certificate or select (New) to add a new SSL certificate for this resource. If a certificate that matches the name is already available on the appliance, it is selected. Otherwise, select one from the SSL certificate list or import a certificate.
|
|
Organization
(Web proxy)
|
Type in your company or organization name.
|
|
Country
(Web proxy)
|
Type in the 2-letter abbreviation for your country (such as US or AU).
|
|
Synonyms
(Web proxy)
|
Define alternative names for the URL resource name. This is convenient for users if they access the server using a different name (perhaps an unqualified or condensed name), or if a Web page contains links pointing to a DNS alias and the name is not properly translated by the Web proxy service. Separate multiple synonyms with semicolons.
The appliance automatically defines a shortened name for the resource as a synonym. For example, if the URL is http://mail.example.com, the appliance adds the synonym mail. This synonym does not, however, appear in the Synonyms box.
When Translate this resource is selected and you specify Synonyms, there must be something in the Alias name field. For the other Custom access options, the Synonyms field is independent of other fields.
|
|
Provide Exchange ActiveSync access to this resource
(Exchange ActiveSync)
|
Select this check box to allow Exchange ActiveSync access to this resource.
For more information, see Exchange ActiveSync Web Access on page 443. For an example use case, see Example: Supporting Exchange on iPhones on page 235.
|
|
Custom FQDN
(Exchange ActiveSync)
|
Type the Custom FQDN (IPv4 or IPv6) name (such as custom.mydomain.com) to be hosted by an externally accessible Web server on the appliance. By default, AMC listens on all interfaces for all services and connects the request to the correct service based on the FQDN being requested.
|
|
Listen on an additional IP address
IP address
(Web proxy)
|
(Migrated/imported configurations only)
An additional listening address can be specified if AMC was upgraded from a previous version where a virtual IP address is configured for the WorkPlace site or the CEM is used. To listen on an additional address, check the Listen on an additional IP address check box and type the IP address.
For new installations, the Listen on an additional IP address fields are hidden. On a partial import, virtual IP address information is lost, and applying pending changes forces the Administrator to fix any WorkPlace site or URL resource configured to use a different IP address. In this case, the Listen on an additional IP address fields are visible, with the check box checked to enable listening on an additional address. Either enter an IP address or uncheck the check box.
For migrated/imported configurations with existing virtual hosts, the UI section is visible, but the Administrator cannot create new virtual addresses. If necessary, use CEM to create virtual host addresses in a new or migrated/imported configuration.
If the host name or IP address on the certificate does not match the IP address that you specified for this site, a security warning is displayed when users access the site.
|
|
IP address
(Exchange ActiveSync)
|
(Migrated/imported configurations only)
Select an existing IP address or select (New) to add an IP address in the New IP address field.
|
|
New IP address
(Exchange ActiveSync)
|
Type in the IP address of the resource in dotted decimal form (w.x.y.z). This address must be on the same subnet as the appliance interface.
|
|
SSL certificate
(Exchange ActiveSync)
|
Select an existing SSL certificate or select (New) to import a new SSL certificate for this resource.
|
|
Organization
(Exchange ActiveSync)
|
Type in your company or organization name.
|
|
Country
(Exchange ActiveSync)
|
Type in the 2-letter abbreviation for your country (such as US or AU).
|
|
Realm
(Exchange ActiveSync)
|
Select the realm from the drop-down list. ActiveSync access requires the use of a realm that uses a single Active Directory authentication server. The realm must be already configured.
|
|
Fallback Exchange server URL
(Exchange ActiveSync)
|
Enter the URL for the Exchange Server you want to use as the fallback server. See Configuring Fallback Servers on page 482 for details on configuring a fallback server.
|
|
The following options are unique to the Matching URL resource type:
|
Option
|
Description
|
|
URL
|
If you do not enter a protocol identifier, AMC automatically inserts http:// before the URL. If this is a URL for a secure site, you must include the https:// protocol identifier. For example, type https://example.domain.com.
The wildcard characters “*” and “?” can be used within address segments (between periods) of a Matching URL resource. Do not use the “?” character after the domain name—it indicates a URL query string.
Use wildcard characters in the following situations:
• Type www.yourcompany*.com to reference several domains that begin with yourcompany and end with .com, or type www.yourcompany.* to reference both http://www.yourcompany.com and http://www.yourcompany.de.
• Create an entry, such as mail*.yourcompany.com, that gives the user access to anything in the yourcompany domain that begins with mail. This example provides access to mail.yourcompany.com and mail2.yourcompany.com, but not to mail3.wemmet.yourcompany.com.
The URL is not case-sensitive.
|
|
Path and query string matching
|
These options allow you to block email attachments, or prevent a Web-based application from displaying restricted data by matching a path element or query string value to a particular URL. See Example: Blocking Email Attachments on page 233 and Example: Restricting Access to Sensitive Data on page 236 for more information.
The Query string value is case-sensitive, while the Path element is not.
|
|
The following options are unique to the Host name or IP resource type:
|
Option
|
Description
|
|
Host name or IP
|
A host can include any computer on your network; for example, bart.private.example.com or 192.0.34.72.
When you specify a host name, the wildcard characters “*” and “?” can be used within an address segment (between periods). For example, the entry mail*.yourcompany.com gives the user access to anything in the yourcompany domain that begins with mail (for example, (mail.yourcompany.com and mail2.yourcompany.com), but not to mail3.wemmet.yourcompany.com. The host name is not case-sensitive.
|
|
The following options are unique to the Network share resource type:
|
Option
|
Description
|
|
Network share
|
Type a UNC path. This can be an entire server (for example, \\ginkgo), a shared folder (\\john\public), or a network folder (\\ginkgo\news).
|
|
The following options are unique to the IP range resource type:
|
Option
|
Description
|
|
IP range
|
An IP range typically identifies a partial range of computers within a subnet; for example, 192.0.34.72-192.0.34.74.
|
|
The following options are unique to the Subnet resource type:
|
Option
|
Description
|
|
Subnet IP
|
A subnet is a portion of a network that shares a common address component. For example, 192.26.34.0.
|
|
Subnet mask
|
For example, 255.255.255.0.
|
|
The following options are unique to the Domain resource type:
|
Option
|
Description
|
|
Domain
|
A domain encompasses one or more hosts.
If the Windows domain check box is cleared, the domain name must be in DNS syntax. For example, sampledomain.com.
|
|
Windows domain
|
To define an entire Windows domain, select the Windows domain check box, and then type the name of the Domain in either NetBIOS or DNS syntax (such as example or example.com). Defining a domain gives authorized users access to all the network file resources within the domain.
|
|
The following options are unique to the Server farm resource type:
4. After you’ve finished defining a resource, click Save.
Example: Specifying a URL Alias
Any Web resource—such as a Web application, a Web portal, or a Web server—can be defined as a “URL resource.” Defining a Web resource as a URL provides several advantages:
: •: You can create a Web shortcut for WorkPlace to give users quick access to a URL resource.
: •: You can define very specific access rules to control which users can access the URL.
: •: You have the option of obscuring (or “aliasing”) the internal host name so it is not publicly exposed. When a user accesses an alias, the request is proxied to the downstream Web resource and its private URL is translated using the alias you specify. The user sees only the public (or “aliased”) URL.
The following figure illustrates how the private address for an inventory application might be translated into a public URL.
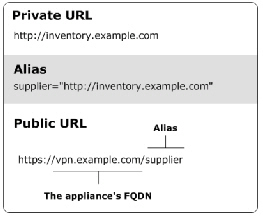
The private URL for this resource is http://inventory.example.com, and the administrator has created an alias for it named supplier.
Instead of using the private URL (which would publicly expose a sensitive host name), suppliers access a public URL: https://vpn.example.com/supplier.
A public URL consists of the following:
: •: An https:// prefix rather than http://: this is because all traffic to and from the E-Class SRA appliance is secured using SSL
: •: The appliance’s fully qualified domain name (in this example vpn.example.com)
: •: The resource’s alias name (in this example supplier)
Note•: Some Web-based applications use Java applets or other browser extensions that submit traffic using protocols other than HTTP. Examples of such applications include Citrix NFuse and certain versions of SAP. Although accessed using a Web browser, these applications may need to be defined as a client/server resource and proxied through OnDemand using the client/server access service.
: •: The private URL for which you create an alias must be a directory on the back-end server; it cannot be a file, and it must begin with either http:// or https://.
: •: Use ASCII characters when specifying an alias. Users who connect to WorkPlace using translated Web access will see an error message if non-ASCII characters are used.
: •: For information on defining URL resources, see Adding Resources on page 226.
Example: Blocking Email Attachments
Your organization may need to restrict access to sensitive data for users working from an unmanaged or untrusted public system. For example, you may want to allow users to view email messages, but prevent them from downloading email attachments that could be left behind on the computer and accessible to unauthorized users.
The following example demonstrates how to use an access control rule, together with a Matching URL resource and End Point Control zone, to block attachments from being downloaded to untrusted devices.
: •: For an overview of access control, see Access Control Rules on page 256.
: •: The example assumes that you have an EPC zone configured (named Untrusted in this example) into which devices that are not IT-managed are classified; see Managing EPC with Zones and Device Profiles on page 353 for information about configuring and using zones.
To block email attachments using a Matching URL resource
1. From the main navigation menu in AMC, click Access Control.
2. Click New. The Add/Edit Access Rule page appears.
3. In the Number box, type a number to specify the rule’s position in the access rule list.
4. Use the Action buttons to specify Deny. This will deny users access to any resource that matches the pattern you specify in the next step.
5. Complete the information under Basic settings:
a.Leave User selected (so that the rule applies to users trying to access a resource).
b.The From box specifies the users to whom the rule applies. For this example, leave the value as Any user.
c.In the To box, click Edit to specify the target resource for this rule. A Resources window appears.
d.Click New and then select Matching URL. The Add Resource - Matching URL page appears.
e.Type a name for the resource. For example, Block email attachments.
f. In the URL box, type the URL address of your mail server.
g.In the Path and query string matching area, select Exchange/OWA attachments from the Type of match list.
h.Click Save. The Add Resource - Matching URL window closes.
6. In the End Point Control zones area, click Edit to select the zone from which you will deny access to the resource (Untrusted).
7. When you create a rule that specifies a Matching URL resource type, the user must be allowed to use a browser as an access method. On the Advanced tab, in the Access method restrictions area, make sure that the Client software agents are either set to Any, or that Web browser is among the selected agents.
8. Click Finish.
Note•: Some Web-based applications automatically redirect users to other Web pages. Be certain to use the target URL address (the Web page to which users are redirected) when configuring the appliance to block email attachments. See Example: Working with a URL Redirect on page 248 for more information.
: •: You cannot configure a Matching URL resource to block attachments for users who connect to the appliance using OnDemand Tunnel or Connect Tunnel.
Related Topics
: •: Example: Restricting Access to Sensitive Data on page 236
Example: Supporting Exchange on iPhones
Exchange ActiveSync is supported for Symbian OS, Android, iPads, and iPhones. Symbian is a popular platform for smart phones such as Nokia or Samsung, and provides email notification, mail, calendar, contacts, tasks, and out of office functions. Android, Google’s mobile OS, and Apple’s iPad and iPhone also support email and related functions via Exchange ActiveSync.
The following example describes configuring a URL resource to support iPhone users who wish to access Microsoft Exchange.
Note: This example assumes you have a realm which uses single Active Directory authentication.
Allow iPhone users to access corporate Exchange server
1. From the main navigation menu in AMC, click Resources.
2. Click New. Select URL. The Add Resource URL page appears.
3. Enter the name, description, and externally-facing URL. Enter only the server name without a starting or index page. In this example, we will use internalexchangeserver.E-Class SRA.com.
4. Choose a group to add this resource to. In this example, we have left this in the default group.
5. Click Exchange ActiveSync Options. The Exchange ActiveSync Options section appears.
6. Select the Provide Exchange ActiveSync access to this resource check box.
7. In the Host and domain name field, type the external host name and domain that will be accessed by iPhone users.
8. Select the host address from the IP address drop-down list or select (New) and then type the host address into the New IP address field.
9. Select the certificate from the SSL certificate drop-down list or select (New) and then type the certificate information into the Organization and Country fields. If you own a wildcard certificate on this domain, you may use it here. For example, if you own a certificate for *.mycompany.com, you could use it for iPhone access at iphonemail.mycompany.com and for VPN access at vpnaccess.mycompany.com.
10.Select the realm from the Realm drop-down list. Only realms that use Active Directory for authentication are available as choices.
11.Click Save.
12.To configure an ActiveSync device profile for iPhones, click End Point Control in the main navigation menu in AMC.
13.On the Device Profiles tab, click New and select Exchange ActiveSync.
14.Enter a name and description for the device profile in the Name and Description fields.
15.In the Add attribute(s) section, select Equipment ID for the Type.
16.In the Device identifier field, enter the user attribute variable that contains the device identifier. For iPhone, the identifier is the serial number of the device. For details, see the Equipment ID table under Device Profile Attributes on page 369.
17.Click Save.
18.Notify your iPhone users of the externally-facing URL and instruct them to log in using their Active Directory credentials. Users must configure ActiveSync for Exchange on the device:
a.On the iPhone, navigate to Settings > Mail > Contacts and Calendars > Add Account > User’s account info.
b.Set the server name to the URL (external host name and domain) provided by the administrator.
Note: To ensure that your Exchange server is correctly configured to work with iPhones, it is recommended that you test iPhone access with the Exchange server directly. After confirming iPhone access to email, then add the SRA appliance between the iPhone and the Exchange server. If your Exchange server is not accessible from the Internet, you can set up a WiFi access point to test iPhone access to it.
For details about setting up an Exchange server for iPhone access, refer to the iPhone Enterprise Deployment Guide, available at: http://manuals.info.apple.com/en_US/Enterprise_Deployment_Guide.pdf.
Example: Restricting Access to Sensitive Data
The following example demonstrates how to use an access control rule, together with a Matching URL resource and End Point Control zone, to prevent a Web-based application from displaying restricted data to untrusted devices.
: •: For an overview of access control, see Access Control Rules on page 256.
: •: The example assumes that you have an EPC zone configured (named Untrusted in this example) into which devices that are not IT-managed are classified; see Managing EPC with Zones and Device Profiles on page 353 for information about configuring and using zones.
Prevent a Web-based application from retrieving data using a Matching URL resource
1. From the main navigation menu in AMC, click Access Control.
2. Click New. The Add/Edit Access Rule page appears.
3. In the Number box, type a number to specify the rule’s position in the access rule list.
4. Use the Action buttons to specify Deny. This will deny users access to any resource that matches the pattern you specify in the next step.
5. Complete the information under Basic settings:
a.Leave User selected (so that the rule applies to users trying to access a resource).
b.The From box specifies the users to whom the rule applies. For this example, leave the value as Any user.
c.In the To box, click Edit to specify the target resource for this rule. A Resources window appears.
d.Click New and then select Matching URL. The Add Resource - Matching URL page appears.
e.Type a name for the resource. For example, Patient Records.
f. In the URL box, type the URL address of your Web-based application. For example, www.patient-records.com.
g.In the Path and query string matching area, select Custom from the Type of match list.
h.Click New and then select Path element. Type reports.aspx and then click OK (the path is not case-sensitive).
i. Click New again and select Query string. Type last_name= and then click OK (the query string is case-sensitive).
j. Click Save. The Add Resource - Matching URL window closes.
6. In the End Point Control zones area, click Edit to select the zone from which you will deny access to the resource (Untrusted).
7. When you create a rule that specifies a Matching URL resource type, the user must be allowed to use a browser as an access method. On the Advanced tab, in the Access method restrictions area, make sure that the Client software agents are either set to Any, or that Web browser is among the selected agents.
8. Click Finish.
Once you save and apply your changes, users who attempt to open the Patient Records resource (using a URL that matches http://www.patient-records.com/reports.aspx?last_name=) and who are classified into the Untrusted zone will be denied access.
Note•: Some Web-based applications automatically redirect users to other Web pages. Be certain to use the target URL address (the Web page to which users are redirected) when configuring the appliance to block email attachments. See Example: Working with a URL Redirect on page 248 for more information.
: •: You cannot configure a Matching URL resource to restrict access to sensitive data for users who connect to the appliance using OnDemand Tunnel or Connect Tunnel.
Related Topics
: •: Example: Blocking Email Attachments on page 233
Editing Resources
Before modifying a resource, carefully examine any Access Control rules associated with it to understand how your changes will affect your security policy.
To edit a resource
1. From the main navigation menu in AMC, click Resources.
2. Click the name of the resource that you want to edit.
3. On the Add/Edit Resource page, make your edits as needed.
4. Click Save.
Note: You cannot change an existing client/server resource’s definition setting (for example, change a host name to an IP range); instead, you must create a new resource and apply the appropriate definition setting.
Deleting Resources
You cannot delete a resource that is referenced in an access control rule, resource group, or WorkPlace shortcut. Before deleting a resource, you must first remove it from any rules in which it is referenced. See Deleting Referenced Objects on page 137 for more details.
To delete a resource
1. From the main navigation menu in AMC, click Resources.
2. On the Resources page, select the check box to the left of any resources that you want to delete.
3. Click the Delete button. If this resource is still referenced by an access control rule, resource group, or WorkPlace shortcut, AMC displays an error message. Click the link in the error message to see a list of all references to this resource.
Using the Resource Exclusion List
By default, access agents and Web browsers redirect connections through the appliance for destination resources that you’ve defined in AMC. This redirection is a little different, depending on the user’s means of access:
: •: The tunnel access agent redirects connections through the appliance for any destination resource that the user is permitted to access.
: •: A Web browser redirects to the appliance all destination resources that have been defined in AMC; if the user does not have access, a “permission denied” Web page is displayed.
There may, however, be resources that you don’t want redirected through the appliance. For example, a user starts Outlook Web Access through the appliance and reads an email message with a link to a public site that is within a domain resource configured on the appliance. The traffic generated by following that link would be sent through the appliance. You can prevent this by specifying the public resource in the exclusion list.
Use the resource exclusion list to specify any resources (including host names, IP addresses, or domains) from being redirected through the appliance. When specifying a domain, you can also use the wildcard characters asterisk (*) and question mark (?). This list is global and applies to all access services.
The resource exclusion list does not affect access control or security. If you want to prevent access to particular resources, add a Deny rule to the access control list.
To see which resources are configured to be redirected through the appliance, click the Show network redirection list link. This displays the Redirection List page.
To delete a resource from the exclusion list, select its check box and then click Delete.
If you exclude a resource by specifying its fully qualified domain name (FQDN), users who connect to WorkPlace from a realm that provides access using translated Web mode can still access the resource if they type its unqualified domain name in the WorkPlace Intranet Address box.
To add a resource to the resource exclusion list
1. From the main navigation menu in AMC, click Resources.
2. Click the Resource exclusion list link at the bottom of the page.
3. In the Exclusion list box, click New, and then type the host name, IP address, or domain that you want to exclude from being redirected through the appliance. Wildcard characters (* and ?) are permitted.
For example, if you have three public web servers (www.YourCompany.com, www2.YourCompany.com, and www3.YourCompany.com), you can allow the network traffic associated with them to avoid the appliance, which will improve performance. Add all three public sites to the Exclusion list by using a wildcard character: www*.YourCompany.com. Resources in this list can also contain variables; see Using Variables in Resource and WorkPlace Shortcut Definitions on page 239 for more information.
Click OK after each addition to the Exclusion list.
5. Click Save.
Caution: If you create a Domain resource in AMC (for example, win.yourcompany.com), and you exclude a resource from that domain using its IP address (10.20.30.40), the resource can still be accessed using its FQDN (server.win.yourcompany.com). This note of caution applies only to agents that use the Web proxy service, not the tunnel clients.
Using Variables in Resource and WorkPlace Shortcut Definitions
Using variables, you can define a single resource or WorkPlace shortcut that derives its value from a property that is unique for each user. Variables can be defined by a property associated with the session a user has started (the user name, for example, or the name of the zone to which he or she has been assigned), or by querying an external LDAP store for a specific set of attributes, such as a group or computer name.
Variables can be used for all resource types except IP range and Subnet. If a variable resolves to nothing, any configuration item using it will be undefined. For example, you might query an LDAP store for a user’s IMEI number (the built-in ID number on a mobile device). In the case of a user who does not have an IMEI number, the variable would not resolve to anything during that user session. A WorkPlace shortcut that uses the variable would not be displayed, for example, and a policy rule that uses it will also fail.
Related Topics
: •: Using Session Property Variables on page 240
: •: Using Query-Based Variables on page 241
: •: Modifying Query Results on page 243
: •: Displaying a Series of Shortcuts Using a Single Definition on page 244
Using Session Property Variables
Once a user has started a WorkPlace session by logging in, there are several session properties that are known, such as the name of the community to which the user has been assigned. You can use these properties to create dynamic resources.
For example, you might want mobile users to have access to a different network share than users with desktop computers. The way you would do this is as roughly as follows:
: •: Define two communities (Mobile and Desktop).
: •: Set up two file shares on your network. For example, \\company\Mobile and \\company\Desktop.
: •: Define a resource for WorkPlace: \\company\{Session.communityName}.
A single resource can in this manner present both kinds of users with the link that’s appropriate for their devices.
|
Built-in variables
|
Description
|
|
{Session.activeDirectoryDomain}
|
The FQDN or IP address of the AD domain to use as a search base.
|
|
{Session.activeDirectoryDomain2}
|
The FQDN or IP address of a second AD domain to use as a search base (if you’re using chained authentication).
|
|
{Session.communityName}
|
The name of the community to which the user was assigned when he or she logged in. The community controls which access agents are available and the end point.
|
|
{Session.ntDomain}
|
The login domain. For example, server3 in this FQDN: server3.uk.company.com.
|
|
{Session.password}
|
The password from the first authentication method.
|
|
{Session.password2}
|
The password from the second authentication method, if used.
|
|
{Session.qualifiedName}
|
For your primary (or only) authentication method, this is the fully qualified user name (username@userdomain.company.com).
|
|
{Session.qualifiedName2}
|
For your secondary authentication method, this is the fully qualified user name.
|
|
{Session.realmName}
|
The name of the realm the user is logged in to.
|
|
{Session.remoteAddress}
|
The IPv4 or IPv6 address of the user's host as seen by the appliance.
|
|
{Session.userName}
|
The short name for the user from the first authentication method. The short name is usually used for both the user’s email address and home folder.
|
|
{Session.userName2}
|
The user’s short name from the second authentication method, if used.
|
|
{Session.zoneName}
|
The name of the zone to which the user has been assigned, based on the profile of his or her device.
|
|
To create a WorkPlace shortcut to a network share based on user name
1. From the main navigation menu in AMC, click Resources.
2. Click New, and then select Network share.
3. Give this resource a name (for example, Personal Folder), and then type the UNC path for the user folders on your network in the Network share box. For example, \\marine_lab\users\.
4. Click {variable} and select Session.userName to add a variable that represents the short login name for the user. When you click Insert, the entry for Network share looks like this:
\\marine_lab\users\{Session.userName}
5. Select the Create shortcut on Aventail WorkPlace check box, and then click Save. By default, the resource you created will be displayed as a link in WorkPlace titled Personal Folder. If you want to change the link text, go to the Aventail WorkPlace page in AMC, and then click the link for the new shortcut.
When the user jdoe connects to WorkPlace, the variable is automatically replaced with the name entered during login and provides access to a folder named \\marine_lab\users\jdoe. When user rsmith follows the same link, he has access to the \\marine_lab\users\rsmith folder.
Note•: For instructions on defining a new variable based on an LDAP query, see Using Query-Based Variables on page 241.
: •: There is an additional built-in variable named {URL_REF_VALUE}, which is the value of the first variable in the URL of a shortcut. See Displaying a Series of Shortcuts Using a Single Definition on page 244 for an example of how to use this.
Using Query-Based Variables
When you configure a realm to use an Active Directory or LDAP authentication server, resources can be defined by querying the external LDAP store for a specific attribute or set of attributes. For example, you can use an LDAP query to create a single resource offering each user a WorkPlace link to his or her personal desktop from home or elsewhere, using the remote desktop protocol (RDP) that is built into Windows.
To create a resource variable that points to users’ remote desktops
1. Modify your LDAP store and add an attribute named rdp.
2. From the main navigation menu in AMC, click Resources.
3. Click the Variables tab, and then click New.
4. Enter a name for the variable (for example, Desktop), and then select User attribute as the Type.
5. Enter rdp in the Attribute text box.
6. In the Output list, leave Single result selected if each user has only one computer associated with him or her in the LDAP store.
7. Select the realm to which this new variable applies, and then enter the username of someone who has access to that realm in the User text box.
8. Click Test to make sure that the user attribute you specified returns a value for this user.
Click Save.
10.On the Resources tab, click New, and then select Host name or IP.
11.Give a name to this resource (for example, Personal computer).
12.In the Host name or IP address text box, click {variable}, and then select {Desktop}, the variable you created earlier. Click Insert.
13.Edit the entry for Host name or IP address to add the portion of the address that the personal computers on your network share. The completed entry might look something like this:
{Desktop}.dept.company.com
As each user logs in, {Desktop} is replaced by the machine name associated with him or her in the LDAP store using the rdp attribute.
14.Click Save.
To create a WorkPlace link to give users access to their remote desktops
1. From the main navigation menu in AMC, click Aventail WorkPlace.
2. Click New, and then select Graphical terminal shortcut.
3. In the Resource list, select Personal computer, and then specify what the link text will be in WorkPlace. For example, My remote desktop.
4. Click Save. By default, the resource you created will be displayed as a link in WorkPlace titled My remote desktop.
When the user John Doe connects to WorkPlace from home or on the road, {Desktop} is replaced by the contents of the rdp attribute associated with him in the LDAP store, and he sees a WorkPlace link (My remote desktop) that points to his office computer (john_doe-340.dept.company.com). When Paula Smith follows the same link, she has access to paula_smith-452.dept.company.com. If the rdp attribute is empty for a given user, then that user will not see a WorkPlace shortcut when he or she logs in.
To create a variable that contains a variable
You can simplify the creation of user-specific links or shortcuts by using one or more variables to define another one. For example, in the procedure above, a Host name or IP address resource was defined as follows, using a variable named {Desktop} followed by a string, in this case the path:
{Desktop}.dept.company.com
You could instead create a variable named {Desktop_path} that resolves to the entire path above.
In another example of using multiple variables to create a single variable, you could replace dept in the path above with the user’s ou (organizational unit) attribute in the LDAP store. This table summarizes the possibilities in the examples outlined here:
|
AMC variable name
|
Resolves to...
|
Based on...
|
|
{Desktop}
|
john_doe-340
|
rdp (LDAP attribute)
|
|
{dept}
|
Sales
|
ou (LDAP attribute)
|
|
{Desktop_path}
|
john_doe-340.dept.company.com
|
AMC variable defined as follows:
{Desktop}.dept.company.com
|
|
{Desktop_by_dept}
|
john_doe-340.Sales.company.com
|
AMC variable defined as follows:
{Desktop}.{ou}.company.com
|
|
Variables cannot be nested more than two deep: you cannot create a variable that refers to a variable that in turn refers to another variable.
Modifying Query Results
You can create a variable by querying an external AD/LDAP store for a specific attribute or set of attributes. To make the query results more useful, you can automatically extract data from them: after the query is sent and the full variable string has been determined, you can perform search and replace operations on its value.
For example, let’s say you have a company with offices in multiple locations, and each office uses a different Exchange server for email. Using some editing options, you can define a single variable that represents both Exchange servers, regardless of location.
To define a variable by automatically editing the results of a query
1. From the main navigation menu in AMC, click Resources.
2. Click the Variables tab, and then click New.
3. Enter a name for your variable. For example, Exchange_server.
4. In the Type list, select User attribute.
5. Select the appropriate realm from the list: it should point to the AD/LDAP store that you will query.
6. In the Attribute list, select msExchHomeServerName.
7. Query the directory server for two different employees—for example, one at headquarters in London, and one in California—by entering the user name and clicking Test for each one. In this example the only difference is in the server name at the end of the resulting strings:
/o=Your Company, Inc./ou=UK/cn=Configuration/cn=Servers/cn=LN0EXL09
/o=Your Company, Inc./ou=UK/cn=Configuration/cn=Servers/cn=CA0EXV08
8. Now modify the query results by clicking New in the Editing options area:
a.In the Search box, enter the following:
/o=Your Company, Inc./ou=UK/cn=Configuration/cn=Servers/cn=
b.Leave the Replace box empty, and then click OK.
For an employee in the London office or one in California, the variable named Exchange_server will contain the appropriate name, either LN0EXL09 or CA0EXV08, depending on the user.
Using the same query, you can create an additional variable that indicates where an employee is based. For example, create a new variable named Location and replace the name of each directory server with its location:
The Location variable will resolve to London or California, depending on the user.
Displaying a Series of Shortcuts Using a Single Definition
When you create a variable based on a user’s session properties or the results of a query, the variable can resolve to one value per user attribute (for example, sAMAccountName and lastLogon), or multiple values (such as a list of groups to which a user belongs, or the workstations a user is permitted to log in to). When a variable can have multiple values, you have the option of creating one shortcut for it that is automatically displayed as a series of shortcuts in WorkPlace.
In this example, we’ll create a single shortcut that will result in a series of WorkPlace shortcuts, one for each workstation the user is allowed to access. Here’s an overview of the process:
|
Step
|
Description
|
|
A
|
Create a variable named User_workstations that points to a multi-valued attribute in an AD or LDAP server named userWorkstations. In the directory store, this attribute lists the workstations a user is allowed to access. For example, a user might have a personal workstation at work, and another workstation that’s used for order inventory.
|
|
B
|
Create a host resource named Workstation_list that points to the User_workstations variable. For the user in this example, the resource has two possible values.
|
|
C
|
Create a WorkPlace graphical terminal shortcut that points to the Workstation_list resource. The link for this shortcut will refer to a special, built-in variable named {URL_REF_VALUE}, which will automatically result in separate links in WorkPlace for each of the workstations a user is permitted to use.
|
|
D
|
Test WorkPlace. If the shortcut does not appear, it may be because the directory store query is not returning any results. Testing it will also help you see whether you need to adjust the location of the shortcuts in your WorkPlace layout.
|
|
A: Create a variable that points to a user attribute in the AD server
1. From the main navigation menu in AMC, click Resources, and then go to the Variables page.
2. Click New, and then enter a name for the variable: User_workstations.
3. Select User attribute in the Type list, and then specify the realm that uses the directory store you want to query.
4. In the drop-down list of attributes returned from the AD store, select userWorkstations.
5. In the Output list, select Multiple results.
6. In the User text box, enter the name of a representative user (someone who is likely to use this shortcut), and then query the AD/LDAP store for the values of userWorkstations by clicking Test.
7. The test results will indicate what character (for example, a comma or a semicolon) you should enter in the Delimiter box.
8. Click Save. The new variable ({User_workstations}) appears in the list and can now be used to define or describe other variables, resources, or WorkPlace shortcuts.
B: Create a host resource that points to the {User_workstations} variable
1. From the main navigation menu in AMC, click Resources.
2. Click New, and then select Host Name or IP Address.
3. Enter Workstation_list as the resource name.
4. In the Host name or IP address box, click {variable}, and then select {User_workstations}, the variable you created in step A.
5. Click Insert, and then click {variable} again to close the list.
6. Edit the entry for Host name or IP address to add the portion of the address that the computers on your network share. The completed entry might look something like this:
{User_Workstations}.dept.company.com
C: Create a WorkPlace shortcut that points to the Workstation_list resource
1. From the main navigation menu, click Aventail WorkPlace.
2. On the Shortcuts page, click New, and then select Graphical terminal shortcut from the list. The General tab of the Add Graphical Terminal Shortcut page appears.
In the Position box, specify the shortcut’s position in the list. (It’s possible to change its position later in your WorkPlace layout.)
4. In the Resource list, select the resource to which this shortcut will be linked: Workstation_list.
5. In the Link text box, type the first part of the hyperlink users will see. For example, enter My workstation(s): followed by a space.
6. Using a variable you can have the link end in each succeeding value for Workstation_list; if there is more than one, then more than one shortcut will be displayed in WorkPlace. Click {variable}, and then select {URL_REF_VALUE} from the list. Click Insert to add the variable to the link text, and then close the list by clicking {variable} again. The entry for Link now looks like this:
My workstation(s): {URL_REF_VALUE}
7. Click Finish to save the shortcut. (For a description of the settings on the Advanced page, see Adding Graphical Terminal Shortcuts to Individual Hosts on page 490.)
This shortcut will automatically result in separate links in WorkPlace for each of the workstations a user is permitted to use. The two WorkPlace links in our example—one to a personal workstation and one to a workstation for entering orders—would look like this for the user “ageorge”:

D: Troubleshooting WorkPlace
1. If users log in to WorkPlace and do not see the shortcut you created, check the following:
a.Is the user in the right community? In the main navigation menu in AMC, click User Sessions, and then click the user’s name to get session details. The user may not be assigned to the right community, or there may be a rule preventing him or her from accessing the resource.
b.Does the variable return a result for this user? In the main navigation menu in AMC, click Resources, and then go to the Variables page. Click the variable named User_workstations, enter the name of the person who is not seeing the shortcut, and then click Test. If no result is returned, the shortcut will not be displayed.
2. Check your WorkPlace layout. When you create a shortcut, you have the opportunity to add it to a group of shortcuts or to the default group (Standalone shortcuts). To change the position of the shortcut, click Realms, and then click the name of the community to which this user belongs. The WorkPlace Appearance page indicates which layout is being used. To modify page content, click Manage layouts.
Creating and Managing Resource Groups
You can define individual resources or manage them in resource groups, which are collections of individual resources. Grouping resources provides a convenient way to manage access to a set of resources with similar characteristics. For example, you might define a resource group containing applications that are important only to your remote employee, simplifying the process of managing access to those resources.
There is no limit to the number of resources that a resource group can contain. When you create a new resource group, it is added to your list of available resources and groups; you can then use the resource group in access control rules.
: •: Adding Resource Groups on page 247
: •: Example: Working with a URL Redirect on page 248
: •: Editing and Deleting Resource Groups on page 249
Adding Resource Groups
When you create a new resource group, it is added to the list of available groups on the Resource Groups tab of the Resources page.
To add a resource group
1. From the main navigation menu in AMC, click Resources.
2. Click the Resource Groups tab, and then click New.
3. Type a Name for the resource group.
4. In the Description box, type a descriptive comment about the group.
5. Select the check box for each resource you want to include in the group, or leave the group empty and add resources to it later. There is no limit to the number of resources that a group can contain.
After you have finished, click Save.
Example: Working with a URL Redirect
Some Web-based applications automatically redirect users to other Web pages. A user accessing the application may browse to a particular Web address, but then be redirected to a different address.
For example, an organization has a mail server with the following URL:
http://domino.example.com/dwa.nsf
A user who accesses this site is then automatically redirected to a different URL:
http://domino.example.com/mail/dwa1.nsf
To give users access to the application using the E-Class SRA appliance, you need to add both the original and the redirected URLs as resources.
The following example demonstrates how to add your Web-based application as a pair of URL resources, how to group the resources together, and then how to define an access control rule so that your users have access to the application.
Configure URL resources for your Web-based application
1. From the main navigation menu in AMC, click Resources.
2. Click New and then select URL from the drop-down list. The Add/Edit Resource – URL page appears.
3. In the Name box, type a name for the resource. For example, Mail Web App.
4. In the URL box, type the address of the mail server. For example, http://domino.example.com/dwa.nsf.
5. Click Save.
6. Repeat the previous steps to create a second Web resource specifying the redirected URL address. If your application uses more than one redirected URL, create an additional URL resource for each address; this example assumes there are only two URLs involved.
Create a resource group for both URL resources
1. From the main navigation menu in AMC, click Resources.
2. Click the Resource Group tab, and then click New. The Add/Edit Resource Group page appears.
3. In the Name box, type a name for the group resource. For example, Mail Web App Group.
4. Select the check boxes for each of the Web resources previously created.
5. Click Save.
Define an access control rule for the resource group
1. From the main navigation menu in AMC, click Access Control.
2. Click New. The Add/Edit Access Rule page appears.
3. In the Number box, type a number to specify the rule’s position in the access rule list.
4. Use the Action buttons to specify Permit. This will allow users to access the group resource that you specify in the next step.
5. Complete the information under Basic settings:
a.Leave User selected (so that the rule applies to users trying to access a resource).
b.The From box specifies the users to whom the rule applies. For this example, leave the value as Any user.
c.In the To box, click Edit to specify the target resource for this rule. A Resources window appears.
d.Select the resource group previously created. In this example, Mail Web App Group.
6. Click Save.
For an overview of access control, see Access Control Rules on page 256.
Editing and Deleting Resource Groups
Before modifying a resource group, carefully examine the associated rules to understand how your changes will affect your security policy. You cannot delete a resource group that is referenced in an access control rule. Before deleting a resource group, you must first remove it from any rules in which it is referenced. See Deleting Referenced Objects on page 137 for more details.
Web Application Profiles
Web application profiles provide single sign-on and translation control for Web applications that use Windows NTLM authentication (v1 and v2 are both supported), or basic authentication.
: •: With a Web application that uses Windows NTLM authentication, access is granted only to users whose Windows credentials can be verified. Support for NTLM is built into Microsoft IIS (Internet-based services for Windows machines) and supported in Internet Explorer.
: •: Basic authentication is supported on a wide variety of platforms (note, however, that it sends passwords in the clear across the network).
You can also configure the Web proxy service in AMC to support forms-based authentication, in which users authenticate by filling out a standard HTML form Web using any combination of browser and Web server. See Creating Forms-Based Single Sign-On Profiles on page 254 for more information.
: •: Viewing Web Application Profiles on page 250
: •: Adding Web Application Profiles on page 250
: •: Preconfigured Web Application Profiles on page 253
: •: Web Application Profile Examples on page 253
: •: Editing and Deleting Web Application Profiles
Viewing Web Application Profiles
Web application profiles are listed on the Configure Web Proxy Service page.
To view your list of available Web application profiles
1. From the main navigation menu in AMC, click Services.
2. In the Access Services area, click the Configure link for Web proxy service.
3. To view your available Web profiles, click the Web Application Profiles tab. The Configure Web Proxy Service page appears.
The list includes preconfigured Web application profiles that are recommended for several popular Web applications, any custom Web profiles you created, and a default Web profile. To view the settings for a Web application profile, click its name.
Adding Web Application Profiles
Web application profiles control single sign-on characteristics, as well as content translation options for a particular Web resource. Each Web resource should have a Web application profile associated with it.
: •: Single sign-on options control whether and how a user’s login credentials are forwarded to downstream Web applications. These options are disabled by default. In addition, one of the following is required in order to configure single sign-on:
: –: Click Use Web content translation on the Configure WorkPlace page in AMC.
: –: Define a WorkPlace link as an aliased URL. This is the approach you should take if you normally redirect traffic through a network agent, but in this case you want to force the resource to be proxied using translated, custom port mapped, or custom FQDN mapped Web access for single sign-on.
For more information, see Web Shortcut Access on page 399 and Configuring WorkPlace General Settings on page 400.
: •: Content translation options control whether hyperlinks in JavaScript code, in cookie bodies, and in cookie paths are translated by the Web proxy service. The options are used only by the translated Web access agent: they are ignored by standard Web access.
Web application profiles are not used if Web shortcut access is set to Redirect through network agent on the Configure WorkPlace page in AMC. See Configuring WorkPlace General Settings on page 400.
To add a Web application profile
1. From the main navigation menu in AMC, click Services.
2. In the Access Services area, click the Configure link for Web proxy service. The Configure Web Proxy Service page appears.
3. Click the Web Application Profiles tab, and then click New. The Add Web Application Profile page appears.
In the Name box, type a name for the profile. If you are creating a profile to associate with a specific application, you might want to give it a name similar to that of the application.
5. In the Description box, type a descriptive comment about the profile.
6. In the Single Sign-On area, specify if and how you want user credentials to be passed along to the Web resource. Forwarding user credentials prevents the user from having to log in multiple times (once to get to the appliance, and again to access an application resource).
If you select the Forward each user’s individual username and password check box, the username and password used to authenticate to WorkPlace are forwarded to the back-end Web server.
: –: If you select the Forward static credentials check box, the appliance forwards the same username and password for all users. This is useful for Web sites that require HTTP basic authentication, but don’t provide personalized content for each user based on the login name. It’s also useful for users who authenticate with a client certificate or token.
: –: If you do not select either option, single sign-on functionality is disabled. If you select both options, the individual username and password option takes precedence. For example, if the user provides a username/password pair, it is forwarded, but if username/password is not provided, the Web proxy service forwards the static credentials.
: –: If you select the Enable Kerberos single sign-on check box and specify the Kerberos realm where the resources are hosted, WorkPlace and Connect Tunnel users can access http resources. This realm is used for authenticating environments like Active Directory, Active Directory Tree, and Active Directory Forest where Kerberos is configured as a preferred authentication mechanism.
7. In the Content translation area, select the items that you want the Web proxy service to translate.
Select the Translate JavaScript code check box if you want the Web proxy service to translate links embedded in JavaScript code used by the Web resource. This is useful for JavaScript that contains absolute URLs or absolute references (/to/path/xyz), or that dynamically generates URLs (for example, location=“http://” + host name + “/index.html”). This improves compatibility with Microsoft Outlook Web Access and other applications that rely on JavaScript. This option is enabled by default.
However, if you notice problems with searching mail based on the Subject, From, or Sent To fields, or if you see an error after logging in when you access OWA using a WorkPlace shortcut, clear the Translate JavaScript code check box for the OWA profile.
: –: Select the Translate content based on file extension check box if you want the Web proxy service to determine content type by examining the file extension, not the MIME type. Normally, the Web proxy service translates certain content types (including text and HTML). It determines the content type from the MIME type in the HTTP header. If a Web resource is sending the incorrect MIME type, select this option and the Web proxy service will decide whether or not to translate a file based on its file extension. This option is disabled by default.
: –: Select the Translate cookie body check box if you want the Web proxy service to translate URLs embedded in the body of a cookie. If a Web resource uses embedded URLs in the body of a cookie (which is not common practice), and you do not have this option enabled, users can experience problems. A common symptom is being unexpectedly redirected to another URL. This option is enabled by default.
: –: Select the Translate cookie path check box if you want the Web proxy service to translate the path attribute of cookies sent by back-end resources. The browser uses cookie paths to determine when to send a cookie back to the server. The appliance changes the path that the browser sees, so if the cookie path is not translated, the browser will never send the cookie. A common symptom of this situation is a user being prompted repeatedly for login credentials after already entering valid ones. If this occurs, you should enable this option. This option is enabled by default.
8. Click Save.
Note•: You can configure single sign-on when you create a WorkPlace shortcut for accessing a Windows Terminal Services or Citrix host. See Adding Graphical Terminal Shortcuts to Individual Hosts on page 490.
: •: The Web translation that AMC performs is more complete and robust in recent versions of the appliance software. Beginning in version 10.x, it is no longer possible to revert to the legacy translation for Web application profiles that worked in version 8.6.x.
Preconfigured Web Application Profiles
Several preconfigured Web application profiles are included with the appliance and are recommended for certain commonly used Web applications. (More can be added; see Adding Web Application Profiles on page 250.) Preconfigured profiles include:
|
Web application profile
|
Description
|
|
Default
|
A default profile that you can use for most Web applications or sites that don’t use NTLM or basic authentication single sign-on
|
|
Domino Web Access 6.x
|
A profile for Lotus Domino Web Access (versions 6.x only)
|
|
iNotes 5.x
|
A profile for Lotus iNotes (versions 5.x only)
|
|
Onyx CRM
|
A profile for the Onyx CRM Employee Portal (versions 4 and later)
|
|
OWA/Single Sign-On
|
A profile for Microsoft Outlook Web Access and other sites that use NTLM or basic authentication single sign-on
|
|
WorkPlaceCfg
|
A read-only profile for WorkPlace
|
|
Web Application Profile Examples
The following explains how the appliance determines which Web application profile to apply to an incoming request, and demonstrates the flexibility of using profiles when specifying resources.
How requests for Web resources are evaluated
Because Web resources can be defined quite broadly, the appliance follows a rule for determining which Web application profile to apply to an incoming request: it chooses the profile associated with the most specific resource.
For example, suppose you’ve defined these two resources:
: •: A DNS domain (xyz.com) with Web application profile A attached
: •: A specific Web server (web1.xyz.com) with Web application profile B attached
If a user request comes in for https://web1.xyz.com/timesheet.html, the appliance uses Web application profile B because it is associated with a more specific resource (the Web server) than Web application profile A (the domain). The actual order that the appliance uses is as follows:
URL —> Host name —> IP address —> Subnet/IP range —> DNS domain
Associating one profile with an entire domain
If you want to associate the same Web application profile to all resources within a single domain, associate a profile with that domain, and then select None as the profile for any individual resources you define that are within that domain. The individual resource will inherit the domain’s profile. If there is no profile associated with a particular resource, and there is no profile to inherit, the appliance uses the system defaults for the profile.
Editing and Deleting Web Application Profiles
Before modifying a profile, confirm that the changes will be compatible with its associated applications.
If a profile is still associated with one or more resources, AMC prevents you from deleting it. You must remove all associations before you can delete the profile. See Deleting Referenced Objects on page 137 for more details.
Creating Forms-Based Single Sign-On Profiles
Many Web applications use forms-based authentication, in which the user enters a set of credentials into HTML form fields, and a session token is stored in a browser cookie. This type of authentication is popular because it is supported on any combination of browser and Web server. The other benefit is that you can customize the login page.
Use AMC to set up a single sign-on profile that will forward a user’s appliance credentials to a Web application that uses forms-based authentication. This process is not automated and may require help from Dell SonicWALL Technical Support; you should be familiar with the HTML code and know things like the form element names and the name of the cookie that stores user credentials.
There are also some built-in profiles that you can modify for your environment:
: •: OWA 2003
: •: OWA 2007/2010
: •: OWA 2013
: •: Citrix Nfuse 1.7
: •: Citrix XenApp
: •: Citrix XenDesktop
To modify the built-in single sign-on profile for Outlook Web Access
1. From the main navigation menu in AMC, click Services.
2. In the Access services area, under Web proxy service, click Configure.
3. Click the Single Sign-On Profiles tab, and then click New. The Configure Single Sign-On Profile page appears.
4. Type a Name and Description, and then select the applicable OWA (Outlook Web Access) application from the Application list. (To start from scratch and specify elements from a custom form, select Other.)
In the Application URL box, type the URL for the application type (for example, the Citrix XenApp/XenDesktop site or the Microsoft Exchange OWA form-based authentication DLL). For an OWA DLL this is usually the FQDN of your Exchange server followed by /exchweb/bin/auth/owaauth.dll. For example:
https://owaserver.domain.com/exchweb/bin/auth/owaauth.dll
6. In the Cookie name text box, type the file name of the cookie used to store user credentials. The cookie name for OWA 2013 is cadata.
7. Make changes to the form elements by clicking a link. (At a minimum, you must change the destination element to match the Application URL.)
8. Click Save.
After a profile is set up, a user’s credentials are automatically sent to the back-end server every time the user logs in, regardless whether the WorkPlace link is clicked. This can be a problem where there is a limit to the number of allowed licenses.
When a user logs in, his or her credentials are sent to all Web applications for which an a single sign-on profile is configured. Unlike a Web application profile, a single sign-on profile is not associated with a resource in AMC—the application resource is defined within the profile.
For information on configuring SSO for a Web application that uses Windows NTLM or basic authentication, see Web Application Profiles on page 249.
Access Control Rules
Access control rules determine which resources are available to users or groups. Rules can be defined broadly to provide access using any method, or defined narrowly so that only a specific access method—Web browser, Connect and OnDemand, or Network Explorer—is permitted.
In addition to evaluating whether users can access resources based on who they are, access control rules can also factor in the trustworthiness of users’ access points using End Point Control zones and device profiles, which are described in Managing EPC with Zones and Device Profiles on page 353.
: •: Configuring Access Control Rules on page 256
: •: Resolving Deny Rule Incompatibilities on page 270
: •: Resolving Invalid Destination Resources on page 271
Configuring Access Control Rules
As your network changes over time, you will need to configure the access control rules that determine what application resources are available to your various users and groups.
Before adding an access control rule, carefully examine your existing rules; you might find that you can modify a rule instead of creating a new one. You can also copy an existing rule and then modify its parameters.
If you decide to add a new rule, review your current configuration to determine where the new rule should fit in the rule order. New rules are added to the top of the list by default; you can then move them to their proper positions.
: •: Viewing Access Control Rules on page 256
: •: Access Control Rules for Bi-Directional Connections on page 258
: •: Requirements for Reverse and Cross-Connections on page 258
: •: Securing Application Ports for Reverse Connections on page 259
: •: Adding Access Control Rules for a Forward Connection on page 259
: •: Specifying Advanced Access Control Rule Attributes on page 260
: •: Adding Access Control Rules for a Reverse Connection on page 263
: •: Adding a Pair of Access Control Rules for a Cross-Connection on page 264
: •: Configuring Advanced Access Control Rule Attributes on page 266
: •: Access Methods and Advanced Options on page 267
: •: Adding Users and Resources From Within Access Control Rules on page 268
: •: Editing, Copying, and Deleting Access Control Rules on page 269
Viewing Access Control Rules
Access control rules are displayed in numerical order on the Access Control page. The appliance evaluates the rules in numbered order. All access control rules are displayed by default, but you can use the Filters settings to filter them by resource type or other criteria.
To view access control rules
1. From the main navigation menu in AMC, click Access Control.
By default, all rules that you have created, regardless of resource type, are displayed. Use the Filters section to display a subset of rules. For information about using filters, see the “Filters” section under A Quick Tour of the AMC Interface on page 109. To see a particular rule set, select one of the following from the Method drop-down list in Filters:
|
Method
|
Description
|
|
Web browser
|
Display rules controlling access to Web-based (HTTP and HTTPS) resources.
|
|
E-Class SRA Connect/OnDemand
|
Display rules controlling access to client/server (TCP/IP) resources.
|
|
Network Explorer
|
Display rules controlling access to Windows file system resources using WorkPlace.
|
|
3. Review the data shown in the access control rule list:
•: Use the check-box column to select one or more rules to delete, copy, or reorder (using the Move Up and Move Down buttons).
•: The number column indicates the order in which the rule will be evaluated. To edit a rule, click its corresponding number.
•: To display configuration details and the objects referenced in a rule, click the plus sign (+) next to it.
•: The Action column indicates whether a rule permits or denies access, or is ignored:
|
Indicator
|
Description
|
|
Green
|
Access is permitted.
|
|
Red
|
Access is denied.
|
|
Gray
|
The rule is not evaluated. (Disabling a rule is a convenient way to temporarily stop using a rule without deleting it.)
|
|
•: The Description column lists the descriptive text you typed when creating the rule.
•: The From column indicates the users to whom the rule applies (Any applies to all users). In the case of a reverse connection, this column indicates the resource that is connecting to a user or group. See Access Control Rules for Bi-Directional Connections on page 258.
•: The To column lists the destination resources to which the rule applies (Any applies to all users). In the case of a reverse connection, this column can also indicate the user or group that is connecting back to a resource. See Access Control Rules for Bi-Directional Connections on page 258.
•: The Method column indicates whether a specific access method is associated with a rule. A globe icon signifies Web browser-based HTTP access; a globe icon with a folder represents Network Explorer, which provides Web access to file system resources; the E-Class SRA logo indicates access using the Connect Tunnel or proxy clients, or the OnDemand Tunnel or proxy agents. Any indicates that the rule applies to all access methods.
•: The Zone column indicates whether an access rule is associated with a particular End Point Control zone. EPC zones are used to classify a connection request based on the attributes of the client device. Any indicates the rule applies to all EPC zones; a red “restricted” icon indicates that the rule controls access for one or more specific zones.
Access Control Rules for Bi-Directional Connections
VPN connections typically involve “forward connections,” which are initiated by a user to a client/server resource. However, if you deploy Dell SonicWALL’s network tunnel clients (Connect Tunnel or OnDemand Tunnel) to your users, bi-directional connections are enabled.
With the Dell SonicWALL VPN, bi-directional connections encompass the following:
: •: Forward connections from a VPN user to a client/server resource. See Adding Access Control Rules for a Forward Connection on page 259.
: •: Reverse connections from a client/server resource to a VPN user. An example of a reverse connection is an SMS server that “pushes” a software update to a user’s machine. See Adding Access Control Rules for a Reverse Connection on page 263.
: •: Cross-connections refer specifically to VoIP (Voice over Internet Protocol) applications that enable one VPN user to telephone another VPN user. Cross-connections require a pair of access control rules: one for the forward connection and one for the reverse connection. See Adding a Pair of Access Control Rules for a Cross-Connection on page 264.
Other examples of bi-directional connections include an FTP server that downloads files to or uploads files from a VPN user, and remote Help Desk applications.
Requirements for Reverse and Cross-Connections
Before you can configure access control rules for reverse connections and cross-connections, the following requirements must be met:
: •: The network tunnel service must be running on the appliance. On the Services page in AMC, check the status for Network tunnel service; it should be Running.
: •: An IP address pool for the network tunnel clients must be configured. See Configuring IP Address Pools on page 474 for information on how to set one up.
: •: Users who have access to a VoIP application must belong to a community that is configured to deploy the network tunnel clients (Connect Tunnel or OnDemand Tunnel) to their computers. See Creating and Configuring Communities on page 66.
Securing Application Ports for Reverse Connections
By default, reverse connections from resources to users have access to all ports on users’ computers. For enhanced security, create access control rules for reverse connections that confine access to the ports that an application specifically uses. Consult the application’s documentation for information about which firewall ports must be open in order to use the application.
When configuring an access rule for a reverse connection, use the Destination restrictions option to confine access to the ports required by the application making the reverse connection. See Configuring Advanced Access Control Rule Attributes on page 266 for information on this option.
Adding Access Control Rules for a Forward Connection
Perform the following steps to add an access control rule for a forward connection from users to destination resources. For information about creating an access control rule for a cross-connection (for example, for a VoIP application), see Adding a Pair of Access Control Rules for a Cross-Connection on page 264.
To add an access control rule for a forward connection
1. From the main navigation menu in AMC, click Access Control.
2. Click New. The Edit Access Rule page appears.
Type a number in the Number box to specify the rule’s position in the access rule list. By default, new rules are added to the top of the list, but you can use this box to place the rule anywhere you want. For example, if you assign the number 3 to a new rule, the new rule will be inserted before the current rule 3 (which will become rule 4). This field is required.
To the right of the Number box is a unique identifier for the rule, which you can use for troubleshooting. When you add or change a rule, for example, the Management Console audit log shows a record of the change using this ID. Logging is described in detail in System Logging and Monitoring on page 276.
4. In the Description box, type a descriptive comment about the rule. This step is optional, but a description can be helpful when viewing your list of rules later; it also appears in log files where can be useful for debugging. The ID is a unique identifier automatically assigned by AMC; it cannot be edited.
5. Use the Action buttons to specify whether the rule will be used to Permit or Deny access, or if the rule is Disabled.
6. Complete the information listed under Basic settings.
Click User to configure a forward connection (from a user to a resource).
: –: If you deploy a network tunnel client, click Resource to create a rule controlling a reverse connection (resource to user) or a cross-connection (user to user). The network tunnel service must be configured with an IP address pool before you can use reverse connections (see Configuring IP Address Pools on page 474).
: •: The From box specifies the users or user groups to whom the rule applies. Click Edit to select from a list of users and groups. If no users or groups are specified, the value for this field is Any user.
: •: The To box specifies the destination resources or resource groups for the rule. Click Edit to select from a list of resources. If no destination resources are selected, the value for this field is Any resource.
7. In the End Point Control zones area, select the zones from which you will permit or deny access to the resources. Click Edit to select from a list. The default for this field is Any zone. See Managing EPC with Zones and Device Profiles on page 353 for information about configuring and using zones.
Click Next to configure additional settings (see Specifying Advanced Access Control Rule Attributes on page 260), or click Finish to save the current settings.
Specifying Advanced Access Control Rule Attributes
For most rules, a basic configuration that includes users or groups, destination resources, and access methods is sufficient. However, additional options are available to provide even tighter access. For example, you can control a connection based on the location of the user (by IP address). Source networks are referenced in an access rule to permit or deny a connection to a destination resource based on the location from which the request originates, provides even greater security.
To configure advanced settings for an access control rule
1. From the main navigation menu in AMC, click Access Control.
2. Click New. The Edit Access Rule page appears.
3. Click the Advanced tab.
4. In the Access method restrictions area, select one or more methods for access to the resource. Any is the recommended setting in most circumstances, unless your security environment requires you to use a particular method for access to a resource.
When you select access methods, the advanced options are enabled or disabled based on whether they apply to the methods you specified. Click Selected to choose the access methods this rule will require:
|
Access method
|
Description
|
|
Web browser

|
Manages access from HTTP or HTTPS resources for users connecting using a Web browser.
The available Advanced settings are:
• User’s network address
• Time and date restrictions
|
|
Network Explorer

|
Manages access from Windows file system resources for WorkPlace users connecting using Network Explorer.
The available Advanced settings are:
• User’s network address
• Read/write permissions
• Time and date restrictions
|
|
Connect and/or OnDemand

|
Manages access from TCP/IP resources such as client/server applications, file servers, or databases, for users connecting with one of the following:
• The Connect Tunnel or proxy clients
• The OnDemand Tunnel or proxy agents
For example, suppose you want to provide access to a network domain for users who have Connect or OnDemand, but you don’t want to allow browser access to Web resources within that domain. You can do that by creating a rule that specifies E-Class SRA Connect and/or E-Class SRA OnDemand as the only access method, and specifies the network domain in the Client restrictions area.
The available Advanced settings are:
• Protocols
• User’s network address
• Destination restrictions (ports)
• Time and date restrictions
|
|
Click Selected to specify the Protocols that the network tunnel or proxy service will accept from the client. A brief description of each command is included here, but for more details, see http://www.ietf.org/rfc/rfc1928.txt.
|
Protocol
|
Description
|
|
TCP
|
Enables normal TCP connections (for example, SSH, telnet, SCP, and so forth).
|
|
UDP
|
Allows the network tunnel or proxy service to make a UDP data transfer. This is necessary for operations such as streaming audio and Microsoft Outlook new-mail notification.
|
|
ICMP
|
(Internet Control Message protocol) Enables the ping and traceroute network troubleshooting commands. Selecting this option will configure the network tunnel or proxy service to allow these operations on your behalf. This option also enables ICMP packets to flow through the network tunnel or proxy service.
|
|
Accept bind requests from server
|
Used in protocols that require the client to accept connections from the server. FTP is a notable example: bind usually occurs with a Connect/Bind pair of connections.
|
|
5. Under Client restrictions, in the User’s network address box, specify the names of any source networks you want evaluated in the rule.
This is useful for controlling access based on the origin of the connection request. Click Edit to select from the list of resources. If no source network is specified, the default value of this field is Any. For reverse connections, this option can be used to block access requests to users’ computers that originate from specific ports or application resources.
6. Use Destination restrictions to restrict access over individual Ports or a range of ports. To enable access on any port, click Any. To specify multiple ports, click Selected and type the port numbers, separated by semicolons. To specify a port range, type the beginning and ending numbers separated by a hyphen. For example, if you are building a policy to control access to an SMTP mail server, you might allow access only over port 25 (the well-known port for SMTP traffic). A list of the latest port number assignments is available at http://www.iana.org/assignments/port-numbers.
Use Permissions to specify whether the rule will allow Read or Read/Write access to the file system resources. These access privileges work in conjunction with Windows access control rules. For a user to have certain file permissions, both entities (that is, Windows and the appliance) must allow them. If you disable file uploads, no user can write to a file, although users with write access will be able to move and delete files. These settings are ignored by reverse connections.
7. Under Time and date restrictions, specify when the rule will be in effect. (The time zone for the time restriction fields is your local time.) You can specify a Shift or a Range, or you can specify that the rule remain in effect at all times.
8. Click Save or, if you want to define another rule, click Finish and Add Another.
Because AMC gives you the flexibility to assign multiple access methods to resources, situations may arise in which there is a mismatch between access methods and resources. This happens if you create a rule that assigns an access method that is incompatible with the specified resource. For example, designating Web browser as the method for accessing a Windows domain resource will trigger an “Invalid destination resources” error message in AMC. For more information, see Resolving Invalid Destination Resources on page 271.
In some cases you can create a Deny rule that contains a mix of resources and access methods that may prevent subsequent rules from being evaluated. This could inadvertently block user access to other resources referenced in the access policy. The logic used to determine access method and resource compatibility is described in Resolving Deny Rule Incompatibilities on page 270.
Reverse connections are available only when IP address pools are configured for the network tunnel clients. AMC displays an error message if you attempt to change the rule from a forward connection to a reverse connection and no IP address pools are configured.
Adding Access Control Rules for a Reverse Connection
Perform the following steps to add an access control rule for a reverse connection from a destination resource to users. Examples of reverse connections include IBM’s Tivoli provisioning products, and Microsoft’s Systems Management Server (SMS). For more information, see Requirements for Reverse and Cross-Connections on page 258.
To add an access control rule for a reverse connection
1. From the main navigation menu in AMC, click Access Control.
2. Click New. The Edit Access Rule page appears.
In the Number box, type a number to specify the rule’s position in the access rule list. By default, new rules are added to the top of the list, but you can use this box to place the rule anywhere you want. For example, if you have four rules and you assign the number 3 to a new one, it is inserted before the current rule 3 (which will become rule 4). This field is required.
4. In the Description box, type a descriptive comment about the rule. This step is optional, but a description can be helpful when viewing your list of rules later, and also appears in log files where it is useful in debugging. The ID is a unique identifier automatically assigned by AMC; it cannot be edited.
5. Use the Action buttons to specify whether the rule will be used to Permit or Deny access, or if the rule is Disabled.
6. Complete the information listed under Basic settings:
Select the Resource button to create a rule controlling a reverse connection from a resource to a user. The User and Resource buttons toggle between forward-connection and reverse-connection rules.
Reverse connections are available only when IP address pools are configured for the network tunnel clients. If you attempt to create a reverse connection with no IP address pools configured, AMC displays an error message. For more information, see Access Control Rules for Bi-Directional Connections on page 258.
•: The From box specifies the resources that will connect to users. Click Edit to select from a list of resources. If no resources are specified, the default value for this field is Any resource.
•: The To box specifies the users to which the resource will connect. Click Edit to select from a list. If no users are selected, the default value for this field is Any user.
7. In the Access methods area, select Any to automatically manage access to all resources in the rule regardless of the access method making the request. This ensures that either the Connect Tunnel client or the OnDemand Tunnel agent, which is required for reverse connections, is managed by the rule. The other access methods do not support reverse connections and will be bypassed.
When you are finished creating the rule, click Save.
Adding a Pair of Access Control Rules for a Cross-Connection
Most of the steps involved in creating an access control rule for a cross-connection are the same as those for creating a rule for a forward connection or a reverse connection. However, there are some key differences and requirements.
For example, to permit your VPN users to call each other using a VoIP application, create one rule for your users to connect to an IP address pool on the appliance, and a second rule for the IP address pool to connect to the users.
You would also need to follow this procedure to create a pair of rules to permit bi-directional connections between an FTP server and users.
To add an access control rule for a cross-connection
1. Ensure that the requirements for configuring a reverse connection are met. For more information, see Requirements for Reverse and Cross-Connections on page 258.
2. From the main navigation menu in AMC, click Access Control.
3. Click New. The Add/Edit Access Rule page appears.
4. Type a number in the Number box to specify the rule’s position in the access rule list. By default, new rules are added to the top of the list, but you can use this box to place the rule anywhere you want. For example, if you have four rules and you assign the number 3 to a new one, it is inserted before the current rule 3 (which will become rule 4). This field is required.
5. In the Description box, type a descriptive comment about the rule. This step is optional, but a description can be helpful when viewing your list of rules later. The description also appears in log files where it is useful when examining logs to determine why a connection did not match a specific rule. The ID is a unique identifier automatically assigned by AMC; it cannot be edited.
Since a cross-connection requires a pair of forward-connection and reverse-connection rules, you should assign similar names to the two rules to make it easy to locate them in the list of access control rules.
6. Use the Action buttons to specify whether the rule will be used to Permit or Deny access, or if the rule is Disabled.
7. Under Basic settings, use the User and Resource buttons to select forward-connection or reverse-connection rules.
To create a forward-connection rule from the users to the IP address pool, click User.
: –: To create a reverse-connection rule from the IP address pool to the users, click Resource.
8. In the From box under Basic settings, specify the users or resources to which this rule applies:
: –: For a forward-connection rule, specify the users or user groups to whom the rule applies. Click Edit to select from a list of users or groups. The default value is Any user.
: –: For a reverse-connection rule, specify the address pool that will be used for the VoIP application. Click Edit to select the address pool from a list of resources. The default value is Any resource.
9. In the To box under Basic settings, specify the users or resources to which this rule applies:
: –: For a forward-connection rule, specify the address pool that will be used for the VoIP application. Click Edit to select the address pool from a list of resources. The default value is Any resource.
: –: For a reverse-connection rule, specify the users to whom the rule applies. Click Edit to select from a list of users or groups. The default value is Any user.
10.In the Access method restrictions area, select Any. This enables the appliance’s Smart Access feature to determine the appropriate access method for the users’ end point devices, which for a reverse connection is either the Connect Tunnel client or the OnDemand Tunnel agent. The other access methods do not support cross-connections or bi-directional connections and will be bypassed.
11.In the Access method restrictions area, select Any to automatically manage access to all resources in the rule regardless of the access method making the request. This ensures that either the Connect Tunnel client or the OnDemand Tunnel agent, which are required for reverse connections, are managed by the rule. The other access methods do not support reverse connections and will be bypassed.
12.Click Finish after you have created the first rule in the pair of cross-connection rule, and then create and save the second rule. (Alternatively, you can save the first rule in the pair, make a copy of it, and then reverse the user and resource settings.)
After you have configured the forward-connection rule and the reverse-connection rule that make up the cross-connection rule pair, you should position the two rules next to each other in the access control list. That will make it easier to identify them as related rules.
AMC displays an error message if you attempt to create a cross-connection rule with no IP address pools configured. For more information, see Access Control Rules for Bi-Directional Connections on page 258.
Configuring Advanced Access Control Rule Attributes
For most rules, a basic configuration that includes users or groups, destination resources, and access methods is sufficient. Settings that provide even tighter access are available on the Advanced page for Add/Edit Access Rule.
For example, if you want to restrict connections to those coming from an individual IP address, select the User’s network address option. Source networks are referenced in an access rule to permit or deny a connection to a destination resource based on the location from which the request originates, which provides you with even greater security.
To configure advanced settings for an access control rule
1. From the main navigation menu in AMC, click Access Control.
2. Click the link for an existing rule.
3. On the Edit Access Rule page, click the Advanced tab.
4. Under Access method restrictions, permit or deny access based on the software agent or client initializing the connection. In most cases, you can leave this set to Any.
5. To restrict the Protocols that the network tunnel or proxy service will accept from the client, click Selected. A brief description of each command is included here, but for more details, see http://www.ietf.org/rfc/rfc1928.txt.
|
Protocol
|
Description
|
|
TCP
|
Enables normal TCP connections (for example, SSH, telnet, SCP, and so forth).
|
|
UDP
|
Allows the network tunnel or proxy service to make a UDP data transfer. This is necessary for operations such as streaming audio and Microsoft Outlook new-mail notification.
|
|
ICMP
|
(Internet Control Message protocol) Enables the ping and traceroute network troubleshooting commands. Selecting this option will configure the network tunnel or proxy service to allow these operations on your behalf. This option also enables ICMP packets to flow through the network tunnel or proxy service.
|
|
Accept bind requests from server
|
Used in protocols that require the client to accept connections from the server. FTP is a notable example: bind usually occurs with a Connect/Bind pair of connections.
|
|
6. Specify the names of any source networks you want evaluated in the rule with the User’s network address option. This is useful for controlling access based on the origin of the connection request. Click Edit to select from the list of resources. If no source network is specified, the default value of this field is Any. For reverse connections, this option can be used to block access requests to users’ computers that originate from specific ports or the application resources.
7. Use Destination restrictions to restrict access over individual Ports or a range of ports. For example, if you are building a policy to control access to an SMTP mail server, you might allow access only over port 25 (the well-known port for SMTP traffic). A list of the latest port number assignments is available at http://www.iana.org/assignments/port-numbers.
To enable access on any port, click Any. To specify multiple ports, click Selected and type the port numbers, separating each with a semicolon. To specify a port range, type the beginning and ending numbers separated by a hyphen.
8. Use Permissions to specify whether the rule will allow Read or Read/Write access to the file system resources. These access privileges work in conjunction with Windows access control rules. For a user to have certain file permissions, both entities (that is, Windows and the appliance) must allow them. If you disable file uploads, no user can write to a file, although users with write access will be able to move and delete files. These settings are ignored by reverse connections.
9. Under Time and date restrictions, specify when the rule will be in effect. (The time zone for the time restriction fields is your local time.) You can specify a Shift or a Range, or you can specify that the rule remain in effect at all times.
10.When you are finished creating the rule, click Save.
Access Methods and Advanced Options
When you restrict your access methods, the advanced options are enabled or disabled based on which ones remain selected (if you select Any as the access method, all the advanced options are available). When AMC validates the rule it prevents you from selecting rule attributes that are not relevant to the access methods. The following table shows the advanced options that apply to each access method.
|
Access method
|
Applicable advanced options
|
|
Web browser
(HTTP/HTTPS)
|
• User’s network address
• Time and date restrictions
|
|
Network Explorer
(Web access to file system resources)
|
• User’s network address
• Read/write permissions
• Time and date restrictions
|
|
E-Class SRA Connect and/or OnDemand (TCP/IP)
|
• Protocols
• User’s network address
• Destination restrictions (ports)
• Time and date restrictions
|
|
Adding Users and Resources From Within Access Control Rules
Some administrators prefer to define all policy objects (users, groups, and resources) before creating access control rules. Although this structured approach works particularly well for the initial configuration, you may find it inconvenient for ongoing management. If so, you can define new resources directly from the interface used to create access control rules.
To add a user or resource to an existing access control rule
1. From the main navigation menu in AMC, click Access Control.
2. Click the link for an existing rule. The Edit Access Rule page appears.
3. In the Basic settings area, click Edit beside the From box. A separate window appears displaying your current users and groups.
Icons shown in the first column represent:
|
Icon
|
Description
|
|

|
Any user belongs to the specific community
|
|

|
Dynamic group
|
|

|
Any user belongs to the specific realm
|
|

|
Technician
|
|
s
4. In the Basic settings area, click Edit beside the To box. A separate window appears displaying your resources and resource groups.
Click New. The page displayed next depends on the type of object you are creating.
6. Define the settings for the new user, group, or resource.
7. When you are finished creating the object, click Save.
8. Select the check box beside the object you want to add to the access rule and then click Save.
Editing, Copying, and Deleting Access Control Rules
Before modifying or deleting an access control rule, carefully examine your existing rules to understand how your changes will affect your security policy. Use caution when deleting rules because you are not prompted to confirm the deletion.
: •: You can reorder the placement of rules in the access control list. But before you do any reordering, carefully examine them to understand how the new order will affect your security policy.
: •: Rather than creating a new access control rule from scratch, you can save time by making a copy of an existing rule and changing some parameters to fit the new rule. Choose a rule that shares characteristics with the rule you plan to create.
Copying is also useful when experimenting with a new access rule: you can edit the copied rule and disable the original rule during your testing. This way you can roll back to your original rule if necessary.
For more information on editing, deleting, and copying access control rules, see Deleting Referenced Objects on page 137.
When you use the Filters settings to filter the view of the access rules by a specific access method or other criteria, you cannot use the Move Up and Move Down buttons to reorder the list. You can move an access control rule only when Method is set to All.
To move a rule more than one position in the list, it’s usually faster to change the Number box on the Add/Edit Access Rule page.
Resolving Deny Rule Incompatibilities
In a Permit rule, you can safely mix and match resources and access methods. However, Deny rules containing specific combinations of resources and access methods may prevent subsequent rules from being evaluated. This can inadvertently block user access to resources referenced later in your access policy.
During its policy evaluation, the appliance may in some cases be unable to determine whether a Deny rule matches an incoming connection request. As a security precaution, it stops processing your rule set and blocks user access.
If you attempt to define a Deny rule referencing any of the three combinations described in the following table, AMC displays this warning message:
“Some of the resources in this rule are not supported by the selected access method(s), which could inadvertently deny access to some resources.”
The following table lists the rule combinations that trigger this warning:
|
Rule action
|
Resource type
|
Access methods
|
|
Deny
|
Windows domain
|
• Any
• Connect and OnDemand
• WorkPlace
|
|
Deny
|
URL
|
• Any
• Connect and OnDemand
|
|
Deny
|
File share
|
• Any
• Connect and OnDemand
|
|
Example
Suppose you create a Deny rule blocking access to a Windows domain and you leave Access methods set to Any. A Windows domain is accessible from WorkPlace, so when the appliance receives a connection attempt from WorkPlace, it matches the rule and denies access.
However, if the user makes a connection request from Connect or OnDemand, the appliance is unable to determine whether the Windows domain rule matches the request (regardless of which destination resource is requested). The appliance then stops evaluating any further rules in your policy and immediately denies access. If the Windows domain rule is at the top of your access control rule list, it prevents the user from accessing any VPN resources. And if the next rule in the list is a Permit rule allowing the user to access a VPN resource, it is not evaluated.
Resolving the Problem
To resolve rule incompatibilities, modify the rule so it doesn’t reference indeterminate access methods. In the case of a Windows domain or network share, select Network Explorer as the only access method. For a URL, select only Web browser or E-Class SRA Connect and/or E-Class SRA OnDemand.
Resolving Invalid Destination Resources
If you attempt to create a rule that assigns an access method to an incompatible destination resource, AMC prevents the conflict and displays an “Invalid resources” warning.
The following table lists the access method/destination resource combinations that trigger this warning.
|
Access method
|
Invalid destination resource
|
|
Web browser
|
• Windows domain
• Network share
|
|
Network Explorer
|
• URL (and Matching URL)
|
|
Connect or OnDemand
|
• URL (and Matching URL)
• Windows domain
|
|
“Invalid Resource” Examples
AMC will not permit you to save a rule that contains a method/resource conflict: if you click Save, AMC removes the invalid resource from the rule. If the rule contains only one mismatched resource, it is replaced with Any. Examples of method/resource conflict are:
: •: If a rule specifies Web browser as the only available access method, it cannot refer to a Windows domain resource. (A Windows domain resource is one that has Domain as its type, and for which the Windows domain check box is selected).
: •: A rule that specifies a Matching URL resource requires Web browser as an access method; if the allowed access methods for a rule don’t include Web browser, the “Invalid resource” warning appears.
To resolve a destination resource error, modify the rule so that the type of access method is compatible with the destination resource. The simplest way to avoid an access method/destination resource conflict is to remove any Access method restrictions on the Advanced tab of the Add/Edit Access Rule page by leaving both Client software agents and Protocols set to Any.