This section provides general troubleshooting instructions and discusses the troubleshooting tools available in the Aventail Management Console (AMC). Failure in core networking services (such as DHCP, DNS, or WINS) will cause unpredictable failures.
The User Sessions page in AMC can be used to monitor, troubleshoot or terminate sessions on your appliance or HA pair of appliances. You can sort through the summary of session details and, if needed, display details on how a device was classified, and why. About 24 hours worth of data is kept; even items that have been deleted or modified are displayed. See Viewing User Access and Policy Details on page 295.
: •: General Networking Issues on page 695
: •: Verify a Downloaded Upgrade File on page 697
: •: Troubleshooting Agent Provisioning (Windows) on page 698
: •: Authentication Issues on page 701
: •: Using Personal Firewalls with E-Class SRA Agents on page 701
: •: E-Class SRA Services Issues on page 702
: •: Tunnel Issues on page 703
: •: OnDemand Issues on page 708
: •: Client Troubleshooting on page 710
: •: Troubleshooting Tools in AMC on page 715
These troubleshooting tips for networking issues are grouped by type of solution. Before using the ping utility, make sure that Enable ICMP pings is enabled on the Configure Basic Network Settings page.
|
|
|
Verify a Downloaded Upgrade File
You can use AMC to install version upgrades, as described in Upgrading, Rolling Back, or Resetting the System on page 322. To make sure that the update was successfully transferred to your local computer, compare its checksum against the one in the .md5 file you extracted from the .zip file.
To verify the MD5 checksum on your PC, use a Windows- or Java-based utility. Microsoft, for example, offers an unsupported command line utility on their site named File Checksum Integrity Verifier (FCIV):
To verify the downloaded file on a PC
1. At the DOS command prompt, type the following, which returns a checksum for the downloaded file:
fciv <upgrade_filename>.bin
2. Open the associated .md5 file (which you downloaded from the MySonicwall Web site) using Notepad or another text editor:
notepad <upgrade_filename>.bin.md5
3. Compare the two check sums. If they match, you can safely continue with your update. If they differ, try the download again and compare the resulting check sums. If they still don't match, contact Dell SonicWALL Technical Support.
To verify the downloaded file on the appliance
1. Type the following command, which returns a checksum for the downloaded file:
md5sum <upgrade_filename>.bin
2. Open the associated .md5 file:
cat <upgrade_filename>.md5
3. Compare the two checksums.
Troubleshooting Agent Provisioning (Windows)
E-Class SRA Access Manager (AAM) is a component that provisions Windows users with EPC and access agents when they log in to WorkPlace. If something goes wrong during provisioning, the error is recorded in a client installation log (identified by username) that you can view in AMC.
The 2.2 ODIS (Secure Virtual Desktop) log files are found in the VirtualDesktop folder in the App data folder. To get to the App data folder, click Start -> Run, type in %appdata% and press Enter.
Here’s a broad overview of the provisioning process. At steps (2) through (6), information is appended to a file named epiBoostrapper.log (stored in \Documents and Settings\<username>\Application Data\E-Class SRA\LogFiles\).
1. Micro-interrogation: JavaScript is used to get basic platform and browser information: Is this a Microsoft OS? Is ActiveX enabled? If not, is Java enabled? (If neither is available, the user sees an error message.)
2. Fetch epiBootstrapper.exe, a self-extracting executable in MSI (Microsoft Windows Installer) format; the executable also includes the macro-interrogator used in step (5).
3. Fetch the list of Advanced EPC agents and install it. At a minimum, OPSWAT.msi is installed.
4. Fetch additional Advanced EPC agents as required by the community.
5. Macro-interrogation: Search for both Advanced EPC and other device profile attributes, such as a particular file name, or a Windows registry key.
6. Provision agents (for example, data protection, or OnDemand Tunnel).
Related Topics
: •: Client Installation Logs (Windows) on page 287
: •: Client and Agent Provisioning (Windows) on page 435
One of the most common errors in AMC is to make a configuration change and then forget to apply it. A Pending changes link appears in the top-right corner in AMC whenever changes have been made but not applied. Click the link and then click Apply Changes to automatically restart the services.
|
An authentication server is referenced in a realm.
|
Using Personal Firewalls with E-Class SRA Agents
Some firewall products display a security alert during the provisioning of E-Class SRA agents or EPC components. This is because the firewalls are regulating outbound connections by process (in addition to port and protocol). In most cases, the user can simply “unblock” or “permit” the outbound connection.
Connect Tunnel users should configure their personal firewalls to allow the E-Class SRA VPN service (ngvpnmgr.exe) and E-Class SRA Access Manager (E-Class SRAComponents.exe) to access the Internet and to add the E-Class SRA appliance by host name or IP address as a trusted host or zone. In addition, Windows Vista users should make an exception for epiVista.exe.
There are a few firewalls, such as one supplied by Trend Micro, that do not permit a user with restricted rights to override the firewall settings. For corporate systems on which users have limited access rights, you may need to update the firewall settings before deploying the E-Class SRA VPN so that users won’t have to respond to security dialog prompts.
Consult the documentation for your corporate personal firewall to determine the firewall policy. If a firewall update proves necessary, a rule that allows all processes to communicate with the appliance over port 443 is recommended.
To see a brief summary of which services are running, click Services on the main navigation menu.
Web Proxy Service Issues
: •: Temporarily increase the server log level in AMC to Verbose. (Don’t forget to click Pending changes in the top-right corner of any AMC page, and then click Apply Changes to automatically restart the service.)
: •: To see the Web proxy service log, click Logging in the main navigation menu, and then select Web proxy audit log from the Log file list. Verify that your connection request appears in the log.
: •: Verify that your DNS server can resolve the Web proxy service Server name setting in AMC to the IP address of the Web proxy service interface. You can use the lookup tool within AMC (see Using DNS Lookup on page 716), or you can issue the nslookup or dig commands from a command prompt.
: •: If your network uses NAT to translate IP addresses, make sure that the Web proxy service Server name setting contains the IP address of the outside (or public) IP address that is being substituted using NAT.
Web Proxy Agent Issues
The Web proxy agent provides access to URL resources on Windows systems with Internet Explorer 7.0 or later. Aventail WorkPlace indicates that Web proxy mode is active on a client by displaying “E-Class SRA Web proxy” in the Connection Status area.
To troubleshoot whether the Web proxy agent is running properly on a client machine, follow these steps:
1. On the client machine, press Ctrl+Alt+Delete and then click Task Manager.
2. Look in Windows Task Manager’s Processes list for the process ewpca.exe. If that file is present, the standard Web mode access agent is running, although it may not be receiving network traffic.
3. To confirm that the Web proxy agent is receiving traffic, start Internet Explorer and then select Tools > Internet Options. On the Connections tab, click LAN Settings or Settings for the dial-up/VPN connection you are using to connect to the appliance.
4. In the appropriate Settings dialog box for your connection type, verify that the Use automatic configuration script check box is selected and that the Address box contains the following address:
http://127.0.0.1:<portnumber>/redirect.pac
Internet Explorer uses the redirect.pac file to determine which connections to send to the Web proxy agent.
5. To view the resource addresses that are redirected by the redirect.pac file, open the file in a text editor. The file is located on the client machine in this folder:
\Documents and Settings\<username>\Application Data\E-Class SRA\ewpca
The //Redirection Rules// section of the redirect.pac file lists the addresses defined as destinations that are sent through the standard Web proxy agent. These addresses come from the list of network and URL resources defined in AMC.
This section describes how to troubleshoot problems with the network tunnel service and the tunnel clients.
|
|
: •: Windows Client Troubleshooting on page 711
: •: Macintosh and Linux Tunnel Client Troubleshooting on page 713
This section describes how to troubleshoot issues with OnDemand (port-mapped).
: •: General OnDemand Issues on page 708
: •: Specific OnDemand Issues on page 710
If OnDemand fails to work properly, perform the following diagnostics.
: •: Testing OnDemand on page 708
: •: Viewing OnDemand Log Files on page 708
: •: Detecting the JRE Version on page 708
: •: Enabling Java in the Browser on page 709
: •: Viewing the Java Console on page 709
Test OnDemand by connecting to the appropriate URLs to start the applet, and then running the supported applications.
When testing, make sure that:
: •: OnDemand can communicate with required network access services.
: •: Web proxy service authentication and access control are working.
: •: OnDemand automatically redirects connections properly.
: •: OnDemand creates connections for each configured application.
: •: OnDemand starts any thin-client applications that are configured to start automatically.
For users running Windows, OnDemand creates a log file when it starts that contains troubleshooting messages. The log files are saved here:
%SystemRoot%\Documents and Settings\AllUsers\Application Data\E-Class SRA\Logfiles\
%SystemRoot%\Documents and Settings\<username>\Application Data\E-Class SRA\Logfiles\
If OnDemand is not working properly, ensure that the user is running a version of the Java Runtime Environment (JRE) that is supported by OnDemand; see Client Components on page 20 for system requirements. In addition, make sure the user has enabled Java in the browser; see Enabling Java in the Browser on page 709.
To detect the JRE version running on a client computer
: •: Internet Explorer for Windows: Open the browser’s Java Console to view information about your JRE; see Viewing the Java Console on page 709.
: •: Browsers for Mac OS X: In the Applications folder, open the Utilities folder, and then open the Java folder. Run the Java Plugin Settings program, and then click About in the menu to see information about the version you are running.
Note: Some versions of Windows may not include a JRE; in this case, you see an error message (“jview.exe must exist in \path or you need to set JAVA_HOME”). If you see this message but you know that you have a JRE on your Windows computer, set the path to the JRE directory as JAVA_HOME in the Environment Variables dialog box; see Windows Help for information. Otherwise, you must either install a JRE on your Windows computer or use a different computer.
Java must be enabled in the user’s browser for the OnDemand applet to run. In Internet Explorer, Java is enabled by default. If OnDemand doesn’t run, and you suspect the defaults have been changed, enable them as described in the browser’s documentation.
If the OnDemand applet doesn’t start, the Java Console might offer an explanation. Have your user follow the steps appropriate for his or her machine:
Viewing the Java console: Windows—Sun JRE users
1. Users who are running the Sun Java Runtime Environment can access the Java Console by right-clicking the Sun Java icon in the taskbar notification area.
2. Click Open Console.
Viewing the Java console: Internet Explorer for Windows
1. Click Tools > Internet Options, and then click the Advanced tab.
2. Under Microsoft VM, select the Java Console enabled and Java logging enabled check boxes, and then click OK.
3. Close the browser and then reopen it.
4. Click Java Console on the View menu.
Viewing the Java console: Mac OS X
1. In the Applications folder, open the Utilities folder.
2. In the Java folder, run the Java Plugin Settings program.
3. In the Java Plug-in Control Panel, click Use Java console on the General page.
This section describes some troubleshooting tips for specific situations you may encounter when using OnDemand.
|
This section provides client troubleshooting information for Windows, Mac, and Linux clients.
: •: Windows Client Troubleshooting on page 711
: •: Macintosh and Linux Tunnel Client Troubleshooting on page 713
Windows Client Troubleshooting
The E-Class SRA installer software can be loaded on a user's computer by Java or by ActiveX. If you want to remove this installer, as well as all the other E-Class SRA software components, follow these steps.
: •: Resetting Browser and Java Settings on page 711
: •: Uninstalling E-Class SRA Components on page 712
: •: Logging Back In to WorkPlace on page 713
Resetting Browser and Java Settings
Follow these steps to reset browser and Java settings. Where applicable, the instructions for Internet Explorer, Google Chrome, and Firefox Mozilla are given.
Clear Cookies and Cache
To clear browser cookies and cache in Internet Explorer, follow these steps:
1. Click Tools > Internet Options.
2. Click Delete Files and Delete Cookies.
To clear browser cookies and cache in Mozilla Firefox, follow these steps:
1. Click Tools > Clear Private Data.
2. Select at least these three check boxes:
: –: Cookies
: –: Cache
: –: Authenticated Sessions
3. Click Clear Private Data Now.
To clear browser cookies and cache in Google Chrome, follow these steps:
1. Click Tools > Clear browsing data.
2. Select at least these check boxes:
: –: Delete cookies and other site and plug-in data
: –: Empty the cache
3. Click Clear browsing data.
Reset Security Zones to Defaults
To reset the security level for all Web content zones in Internet Explorer, follow these steps:
1. Click Tools > Internet Options > Security tab.
2. Highlight a Web content zone (for example, Internet), and then click the Default Level button. Do this for each zone.
Reset Advanced Settings to Defaults
To reset advanced Internet Explorer settings, follow these steps:
1. Click Tools > Internet Options > Advanced tab.
2. Click the Restore Defaults button.
Reset Privacy Settings to Defaults
To reset Internet Explorer privacy settings, follow these steps:
1. Click Tools > Internet Options > Privacy tab.
2. Click the Default button.
Clear your Java Cache
To clear the Java Cache on your Windows system, follow these steps:
1. In the Control Panel, double-click Java.
2. Click the Delete Files button.
3. Make sure that all three types of temporary files are selected for deletion, and then click OK.
Enable your Java Cache
By default, Java is configured to keep a cache of temporary files on the local computer. If you are using Java for remote access through an E-Class SRA appliance, make sure that this cache is enabled:
1. In the Windows Control Panel, open Java.
2. In the Java control panel, click Settings in the Temporary Internet Files area.
3. Select Keep temporary files on my computer.
Uninstalling E-Class SRA Components
Follow these steps to uninstall all E-Class SRA files:
1. Reboot your computer. This ensures that no files are loaded in memory and makes the uninstall easier.
2. Remove all E-Class SRA components:
a.In Windows Explorer, browse to %WINDIR%\Downloaded Program Files\.
b.Right-click the E-Class SRA Installer file, and select Remove.
c.Uninstall the E-Class SRA VPN Software. You are prompted to reboot your computer, but you don’t need to do so until the final step in this procedure.
d.In the Control Panel, open Add/Remove Programs.
e.Remove each E-Class SRA component.
3. The E-Class SRA software may have been installed using either ActiveX or Java (if you’re not sure, follow both sets of instructions):
ActiveX
If you have already done step 2b above, you can skip to the steps for Java.
a.In Windows Explorer, browse to %WINDIR%\Downloaded Program Files\.
b.Right-click on the E-Class SRA Installer file, select Remove, and then click OK.
c.Uninstall the E-Class SRA VPN Software. You are prompted to reboot your computer, but you don’t need to do so until the final step in this procedure.
Java
a.In Windows Explorer, browse to %HOMEPATH%\Application Data\E-Class SRA\EP\.
b.Double-click uninstall_ep.exe.
c.Uninstall the E-Class SRA VPN Software. You are prompted to reboot your computer, but you don’t need to do so until the final step in this procedure.
4. In Windows Explorer, browse to %HOMEPATH%\Application Data\, right-click on the E-Class SRA folder, and then select Delete.
5. Reboot the computer.
Log back in to WorkPlace, install E-Class SRA Access Manager, and let the E-Class SRA components load.
If something goes wrong during client or agent installation, the error is recorded in a client installation log. This log is automatically uploaded to the appliance and listed in AMC if E-Class SRA Access Manager is installed. Users who do not have E-Class SRA Access Manager are prompted to upload the log file to the appliance when an installation error occurs.
Follow these steps to obtain additional log files:
1. Browse to %HOMEPATH%\Application Data\.
2. You should see a folder named E-Class SRA: zip the folder contents up, and email it to Dell SonicWALL Technical Support.
3. Browse to %ALLUSERSPROFILE%\Application Data\.
4. You should see a folder named E-Class SRA: zip the folder contents up, and email it to Dell SonicWALL Technical Support.
5. Open a DOS box (click Start > Run, type cmd, and then press Enter).
6. In the command prompt window, type ngutil -all > ngutil.txt.
7. Email the ngutil.txt file to Dell SonicWALL Technical Support.
8. Click Start > Run, type msinfo32, and then press Enter.
9. Highlight System Summary, and then select File > Export. Email the exported file to Dell SonicWALL Technical Support.
Macintosh and Linux Tunnel Client Troubleshooting
When troubleshooting Macintosh and Linux tunnel client problems, request the system and version information described in this section from your users. Before gathering this information, users should uninstall and re-install the software.
: •: Macintosh System and Application Information on page 713
: •: Linux System and Application Information on page 714
Macintosh System and Application Information
Have users specify the following information:
|
When you start Connect Tunnel, make sure that the log files /var/log/AvConnect.log and /var/log/AvConnectUI.log are set to collect debugging information. You can enable debug mode in the E-Class SRA Connect client itself, or go to a command prompt and type the following:
/Applications/AventailConnect.app/Contents/MacOS/startct.sh -d
Linux System and Application Information
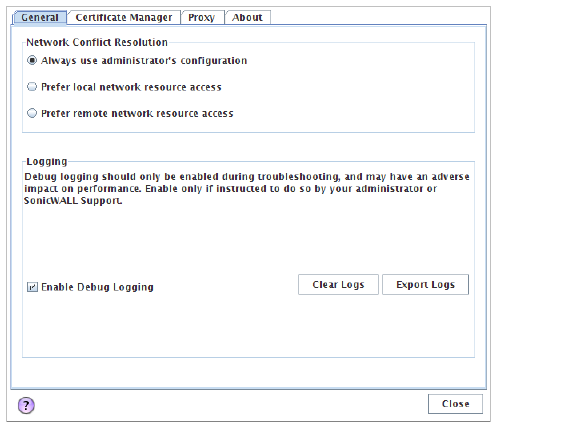
Have your users enable debug logging and clear the current set of logs before attempting to reproduce an issue. Once the issue is reproduced, export the logs to Dell SonicWALL Support.
Use the Enable Debug Logging check box, Clear Logs button, and Export Logs button on the General tab to perform these functions:
You can monitor, troubleshoot or terminate sessions on your appliance, filtering them by user name, realm (authentication server), community, access agent, traffic load, and so on—and then get a quick summary of particular sessions. Several basic network tools are also available, including ping, traceroute, DNS lookup, a routing table viewer, and a way to capture and filter network traces for backend connectivity troubleshooting.
: •: Viewing User Sessions on page 290
: •: Using DNS Lookup on page 716
: •: Viewing the Current Routing Table on page 716
: •: Capturing Network Traffic on page 717
: •: Logging Tools for Network Tunnel Clients on page 718
: •: Using CEM Extensions on page 719
: •: Traceroute Command on page 720
: •: Snapshot Tool on page 721
You can use AMC’s Lookup tool to determine how DNS is resolving an IP address or a host name. This tool is useful for troubleshooting various DNS problems (for example, it can determine whether your DNS server is running).
Use a fully qualified domain name or an IP address to specify a host in the Lookup tool. However, you can type a non-qualified host name as long as you have defined one or more default search domains on the Configure Name Resolution page (available from the Network Settings page in AMC). For details on name resolution, see Configuring Name Resolution on page 150.
To determine how DNS is resolving an IP address or host name
1. From the main navigation menu, click Troubleshooting.
2. Click the Lookup tab.
3. In the Address box, type the IP address or host name of the machine against which you want to issue the command.
4. Click Go.
Viewing the Current Routing Table
You can view the current routing table from within AMC.
To view the current routing table
1. From the main navigation menu, click Troubleshooting.
2. Click the Routes tab.
3. Click Go. The routing table is displayed.
This network traffic utility, which is based on tcpdump, allows you to capture a packet-by-packet list of the data going in and out of the appliance. If you are new to troubleshooting, you can use this utility to generate a file of network traffic data that can be sent to Technical Support for troubleshooting network issues. If you are familiar with troubleshooting and reading trace files, you can analyze the traffic using a network protocol analyzer, such as Wireshark.
Capturing all network traffic on your appliance can quickly result in files that are too unwieldy to analyze. Where possible, use filters to restrict the traffic to issues you are troubleshooting.
The following sample procedure demonstrates how to filter by host and port (in this example, an Exchange server and Web traffic).
To filter and capture network traffic to a file on the appliance
1. From the main navigation menu, click Troubleshooting.
2. Click the Network Traffic tab.
3. To restrict the capture to traffic coming from or going to your Exchange server, enter the server’s full qualified domain name or IPv4 or IPv6 address in the These hosts text box. For example, exchange.mycompany.com.
4. To make sure that you are capturing only the HTTP traffic, select Web (HTTP or HTTP/S) from the Common ports list; only traffic to and from the HTTP and HTTPS ports (80, 443, 8080, and 8443) will be captured.
Click Start to begin capturing traffic. The size limit for a single capture is 500 MB of raw data; when the size of a capture file reaches 100 MB, it “rolls over” into a separate file (large files are difficult to process with packet analysis tools such as Wireshark). If the total size of a single capture reaches 500 MB (five files of 100 MB each), the capture automatically stops. During a capture, the Size column indicates how close you are to the limit.
6. Click Stop to stop capturing traffic. The capture file is a .zip file that is stored on the appliance and listed here. (The figure in the Size column indicates how much room the file is using on the appliance; this is the size of the compressed .zip file, not the raw data.) The maximum number of files you can store is ten; as more capture files are added, the oldest ones are dropped from the list.
7. To download captured data, click the button corresponding to the file you want to analyze or send to Technical Support, and then click Download. Each capture file is a .zip file containing the captured network traffic (for example, eth0.cap) and a readme text file outlining what filters were used, if any, and when the data was captured.
Comment: Internal interface, hosts: exchange.mycompany.com, selected ports
Internal interface (eth0): enabled
External interface (eth1): disabled
Protocol: <All>
Hosts: exchange.mycompany.com
Ports: 80,443, 8080, 8443
Start time: Wed Aug 15 2007 17:56:52 GMT
Stop time: Wed Aug 15 2007 17:58:31 GMT
Note: Captured network traffic is not encrypted and may contain passwords and other sensitive information. If you have security concerns about storing a downloaded capture or sending it over an unsecured Internet connection, use Snapshot Tool in AMC instead. You can make a partial snapshot that includes only network captures, and then choose to encrypt the results. See Snapshot Tool on page 721 for more information.
You can capture network traffic on either of the appliances in a high-availability pair (the master node or the slave node).
Logging Tools for Network Tunnel Clients
To capture a session during which a user is running either of the network tunnel clients, have users follow these steps and email you the results. The Windows procedure differs from the one for Macintosh and Linux users.
To run ngutil on a Windows client computer
1. Go to a command prompt: Click Start > Run, and then type cmd in the Open box; if you are using Windows Vista, Click Start, and then type cmd in the Start Search box.
2. At the command prompt, clear the event log and set the severity level by typing the following command:
ngutil -reset -severity=debug
3. Start the network tunnel client and perform any actions the system administrator wants captured in the log.
4. At the command prompt, type ngutil > log.txt to write the buffered log messages to a file named log.txt in the current directory.
5. Send the log.txt file to the administrator.
6. Alternatively, you can run ngutil -poll to see real-time logging on the client computer. (Press Ctrl-C to stop logging.)
Note: You can also have users type the ngutil -tail=1000>client-log.txt command; this sends the most recent 1000 lines in the client log to a file named client-log.txt in plain text.
For more information on the syntax for the ngutil command, type ngutil -help at the command prompt.
To save session information on a client computer (Macintosh or Linux)
1. Start the network tunnel client and perform any actions the system administrator wants captured in the log.
2. On the client device, locate the files AvConnect.log and AvConnectUI.log and send them to the administrator.
Dell SonicWALL Technical Support may ask you to use Aventail E-Class SRA Configuration Extension Mechanism (CEM) advanced URL extensions.
These CEM extensions are used to access advanced AMC pages and should only be used when instructed to do so by Technical Support. For additional information, see Knowledge Base article 10061 at:
http://www.sonicwall.com/us/en/support/2213.html
The Configuration Extension Mechanism (CEM) is a generic mechanism to allow simple configuration to be done for features that appear in maintenance releases or hotfixes. The CEM page allows the configuration of arbitrary key-value pairs for enabling advanced functionality. These key-value pairs are read from the extension config file by each service that has a patch generated for it (custom drop, hotfix, or maintenance release).
Advanced features should be used only under Dell SonicWALL Support supervision. Please contact Dell SonicWALL Support for additional instructions at:
Contact Support Page - http://www.sonicwall.com/us/support/contact.html
Contact Dell SonicWALL Page - http://www.sonicwall.com/us/company/286.html
Use the ping command to verify a network connection. When you issue the ping command, it sends an ICMP ECHO_REQUEST packet to a target host and waits to see if the host answers.
To issue a ping command
1. From the main navigation menu, click Troubleshooting.
2. In the Address box on the Ping page, type the IPv4 or IPv6 address or host name of the machine you want to ping.
3. Click Go. AMC issues the ping command. After about five seconds, the results appear in the large box at the bottom of the page. If the ping command cannot reach the host, it returns results resembling the following:
Use the traceroute command to see the sequence of gateways through which an IP packet travels to reach its destination. This can help you find a network failure point.
To issue a traceroute
1. From the main navigation menu, click Troubleshooting.
2. In the Address box on the Ping page, type the IP address or host name of the machine against which you want to issue the traceroute command.
3. Select the Use traceroute check box.
4. Click Go. Traceroute returns a list of hosts, starting with the first gateway and ending with the destination.
A “snapshot” of your configuration can help Dell SonicWALL Technical Support or other IT professionals diagnose any problems you are having with the appliance. This file, especially if it includes core dump files, can be quite large (the File Download dialog box in the final step will tell you how large).
To save a configuration snapshot
1. From the main navigation menu, click Troubleshooting.
2. Click the Snapshot tab.
Select a full or partial snapshot.
4. Specify whether you will include all system logs, or just the four most recent ones.
5. Click Save snapshot. The files are saved in a zip archive named snapshot.tgz.
6. If you plan to send the file to Dell SonicWALL Technical Support, you should select Encrypt file to keep sensitive information secure. Technical Support will need the password you assigned to this archive so that they can decrypt the file. Make sure you send it in such a way that it meets your internal security requirements (over the phone or by secure email, for example).
7. Click the Download link to save the compressed file locally.