User Access Components and Services
The E-Class SRA appliance includes several components that enable users to access resources on your network. This section describes each of the user access components and the services that control them.
Many of these components are provisioned or activated from the WorkPlace portal. For more information about WorkPlace, see The WorkPlace Portal.
• Client Installation Packages
• Network Tunnel Client Branding
User access agents are deployed to client devices based on the community to which the user belongs. Most agents are deployed automatically when the user logs in to the WorkPlace portal using a browser. The main exceptions—the Connect Tunnel agent and the Connect Mobile agent—can be made available for manual user download and installation from links on the WorkPlace portal. The installation package for these two access agents can also be made available for download from a file share on your network or deployed through applications such as Microsoft’s Systems Management Server (SMS) or IBM’s Tivoli. For more information, see Selecting Access Methods for a Community.
When deployed automatically—when a user logs in using a browser—the access agents are both deployed and activated on the first visit. This generally requires the user to accept a download for the Secure Endpoint Manager (SEM), which will in turn manage the access agent installation and future access agent updates. On subsequent visits to the WorkPlace portal from the same client device using the same browser, the access agents are automatically activated without user intervention. See Client and Agent Provisioning (Windows) for more information.
The following table compares the capabilities of access agents and lists their requirements. For other system-requirement information, see Client Components.
| |||||||||||||||||||||||||||||||||||||||||||||||||||||||||||||||||||||||||||||||||||||||||||||||||||||||||||||||||||||||||||||||||||||||||||||||||||||||||||||||||||||||||||||||
(1) Port-mapped mode requires ActiveX or Java. For a user without administrator rights who can’t run ActiveX, the Java Runtime Environment (JRE) is used.
(2) See knowledgebase article 2803 for instructions on how to configure WorkPlace so that Pocket PC users can download and install the Connect Mobile CAB file directly, without using ActiveSync.
The Connect Tunnel Service is not listed in this table. You can install and configure this add-on component so that the VPN connection starts automatically without user intervention. For more information, see Running Connect as a Service.
Connect Tunnel for Android is also not provisioned from WorkPlace. You can download and install the Android client from the Android Market. For more information, see Connect Tunnel for Android.
Related Topics
• Client and Agent Provisioning (Windows)
Client and Agent Provisioning (Windows)
Secure Endpoint Manager is a component that enables you to provision Windows users with EPC and access agents reliably when they log in to WorkPlace. It provides better application compatibility for applications that need an agent, and more reliable EPC interrogation; in addition, most client updates do not require administrator privileges. If something goes wrong during provisioning, the error is automatically recorded in a client installation log (identified by username) that you can view in AMC.
Installing Secure Endpoint Manager is a one-time step and does not require that the user have administrator privileges. The only other time users will be (briefly) aware of it once it’s installed is when an access agent or the Access Manager itself needs to be updated. Installing Secure Endpoint Manager is also not required, but users without it will have just Web-only access to resources in WorkPlace, or be forced to log out, depending on how you configure the community.
• Installing Secure Endpoint Manager
• Installing Secure Endpoint Manager on a Computer Running Vista
• Provisioning and Personal Firewalls
• Troubleshooting Agent Provisioning (Windows)
Installing Secure Endpoint Manager
Users are normally required to install a Secure Mobile Access agent or client before they are granted access to network resources when they log in to WorkPlace. This is the recommended setting: it provides better compatibility for applications that need an agent, which means broader access for users and fewer Help Desk calls for you. (To omit this requirement, clear the Require agent in order to access network check box when you are configuring the access methods for a particular community.)
Users logging in to WorkPlace are offered these choices when this setting is enabled:
Install: Secure Endpoint Manager is installed on the user’s computer. Users will need to do this only once.
• Logout: The user’s session is ended.
If you configure the community such that an agent or client is not required, users are offered these choices when they log in:
Install: Secure Endpoint Manager is installed on the user’s computer. Users will need to do this only once.
• Remind me later: The user is prompted to install Secure Endpoint Manager during the next login.
• Don't show this again: The user sees no Secure Endpoint Manager prompts during subsequent logins on this computer. This is a good choice for a user who wants to bypass agent provisioning (in an airport, for example) and is satisfied with just Web-only access.
CAUTION In this scenario (assuming EPC is enabled), the user is placed in either the Default zone or a Quarantine zone, depending on how the community is configured. A Quarantine zone may be too restrictive, and the Default zone probably needs to accommodate many other types of users. You might want to create a unique, Web-only zone for users who don’t require an agent. See Scenario 3: Employees Connecting from a Public Kiosk for ideas on how to set up this kind of zone.
Installing Secure Endpoint Manager on a Computer Running Vista
When users install Secure Endpoint Manager for the first time on a computer running the Microsoft Vista operating system, they see an additional consent dialog that was not seen in previous Windows versiions. Users should follow the on-screen instructions and select Do not show me the warning for this program again, and then click Allow.
Provisioning and Personal Firewalls
Some third-party firewall products regulate outbound connections by process (in addition to port and protocol). These firewalls may raise a security alert dialog regarding Secure Endpoint Manager during the provisioning of agents or EPC components. In most cases, the user should be instructed to “unblock” or “permit” the outbound connection.
There are a few firewalls, such as one supplied by Trend Micro, that do not permit a user with restricted rights to override firewall settings. For corporate systems on which users have limited access rights, you may want to update the firewall settings before deploying the Secure Mobile Access VPN so that users won’t have to respond to these security dialog prompts. See Using Personal Firewalls with Agents for more information.
If something goes wrong during client or agent installation on a computer running Windows, the error is recorded in a client installation log on the user’s local computer. These logs are automatically uploaded to the appliance and listed in AMC if the user has Secure Endpoint Manager installed. For more information, see Client Installation Logs (Windows).
WorkPlace is a Web-based portal that provides dynamically personalized access to Web resources protected by the Web proxy service. After a user logs in to WorkPlace, a home page appears that contains an administrator-defined list of shortcuts. These shortcuts point to Web-based file shares, Web-based applications, and terminal server resources to which the user has access privileges.
All Secure Mobile Access user access components are provisioned or activated through the WorkPlace portal, with the exception of the Connect Mobile client, which is deployed separately.
WorkPlace is accessible from any standard Web browser. For more information, see The WorkPlace Portal.
Network Explorer, available through WorkPlace, is a Web-based user interface that provides access to any shared Windows file system resources a user has permission to access (even from a computer that isn’t running Windows). These resources can include domains, servers, computers, workgroups, folders, and files.
Network Explorer is an optional component that can be controlled through policy or completely disabled. It is supported on any browser supported by WorkPlace. For more information, see The WorkPlace Portal.
The Secure Mobile Access tunnel clients provide secure access for TCP and UDP traffic; bi-directional traffic, such as remote Help Desk applications; cross-connections, such as VoIP applications; and reverse connections, such as SMS. The clients all provide network-level access to all resources, effectively making the user’s computer a node on your network:
• OnDemand Tunnel agent is a browser-based, Web-activated agent.
• Connect Tunnel client is a Web-installed client. The tunnel clients are managed from AMC using the network tunnel service. Configuring this service to manage TCP/IP connections from the network tunnel clients requires setting up IP address pools that are used to allocate IP addresses to the clients.
Related Topics
The OnDemand Tunnel agent enables you to provide complete network and application access through a Web browser to resources protected by the network tunnel service. The OnDemand Tunnel agent is a lightweight agent that provides the same broad application and protocol access as the Connect Tunnel client, but it is integrated into the WorkPlace portal and automatically starts each time users log in to WorkPlace.
The OnDemand Tunnel agent is supported on Windows, Linux, and Macintosh, and requires Internet Explorer with ActiveX or Java enabled, or Mozilla Firefox or Safari with the Java Runtime Environment (JRE).
The Connect Tunnel client provides full access to resources protected by the network tunnel service, and to any type of application, including those that use TCP, and non-TCP protocols such as VoIP and ICMP. Connect Tunnel also includes split-tunneling control, granular access controls, proxy detection, and authentication.
The Connect Tunnel client can be deployed in a number of ways (for more information, see Client Installation Packages):
• Offer users a shortcut in WorkPlace for downloading and installing the client; the link points to the Connect Tunnel resource, described in Built-In Resources.
• If you don’t want to require users to log in to WorkPlace, have them download and install the Connect Tunnel client components from a network location (such as a Web server, FTP server, or file server).
• Distribute installation packages using an application such as SMS or Tivoli.
• Create a master image of a Connect Tunnel install and copy it to user systems using a third-party disk-image copying utility such as Norton Ghost.
The Connect Tunnel client is supported on Windows, Linux, and Macintosh operating systems, and installation of the Connect Tunnel client requires users to have administrator privileges. All Connect Tunnel configuration and management is performed in AMC.
The Connect Tunnel client supports command-line utilities such as “ngdial” that can modify the normal run-time behavior of the client and enable you to perform troubleshooting and diagnostic tasks without using the standard graphical user interface. For more information, see Command Line Access to Connect Tunnel with NGDIAL.
When Connect Tunnel is active, a Connect Tunnel icon is displayed in the system taskbar. Mousing over this icon displays the following popup window:
You can configure the Windows version of the Connect Tunnel client software to be automatically updated on users’ computers whenever a new version becomes available. For more information, see Windows Tunnel Client Automatic Client Updating.
Note A user logged in as a “guest” on a computer running the Windows Vista operating system will not be able to run Connect Tunnel. A guest account is for users who don't have a permanent account on your computer or domain—it allows them to use your computer without giving them access to your personal files.
This section provides an overview of the Connect Mobile client.
The Connect Mobile client is a lightweight application for Windows Mobile-powered devices. It provides access to a broad range of resources—including traditional client/server applications, thin-client applications, and Web resources—protected by the Web proxy service.
The Connect Mobile client is installed using a Windows setup program that extracts the application files and then copies them to the user’s device using Microsoft ActiveSync. For information about deploying the setup files to users, see Client Installation Packages.
Some legacy devices may display the Windows Mobile branding, but are in fact powered by an older version of the operating system. For example, the Connect Mobile client does not support the following Smartphone 2003 devices:
• Audiovox SMT5600
• Motorola MPx220
• Sierra Wireless Voq
• Samsung i600
• iMate SP2
But these small form factor devices, along with other Web-enabled devices, can use the WorkPlace portal for Web-based access to the Secure Mobile Access SSL VPN appliance. See WorkPlace and Small Form Factor Devices for more information.
This section provides an overview of the Web proxy agent and zero-client Web access methods such as translated Web access, custom port mapped Web access, and custom FQDN mapped Web access. A section describing Exchange ActiveSync Web access is also included.
• Custom Port Mapped Web Access
• Custom FQDN Mapped Web Access
• Exchange ActiveSync Web Access
The Web proxy agent provides access through the WorkPlace portal to any Web resource—including Web-based applications, Web portals, and Web servers—as well as Windows network shares. The Web proxy agent provides improved application compatibility over Translated Web access, but provisioning the Web proxy agent can take a little extra time when a user first logs in to WorkPlace. The Web proxy agent requires Internet Explorer with ActiveX enabled.
By default, the appliance is configured to deploy a Microsoft ActiveX control (the “Web proxy agent”) on Microsoft Windows systems running Internet Explorer. If the Web proxy agent cannot run, Translated Web access can be used as a fallback. Translated Web provides basic access to Web resources, and enables you to create aliases that obscure internal host names. It proxies Web content directly through the appliance and provides access to any Web resource that is specifically configured to run with WorkPlace, as well as access to Windows network shares. Translated Web access works on any Web browser that supports SSL and has JavaScript enabled. It uses URL rewriting, which may have limitations with some Web applications, such as AJAX. Custom port mapping or custom FQDN mapping may be used as an alternative to URL translation.
Custom port mapping involves mapping the backend resource or server to a port number at the EX-Series appliance. Apache listens on this port and all HTTPS traffic received on it is terminated at the appliance. A new HTTP request is made to retrieve the mapped backend resource. The HTTP reply is transmitted using plain text to facilitate translation of absolute URLs. URL rewriting is not used. When using custom port mapping, any firewalls in the network must be configured to keep the specific ports open. Custom port mapping does not require installation of a client agent, and works with any Web browser.
Custom FQDN mapping means that the backend resource or server is mapped to an external fully qualified domain name (host and domain). The resource should be accessed with the FQDN name rather than with the IP address. The FQDN name should be resolvable to an IP address in the public domain. Apache listens on port 443 at this IP address. All HTTPS traffic is terminated at this socket. A new HTTP request is made to retrieve the mapped backend resource. The HTTP reply is transmitted using plain text to facilitate translation of absolute URLs. URL rewriting is not used.
Notes for Custom Port Mapped or Custom FQDN Mapped Web Access
These access methods are ideal for all well written applications that predominantly use relative URLs. Ajax and Flash applications may also behave better with these access methods than the Translated Web Access.
The following applications are recommended for Custom Port Mapped or Custom FQDN Mapped Web Access over Translated Web Access:
• Share Point 2010, SharePoint 2013
• Outlook Web Access 2013
• Dominos Web Access
• Complex web applications (Java applets/AJAX/Flash/other advanced web technologies)
Configuration Requirements
• Each resource should be configured using only one of the access methods. Do not mix translated, custom port mapped and custom FQDN mapped modes.
• Do not include a path in the URL. For example, do not use a URL like:
http(s)://backend_hostname(:portNumber)
To set the complete path on WorkPlace, specify the start page on the Edit WorkPlace ShortCuts > Advanced page, as explained in Adding Web Shortcuts.
• Use of valid Certificates is highly recommended.
This Internet Explorer issue is described at:
http://connect.microsoft.com/IE/feedback/ViewFeedback.aspx?FeedbackID=379975
– Custom Port Mapped resource may get redirected to Workplace Portal in case of certificate warning while accessing with Internet Explorer.
• The resources should be configured and accessed using host and domain name only, not via IP address.
Known Behavior
• Logging out of applications like OWA, DWA and SharePoint from an Internet Explorer browser may log you out of Workplace. Note that logging out does not affect other active WorkPlace shortcut sessions. Only the browser is logged off as the backend application clears all cookies (including appliance specific cookies) on logoff.
Application Specific Notes
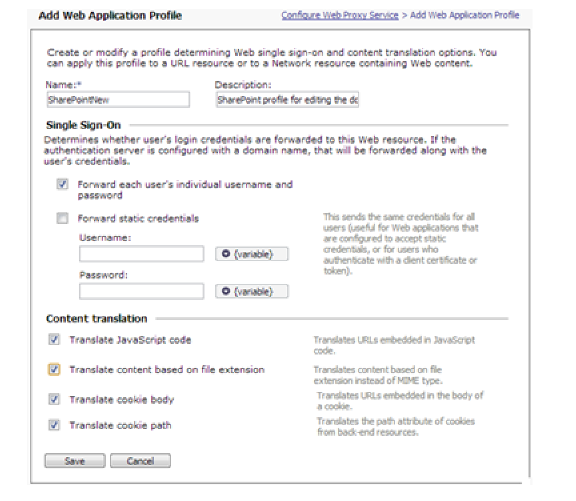
: SharePoint
• For editing the document in Microsoft applications (Word/Excel/PPT) a new Web Application profile similar to the existing SharePoint Web Application profile is needed. To create a new Web Application profile, see Adding Web Application Profiles.
When creating the new SharePoint Web Application profile you must enable the Translate content based on file extension option in the Content Translation section and associate it with the SharePoint resource. Otherwise, the document cannot be edited.
The new Web Application profile for SharePoint should be as shown below,
Note Files cannot be uploaded using Windows Explorer, because opening Windows Explorer requires WebDAV (Web Distributed Authoring and Versioning) protocol, which Secure Mobile Access does not support.
Domino Web Access
• When using custom port mapped or custom FQDN mapped access for Domino Web Access (DWA), the page is not automatically refreshed if you edit the layout of the page. Click the Refresh button for the new layout to take effect.
Exchange ActiveSync Web Access
Beginning in 10.6 Secure Mobile Access supports Exchange ActiveSync for Apple iPhones/iPads and smart phones or tablets that run Android 2.1/2.2/2.3+ or the Symbian 9.x operating system.
Symbian is an open OS that acts as host to many devices. A few popular devices that run the latest Symbian OS versions and support Exchange ActiveSync (branded as “Mail for Exchange” on Nokia devices) are:
• Symbian OS 9.1 – Nokia E65, N71
• Symbian OS 9.3 – Nokia E72
• Symbian OS 9.4 – Nokia X6, Samsung Omnia HD
Once the administrator configures the E-Class SRA appliance, a user with a supported smartphone or tablet can configure the device to access email using Exchange ActiveSync.
To do this, the user enters an email account name, server, domain, user name and password. The user turns on ActiveSync for this account. The results are saved as a new email account on the device.
With ActiveSync turned on, the device gives the user notice when new mail arrives.
When the user syncs the iPhone or Symbian device to a computer that is connected to the Exchange server through the E-Class SRA appliance, the mail, contacts and calendar are updated. On Symbian, Tasks and Out Of Office settings are also supported.
Enabling Exchange ActiveSync access on the appliance
The administrator can enable Exchange ActiveSync access for a community of iPhone or Symbian device users. This involves the following tasks:
• Create a realm that uses an Active Directory authentication server. Realms that use chained authentication are not supported for Exchange ActiveSync.
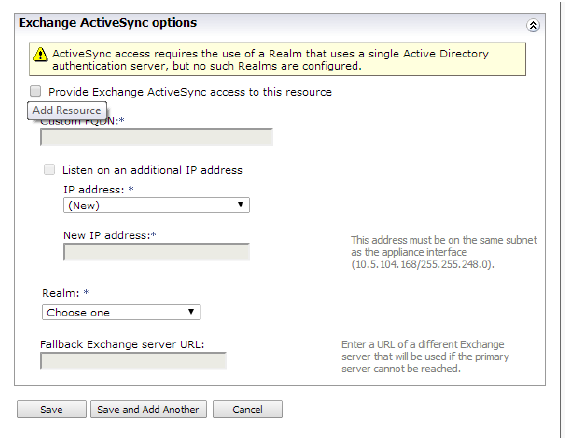
• Create a resource for Exchange ActiveSync using the “Exchange ActiveSync options” section of the Resources Add/Edit page for a URL resource.
The Exchange ActiveSync options section allows the administrator to specify a custom FQDN, IP address, SSL certificate, and realm to use for providing Exchange ActiveSync access.
The custom FQDN, IP address, and SSL certificate options function in the same way as those for Workplace sites that use these options. The custom FQDN provides a host/domain name through which ActiveSync connections or sessions can be established.
The IP address is a virtual IP address hosted by the appliance, and must be on the same subnet as the external interface (or the internal if single-homed) of the E-Class SRA appliance so that it is reachable via the public interface of the appliance.
The SSL certificate can be a wildcard certificate or you can configure a server certificate that matches the host name.
The only realms that appear in the Realm drop-down list are those that use an Active Directory authentication server. Realms that use chained authentication do not appear in the list. A realm used for Exchange ActiveSync cannot be changed to provide chained authentication or to use an authentication server other than Active Directory.
• Define a Device Profile for end point control of Exchange ActiveSync devices from the EPC page in AMC. You can select Exchange ActiveSync as the device profile type.
The only attribute that can be configured for this device profile is “Equipment ID”. The device serial number is used as the identifier. Equipment ID retrieval uses the underlying operating system hard disk drivers. All driver updates should be applied to ensure that Equipment ID retrieval works reliably.
The Exchange ActiveSync device profile can be included in any zone for evaluation.
Note ActiveSync clients will not be able to connect on zones that have Device authorization enabled.
• View the Network Settings page to see all custom IP addresses used for virtual hosting, the FQDNs that listen on these addresses, and the associated Resources or WorkPlace Sites.
The Resources and WorkPlace Site items are links to the configuration page for easy navigation and editing.
• View the User Sessions page, which displays Exchange ActiveSync sessions as belonging to the “Exchange ActiveSync” Access Agent. “Exchange ActiveSync” is an option in the Agent list under Filters.
Exchange ActiveSync sessions
Initial connections to the ActiveSync custom FQDN name cause a username and password challenge by the appliance.
If the user successfully authenticates, the ActiveSync session is established with the Exchange server without further user interaction.
For users connecting to Exchange 2007, the device IMEI serial number is parsed out of the ActiveSync stream during session initialization. The administrator of the Exchange system might need to make configuration changes that result in the device identifier being sent.
Authentication methods from the appliance to the Exchange server use basic authentication.
Notes for Exchange ActiveSync device profiles
• Device authorization is not supported by ActiveSync clients. ActiveSync clients will not be able to connect on zones that have Device authorization enabled.
• The profiles only work with an ActiveSync stream because that is the only way to obtain the device value.
• The profiles only work on ActiveSync streams that are interacting with Exchange 2007 servers.
• Only ActiveSync for Exchange is supported in this release.
ActiveSync Resource Configuration with SAN Certificates
Starting in 10.7, SAN certificate support has been added. SAN certificates can be used for different host names on the same IP address.
However, if you do not want to use a SAN certificate and instead want to continue configuring ActiveSync resources as in previous versions, the same can be achieved with a CEM variable MGMT_ALLOW_LEGACY_VIRTUAL_HOSTS being set to TRUE.
For more information, see:
To use a SAN certificate, configure the IP address on the Exchange ActiveSync options page.
You can make the Connect Tunnel client and Connect Mobile client components available for users to download and install from another network location (such as a Web server, FTP server, or file server) without requiring them to log in to WorkPlace. You can also push the Connect Tunnel client installation package to users through an application such as Tivoli or SMS, or create a master image of a client install and copy it to user systems using a third-party disk-image copying utility.
The client setup packages are available for you to download from AMC. With the Windows-based packages—Connect Tunnel for Windows and Connect Mobile—you also have the option of configuring various client settings in an .ini configuration file before distributing the client to users.
Note The easiest way to ensure that users are running the latest version is to make client updates automatic; see Windows Tunnel Client Automatic Client Updating for more information.
Related Topics
• Downloading the Secure Mobile Access Client Installation Packages
• Customizing the Configuration for the Connect Tunnel Client
• Command Line Access to Connect Tunnel with NGDIAL
• Customizing the Configuration for the Connect Mobile Client
• Running Connect as a Service
• If your environment includes an outbound HTTP proxy for access to the Internet, you must use one that does not require authentication, otherwise you will see the following error message in the log file for Connect Tunnel Service (ctssrv.log): “Direct internet access is not available.” You must also configure Connect Tunnel Service to run under a Windows user account with administrative privileges.Distributing Secure Mobile Access Client Setup Packages
Downloading the Secure Mobile Access Client Installation Packages
This section describes how to download the installation packages for the Connect Tunnel client or Connect Mobile client to your local workstation.
To download a client installation package
1. From the main navigation menu, click Agent Configuration.
2. In the Secure Mobile Access access agents area, under Client installation packages, click Download. The Client Installation Packages page appears.
3. Select the language for the installation packages. Each package includes translated user interface elements and online help.
Download the client installation files for the platforms you plan to support (<xx> represents the language you selected):
|
5. The Download Client Package page appears, and a File Download dialog box prompts you to save the file to your local computer.
6. Click Save, browse to the appropriate directory, and then click Save again.
7. Click OK on the Download Client Package page to return to the Client Installation Packages page.
Customizing the Configuration for the Connect Tunnel Client
The Connect Tunnel client setup package that you download from the appliance is not configured. You can customize the Connect Tunnel configuration file (an .ini file) before deploying the setup package to users. This allows you to speed things up for users by preconfiguring the client with the host name or IP address of the appliance, the realm name used during log in, and other client options. If you skip this step, the package uses the default appliance settings.
To customize the Connect Tunnel configuration file
1. Download the Connect Tunnel installation file onto a Windows computer as described in Downloading the Secure Mobile Access Client Installation Packages.
2. Open a Windows command prompt by typing cmd in the Start > Run box.
3. Browse to the directory where you saved ngsetup_<xx>.exe, and then extract the installation files by typing the following command. The destination for the unpacked files will be the current working directory unless you specify a <path> with the expand parameter:
ngsetup_<xx>.exe -expand=<path>
4. Open the ngsetup.ini file in a text editor and specify the appropriate configuration settings.
5. Save and then close the modified ngsetup.ini file. The .ini customizations you made will be incorporated during setup if the file is copied to the same directory in which you saved ngsetup_<xx>.exe. To specify a different location for the .ini file, use the following command:
ngsetup_<xx>.exe -f=<path>\<configuration file name>
You can also log installation data to a file named ngmsi.log in the %ALLUSERSPROFILE%\Documents and Settings\All Users\Application Data\Aventail folders. Type the following for a list of all the possible parameters:
ngsetup_<xx>.exe -?
6. The following table describes the configuration options, followed by a sample .ini file. Some of these options are available only when Connect Tunnel is installed from WorkPlace. For any optional components that you do not specify, default values are used.
|
Sample ngsetup.ini file
[Install Settings]
UILevel=FULL
ProductCode={A814B50B-B392-458A-8C31-51697E1EBB7A}
PackageCode={A77CB50B-0384-5D8A-DE3D-61099E9EB37C}
Branding=C:\Users\Admin\AppData\Roaming\Aventail\CustomBranding.zip
BrandingMD5=1fc1a7b361c3b7e81e29842372f5e875
Note The value of Branding should specify the absolute path of your Custom Branding file. The value of Branding MD5 can be obtained using any MD5 tool.
[Connectoid 1]
ConnectionName="XYZ Company Network"
VpnServer=64.94.142.134
[Connectoid 2]
ConnectionName="Test Network"
VpnServer=64.94.142.134
StartMenuIcon=1
DesktopIcon=1
UserRealm="employees"
StatusDlg=1
Taskbar=1
RunAtStartup=1
Note•: On a computer running the Windows operating system, there is a registry key that enables you to launch programs once, after which the reference is deleted so that the program is not run again. After Connect Tunnel is installed, any program that is listed in HKEY_Local_Machine\Software\Microsoft\Windows\CurrentVersion\RunOnce is executed.
• The file cannot include certain items—such as authentication type and custom prompts—until a connection has been made to the VPN appliance. This means that first-time users are presented with dimmed authentication prompts. There are a few workarounds:
– Have users install from WorkPlace.
– Have users click Properties in the Connect dialog box and select a realm.
– Refer to Secure Mobile Access knowledgebase article 2831 for an explanation of how to obtain a complete configuration file from a WorkPlace installation and modify it for your users.
Command Line Access to Connect Tunnel with NGDIAL
The NGDIAL command-line utility establishes a connection to a remote network using Connect Tunnel, much like the Windows RASDIAL utility does with other network connections.
The NGDIAL command-line utility can also create, delete, and modify network connection phone book entries. Issuing the NGDIAL command without any parameters will list all RAS connections.
Beginning in software version 10.6.1, Linux and Macintosh configurations support Connect Tunnel and the Connect Tunnel Extensibility Toolkit.
For more information about using the Windows Remote Access Service (RAS) to develop client applications that access network resources secured by an E-Class SRA appliance through the Connect Tunnel client, see the Connect Tunnel Extensibility Toolkit, which can be downloaded from www.SonicWALL.com.
ngdial <connection name> <public> [<private>|* [<auth type>]]
[-phonebook=<phonebook>]
[-server=<server name>|<server IP>]
[-login=<login group>]
[-proxycredential=<username>[,<password>|*]]
[-status[=enable|disable]] [-icon[=enable|disable]] [-gui]
ngdial <connection name> <public> [<private>|* [<auth type>]]
: [-phonebook=<phonebook>]
: [-connection=<connection name>|<Connection list friendly name>]
: [-proxycredential=<username>[,<password>|*]]
: [-status[=enable|disable]] [-icon[=enable|disable]] [-gui]
: [-nocerterrors]
ngdial <connection name> -disconnect|-d
ngdial <connection name> -prompt
[-phonebook=<phonebook>]
ngdial <connection name> [-list= <connection name>]
ngdial <connection name> [-editserver= <server name>]
ngdial <connection name> [-editrealm= <realm name>]
ngdial <connection name> -create
[-phonebook=<phonebook>]
[-server=<server name>|<server IP>]
[-login=<login group>]
[-status[=enable|disable]] [-icon[=enable|disable]]
ngdial -help | -?
|
Examples:
NGDIAL "ACME Corp" -create -server=remote.acme.com -icon -status
NGDIAL "ACME Corp" "Jen Bates" * -login="Business Partners" -icon -gui
NGDIAL "ACME Corp" jdoe password
NGDIAL "ACME Corp" -disconnect
Note Although the ngdial -help usage statement indicates that the -icon=disable flag is an option without the -create flag, in some cases the -create flag is necessary to disable the icon.
To disable the icon so that it does not appear on the taskbar, you can use either of the following two methods:
• Set taskbar=0 in the ngsetup.ini file and then type a command such as:
ngdial "SMA VPN Connection" -server=<server IP address> -login="Realm name" username password -icon=disable -gui
• Type a command using the -create option with the -icon=disable option to store the icon parameter, and then type the command to connect, such as:
ngdial "SMA VPN Connection" -create -server=<server IP address>
-icon=disable -gui
ngdial "SMA VPN Connection" -server=<server IP address> -login="Realm name" username password -icon=disable -gui
Customizing the Configuration for the Connect Mobile Client
The Connect Mobile client setup package that you download from the appliance is not configured. To simplify things for users you can preconfigure a few options in cmsetup.ini (such as the host name or IP address of the appliance and the realm name) before deploying the setup package to users. If you don’t customize the .ini file the default appliance settings are used.
To customize the Connect Mobile configuration file
1. Download the Connect Mobile installation file onto a Windows computer as described in Downloading the Secure Mobile Access Client Installation Packages. This computer must have Microsoft ActiveSync installed so that the cmsetup.ini configuration file can be extracted and customized.
2. Go to a command prompt: Click Start > Run, and then type cmd in the Open box; if you are using Windows Vista, Click Start, and then type cmd in the Start Search box.
3. Browse to the directory where you saved the cmsetup.exe file, and then extract the installation files by typing the following command. The destination for the unpacked files will be the current working directory unless you specify a <path>:
cmsetup.exe -extract=<path>
4. Open the cmsetup.ini file in a text editor and specify the appropriate configuration settings.
5. Save and then close the modified cmsetup.ini file, ensuring that it is still located in the same directory in which you saved the cmsetup.exe file.
6. Save and then close the modified cmsetup.ini file. The .ini customizations you made will be incorporated during setup if the file is copied to the same directory in which you saved cmsetup.exe. To specify a different location for the .ini file, use the following command:
cmsetup.exe -install=<path>\cmsetup.ini
The following table describes the configuration options. For any optional components that you do not specify, default values are used.
|
Sample cmsetup.ini file
[Connectoid 1]
ConnectionName="XYZ Company Network"
VpnServer=64.94.142.134
LogonGroup=Partners
Locale=AUTOMATIC
AutoStart=0
Logging=0
SilentIcon=0
SilentTrust=0
ReAuthPrompt=1
LogonRetries=3
LogonRetrySeconds=5
The Connect Tunnel client is a Windows client component of Secure Mobile Access’s VPN solution that enables secure, authorized access to Web-based and client/server applications, and to Windows file shares.
In a server environment, you can install and configure an add-on component—Connect Tunnel Service—so that the VPN connection starts automatically without user intervention: no user login is required, and no user interface or icons are displayed. For example, you may want to synchronize data between a remote system in the field and a file server secured behind the VPN at corporate headquarters. On the remote system (running the Windows Server platform), Connect Tunnel Service is configured to run at a specific time, connect to the corporate file server, and synchronize its database with the master database at headquarters.
Note Connect Tunnel has the capability to establish a dial-up connection before it makes a connection to an E-Class SRA appliance. The Connect Tunnel Service, on the other hand, does not support this option; it requires an always-on, non-dialup network connection.
Related Topics
• Installing Connect Tunnel Service
Installing Connect Tunnel Service
Using the Connect Tunnel Service involves installing both Connect Tunnel and Connect Tunnel Service.
To install and configure Connect Tunnel Service
1. On the Client Installation Packages page in AMC (Agent Configuration > Download), select a language and then download the installation packages for both the Connect Tunnel (ngsetup_<xx>.exe) and Connect Tunnel Service (ctssetup_<xx>.exe).
2. Install Connect Tunnel first (ngsetup_<xx>.exe). A shortcut named Secure Mobile Access VPN Connection will be created on desktop.
3. Install Connect Tunnel Service (ctssetup_<xx>.exe). A shortcut named Secure Mobile Access VPN Service Options will be created on desktop.
4. On the desktop, double-click the Secure Mobile Access VPN Service Options shortcut. Alternatively, double-click VPN Service Options in the Control Panel. The VPN Service Properties dialog box appears.
On the VPN tab, configure the following settings:
|
6. On the Service tab, configure the following settings:
|
7. Click the Start and Stop buttons to control the service.
To verify that Connect Tunnel started, open the VPN Connection shortcut on the desktop. You should see the established connection. Alternatively, you can issue the ipconfig command on the command line to verify that you have a virtual IP address for the VPN connection.
Windows Services and Scripting Options
You can use Windows Services to manage Connect Tunnel Service on a local or remote computer.
How to use Windows Services to configure and run Connect Tunnel Service
1. On the computer running the Windows Server platform and Connect Tunnel Service, run Windows Services, and then open the VPN Service Properties dialog box (Control Panel > Administrative Tools > Services > VPN Service).
Use these settings to control the service (start, stop, pause, resume, or disable it), set up recovery actions in case of service failure, or disable the service for a hardware profile.
Using a Command or Script to Run Connect Tunnel Service
You can use the Windows sc.exe utility to communicate with Service Controller (services.exe) from the command prompt or in a batch file. This enables you, for example, to automate the startup and shutdown of the VPN service. Or, in an environment where you want users to be able to start the VPN connection by clicking on a shortcut (and without being aware of the credentials), you could also create a shortcut on the desktop that launches a command or batch file.
For example, start and stop the service on a remote computer with the following commands:
sc \\SERVERNAME start ctssrv
sc \\SERVERNAME stop ctssrv
To start or stop the Connect Tunnel Service from the command line or a third-party application, invoke these commands:
%windir%\system32\sc.exe start ctssrv
%windir%\system32\sc.exe stop ctssrv
Troubleshooting
Use the Windows Event Viewer (Control Panel > Administrative Tools > Event Viewer> Application > CTS) to view any information, warning, or error messages related to running Connect Tunnel Service. For more detailed messages, look in the service log. The default location is here:
%ALLUSERSPROFILE%\Application Data\Aventail
Note If your environment includes an outbound HTTP proxy for access to the Internet, you must use one that does not require authentication, otherwise you will see the following error message in the log file for Connect Tunnel Service (ctssrv.log): “Direct internet access is not available.” You must also configure Connect Tunnel Service to run under a Windows user account with administrative privileges.Distributing Secure Mobile Access Client Setup Packages
You can deploy the Connect Tunnel client and Connect Mobile setup packages to users from a network location (such as a Web server, FTP server, or file server) without requiring them to log in to WorkPlace.
For the Connect Tunnel client, you can also push an installation package to users through a configuration management application such as Microsoft Systems Management Server (SMS) or IBM Tivoli Configuration Manager, or distribute a disk image that includes a preconfigured Connect Tunnel installation.
If you configured the client’s .ini file, you should distribute it along with the setup program (if you distribute the setup program by itself the client will use the default settings).
• Deploying Client Installation Packages for Connect Tunnel
• Deploying Client Installation Packages for Connect Mobile
Deploying Client Installation Packages for Connect Tunnel
The Connect Tunnel client can be installed as an .exe file, deployed using a Microsoft Installer (.msi) file, or distributed as part of a disk image.
To deploy the Connect Tunnel client as an .exe file
Distribute the ngsetup_<xx>.exe file to users (<xx> represents the language you selected). If you modified the ngsetup.ini file (as described in Customizing the Configuration for the Connect Tunnel Client), distribute this file as well. To invoke the .ini file, pass it as a command-line parameter to the setup program by typing the following command:
ngsetup_<xx>.exe -f=<path>\<configuration file name>
To simplify the user experience, you might write a batch file that calls the setup program with this parameter.
To deploy the Connect Tunnel client using an .msi file
Set up your configuration management software program (such as Microsoft SMS or IBM Tivoli) to deploy the .msi installation package and the modified ngsetup.ini file (if you created one).
If you install the Connect Tunnel client this way (rather than running ngsetup_<xx>.exe.), you must set the Windows Installer to do a per-machine, rather than a per-user, installation. (A per-user installation does not make the registry entries that are necessary for later updates.)
To specify a per-machine installation so that subsequent MSI updates will be supported, follow these steps:
1. Download ngsetup_<xx>.exe from the Client Installation Packages page in AMC, and then extract the installation files by typing the following command. The destination for the unpacked files will be the current working directory unless you specify a <path> with the expand parameter:
ngsetup_<xx>.exe -expand=<path>
2. Modify the ngsetup.ini file (as described in Customizing the Configuration for the Connect Tunnel Client) as needed.
3. To run Windows Installer, type the following:
msiexec.exe /i ngvpn.msi ALLUSERS=1 NGSETUP=1 CONFIGURATIONFILE=<path>\<.ini file name>
To deploy the Connect Tunnel client as a disk image
Disk cloning is a common method for distributing Windows operating systems and applications. If you decide to use this distribution method for Connect Tunnel, you must run the Windows System Preparation Tool (Sysprep.exe) to prepare the disk image for duplication. Without Sysprep, the computer’s security ID (SID) remains unchanged and Connect Tunnel’s unique identifier is then duplicated, resulting in IP address conflicts. Here is a broad outline of how to prepare and distribute disk images:
1. Install Connect Tunnel for Windows on a reference system and configure it as needed.
2. Run the Windows System Preparation Tool and shut down the computer.
3. Duplicate the master disk using a third-party application or disk duplicator.
4. When the disk is inserted into the destination computers, Mini-Setup will prompt the user for information (for example, the computer name). You can automate this step by creating an “answer file” (sysprep.inf). For more information about using System Preparation Tool, refer to the Microsoft Web site:
http://support.microsoft.com/kb/302577
Deploying Client Installation Packages for Connect Mobile
The Connect Mobile client runs on Windows Mobile-powered devices. To install the client, use ActiveSync to synchronize the mobile device to a Windows desktop computer through a serial, USB, or network connection. With ActiveSync installed and the mobile device cradled, the desktop installation program copies the application files and configures the initial settings. After installation, the mobile device can be uncradled and connected to its Internet service provider for VPN usage.
To deploy Connect Mobile as an .exe file
Distribute the cmsetup.exe file to users. If you modified the cmsetup.ini file (as described in Customizing the Configuration for the Connect Mobile Client), you should distribute it also. To invoke the .ini file, put it in the same folder as the .exe file program and have users run the executable. If the .ini file is stored in a different folder, pass it as a command line parameter to the setup program, as follows:
cmsetup.exe -install=z:\yourcompany.com\Aventail_apps\ini\cmsetup.ini
Note The ActiveSync installer normally gives you the option of installing programs on an external storage card. Do not choose this option for Connect Mobile: installing onto an external storage card causes file system access errors at device startup.
Network Tunnel Client Branding
Custom branding is available for the Connect Tunnel user interface. This feature allows companies to replace the Dell branding in Connect Tunnel windows with their own company names and logos. Connect Tunnel branding is available on Windows, Mac OS X, and Linux platforms and is done on a per-appliance basis.
To upload customized branding graphics and guidelines:
1. Under the main navigation menu, select Agent Configuration and then click Configure next to Network Tunnel client branding.
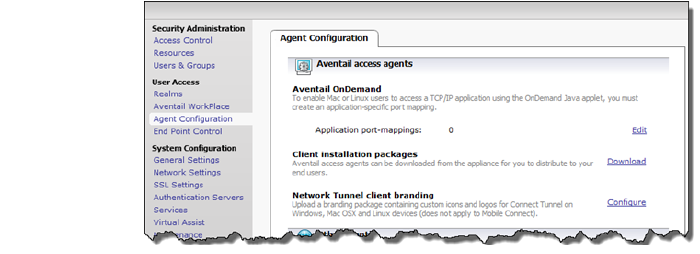
2. Click Download next to Default branding package and select the download location.
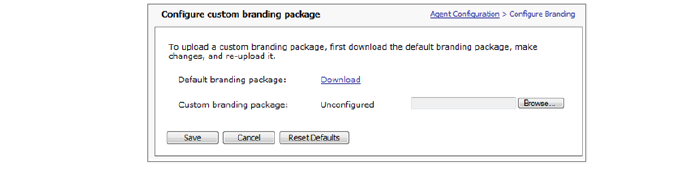
3. Click OK to return to the Configure custom branding package page.
4. Unzip the downloaded file, which contains a folder of branding files for each platform (Windows, Linux, and Mac). Using the README.txt file as a guide, replace the default files with custom branding files, and then zip the files.
5. On the Configure custom branding package page, click the Browse button and select the zip file containing the custom branding files.
6. After saving the file, click Save. All Connect Tunnel windows and icons are then updated with custom branding.
The OnDemand Proxy Agent is a secure, lightweight agent that provides access to TCP/IP resources. It uses local loopback proxying to redirect communication to protected network resources according to routing directives defined in AMC (it does not support UDP applications).
Note that the OnDemand Proxy Agent does not scale as effectively as the OnDemand Tunnel agent. The OnDemand Proxy Agent is not recommended for usage as a broad VPN agent, but instead should be targeted for access to specific applications through WorkPlace. In situations where you want to provide broad access to applications through the WorkPlace portal for more than 500 concurrent users at a time, we recommend that you deploy the OnDemand Tunnel agent instead. Note that you can use OnDemand Proxy as a fallback for OnDemand Tunnel in case OnDemand Tunnel cannot be installed (perhaps due to issues around administrative rights). In that scenario, you would configure both OnDemand Tunnel and OnDemand Proxy within a community.
This section provides an overview of OnDemand and describes how to configure and deploy it.
• How OnDemand Redirects Network Traffic
• Configuring OnDemand to Access Specific Applications
• Configuring Advanced OnDemand Options
OnDemand Proxy is a loopback-based proxy solution that secures communication between a client application and an application server.
The following diagram illustrates the connection sequence:

1. OnDemand starts automatically when the user logs in to WorkPlace.
2. OnDemand runs within the WorkPlace window.
3. OnDemand waits for application requests on the local loopback address (127.0.0.1) and redirects the traffic to the Web proxy service.
4. The Web proxy service proxies the traffic to an application server using the application’s required port(s).
5. The application server sends application traffic to the Web proxy service.
6. The Web proxy service sends the application traffic to OnDemand, which then passes it to the client application.
OnDemand supports TCP applications that use one or multiple ports, including applications that dynamically define ports (it does not support UDP-based applications). Here are applications that are typically accessed using OnDemand:
|
By default, OnDemand is configured to run automatically when the user connects to WorkPlace. For optimum performance, OnDemand is installed on the user’s computer the first time it is accessed, minimizing download time for returning users.
By default, OnDemand starts automatically when users log in to WorkPlace. Mapped mode enables users to click a shortcut that is configured for a specific application. Optionally, you can configure OnDemand to automatically launch a specified Web URL when users click a shortcut. This is useful for starting an application (such as a thin-client application) when OnDemand runs. You must manually create any shortcuts to specific applications. Mapped mode is supported on Windows, Macintosh, and Linux platforms.
On Windows PCs, when a user logs in to WorkPlace for the first time, WorkPlace automatically downloads, installs, and launches OnDemand on the user’s computer (assuming the community the user belongs to is configured to do so). On subsequent WorkPlace logins, WorkPlace automatically starts OnDemand.
By default, when OnDemand is enabled, it starts automatically when users log in to WorkPlace and runs within the WorkPlace window. Users must keep the WorkPlace window open while working with OnDemand in this embedded mode.
Note•: Users cannot start an application from the OnDemand window. Unless you configure a URL to launch automatically when users start OnDemand, users must manually start applications as they would normally.
• Users may need to configure their personal firewalls to allow OnDemand traffic.
How OnDemand Redirects Network Traffic
OnDemand uses the local loopback address to redirect and secure traffic through the appliance. This section provides an overview of loopback proxying and describes the various redirection methods.
OnDemand uses local loopback proxying to securely submit application traffic through the Web proxy service. For example, suppose a Windows user wants to connect to the appliance and run a Citrix application:
1. The user logs in to WorkPlace, and OnDemand automatically starts.
2. OnDemand dynamically maps the local loopback address to the host name for the Citrix server.
3. The user runs the Citrix application, which attempts to connect to citrix.example.com. OnDemand resolves the Citrix host name to 127.0.0.1 and routes the traffic to the Web proxy service.
4. OnDemand encrypts the Citrix traffic using SSL and securely routes it to the E-Class SRA appliance, which in turn forwards it to the Citrix server.
5. The Citrix server responds, sending data back through the E-Class SRA appliance.
6. The appliance forwards the response to OnDemand over SSL.
7. OnDemand forwards the information to the Citrix application.
To redirect traffic to destination servers, modify the hosts file on the user’s computer. This redirection method is supported on Windows, Macintosh, and Linux platforms, provided the user has administrator privileges on the local computer.
Modifying the hosts file on a user’s system maps a destination server to a local loopback address. When an application attempts to resolve a host name, traffic is redirected to the loopback address on which OnDemand is listening.
The following example shows a typical hosts file, with host names mapped to IP addresses, followed by a hosts file modified for use by OnDemand. Notice that the OnDemand host names are mapped to the local loopback address, not the host’s IP address. For application-specific configurations, these loopback addresses would match the addresses you specify when configuring OnDemand in AMC; for more information, see Configuring OnDemand to Access Specific Applications.
Typical Hosts File
: 192.168.1.135 telnet.example.com telnet
: 192.168.1.140 mailhost.example.com mail
: 192.168.1.143 citrix.example.com citrix
OnDemand Hosts File
: 127.0.0.1 telnet.example.com telnet
: 127.0.0.1 mailhost.example.com mail
: 127.0.0.1 citrix.example.com citrix
Configuring OnDemand to Access Specific Applications
If you are deploying OnDemand to users on non-Windows platforms, or want to automatically use the launch URL feature to start a thin-client application when users run OnDemand, you must define an application-specific configuration in AMC. This involves mapping the port numbers for the client and server, a process called “port mapping.”
• Configuring an Application for Use with OnDemand
To configure OnDemand to redirect traffic for a specific application, you need to know the port numbers the application uses for the client and server, and then map those ports in AMC. OnDemand listens for incoming requests on specific ports on the client and then proxies them to the appliance, which forwards the information to an IP address and port on the application server.
For example, you might configure an IP address and port on the client (such as 127.0.1.1:23) to the host or IP address and port on the destination server, such as telneta.example.com:23.
Some applications—such as email—use multiple ports for different protocols. In this case, you must configure OnDemand to listen on several different ports. This configuration can also be useful for configuring OnDemand to work with several different applications. The following example shows OnDemand configured to work with three applications over five different ports.
In this example OnDemand is configured to listen on port 23 for telnet and port 1494 for Citrix. For email requests it is listening on port 25 (SMTP), port 110 (POP3), and port 143 (IMAP).
Configuring an Application for Use with OnDemand
To configure an application, you need to know the protocols it uses for each service and map the source address and ports on the client to those on the destination host. You also have the option of specifying a URL to open a Web page, which is useful for automatically starting an application, when the user runs OnDemand.
To configure an application for use with OnDemand
1. On the main navigation menu of AMC, click Agent Configuration.
2. In the OnDemand area under Access agents, click Edit. The Configure OnDemand page appears.
3. In the Mapped mode area, click New.
In the Application name box, type the name to use for the application. This name is displayed to the user in WorkPlace. Use a short, descriptive name.
5. In the Description box, type a descriptive comment about the application.
6. Configure each service used by the application in the Add mapping area.
a. Click the Edit button beside the Destination resource box, select the network resource you want to configure, and then click Save. Alternatively, you can create a new network resource by clicking the New Resource button in the Resources dialog box.
b. If the IP address/port combination of the service conflicts with that of another service, you can modify the IP address displayed in the Local host box, or you can map the ports as described below. You can change the Local host value to any IP address in the 127.x.y.z address space.
c. In the Service type list, select the type of service used by the application. This populates the Destination/local ports boxes with the well-known port for that service. If the service uses a destination port that differs from that of the local port, map the ports to each other by editing the information in the Destination/local ports boxes as needed.
d. Click Add to Current Mapping. This adds the mapping to the Current mapping list.
5. If the application uses multiple services, repeat step six to configure each one. Most applications use only one service, but some (like email) use multiple protocols, which requires multiple services.
6. Select the Create shortcut on WorkPlace check box.
If you want OnDemand to open a Web page automatically (which is useful for automatically starting a thin-client application), type the URL of the appropriate page in the Start an application by launching this URL box. You must specify either an http:// or an https:// protocol identifier. The URL you specify automatically opens in a new browser window after OnDemand loads.
– In WorkPlace you can set up groups to organize resources for your users, or have shortcuts appear singly. In the Add this shortcut to group list, select a new or existing group to which to add your shortcut, or select Standalone shortcuts if you want it to appear on its own. (The order in which shortcuts appear can be changed on the Configure WorkPlace Layout page; see Creating or Editing a WorkPlace Layout for more information.)
Note After you initially configure the Create shortcut on WorkPlace option, you can view its setting only on the Mapped Mode page; you cannot edit it on this page. After initially configuring this setting, shortcuts are managed from the Shortcuts page in AMC. For more information, see Working with WorkPlace Shortcuts.
Configuring Advanced OnDemand Options
This section describes how to access the appliance using its external IP address and add debug messages to the OnDemand logs.
• Accessing the Appliance Using Its External IP Address
• Adding Debug Messages to the OnDemand Logs
Accessing the Appliance Using Its External IP Address
By default, OnDemand accesses the appliance using the FQDN contained in the appliance’s SSL certificate. This works in a production environment—where the FQDN is added to public DNS—but may be an issue in a test environment for one of two reasons:
• You have not added the FQDN for the appliance to DNS.
• The external IP address does not match the external network address on the appliance because your environment uses Network Address Translation (NAT).
In either case, you will need to configure OnDemand to use the IP address for the external network interface.
To configure OnDemand to use the appliance’s external IP address
1. From the main navigation menu in AMC, click Agent Configuration.
2. In the Access agents area, to the right of OnDemand, click Edit. The Configure OnDemand page appears.
3. Click to expand the Advanced area and then, in the Appliance FQDN or IP address box, type the IP address for the external network interface.
Before moving the appliance into production, make sure this value contains the FQDN from the appliance’s SSL certificate. Whenever you update the appliance’s SSL certificate, AMC automatically inserts the FQDN in this field (overwriting any value you’ve previously specified).
The first time a user starts OnDemand, the Web browser displays a security warning asking the user to grant permissions to run OnDemand. For information on configuring the browser, see Suppressing the Java Security Warning.
Adding Debug Messages to the OnDemand Logs
Normally, the OnDemand logs show just information and warning messages. You can also log debug messages, but this should be done only when you are troubleshooting (otherwise the log file becomes too large).
To add debug messages to the OnDemand logs
1. From the main navigation menu in AMC, click Agent Configuration.
2. In the Access agents area, to the right of OnDemand, click Edit. The Configure OnDemand page appears.
3. Click to expand the Advanced area, and then select the Enable debug OnDemand log messages check box.
This section explains client-side configuration that may be useful for working with OnDemand.
• Suppressing the Java Security Warning
• Configuring a Proxy Server in the Web Browser
Suppressing the Java Security Warning
When OnDemand starts, the Web browser displays a security warning asking the user to grant permission to run OnDemand. This warning varies, depending on the operating system and browser. The user must accept this certificate to run OnDemand.
OnDemand includes a Java code-signing certificate that ensures the validity of the applet. For Windows and Mac OS X, the certificate includes a Class 3 Digital ID from Thawte, which is widely used by commercial software publishers.
To prevent the security prompt from appearing each time OnDemand is started, users can configure their systems to trust the Secure Mobile Access certificate. Once this is done, the browser trusts all subsequent software downloads from Secure Mobile Access.
Configuring a Proxy Server in the Web Browser
When passing an outbound connection over a proxy server, OnDemand uses the Web browser’s settings to determine the proxy server address and port. This configuration requires the user to configure his or her Web browser, either by specifying the outbound proxy server address and port or by enabling automatic proxy detection.
If a user enables both automatic proxy detection and manual proxy identification, OnDemand checks for proxy server settings in this order:
1. If the Automatically detect settings option is enabled, OnDemand attempts to automatically detect the proxy server settings.
2. If OnDemand is unable to automatically detect the proxy server settings, it checks to see if the Use automatic configuration script option is enabled.
3. If OnDemand is unable to detect the proxy server settings through a configuration script, it uses the proxy server settings that the user manually specified.
To configure automatic proxy detection in Internet Explorer for Windows
1. On the Tools menu, click Internet Options.
2. On the Connections tab, click LAN Settings.
3. Under Automatic Configuration, enable one or both of the options:
– To automatically detect proxy-server settings, select the Automatically detect settings check box. (This option is supported only for users running Internet Explorer with the Microsoft Virtual Machine.)
– To use configuration information contained in a configuration file, select the Use automatic configuration script check box and then, in the Address box, type the URL or path for the configuration file.
To manually specify proxy server settings in Internet Explorer for Windows
1. On the Tools menu, click Internet Options.
2. On the Connections tab, click LAN Settings.
3. Under Proxy Server, select the Use a proxy server check box, and specify the IP address and port for it.
If a different proxy server is used for different protocols, click Advanced and specify the necessary information; be sure to specify proxy servers for both HTTP and Secure.
CAUTION Enabling either of the automatic settings in the LAN Settings dialog box (Automatically detect settings or Use automatic configuration script) may override the proxy server settings; clear these two check boxes to ensure that proxy detection works correctly.
This section provides an overview of the access services, and describes how to start, stop, and configure the services.
• Stopping and Starting the Secure Mobile Access Services
• Configuring the Network Tunnel Service
• Configuring IP Address Pools
• Configuring Web Resource Filtering
• Configuring the Web Proxy Service
Users can access VPN resources secured by the E-Class SRA appliance using three primary methods, or access services. This section describes each of the access services and the types of resources they provide access to.
• The network tunnel service is a network routing technology that provides secure network tunnel access to a wide range of client/server applications, including those that use non-TCP protocols such as VoIP and ICMP, reverse-connection protocols, and bi-directional protocols, such as those used by remote Help Desk applications. It works in conjunction with the Connect Tunnel client and the OnDemand Tunnel agent to provide authenticated and encrypted access. The network tunnel service can traverse firewalls, NAT devices, and other proxy servers that can interfere with traditional VPN devices.
When Web resource filtering is enabled for the network tunnel service, policies for tunnel sessions can use URL-based rules in addition to IP-based rules.
• The Web proxy service provides users with secure access to Web-based applications, Web servers, and network file servers from a Web browser, or Web-based applications and Web servers from a Windows Mobile-powered device using the Connect Mobile client. The Web proxy service is a secure HTTP reverse proxy that brokers and encrypts access to Web-based resources.
• The WorkPlace service controls access to network file shares accessed from a Web browser. The WorkPlace service communicates with Windows file servers and network shares (including Microsoft Distributed file system, or Dfs, resources) using the Server Message Block (SMB) file-sharing protocol. For information about configuring the WorkPlace service, see Configuring WorkPlace General Settings.
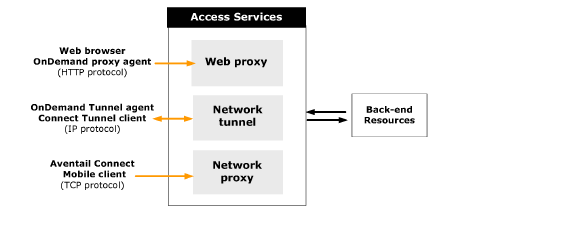
The table below illustrates the relationships between the Secure Mobile Access access services and the user access components that they control.
|
Stopping and Starting the Secure Mobile Access Services
You may occasionally want to temporarily stop one of the Secure Mobile Access services.
CAUTION Dell recommends stopping the services only during scheduled maintenance periods or during off hours. Also, you should give your users advance warning that the service will be going down.
To start or stop a service
1. From the main navigation menu, click Services.
Under Access Services, click the appropriate link:
– Click Stop to stop the service. All existing user connections will be terminated.
– Click Start to start the service.
Configuring the Network Tunnel Service
The network tunnel service controls access from the Connect Tunnel client and the OnDemand Tunnel agent. In order to deploy the network tunnel clients to users, you must first make one or more IP address pools available to the community. Configuring the network tunnel service requires setting up IP address pools that are used to allocate IP addresses to the clients; these IP addresses become the clients’ end points on VPN connections.
Network tunnel service configuration also allows you to enable Web resource filtering so that you can enforce the same URL-based rules that administrators define for ExtraWeb in tunnel sessions. Web resource filtering also allows you to leverage single sign-on functionality when accessing Web applications.
You can add custom connections to configure Connect Tunnel to access a different default appliance or realm, or list other appliances and realms the client can connect to. By default, Connect Tunnel is configured to access the realm and appliance from which it was downloaded.
You can also set up fallback servers to give network tunnel clients a list of servers to contact in the event of a connection failure.
To configure the network tunnel service
From the main navigation menu, click Services.
3. Under Access services, in the Network tunnel service area, click Configure. The Configure Network Tunnel Service page appears.
In the IP address pools area, create one or more IP address pools. For more information, see Configuring IP Address Pools.
5. To enable and configure Web resource filtering, click Edit in the Web resource filtering area. For more information, see Configuring Web Resource Filtering.
6. To configure a custom connection in which Connect Tunnel can access the current or a different default appliance or realm, or list other appliances and realms the client can connect to, click the New button in the Custom Connections area. For more information, see Configuring Custom Connections.
7. To configure fallback servers that network tunnel clients can contact in the event of a connection failure, click the New button in the Fallback servers area. For more information, see Configuring Fallback Servers.
IP address pools are used to allocate IP addresses to the network tunnel clients. When a user makes a connection using the Connect Tunnel client or the OnDemand Tunnel agent, the E-Class SRA appliance assigns the client an IP address from one of its configured address pools. Only pools allowed for the client’s community are considered. For more information about how IP addresses are allocated to a community, see IP Address Allocation.
For information about editing and deleting IP address pools, see Adding, Editing, Copying, and Deleting Objects in AMC.
• Address Pool Allocation Methods
• Best Practices for Configuring IP Address Pools
• Adding Translated IP Address Pools
• Adding Dynamic IP Address Pools
• Adding RADIUS-Assigned IP Address Pools
• Adding Static IP Address Pools
Address Pool Allocation Methods
You can configure IP address allocation in the following ways:
Translated Address Pools (Source NAT)
With translated address pools, the appliance assigns non-routable IP addresses to clients and uses source network address translation (Source NAT) to translate them to a single address you configure for back-end traffic. The appliance uses the name servers you specify in AMC to define the DNS and WINS settings on the client. Source NAT translates the client’s non-routable source address to a single configured address from a fixed, non-routable sequence (2.0.0.2 through 2.255.254.254) on the internal network.
The advantages of using translated address pools are:
• Source NAT address pools require only a single back-end address, which is shared by all remote connections.
• Fewer IP addresses are required for the tunnel clients.
The constraints of this type of pool are:
• All network activity must be initiated by the client; therefore, this method of IP address allocation does not support applications that make reverse connections or cross-connections (such as SMS, VoIP, or FTP).
• Windows domain browsing is not supported; if users try to browse a Windows domain through Network Explorer or Network Neighborhood, an error message indicates that they are not authorized to access the resources.
• Client-to-client cross-connections are not supported.
Routed Address Pools (DHCP)
With a routed address pool, IP addresses are dynamically allocated to the tunnel clients from a DHCP server. DHCP address pools have these characteristics:
• They require an external server that has enough spare addressing capacity to support the new remote clients. These pools are easy to set up and maintain, and impose few restrictions on client activity.
• Reverse connections and cross-connections are supported, but client IP addresses must be known. If necessary, you can associate a fixed DHCP address with a particular client by configuring the DHCP client ID on the DHCP server. Client IDs are generated during client configuration; consult the DHCP server logs to find particular IDs.
RADIUS-Assigned Address Pools
Some applications require a one-to-one relationship between an assigned IP address and a user. This is best supported by a RADIUS server, where IP address allocation happens during the authorization process, as part of authentication.
This strict one-to-one correlation may have some unintended consequences:
• For example, if an employee is logged in to the appliance at work and forgets to log out, logging in from home will fail: the IP address is still attached to the original tunnel connection at the office. Optionally, you can configure the community and realm in AMC that is referencing the RADIUS server to use other IP address pools if the RADIUS pool is exhausted.
• If you have two appliances authenticating against the same RADIUS server and both are using RADIUS pools, duplicate address assignments will be made, resulting in multiple network conflicts.
Static Address Pools
With static address pools, you specify one or more static IP address pools from which IP addresses will be allocated to the tunnel clients. You can configure static IP address pools as subnets or address ranges. Static address pools have these characteristics:
• Static address pools require no configuration work outside of the appliance, and they support reverse connections and cross-connections.
• Static pools require identification of one back-end address per simultaneous remote connection. If enough addresses are available to cover all possible remote clients (not just simultaneous connections) and no address conflicts occur, this method tends to be the most stable because the same address is typically assigned to the same client.
• Static pools leave an IP address assigned as long as the tunnel remains up. If the tunnel goes down, there is a two-minute period during which the address is available, but only for reassignment to the same client. After that two minute period expires, the address is available to any client; address reassignment is performed using an LRU (Least Recently Used) scheme.
• Windows domain browsing is supported.
Best Practices for Configuring IP Address Pools
Here are some best practices to keep in mind when configuring IP address pools:
• Don’t duplicate addresses:
– When configuring static IP address pools, do not specify IP addresses that are already assigned to other network resources.
– Be aware that any IP addresses you configure for use by the network tunnel clients may conflict with IP addresses already in use on the client networks. Whenever possible, avoid configuring IP addresses that you know to be in use on your users’ networks.
– When configuring translated (Source NAT) IP address pools, be sure to specify an unused address on the subnet of the internal interface.
– If you are using RADIUS pools on more than one appliance, and the appliances are authenticating against the same RADIUS server, duplicate address assignments will be made.
• When configuring dynamic DHCP or static IP address pools, ensure that you have enough IP addresses to accommodate your maximum number of concurrent users. For example, if your maximum concurrent user count is 100, you should make at least 100 IP addresses available.
Adding Translated IP Address Pools
This section describes how to create a translated IP address pool using secure network address translation (Source NAT).
To add a translated IP address pool
1. From the main navigation menu, click Services.
2. Under Access services, in the Network tunnel service area, click Configure. The Configure Network Tunnel Service page appears.
3. In the IP address pools area, click New. The Configure IP Address Pool page appears.
In the Name box, type a name for the address pool.
5. In the Description box, type a descriptive comment about the address pool.
6. Click Translated address pool (Source NAT).
7. In the IP address box, type the Source NAT address that will appear to back-end servers as the source of all client traffic. Ensure that this IP address is not in use elsewhere.
8. Click Save.
Adding Dynamic IP Address Pools
This section describes how to create a dynamic IP address pool.
To add a dynamic IP address pool
1. From the main navigation menu, click Services.
2. Under Access services, in the Network tunnel service area, click Configure. The Configure Network Tunnel Service page appears.
3. In the IP address pools area, click New. The Configure IP Address Pool page appears.
In the Name box, type a name for the address pool.
5. In the Description box, type a descriptive comment about the address pool.
6. Click Routed address pool - dynamic.
7. By default the DHCP server box is blank; the appliance sends broadcast requests to locate DHCP servers and uses them to allocate addresses. Leave this box blank unless you need to configure a specific DHCP server.
8. Click Save. (DHCP address pools ignore the Advanced settings on this AMC page.)
Adding RADIUS-Assigned IP Address Pools
This section describes how to create a dynamic, RADIUS-assigned IP address pool.
To add a RADIUS-assigned IP address pool
1. From the main navigation menu, click Services.
2. Under Access services, in the Network tunnel service area, click Configure. The Configure Network Tunnel Service page appears.
3. In the IP address pools area, click New. The Configure IP Address Pool page appears.
In the Name box, type a name for the address pool.
5. In the Description box, type a descriptive comment about the address pool.
6. Click RADIUS-assigned - dynamic to configure a pool in which IP address allocation is made during the authorization process, as part of authentication. You would choose this setting if, for example, you have an application that requires a one-to-one relationship between an assigned IP address and a user.
7. (Optional) To change the virtual interface settings for configuring the client interface, click to expand the Advanced area. The Virtual interface settings are preconfigured with the DNS server, WINS server, and Search domains as defined on the Network Settings page. (For more information, see Configuring Basic Network Settings.) To change these settings, select the Customize default settings check box and then specify custom values for any settings that you want to change.
Click Save.
Adding Static IP Address Pools
This section describes how to create a static IP address pool.
To add a static IP address pool
1. From the main navigation menu, click Services.
2. Under Access services, in the Network tunnel service area, click Configure.
3. In the IP address pools area, click New. The Configure IP Address Pool page appears.
In the Name box, type a name for the address pool.
5. In the Description box, type a descriptive comment about the address pool.
6. Click Routed address pool - static, and then click New.
7. Specify the IP address or addresses to make available to the tunnel clients. Type IP addresses and subnet masks using dotted decimal form (n.n.n.n).
– To define a single host, type an IP address and a Subnet mask of 255.255.255.255.
– To specify a range of IP addresses, type the beginning address in the IP address box and the ending address in the IP range end box, and specify a Subnet mask.
– To define an entire subnet, type the network address in the IP address box and fill in the Subnet mask box. The subnet mask is converted to a range and values are filled in as appropriate. If the IP address of the subnet is entered, it is converted to the first usable address in the network, but addresses in the middle of the subnet are used as is. The ending address is filled in with the highest usable address in the subnet.
8. Click OK. The pool is added to the list of available IP address pools.
9. (Optional) To change the virtual interface settings for configuring the client interface, click to expand the Advanced area. The Virtual interface settings are preconfigured with the DNS server, WINS server, and Search domains as defined on the Network Settings page. (For more information, see Configuring Basic Network Settings.) To change these settings, select the Customize default settings check box and then specify custom values for any settings that you want to change.
Click Save.
Configuring Web Resource Filtering
Web resource filtering enables extra processing for defined IP addresses and ports to detect HTTP traffic. When HTTP requests are found, policy and single sign-on logic are applied to the Web server connections.
Web resource filtering allows you to enforce the same URL-based rules in tunnel sessions that administrators define for ExtraWeb. It also allows you to leverage single sign-on functionality when accessing Web applications.
When Web resource filtering is not enabled, the available policies for Web access and tunnel access are not equivalent. The Web access cases can evaluate URL policy for all translated access and HTTP access for Web proxy and port map clients. For users connected via a tunnel, the IP layer redirection only permits policies based on IP address. In deployments where multiple Web addresses or namespaces are hosted on a single Web server, all Web content is reachable at a single IP address or pool of addresses. Basing policy on just the IP layer does not permit the administrator to enforce policy distinctions between the multiple namespaces. Enabling Web resource filtering allows policies to use URL-based rules in addition to IP-based rules for tunnel sessions.
To configure Web resource filtering
1. From the main navigation menu, click Services.
2. In the Access services area, click Configure under Network tunnel service.
3. In the Web resource filtering area, click Edit. The Configure Tunnel Web Policy page appears.
Select the Enable web resource filtering check box to cause the tunnel service to check all client traffic at ports that may contain Web network traffic.
Click Save.
Configuring Custom Connections
By default, Connect Tunnel is configured to access the realm and appliance from which it was downloaded. Use the Custom Connections options to configure Connect Tunnel to access a different default appliance or realm, or list other appliances and realms the client can connect to.
To configure custom connections
1. From the main navigation menu, click Services.
2. In the Access services area, click Configure under Network tunnel service.
3. In the Custom Connections area, click New to add a custom connection. The Custom connections table displays editable fields for the name, appliance, and realm.
Type a descriptive name for the custom connection into the Connection name field.
5. Type the FQDN or IP address of the appliance into the Appliance field.
6. Type the realm name into the Realm field.
7. Select Display notifications check box if notifications should be displayed when this custom connection is used.
8. Select Prompt for reconnect check box if the user should be prompted to reconnect to this custom connection if disconnected.
9. Click OK.
10. When more than one custom connection is listed, to change the order of the connections, select the check box next to one custom connection and then click either Move Up or Move Down. The list is updated with the new order.
11. To delete a custom connection, select the check box next to it and then click Delete.
Fallback servers give network tunnel clients a list of servers to contact in the event of a connection failure.
To configure fallback servers
1. From the main navigation menu, click Services.
2. In the Access services area, click Configure under Network tunnel service.
3. In the Fallback servers area, click New to add a fallback server. The Fallback servers table displays editable fields for the server and realm.
Type the IP address of the fallback server into the Server field.
5. To specify a realm to use on the fallback server, type the realm name into the Realm field. Specifying the realm is optional. If none is specified, the primary realm will be used.
6. Click OK.
7. When more than one fallback server is listed, to change the order of the servers, select the check box next to one server and then click either Move Up or Move Down. The list is updated with the new order.
8. To delete a fallback server, select the check box next to it and then click Delete.
Configuring the Web Proxy Service
This section describes how to configure the service that manages access to Web resources. The Web proxy service provides Web proxy access, translated Web access, custom port mapped Web access, and custom FQDN mapped Web access.
To configure the Web proxy service
1. From the main navigation menu, click Services.
2. In the Access services area, click Configure under Web proxy service.
On the General tab, select Enable HTTP compression if you want to compress HTML, XML, and CSS files before they are sent from the appliance to the client. This reduces the download size of Web pages accessed through the appliance, but may also affect system performance.
Enabling compression may affect system performance.
4. Configure Downstream Web resources:
– If you want the Web proxy service to check the validity of certificates presented by back-end Web servers, select Validate SSL server certificates. If enabled, the appliance will make sure the CN in the certificate matches the host name and that the certificate is valid. Secure Mobile Access recommends enabling this feature if you are using downstream HTTPS.
– To view details about the appliance’s root certificate listing CAs that issued certificates to back-end Web servers, or to import a certificate, click the SSL Settings link. For more information about managing CA certificates, see CA Certificates.
Note For information about configuring Web application profiles, see Adding Web Application Profiles.
The E-Class SRA appliance supports native Web-based access to individual Windows Terminal Services or Citrix servers, and to Citrix server farms. The Native Access Module requires a separate license; contact your channel partner or Secure Mobile Access sales representative for information on purchasing one.
• Providing Access to Terminal Server Resources
• Defining an Access Control Rule and Resource for Terminal Server Access
• Managing Graphical Terminal Agents
• Graphical Terminal Shortcuts
Providing Access to Terminal Server Resources
The Web-based graphical terminal agents provide access to a terminal server using native application protocols. For example, when accessing a Citrix server, the client sends traffic from the client to the server using the proprietary (non-HTTP) Citrix protocol. Accordingly, to provide access to a terminal server resource, you must configure WorkPlace to provision one of the Secure Mobile Access access methods (the Web proxy agent or one of the tunnel clients). If you configure WorkPlace to provide only Translated Web access, terminal resources will be unavailable because the client computer will not have the network transport required to access a proprietary application protocol. For information about configuring access methods, see Selecting Access Methods for a Community.
You can enable single sign-on for applications hosted on Windows Terminal Services or a Citrix server; this passes the user’s WorkPlace login credentials to all published applications on the server. If you disable single sign-on, an additional login page is displayed and the user must supply the required credentials before accessing any applications that are hosted on the terminal server.
Enabling access to terminal server resources consists of the following basic steps:
1. Define the terminal server resources and access policy
First define individual Windows Terminal Services or Citrix servers, or Citrix server farms, and then add these resources to access control rules:
– You must define each host or Citrix server farm object as a resource in AMC. If your network includes a set of Citrix servers that have similar names, you can save time by using wildcard characters to define one resource object that includes multiple servers.
If you are configuring a Citrix server farm, you must also define each individual Citrix server that is hosting applications as a resource. For information about defining Citrix server farms, see Adding Citrix Server Farm Resources.
– Reference the resources in access control rules as you would any other resource. For information about providing terminal server access to individual Windows Terminal Services or Citrix servers, and see Defining an Access Control Rule and Resource for Terminal Server Access.
2. Install or update the appropriate graphical terminal agent
When a user initiates a connection to a Citrix or Windows Terminal Services resource through WorkPlace, the appliance determines whether the version of the applicable agent that is available on the appliance is already installed on the user’s computer, and automatically installs or updates the agent as needed. You must ensure that the correct graphical terminal agents are configured in AMC; for information about managing the agents, see Managing Graphical Terminal Agents.
3. Create a WorkPlace shortcut that references the terminal server resource
The Windows Terminal Services or Citrix host is accessed from a Web-based agent that is deployed when users click a shortcut in WorkPlace. For information about configuring graphical terminal WorkPlace shortcuts, see Graphical Terminal Shortcuts.
• Adding Citrix Server Farm Resources
The E-Class SRA appliance allows you to specify individual Citrix servers, one or more load-balanced Citrix server farms, or VMware servers.
Adding Citrix Server Farm Resources
This section describes how to define a Citrix server farm as a resource. For information about providing terminal server access to Citrix servers, see Defining an Access Control Rule and Resource for Terminal Server Access.
To enable users to access Citrix resources, first configure the appliance with two Citrix agents: an ActiveX control that runs on Windows, and a cross-platform Java applet. Once the agent files are uploaded to the appliance, the appropriate Citrix client is automatically provisioned to users the first time they access a Citrix resource from WorkPlace. For details, see Managing Graphical Terminal Agents. The appliance supports all desktop operating systems and applications that are supported by the Citrix clients. Small form factor devices are not supported.
For individual Citrix servers, you can specify a custom ICA file; these files contain additional configuration settings for the Citrix host.
Citrix server farms must meet the following system requirements:
• Citrix XenApp
• Citrix XML service must be running
When a user clicks a WorkPlace shortcut that points to a Citrix server farm, a separate WorkPlace window appears and displays the resources that are hosted on the server. The WorkPlace Web interface provides the services that users need to browse and work with applications that are hosted on Citrix servers in the farm. There is no need to deploy an additional Web interface. The user can browse these resources and click links to automatically launch applications. The Citrix applications appear in the Citrix client window.
To add a Citrix server farm resource
1. On the main navigation menu in AMC, click Resources.
2. On the Resources page, click New and then select Server farm from the list. The Add Resource - Server Farm page appears.

3. In the Name box, type a name for the server farm.
4. In the Description box, type a descriptive comment about the server farm. This step is optional, but a description can be helpful later when viewing your list of resources.
5. Under Citrix or VMware servers, click New. and then specify the servers that are included in the server farm. Each server farm must include at least one Citrix XenApp server.
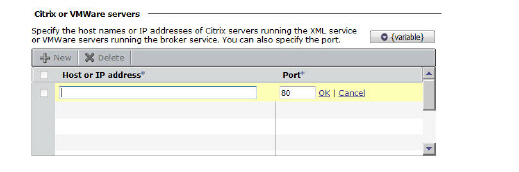
a. In the Host or IP address box, type the host name or IP address for the Citrix XenApp server.
b. In the Port box, type the number of the port through which the appliance connects to the XML browser service on the Citrix XenApp server. The default port number is 80.
c. Click OK. The server is added to the list of servers in the farm.
4. Click Save.
To add a VMware view resource
1. On the main navigation menu in AMC, click Resources.
2. On the Resources page, click New and then select Server farm from the list. The Add Resource - Server Farm page appears.
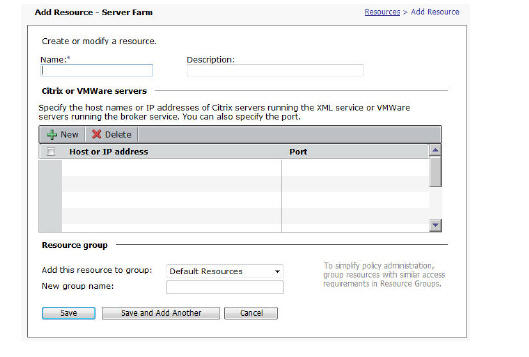
3. In the Name box, type a name for the VMware view.
4. Optional. In the Description box, type a descriptive comment about the VMware view.
5. Under Citrix or VMware servers, click New and then specify the VMware servers that are included in the VMware view. Each view must include at least one server.
a. In the Host or IP address box, type the host name or IP address for the VMware server.
b. In the Port box, type the number of the port through which the appliance connects to the service on the VMware server. The default port number is 80.
c. Click OK.
4. Click Save.
To add a VMware View Client
1. On the main navigation menu in AMC, click Agent Configuration.
2. In the Other agents area > Graphical terminal agents, click Configure.
3. In the VMware View clients area, click Browse... to navigate to the agent file. Select the agent file for each
4. Click Save.
Defining an Access Control Rule and Resource for Terminal Server Access
This section describes how to provide terminal sever access to your users by defining an access control rule and creating a terminal server resource. For more information see, Access Control Rules and Adding Resources.
To define a terminal server resource
1. From the main navigation menu in AMC, click Access Control.
2. Click New. The Add/Edit Access Rule page appears.
3. In the Number box, type a number to specify the rule’s position in the access rule list.
4. Use the Action buttons to specify Permit.
5. Complete the information under Basic settings:
a. Leave User selected (so that the rule applies to users trying to access a resource).
b. The From box specifies the users to whom the rule applies. For this example, leave the value as Any user.
c. In the To box, click Edit to specify the target resource for this rule. A Resources window appears.
d. Click New and then select Host name or IP from the list. If you have more than one terminal server on the same IP subnet, you can select IP range or Subnet. The Add/Edit Resource page appears.
e. Type a name for the resource. For example, terminal server.
f. In the Host name or IP address box, type the host name or IP address for the terminal server.
g. Click Save. The Add/Edit Resource window closes.
8. Click Finish.
Managing Graphical Terminal Agents
This section describes how to configure the graphical terminal agents that give users access to terminal server resources through the E-Class SRA appliance. For information about providing access to terminal servers through WorkPlace, see Graphical Terminal Shortcuts.
• Managing the Windows Terminal Services Agent
• Managing the VMware View Clients
Managing the Windows Terminal Services Agent
As shown in the Windows Terminal Services agent section of the Configure Graphical Terminal Agents page, the E-Class SRA appliance automatically uses either the native RDP client that is installed on the Windows client machine, or a cross-platform Java-based Windows Terminal Services agent that is pre-installed on the appliance. The cross-platform agent has been customized for use on the appliance and cannot be updated. The native Windows RDP client is updated on the client machine by Microsoft automatic updating.
To enable users to access Citrix resources, you must configure the appliance with two Citrix agents: an ActiveX control that runs on Windows, and a cross-platform Java applet.
To configure the appliance for each Citrix agent, upload the agent file to the appliance. The E-Class SRA appliance provisions the Citrix agents to users the first time they access a Citrix resource from WorkPlace.
To install the Citrix agents
1. From the main navigation menu in AMC, click Agent Configuration.
2. In the Other agents area, under Graphical terminal agents, click Configure. The Configure Graphical Terminal Agents page appears.
To specify the ActiveX agent, configure the Windows (ActiveX control) settings under Citrix agents:
a. In the Agent file box, type the path for the agent file, or click Browse to locate it.
b. Click Save to transfer the file to the E-Class SRA appliance.
3. To specify the Mac OS X agent, configure the Mac OS X settings under Citrix agents:
a. In the Agent file box, type the path for the agent file, or click Browse to locate it.
b. Click Save to transfer the file to the E-Class SRA appliance.
3. To specify the Java agent, configure the Cross-platform (Java applet) area under Citrix agents:
a. In the Agent file box, type the path for the agent file, or click Browse to locate it.
b. Click Save to transfer the file to the E-Class SRA appliance.
Managing the VMware View Clients
To enable 32-bit and 64-bit Windows users to access VMware resources, you must configure the appliance with two VMware View clients: a 32-bit Windows client and a 64-bit Windows client.
To configure the appliance for each VMware View client, upload the agent file to the appliance. The E-Class SRA appliance provisions the VMware View agents to users the first time they access a VMware View resource from WorkPlace.
To install the VMware agents
1. From the main navigation menu in AMC, click Agent Configuration.
2. In the Other agents area, under Graphical terminal agents, click Configure. The Configure Graphical Terminal Agents page appears.
To specify the agent for a 32-bit Windows VMware View client, configure the Windows (32-bit) settings under VMWare View clients:
a. In the Agent file box, type the path for the agent file, or click Browse to locate it.
b. Click Save to transfer the file to the E-Class SRA appliance.
3. To specify the agent for a 64-bit Windows VMware View client, configure the Windows (64-bit) area under VMWare View clients:
a. In the Agent file box, type the path for the agent file, or click Browse to locate it.
b. Click Save to transfer the file to the E-Class SRA appliance.
3. To specify the agent for a Mac OS X VMware View client, configure the Mac OS X area under VMWare View clients:
a. In the Agent file box, type the path for the agent file, or click Browse to locate it.
b. Click Save to transfer the file to the E-Class SRA appliance.
Graphical terminal shortcuts provide your users with Web-based access to resources that are available through Windows Terminal Services or Citrix hosts. Before you can create a shortcut to a terminal resource, you must first define the resource (for more information, see Adding Resources and Adding Citrix Server Farm Resources). You must also ensure that the correct graphical terminal agents are configured in AMC; for more information see Managing Graphical Terminal Agents.
This section describes how to configure graphical terminal shortcuts to individual Citrix or Windows Terminal Services hosts, and Citrix server farms.
• Adding Graphical Terminal Shortcuts to Individual Hosts
• Adding Graphical Terminal Shortcuts to Server Farms
Adding Graphical Terminal Shortcuts to Individual Hosts
This section describes how to configure a graphical terminal shortcut to an individual Windows Terminal Services or Citrix host. For information about configuring graphical terminal shortcuts to Citrix server farms, see Adding Graphical Terminal Shortcuts to Server Farms.
To add a graphical terminal shortcut to an individual host
1. From the main navigation menu, click WorkPlace.
2. On the Shortcuts tab, click New and then select Graphical terminal shortcut from the list. The General tab of the Add Graphical Terminal Shortcut page appears.
In the Position box, specify the shortcut’s position in the list.
4. In the Resource list, select the host or IP address resource to which this shortcut will be linked. This list contains the available defined resources. (URL and Network share resources do not appear because they cannot have graphical terminal shortcuts associated with them.)
5. Enter the hyperlink that users will click to access the resource and (optionally) a description of the link that will appear next to it. These entries can include variables:
a. In the Link text box, type the text for the hyperlink users will see. For example, if the resource you selected was the Windows domain for users’ home directories, enter Home directory. Using a variable you can have the link be followed by the actual path: click {variable}, and then select {URL_REF_VALUE} from the list. Click Insert to add the variable to the link text, and then close the list by clicking {variable} again.
b. In the Description box, type a descriptive comment about the shortcut. Although optional, a description helps users understand what the resource is. You can, for example, use a variable to be specific about the user’s identity. Here’s a sample entry for Description, followed by the explanatory text the user (in this case LGeorge) sees in WorkPlace:
{Session.userName}’s user directory —> LGeorge’s user directory
3. Click Finish to save the shortcut with the current settings, or click Next to display additional configuration settings. The Advanced tab of the Add Graphical Terminal Shortcut page appears.
Under Session type, specify the type of session to initiate:
– Click Windows Terminal Services to initiate a connection to a Windows Terminal Services host. In the Port box, type the port number for the Windows Terminal Services connection. Select the Automatically reconnect if session is interrupted check box for seamless reconnection attempts.
– Click Citrix to initiate a connection to an individual Citrix host. In the Port box, type the port number for the connection. Optionally, you can specify a Custom ICA file by typing its path or clicking Browse to locate it. Custom ICA files contain additional configuration settings for the Citrix host.
5. Under Single sign-on, specify how you want user credentials forwarded to the host. Forwarding user credentials prevents the user from needing to log in multiple times (once to get to the appliance, and again to access the host).
– Click None to disable single sign-on and instead prompt the user for credentials.
– Click Forward user’s session credentials to pass the username and password for authentication in WorkPlace along to the host.
– Click Forward static credentials to forward the same username and password for all users. Type the static Username, Password, and Domain to be forwarded for all users.
6. Specify Startup options if you want to automatically start an application when users click the graphical terminal shortcut.
– In the Start application box, type the path to the application.
– If the application requires a working directory, type its path in the Working directory box.
7. Specify Display properties:
– In the Screen resolution list, select the appropriate resolution for the application. The default resolution is 1024 x 768 pixels. To set a custom resolution, select Custom..., and then type the desired pixel values (width x height) into the fields that appear to the right. The minimum supported resolution is 640x480 and the maximum is 4096x2048 pixels.
– For Terminal Services shortcuts, select the Allow users to select a different resolution check box to give users control over their screen resolution. Users will be able to select their own resolution from a list box on the shortcut itself in Workplace. This check box is disabled for Citrix shortcuts.
– In the Color depth list, select the color depth. The default setting is Lowest (8-bit). Note that higher color depth settings can affect performance.
8. Specify Resource redirection settings as needed:
– Select the Allow access to local drives check box to enable users to access local drives during the session.
– Select the Allow access to local printers check box to enable users to access local printers during the session.
– Select the Bring remote audio to local computer check box to enable users to access remote audio during the session. Note that audio redirection is network intensive and can affect performance. The default is off.
– Select the Share clipboard between local and remote computers check box to enable clipboard copy/paste in both directions for the user. The default is to allow this feature.
9. Click Finish.
Note•: Enabling single sign-on for shortcuts to Citrix hosts causes users’ authentication credentials to be forwarded to the client, which can potentially compromise security.
• The Java open-source version of the Windows Terminal Services agent does not support any Resource redirection options.
• Enabling clipboard sharing is not appropriate for shortcut that provides read-only access to applications and sets of data.
Adding Graphical Terminal Shortcuts to Server Farms
This section describes how to configure a graphical terminal shortcut to a Citrix server farm. For information about configuring graphical terminal shortcuts to individual Citrix or Windows Terminal Services hosts, see Adding Graphical Terminal Shortcuts to Individual Hosts.
To add a graphical terminal shortcut to a server farm
1. From the main navigation menu, click WorkPlace.
2. Click New and then select Graphical terminal shortcut from the list. The General tab of the Add Graphical Terminal Shortcut page appears.
In the Position box, specify the shortcut’s position in the list.
4. In the Resource list, select the resource to which this shortcut will be linked. This list contains the available defined resources. (URL and Network share resources do not appear because they cannot have graphical terminal shortcuts associated with them.)
5. In the Link text box, type the hyperlink text that users will click to access the graphical terminal resource.
6. Enter the hyperlink that users will click to access the resource and (optionally) a description of the link that will appear next to it. These entries can include variables:
a. In the Link text box, type the text for the hyperlink users will see.
b. In the Description box, type a descriptive comment about the shortcut. Although optional, a description helps users understand what the resource is. You can, for example, use a variable to be specific about the user’s identity. Here’s a sample entry for Description, followed by the explanatory text the user (in this case LGeorge) sees in WorkPlace:
{Session.userName}’s user directory —> LGeorge’s user directory
3. In WorkPlace you can set up groups to organize resources for your users, or have shortcuts appear singly. In the Shortcut group area, add your new shortcut to a new or existing group, or have it appear on its own in WorkPlace by adding it to the Standalone shortcuts group. (The order in which shortcuts appear can be changed on the Configure WorkPlace Layout page; see Creating or Editing a WorkPlace Layout for more information.)
4. Click Finish to save the shortcut with the current settings, or click Next to display additional configuration settings. The Advanced tab of the Add Graphical Terminal Shortcut page appears.
If necessary, you can specify a different Port for sending ICA traffic between the Citrix client and WorkPlace. The default port is 1494.
6. Under Single sign-on, specify how you want user credentials forwarded to the host. Forwarding user credentials prevents the user from needing to log in multiple times (once to get to the appliance, and again to access the host).
– Click None to disable single sign-on and instead prompt the user for credentials.
– Click Forward user’s session credentials to pass the username and password used for authentication in WorkPlace along to the host.
– Click Forward static credentials to forward the same username and password for all users. Type the static Username, Password, and Domain to be forwarded for all users.
7. Select the Enable SSO to Citrix applications check box to forward the user’s WorkPlace login credentials to all published applications that are hosted on the Citrix server farm. Enabling single sign-on to Citrix applications provides more convenience for the user; however, it can potentially compromise security, as users’ passwords are temporarily stored in cleartext on the client computer.
8. Specify Display properties:
– In the Screen resolution list, select the appropriate resolution for the application. The default setting is 1024 x 768 pixels.
– In the Color depth list, select the color depth. The default setting is 16-bit. Note that higher color depth settings can affect download speed.
9. Click Save.
Note Enabling single sign-on for shortcuts to Citrix hosts causes users’ authentication credentials to be forwarded to the client, which can potentially compromise security.
Connect Tunnel for Android provides secure network access to client/server applications that are available for Android devices such as smart phones. The Android client provides application layer proxy redirection similar to OnDemand Mapped mode.
The Android client supports creation of multiple VPN profiles, import of client certificates, all available authentication methods and basic End Point Control (EPC). After successful authentication, the client attempts to load and start any pre-defined port maps specified by the administrator. The end-user can also define port maps, though access is still based on policy evaluation at the appliance. Typical port map uses are for RDP, VNC, or SSH access to backend servers protected by the E-Class SRA appliance in the company’s network.
• Installing Connect Tunnel for Android
• Configuring and Using Connect Tunnel for Android
Installing Connect Tunnel for Android
The Connect Tunnel Android client can be downloaded and installed from the Android Market free of charge.
Connect Tunnel for Android is supported on Android devices running 2.1 and higher.
Configuring and Using Connect Tunnel for Android
This section describes profile management, authentication, port map creation and management, notifications, preferences, and the certificate store.
• Preferences and Certificate Store
On the first launch, the application will not have any VPN profiles.
To create a VPN profile, perform the following steps:
1. Select Add VPN on the main screen or press the MENU key on the device and select Add in the options menu.
In the VPN Configurations screen, leave the VPN Configuration Name field blank to allow it to be automatically populated after selecting values for the other fields. Optionally, you can type a descriptive name for the VPN profile in the VPN Configuration Name field.
3. Type the hostname or IP address of the VPN in the Host name or IP address of your VPN field.
4. Press the Change button to load the login groups/realms, and then select the desired realm.
After selecting a realm from the dialog, the Login Group field is populated with the selected realm and the VPN Configuration Name is set to “Realm@VPN” if no name is already entered. Save the VPN profile by pressing the Save button.
Once a VPN profile is added, it is displayed in the home screen. The home screen displays all configured VPN profiles.
On the home screen, manage the VPN profiles by pressing and holding any profile in the list or by selecting Edit in the options menu.
After long-pressing the profile, a dialog box displays which allows you to directly edit or delete the profile.
Select Delete VPN Configuration to delete the profile.
8. Select Edit VPN Configuration to edit the profile.
You can manage multiple profiles at the same time by using the options menu.
After selecting a VPN profile to login to on the home screen, a login screen is displayed. The type of login screen depends on the authentication method that was configured by the administrator. The login screen may request username and password authentication, or it may use certificate authentication. You can import any certificates (*.pfx) stored on the SD card for authentication purposes.
Once you provide the credentials and press Connect, you may see a certificate dialog prompt if there are any issues with the SSL certificate. Press Show Certificate to read the details.
Press Accept to accept the certificate and continue the login process. Press Reject if there appears to be any problem with the certificate.
If the provided credentials are invalid, a re-authentication screen is displayed.
If the authentication server is using Active Directory, a password change notification screen may be displayed.
If stacked authentication is configured by the administrator, an additional screen is displayed for entering the secondary authentication credentials.
After successful authentication, you will see a list of services port maps, or shortcuts, defined by the administrator, plus any user-defined port maps to services.
Note You will only see administrator created application port maps when connected to a realm with OnDemand enabled.
You can long-press on any item in the list to see the service details and to copy the address onto the clipboard.
Select View Portmap to see the details, and select Copy Portmap to copy the address.
Users can create port maps in addition to administrator defined port maps. To create a new port map, press the “Plus” button next to Services.
At any time, you can remove the port maps you have defined.
All user defined port maps are stored on the device at the end of the VPN session for re-use later. The user defined port maps will work subject to the Access Control Lists (ACLs) defined by the administrator. If you do not have access to a particular resource, then the port map will not work even though it is displayed.
At any time, you can press the Home button to cause the VPN session to run in the background. The notification bar and pull-down screen display a Connect Tunnel notification once the VPN session is established.
To view session details in the VPN status screen, select the notification.
Preferences and Certificate Store
From the Home screen, you can navigate to the Preferences screen and to the certificate store.
In the Preferences screen, you can enable debug logs and can copy the logs to an external SD card for sending to Secure Mobile Access Support, if needed.
The Preferences screen also allows you to navigate to the certificate store which displays both the user certificates and the public certificates stored by the application or user. You can import the user certificate(s) given to you by the E-Class SRA appliance administrator into the certificate store for logging in to a realm configured with certificate authentication.
Enabling and Saving Debug Logs
In Connect Tunnel, you can set up debug logging and save the logs to a designated location. Click on the Properties button at the bottom of the Log In screen. On the Settings tab, click on Clear Logs and Apply to clear the current set of logs, then select the check box for Enable Debug Logging. Click OK.
To download log to a selected site, for sending to Secure Mobile Access Support, click Export Logs. Select the location from the popup browser, and click Save.
