End Point Control
The E-Class SRA appliance includes support for End Point Control, which you can use to protect sensitive data and ensure that your network is not compromised when accessed from devices in untrusted environments. End Point Control works by:
• Verifying that the user’s environment is secure
• Removing user data from a personal computer after a session
• Controlling access to sensitive resources
Related Topics
• Overview: End Point Control
• Managing EPC with Zones and Device Profiles
• Application Access Control
Overview: End Point Control
Traditional VPN solutions typically provide access only from the relative safety of a corporate laptop. In that environment, one of the biggest security concerns is unauthorized network access. An SSL VPN, on the other hand, enables access from any Web-enabled system, including devices in untrusted environments. A kiosk at an airport or hotel, or an employee-owned computer, increases the risk to your network resources.
End Point Control reduces your exposure from untrusted environments in three ways:
Verifying that the user’s environment is secure
Corporate IT departments configure computers under their control with antivirus software, firewalls, and other safeguards designed to protect them from malicious software (malware). In contrast, unmanaged computers can easily contain keystroke recorders, viruses, Trojan horses, and other hazards that can compromise your network.
Secure Mobile Access lets you define “zones of trust” that provide different levels of access depending on the level of trust at the user’s end point. Connection requests are compared against device profiles you set up in AMC and then assigned to the appropriate zone.
Removing user data from a PC after a session
It’s easy to inadvertently leave sensitive data on an untrusted PC. For example, a user logged in to a public kiosk leaves a variety of data in the PC’s cache after logging out, including passwords, browser cookies, and bookmarked URLs. Users may also accidentally leave files or email attachments on the hard disk. Secure Mobile Access’s data protection agents automatically remove session data from the PC.
Controlling access to sensitive resources
You can reference End Point Control zones in access control rules. For example, a connection originating from a less trusted EPC zone can be denied access to sensitive resources.
• How the Appliance Uses Zones and Device Profiles for End Point Control
• End Point Control Scenarios
How the Appliance Uses Zones and Device Profiles for End Point Control
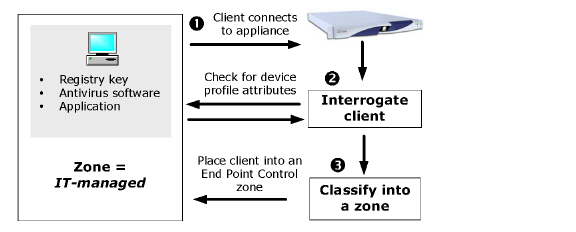
End Point Control is managed and deployed at the community level on the appliance. An authentication realm—the entry point to the appliance for users—references one or more communities, which are collections of users or groups with similar access needs. A community in turn references one or more EPC zones. EPC zones can reference one or more device profiles, which define the attributes that must be present on a client computer. The EPC process works this way:
1. A user connects to the appliance:
a. The user logs in to an authentication realm.
b. The appliance assigns the user to a community that belongs to that realm.
3. The appliance interrogates the user’s computer to determine if it has attributes (contained in a device profile) that match those defined in one of the community’s EPC zones.
4. If the device matches a profile, the appliance classifies the computer into a particular EPC zone and deploys the EPC tools configured for that zone.
5. If the user is connecting with a personal device, they may optionally be prompted to authorize the VPN connection.
In this case, the user’s device profile matches an End Point Control zone named IT-managed. For a more detailed description of this process, see the first scenario in End Point Control Scenarios.
Note•: End Point Control has some specific Web browser requirements (for example, Safari is recommended over Mozilla Firefox on Apple Macintosh systems); see Client Components for detailed requirements.
• During client interrogation, the device profile attributes that the appliance is checking for and whether they were found is recorded in the system message log, provided the log level is set to verbose. See End Point Control Interrogation for more information.
Related Topics
• Defining Zones
Defining Zones
There are three categories of zones that you can customize, plus a built-in zone (Default). A community can include Deny, Standard, and Quarantine zones; the Default zone, on the other hand, is global. See Adding Communities to a Realm for more information about communities.
|
Zone type
|
Description
|
|
Deny
|
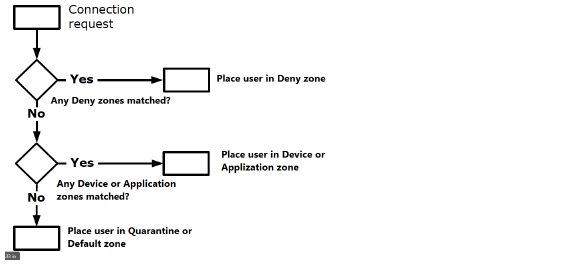
Deny zones are evaluated first. The appliance tries to find a match in the list of Deny zones, starting with the one at the top. If there is a device profile match (for example, a certain file is found on the device), the user is denied access to the network. See Creating a Deny Zone for more information.
|
|
Device
|
If the device does not match the criteria for a Deny zone, the appliance tries to find a match in the list of Standard zones, starting with the one at the top. The Standard zone category contains the Device zone. If the device matches the criteria, it is placed in a “zone of trust”.
If no match is found, the device is placed in the Default zone, or in a Quarantine zone (if one is defined). See Creating a Device Zone for more information.
|
|
Application
|
If the application does not match the criteria for a Deny zone, the appliance tries to find a match in the list of Standard zones, starting with the one at the top. The Standard zone category contains the Application zone. If the Application matches the criteria, it is placed in a “zone of trust”.
If no match is found, the device is placed in the Default zone, or in a Quarantine zone (if one is defined). See Creating an Application Zone for more information.
|
|
Quarantine
|
A device for which there is no profile match is placed in either the Default zone or in a Quarantine zone. You can customize the message users see; for example, you may want to explain what is required to bring the user’s system into compliance with your security policies. There can be only one Quarantine zone in a community. See Creating a Quarantine Zone for more information.
|
|
Default
|
This zone is global and implicitly present in every community configured in AMC. If a device does not match any other profile, you choose whether it should “fall through” to the Default zone, or to a Quarantine zone. You can customize the Default zone to some extent, but you cannot delete it. See Configuring the Default Zone for more information.
|
|
The following diagram illustrates the order in which zones are evaluated. Only the Default zone is required:
End Point Control Scenarios
This section describes some typical End Point Control scenarios that use zones and device profiles to classify connection requests and deploy End Point Control tools to clients.
• Scenario 1: Employees Connecting from IT-Managed Laptops
• Scenario 2: Employees Connecting from a Home PC
• Scenario 3: Employees Connecting from a Public Kiosk
• Scenario 4: Employee Connects from a PC with Google Desktop
• Scenario 5: Employee Connects from a Mobile Device
• Performing Recurring EPC Checks: Example
Scenario 1: Employees Connecting from IT-Managed Laptops
This scenario begins with an employee connecting to the appliance using an IT-managed laptop.
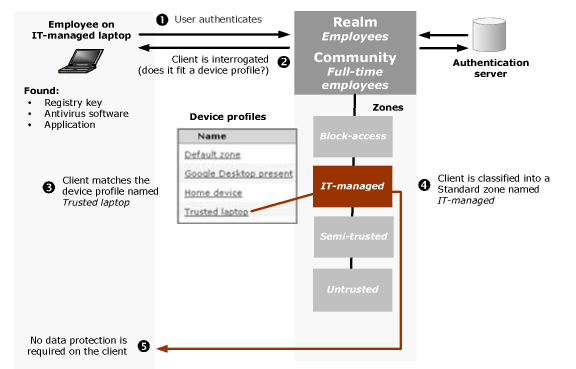
Here’s the sequence of events when a user logs in:
1. The user connects to the appliance, logs in to the realm Employees, and is assigned to the Full-time employees community.
2. After the user authenticates, the client device is interrogated to determine if it matches any device profiles belonging to the zones referenced by the Full-time employees community. Device profiles are evaluated by zone, starting with any Deny zones and then proceeding through the zones listed for the community.
3. The appliance finds that the client doesn’t match the device profile for the Deny zone (Block-access), so it proceeds to check the profile for the IT-managed zone. The IT-managed zone references a device profile named Trusted laptop. The appliance determines that the user’s device attributes match that particular device profile (a registry key entry, antivirus software, and an application).
4. Based on that match, the appliance classifies the device into the IT-managed zone and doesn’t evaluate the subsequent zones in the list for that community.
5. The IT-managed zone is not configured to require a data protection tool on the client. The appliance then provisions the access agent configured for the Full-time employees community, and the user is able to access the appropriate network resources.
Scenario 2: Employees Connecting from a Home PC
This scenario begins with an employee connecting to the appliance from a home PC.
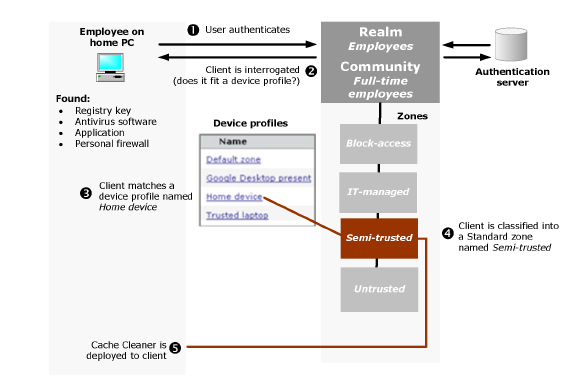
Here’s the sequence of events when a user logs in:
1. The user connects to the appliance, logs in to the realm Employees, and is assigned to the Full-time employees community.
2. Once the user is authenticated, the client device is interrogated to determine if it matches any device profiles belonging to the zones referenced by the Full-time employees community. Device profiles are evaluated by zone, starting with any Deny zones and then proceeding through the others listed for the community.
3. In this scenario, the appliance finds that the client doesn’t match the device profile for the Deny zone (Block-access) or the Standard zone named IT-managed, so it continues to the next one in the list: Semi-Trusted.
4. The Semi-trusted zone references a device profile named Home device. The appliance determines that the user’s device attributes (a registry key entry, antivirus software, an application, and a personal firewall) match that device profile.
5. Based on that match, the appliance classifies the device into the Semi-trusted zone and doesn’t evaluate the subsequent zones in the community.
6. Because the Semi-trusted zone is configured to require a data protection tool on the client, the appliance deploys Cache Cleaner to the client. The appliance then provisions the access agent configured for the Full-time employees community, and the user is able to access the appropriate network resources.
Scenario 3: Employees Connecting from a Public Kiosk
This scenario begins with an employee connecting to the appliance from a public kiosk.
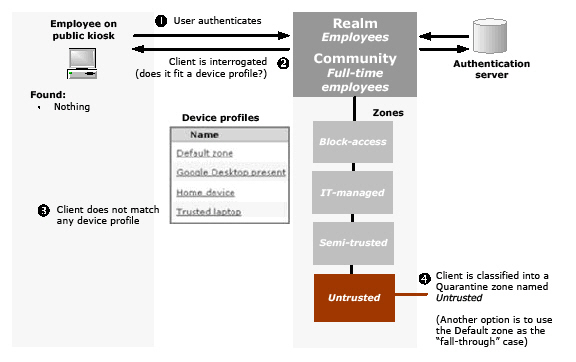
Here’s the sequence of events when a user logs in:
1. The user connects to the appliance, logs in to the realm Employees, and is assigned to the Full-time employees community.
2. After the user authenticates, the client device is interrogated to determine if it matches any device profiles belonging to zones referenced by the Full-time employees community, starting with any Deny zones and proceeding through the others listed for the community.
3. In this scenario, the appliance finds that the client doesn’t match any of the configured device profiles. There are a couple of ways to handle this sort situation: classify the client into a Quarantine zone, or into the Default zone. In this example, the Quarantine zone Untrusted is used. The only resources a user has access to are those that you have set up: you might, for example, display a customized page with links to Web resources for bringing a system into compliance with your security policies.
a. If the untrusted device (for example, a PC in a public kiosk) is running Windows 7, Windows Vista, or Windows 2008 Server, and a supported browser, the user is required to download and install the client component manager, Secure Endpoint Manager. The client component manager automatically deploys Cache Cleaner for the user. The appliance then provisions the access agent configured for the Full-time employees community, and the user can access the appropriate network resources.
b. If the device’s operating system and browser are not compatible with Cache Cleaner, a message is displayed.
c. If Cache Cleaner cannot be deployed on the client, the user’s connection request is denied.
See Configuring the Default Zone for information on the setup options for this zone.
Scenario 4: Employee Connects from a PC with Google Desktop
An employee connects to the appliance from a PC outside of the corporate office.
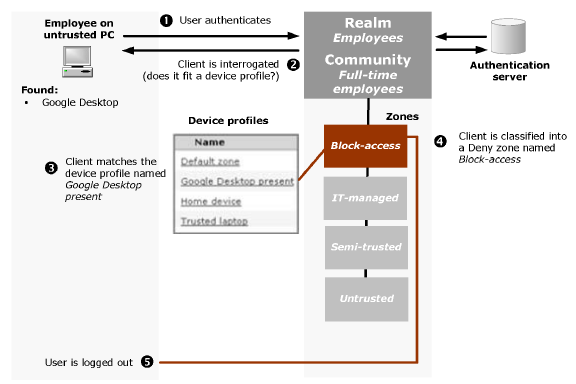
Here’s the sequence of events when a user logs in:
1. The user connects to the appliance, logs in to the realm Employees, and is assigned to the Full-time employees community.
2. After the user authenticates, the client device is interrogated to determine if it matches any device profiles belonging to the zones referenced by the Full-time employees community, starting with any Deny zones.
3. In this case the appliance determines that the PC is running Google Desktop, which makes it a match for the Google Desktop present device profile. The device is classified into the Deny zone named Block-access.
4. No other zones are evaluated and the user’s access request is denied.
5. The user is logged out.
Scenario 5: Employee Connects from a Mobile Device
In this scenario an employee connects to the appliance from a mobile device outside of the corporate office. To establish an association between a particular user and his or her device (in case the device is misplaced or lost), the administrator has collected the user name and IMEI (International Mobile Equipment Identity) number for each device, and has added the IMEI number for user accounts on the Active Directory server. The administrator has also created a device profile named Mobile resources that verifies that user/IMEI association.
Here’s the sequence of events when a user logs in:
1. The user connects to the appliance, logs in to the realm Employees by entering a user name and password, and is then assigned to the Mobile employees community.
2. After the user authenticates, the client device is interrogated (using a device profile for the zone referenced by the Mobile employees community) and its IMEI number is determined.
3. The IMEI number is compared against the one that is associated with the user in the AD directory. If there’s a match, the user is allowed access to mobile device-specific links; otherwise he or she is denied access.
4. Optionally, the user may be prompted to authorize the VPN connection from the personal device.
Note Checking for an IMEI number works only on wide area networks (WAN), not WiFi, and the WAN service must be on in order for the post-authentication process to determine the IMEI number on the mobile device.
In order to track service by mobile device and user you can process audit log files for network proxy, Web proxy, or tunnel clients.
Managing EPC with Zones and Device Profiles
Device profiles can include any combination of the following attributes to identify a client and assign it to a “zone of trust,” quarantine it, or deny it access altogether:
• Application
• Client certificate
• Directory name
• Equipment ID (the identifier for a device; for example, the IMEI number of a mobile device)
• File name, size, or timestamp
• Windows domain
• Windows registry entry
• Windows version
If you have Advanced EPC, you have additional attributes for identifying security programs on client devices:
• Antivirus program:
• Antispyware program
• Personal firewall program
And, you can define fallback detection for these types of security programs using the EPC library. See Advanced EPC: Using Fallback Detection for configuration instructions.
An EPC zone can reference one or more device profiles. Multiple device profiles are useful if there are users with similar VPN access needs who use different computer platforms. For example, you could configure an EPC zone that references a device profile for Windows computers, and another zone for Macintosh computers. AMC supports device profiles for Windows, Macintosh, Linux, Windows Mobile-powered devices, and other mobile devices (such as PDAs and smartphones). You can create as many additional zones and device profiles as needed to accommodate different access scenarios and levels of trust, such as separate zones for employees and business partners or contractors.
AMC includes a predefined zone and some device profiles:
• You can configure the Default zone to some extent, but you cannot delete it. A device that cannot be classified into any of the zones you have configured is placed in either the Default zone, or a Quarantine zone. (When you configure a community, you choose which of these will be the “fallback” zone; see Using End Point Control Restrictions in a Community for how to do this.) See Configuring the Default Zone for more information.
• To help you get started with Advanced EPC, the appliance includes some preconfigured device profiles designed for common access scenarios. You can use these as is, or customize them to meet your needs; see Advanced EPC: Using Preconfigured Device Profiles for more information.
Communities are used to specify which zones are available to users after they authenticate. For information on linking zones to communities, see Using End Point Control Restrictions in a Community. In addition, you can tie zones to your access policy in much the same way as users, groups, and resources.
• Enabling and Disabling End Point Control
• Zones and Device Profiles
• Creating Zones for Special Situations
• Using the Virtual Keyboard to Enter Credentials
Enabling and Disabling End Point Control
You can globally enable or disable End Point Control in AMC. Here are two examples of situations where you might want to temporarily disable EPC:
• You have upgraded your version of antivirus software company-wide from version 2.x to 3.x. You could temporarily disable EPC in order to change the device profile that specifies the antivirus software.
• You can create new device profiles and zones on a production appliance without disrupting users.
When End Point Control is disabled (which is the default setting), the appliance does not perform the following EPC actions:
• Evaluate the attributes of client devices
• Classify connection requests into zones
• Enforce zone restrictions in access control rules
To enable End Point Control
1. From the main navigation menu, click End Point Control.
2. Click the Edit link in the General section. The Configure End Point Control page appears.
3. Check the Enable End Point Control check box.
4. Click Save.
Note When EPC is enabled, you can specify (on a per-zone basis) how often EPC checks are done: only once (at login), or at login and then every <n> minutes for the duration of the session. See Creating a Device Zone or Configuring the Default Zone for more information.
Zones and Device Profiles
This section describes how to configure and use zones and devices profiles.
• Viewing Zones and Device Profiles
• Creating a Device Zone
• Creating an Application Zone
• Creating a Deny Zone
• Creating a Quarantine Zone
• Configuring the Default Zone
• Defining Device Profiles for a Zone
• Device Profile Attributes
• Advanced EPC: Extended Lists of Security Programs
• Advanced EPC: Using Preconfigured Device Profiles
• Using Comparison Operators with Device Profile Attributes
• Using End Point Control with the Connect Tunnel Client
• Performing Recurring EPC Checks: Example
Viewing Zones and Device Profiles
You can see the list of End Point Control zones in AMC and quickly determine what types they are and whether there are any communities associated with them.
To view configured zones
1. From the main navigation menu in AMC, click End Point Control.
2. Click Edit in the Zones and Device Profiles section. The Configure Zones and Devices page appears.
3. The Configure Zones and Devices page provides a summary of the zones configured in AMC, and a summary of the EPC agent status. The E-Class SRA appliance comes with a preconfigured zone named Default. Click the name of a zone to view or edit its settings.
4. You can see information about each zone in the list:
• The plus sign (+) column expands a selected zone to display the device profiles and communities the zone is associated with.
• The Type column identifies whether a given zone is a Default, Standard, Deny, or Quarantine one (these zone types are described in detail in Defining Zones).
• The Name column displays the name you assigned when creating a zone; edit a zone by clicking its name.
• The Description column lists any descriptive text for the zone.
• The Used column indicates whether the zone is referenced by any communities. A blue dot indicates it is being used by one or more communities. If a zone is not referenced, this field is blank.
Device profiles specify the attributes used to identify a client, such as the presence of a registry key or software program. They are referenced by End Point Control zones.
To view configured device profiles
1. In the Device Profiles section, review the list of configured profiles. If you have Advanced EPC, this list includes several preconfigured device profiles.
You can see information about each profile:
– The Type column displays an icon representing the platform the device profile supports: Microsoft Windows, Mac OS X, Linux, Windows Mobile, and Other mobile device.
– The Name column displays the name you assigned when creating the device profile; edit a device profile by clicking its name.
– The Description column lists any descriptive text for the device profile.
– The Used column indicates whether the profile is referenced by any clients. A blue dot indicates it is being used by one or more clients. If a zone is not referenced, this field is blank.
Creating a Device Zone
Device zones are evaluated after Deny zones. You could create a device profile, for example, named Windows firewall that would require that a personal firewall be running. When this End Point Control policy is in place, any device that is a match is placed in a “zone of trust.”
To define a Device zone
1. From the main navigation menu in AMC, click End Point Control. The End Point Control Settings page appears.
2. Click Edit in the Zones and Device Profiles section, which displays the Configure Zones and Devices page.
3. Click New and select Device zone from the menu. The Zone Definition - Device Zone page appears.
4. In the Name box, type a meaningful name for the zone (for example, Windows firewall required). If a zone will be referenced by mobile device users, keep the name short so that all of it is visible on the mobile device.
5. (Optional) In the Description box, type a descriptive comment about the zone.
6. In the All Device Zone Profiles list, select the check box for any device profiles that you want to require in the zone, and then click the right arrow (>>) button. Only one of the profiles in the In Use list needs to match for the device to be placed in the zone you are creating.
7. If there are no device profiles for this zone, click New to add one. See Defining Device Profiles for a Zone for more information on creating profiles.
8. In the Access method restrictions area, specify which access methods, if any, will not be allowed for clients that are classified into this zone.
9. Specify whether a Data protection agent is required. Cache Cleaner provides enhanced protection on all platforms except Linux platforms.
10. Check the top check box in the Device Authorization area to require users to authorize their personal device before a VPN connection is established. By default, this check box is checked when EPC is enabled for device zones.
11. To change the authorization terms that users must agree to, type the desired authorization terms in the Terms section of the Device Authorization area. The Device Authorization check box must be checked to edit the terms.
12. By default, a user authorization expires 180 days after the device was last used. When device authorization is enabled, you can disable zone authorization expiration by unchecking the expiration check box or change the number of days before expiration by typing the desired number of days.
13. By default, user connections to a device zone are not dropped when the connection is inactive. However, a inactivity timer can be set In the Inactivity timer area to end the connection after a set period of inactivity. The inactivity timer interval can be set from 3 minutes to 10 hours (default is never).
Note In earlier releases, the Inactivity Timer was part of Community attributes.
14. In the Recurring EPC area, you can specify how often EPC checks are done: only once (at login), or at login and then every <n> minutes for the duration of the session. On small form factor devices, recurring EPC is supported only with Connect Mobile. See Performing Recurring EPC Checks: Example for a description of a scenario where the appliance repeatedly checks for the presence of a USB device: when the check fails, the session ends. By default, the end point is checked at login.
15. The connection between devices and the appliance can handle interruptions—such as suspending a session and later resuming it, or temporarily losing connectivity—without requiring that users reauthenticate, as long as the device is using the same IPv4 or IPv6 IP address.
To allow users to resume sessions from a different IP address—for example, when roaming from one IP subnet to another by plugging into another part of your network—select the Allow user to resume session from multiple IP addresses check box in the Advanced area.
16. When you are finished configuring the zone, click Save.
Note For information on how to copy or delete an EPC zone, see Adding, Editing, Copying, and Deleting Objects in AMC.
Creating an Application Zone
Application zones are evaluated after Deny and Device zones. You could create an application zone that allows only specific users to access the corporate network while running a specific application. When this End Point Control policy is in place, any device that is a match is placed in a “zone of trust.”
To define an Application zone profile
1. From the main navigation menu in AMC, click End Point Control.
2. Click Edit in the Zones and Device Profiles section, which displays the Configure Zones and Devices page.
3. In the Device Profiles section click New application zone profile and then select Android from the drop-down list, which displays the Device Profile Definition page.
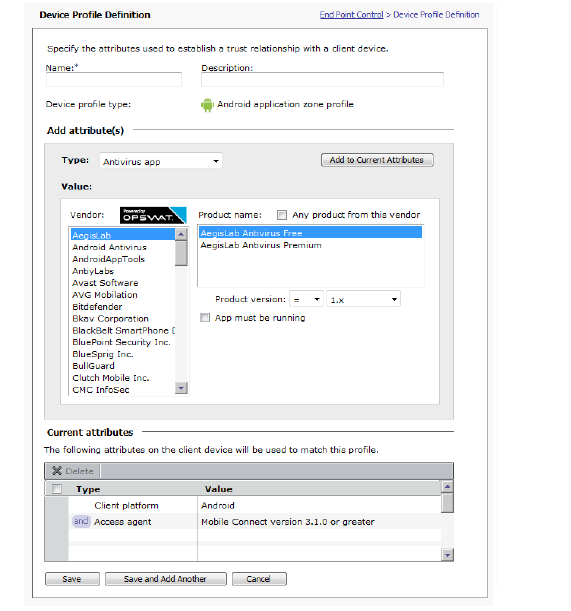
4. In the Name field, type a meaningful name for the profile (for example, Unmanaged Android Devices).
5. (Optional) In the Description box, type a descriptive comment about the zone.
6. If the desired attributes are not listed in the Current attributes section, select the type of application from the Type drop-down list. Any number and combination of attributes can be associated with the definition. The remainder of the Add attributes section varies, depending on the type selected:
|
Type
|
Attributes
|
|
Antivirus app
|
• Select the app from the Product Name drop-down list
OR
Check Any product from this vendor check box to add all products from the identified vendor.
• In the Product version fields select the version number to allow and the qualifier (>, >=, =, <, <=) from the drop-down lists.
• To only use the app as a filter when the app is running, check the App must be running check box
|
|
Personal Firewall App
|
• Select the app from the Product Name drop-down list
OR
Check Any product from this vendor check box to add all products from the identified vendor.
|
|
Application
|
• Select the device profile definition from the Application drop-down list.
|
|
Client certificate
|
• Select the CA certificate drop-down list. You may need to import a new certificate or modify an existing certificate if the desired certificate is not displayed.
|
|
Directory name
|
• Type the directory name in the Directory Name field.
|
|
Equipment ID
|
• Select whether to match the device identifier (either literal value of variable evaluated at runtime) to the profile if the user is not using a registered device. For example, if the equipment ID is used, the device profile will be used to control access to applications by all devices matching the equipment ID.
|
|
File name
|
• Type the file name in the File name field.
|
|
Android version
|
• In the Operator field, select the qualifier (>, >=, =, <, <=) from the drop-down list.
• In the Major field, type the major version number to use as a filter.
• Optionally, in the Minor field, type the minor version number to use as a filter.
• Optionally, in the Build field, type the build number to use as a filter.
|
|
7. Click the Add to Current Attributes button, which transfers the attribute to the Current attributes section of the page.
8. Click Save.
To create an Application zone
Note Every Application zone must have at least one Application Zone Profile assigned to it. The profile is used to determine if a connecting device is application control aware and whether to enforce policy at the Device or Application level.
1. In the Zones section select Application zone from the drop-down list. The Zone Definition - Application Zone page appears.
Only those profiles that are Application Access Control aware are included in the profiles.
2. In the Name box, type a meaningful name for the zone. If a zone will be referenced by mobile device users, keep the name short so that all of it is visible on the mobile device.
3. (Optional) In the Description box, type a descriptive comment about the zone.
4. In the All Application Zone Profiles list, select the check box for any profiles that you want to require in the zone, and then click the right arrow (>>) button. Only one of the profiles in the In Use list needs to match for the application to be placed in the zone you are creating.
5. If there are no device profiles for this zone, click New to add one. See Defining Device Profiles for a Zone for more information on creating profiles.
6. Check the top check box in the Device Authorization area to require users to authorize their personal device before a VPN connection is established. By default, this check box is checked when EPC is enabled for application zones.
7. To change the authorization terms that users must agree to, type the desired authorization terms in the Terms section of the Device Authorization area. The Device Authorization check box must be checked to edit the terms.
8. By default, a user authorization expires 180 days after the device was last used. When device authorization is enabled, you can disable zone authorization expiration by unchecking the expiration check box or change the number of days before expiration by typing the desired number of days.
9. By default, user connections to a zone are not dropped when the connection is inactive. However, a inactivity timer can be set In the Inactivity timer area to end the connection after a set period of inactivity. The inactivity timer interval can be set from 3 minutes to 10 hours.
10. In the Recurring EPC area, you can specify how often EPC checks are done: only once (at login), or at login and then every <n> minutes for the duration of the session. See Performing Recurring EPC Checks: Example for a description of a scenario where the appliance repeatedly checks for the presence of a USB device: when the check fails, the session ends.
11. The connection between devices and the appliance can handle interruptions—such as suspending a session and later resuming it, or temporarily losing connectivity—without requiring that users reauthenticate, as long as the device is using the same IPv4 or IPv6 IP address.
To allow users to resume sessions from a different IP address—for example, when roaming from one IP subnet to another by plugging into another part of your network—select the Allow user to resume session from multiple IP addresses check box in the Advanced area.
12. When you are finished configuring the zone, click Save.
Creating a Deny Zone
Deny zones are evaluated first. If there is a device profile match (for example, if a certain file or registry key is found on the device), the user is denied access and logged out.
To define a Deny zone
1. From the main navigation menu in AMC, click End Point Control. The End Point Control Zones page appears.
2. Click New and then select Deny zone from the menu. The Zone Definition - Deny Zone page appears.
3. In the Name box, type a meaningful name for the zone (for example, Google Desktop present).
4. (Optional) In the Description box, type a descriptive comment about the zone.
5. In the All Profiles list, select the check box for any device profiles that you want to require in the zone, and then click the right arrow (>>) button. (Only one of the profiles in the In Use list needs to match in order for the device to be placed in the Deny zone you are creating.)
For example, the device profile definition might require that the application GoogleDesktop.exe be running. If GoogleDesktop.exe is found on the device, the device is a match for the Deny zone you named Google Desktop present, and the user is denied access and logged off.
6. If there are no device profiles appropriate for this zone, click New to add one. See Defining Device Profiles for a Zone for more information on creating profiles.
7. At the Customization section at the bottom of the Zone Definition page, you can customize the message that denied users see when they are logged out (for example, “Your system is running Google Desktop, which poses a security risk”).
8. When you are finished configuring the zone, click Save.
For information on how to copy or delete an EPC zone, see Adding, Editing, Copying, and Deleting Objects in AMC.
Creating a Quarantine Zone
For devices that cannot be classified—that is, they do not match any of the Deny or Standard zone profiles—you can create a Quarantine zone. You can offer a user whose device is classified into this zone Web links and an explanation, for example, of how to bring his or her device into compliance with your security policies, or how to configure a system for EPC interrogation.
Only one Quarantine zone per community can be defined (you can create multiple Deny and Standard zones).
When you configure a community, you choose the “fallback” zone for devices that cannot be classified: they can either be placed in the Default zone or a Quarantine zone. For more information, see Using End Point Control Restrictions in a Community
To define a Quarantine zone
1. From the main navigation menu in AMC, click End Point Control. The End Point Control Settings page appears.
2. Click Edit in the Zones and Device Profiles section, select New in the Configure Zones and Devices page, and then select Quarantine zone from the menu. The Zone Definition - Quarantine Zone page appears.
3. In the Name box, type a meaningful name for the zone.
4. (Optional) In the Description box, type a descriptive comment about the zone.
5. In the Customization area, type the message you want quarantined users to see. You might offer an explanation for why a device was placed in quarantine and what is required to make it comply with your security policies.
Remediation steps for devices that are placed in a Quarantine zone should probably include information on how to configure a system for EPC interrogation. For most users, this means enabling Java in the browser, enabling ActiveX, or downloading the Java Runtime Environment (JRE). Your message for users could include some or all of the following:
– Verify that Java or JavaScript is enabled in the Web browser on the computer (in most browsers, Java is enabled by default). End point interrogation can’t take place if ActiveX and Java are both disabled in the user’s browser.
– If you are using Microsoft Windows and Internet Explorer, verify that ActiveX is enabled: start Internet Explorer, and then click Internet Options on the Tools menu. On the Security tab, click the Internet logo at the top of the tab, and then click Custom Level to configure ActiveX controls and plug-ins.
– JRE allows Java applications or Java applets to run on personal computers. To see if it is running on your machine, type java -server at the command prompt.
6. Add any Web links that can help users bring their devices into compliance. This can be a mixture of public and private URLs:
– A public address might reference an Internet URL from which the user can download a software component, such as a Java Virtual Machine. Public resources are normally redirected through the appliance;prevent this redirection by adding the resource in the exclusion list. See Using the Resource Exclusion List for instructions.
– A private address might reference an intranet URL containing the latest virus definitions. In this case, rules are automatically created to give users access to the URL you specify and to prevent them from accessing any other resources.
7. Click Save, or Save and Add Another.
When you configure a community, you choose the “fallback” zone for devices that cannot be classified: they can either be placed in the Default zone or a Quarantine zone. For more information, see Using End Point Control Restrictions in a Community
Only one Quarantine zone per community can be defined (you can create multiple Deny and Standard zones).
Configuring the Default Zone
AMC provides a global Default zone that serves as a fail-safe to either allow or block VPN access for any connection requests that don’t match the other zones you set up. When the appliance receives a connection request that it can’t classify into a zone—meaning it can’t identify the client device’s operating system, browser, or other attributes—that device is automatically placed in the Default zone. You can choose whether to grant or deny VPN access to users whose devices are assigned to the Default zone.
Unlike other zones, the Default zone does not include device profiles, but it can be configured to require the presence of a data protection agent. The Default zone is implicitly present in every community configured in AMC.
To configure the Default zone
1. From the main navigation menu in AMC, click End Point Control.
2. Click the Edit link in the Zones section of the Configure Zones and Devices page. The Zone Definition - Default Zone page appears with Default zone automatically entered in the Name box. (The name for this zone cannot be changed.)
3. In the Access restrictions section, select whether the appliance will Allow VPN access or Block VPN access for devices that are placed in the Default zone. If you select Block VPN access, users who are assigned to the Default zone are logged off of the appliance.
4. In the Access method restrictions section, specify which access methods, if any, will not be allowed for clients that are classified into this zone.
5. In the Data protection section, specify whether client devices placed in the Default zone are required to have Cache Cleaner to connect. Cache Cleaner provides enhanced data protection on all platforms except Linux platforms,
6. In the Recurring EPC section, you can specify how often EPC checks are done. Select Check endpoint at login to perform an EPC check only once (at login), or select Check endpoint at login and every <n> minutes thereafter at login and then every <n> minutes for the duration of the session.
7. The connection between devices and the appliance can handle interruptions—such as suspending a session and later resuming it, or temporarily losing connectivity—without requiring that users reauthenticate, as long as the device is using the same IPv4 or IPv6 IP address.
To allow users to resume sessions from a different IP address—for example, when roaming from one IP subnet to another by plugging into another part of your network—select the Allow user to resume session from multiple IP addresses check box in the Advanced area.
Note For Secure Network Detection to work, this check box must be checked to allow user to resume sessions from multiple IP addresses.
8. Click Save.
Examples
To provide a limited degree of access to users whose connection requests don’t meet your criteria for a trusted relationship, you can include the Default zone in a restrictive access control rule. For example, you could let users access their email by including the Default zone in a “permit” access control rule limited to Web browsers connecting to Outlook Web Access.
If a restrictive access policy that requires a high degree of trustworthiness and does not allow connection requests unless they are explicitly defined, setting the Default zone to Block VPN access is the best strategy. Keep in mind that if your other zones and access control rules inadvertently omit legitimate users, the Default zone will block them without exception.
Defining Device Profiles for a Zone
A device profile establishes a trust relationship with a client device by looking for one or more attributes, such as an antivirus program, application, or Windows registry entry. Device profiles can be referenced by one or more zones.
A device profile can be defined to detect only one attribute on a client computer, or it can require multiple attributes. When a device profile references multiple attributes, each of those attributes must be present on a client computer for there to be a match.
Device profiles can be used to support:
• Microsoft Windows
• Apple Macintosh
• Linux operating systems
• Apple iOS mobile operating system
• Android mobile operating system
• Windows Mobile-powered devices
• Other mobile devices such as PDAs and smartphones
To define a device profile for a zone
1. From the main navigation menu in AMC, click End Point Control.
2. Click the Edit link in the Zones and Device Profiles section, in the Device Profiles section click New, and then select one of the listed platforms. The Device Profile Definition window appears:
3. In the Name text box on the Device Profile Definition page, type a meaningful name for the device profile.
4. (Optional) In the Description box, type a descriptive comment about the device profile.
5. Select attributes for the device profile. After selecting each attribute, click Add to Current Attributes. The attribute is added to the Current attributes list at the bottom of the page.
– The available attributes depend on the device profile you selected; Client certificate, for example, is not available as an attribute in a Linux profile, and Antispyware program is available only for users who have Advanced EPC.
– Where multiple entries are allowed for an attribute, note whether a device profile must match all (and) or match any (or) items on the device.
Detailed descriptions of the attributes and the platforms on which they are available are in Device Profile Attributes.
6. Click Save.
For information on how to copy or delete a device profile, see Adding, Editing, Copying, and Deleting Objects in AMC.
Device Profile Attributes
A device profile can have several attributes, all of which are detailed in this section. There are a few things to note about this list:
• The attributes from which you can choose differ, depending on the platform you selected for your device profile.
• Users who have Advanced EPC can pick from a wide range of security programs. Advanced EPC is included with the EX9000 and EX7000; it can be purchased separately for the other appliance models.
• Where multiple entries are allowed for an attribute, a device profile must either match all (and) or any (or) items on the device. In the following example, only one of the two antivirus programs is required in order for there to be a match, but both of the Windows registry keys are required:
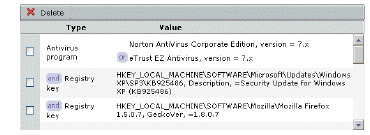
• To delete an item in the list, select the check box in the left column and click Delete. To delete a single (or) item, for example, Norton AntiVirus but not eTrust EZ Antivirus, move your pointer to the left of the item you want to delete and click the red “X” that appears (in the Value column) for the item you want to delete.
The following section describes each attribute, the platforms on which it can be used, and whether multiple attributes of the same type (where allowed) are ORed or ANDed.
|
Android Application
|
Platform
|
Match
|
|
Select one or more Android applications that EPC should check for in this profile. To do so, select the vendor from the Vendor list, which displays the vendor’s mobile security product and current version number. If the vendor has more than one mobile security product, all mobile security products are listed in the Product name list. Select the mobile security product that EPC should check for in this application. Next, The most current version of the selected product is displayed. Select the Operator used to compare the product version number.
The default is all versions greater than the most current version. To specify the current version and all future versions, select >= (greater than or equal to) from the Operator drop-down list. For more information, see Using Comparison Operators with Device Profile Attributes.
|
Android
|

(Match any)

(Match all)
|
|
|
Android version
|
Platform
|
|
Type the major and minor versions, and the build number for the operating system.
The comparison Operator applies to all three values. To specify all versions, enter “greater than or equal to” (>=) as the Operator, and then type the major version number in the Major text box and the minor version number in the Minor text box. For more information, see Using Comparison Operators with Device Profile Attributes.
|
Android
|
|
|
Antivirus program
|
Platform
|
Match
|
|
(This attribute is available only if you have Advanced EPC.) Select the antivirus programs that EPC should check for in this profile. See Advanced EPC: Extended Lists of Security Programs for more information.
If you don’t have Advanced EPC, or if you don’t see the security programs that your users require, you can still specify programs by adding them to a device profile using another attribute, such as Application or Windows registry entry.
|
Windows
Mac OS
Linux
|

(Match any)
|
|
|
Antispyware program
|
Platform
|
Match
|
|
(This attribute is available only if you have Advanced EPC.) Select an antispyware vendor on the left, and the name and parameters for the program on the right.
If you don’t have Advanced EPC, or if you don’t see the security programs that your users require, you can still specify programs by adding them to a device profile using another attribute, such as Application or Windows registry entry.
|
Windows
Mac OS X
|
If you add more than one antispyware program, specify whether it should match any item in your list (or), or all of them (and).
|
|
|
Application
|
Platform
|
Match
|
|
The device profile can check for the name of an application process that is running on the client device. Type the name of the application; names can contain wildcard characters (* and ?) and are case-sensitive in Mac OS X, Apple iOS, Linux, and Linux-based applications for Androids, but not case-sensitive in Windows.
Device profiles that check for the name of the application process used by jailbroken or rooted devices include:
• For jailbroken Apple iOS devices, the application is “sbsettingsd”.
• For rooted Android devices, the application is “com.noshufou.android.su”.
Note: If creating a device profile for jailbroken iOS devices or rooted Android devices, be sure to configure a denied EPC zone for each profile and bind each of these zones to at least one community.
|
Windows
Mac OS X
Linux
Windows Mobile
Apple iOS
Android
|

(Match all)
|
|
|
Client certificate
|
Platform
|
Match
|
|
Select a Certificate Authority from the drop-down list in the CA certificate area. (See Importing CA Certificates if the CA you want to use is not listed). A client device will match this profile as long as the appliance is configured with the root certificate for the CA that issued the client certificate to your users (an intermediate certificate will not work).
Select the certificate store(s) you want searched:
• System store only specifies that only the system store (HKLM\SOFTWARE\Microsoft\SystemCertificates) is searched
• System store and user store specifies that the system store is searched first, followed by the user store (HKCU\Software\Microsoft\SystemCertificates)
Notes:
• A device profile can contain only one client certificate attribute.
• A Windows Mobile-powered device has only one user, which means that any client certificates in the local user store are always the same. (On a desktop or laptop device, there can be multiple users.)
• The system store cannot be searched unless the user has administration privileges on the client device.
|
Windows
Mac OS X
Windows Mobile
Apple iOS
Android
|

(Match any)
|
|
|
Directory name
|
Platform
|
Match
|
|
Type the name of a directory that must be present on the hard disk of the device. Directory names are not case-sensitive.
• For jailbroken Apple iOS devices, the directory name is “/Applications/Cydia.app”.
Note: If creating a device profile for jailbroken iOS devices, be sure to configure a denied EPC zone for the profile and bind this zone to at least one community.
|
Windows
Mac OS X
Linux
Windows Mobile
Apple iOS
Android
|

(Match all)
|
|
|
File name
|
Platform
|
Match
|
|
Type the name of a file (including its extension and full path) that must be present on the hard disk of the device. File names are not case-sensitive. You can use environment variables (such as %windir% or %userprofile%), or wildcard characters (* and ?).
You can optionally specify a File size or the date and time (GMT) the file was Last modified. Both of these options use a comparison Operator; for more information and examples, see Using Comparison Operators with Device Profile Attributes. The file’s modification date and time can be specified as an Absolute or Relative value.
The device profile can be configured to validate file integrity using an MD5 or SHA-1 hash (valid on all platforms), or use a Windows catalog file to validate Windows system files.
Device profiles that check for the name of the file(s) used by jailbroken or rooted devices include:
• For jailbroken Apple iOS devices, the file name is “cydia”.
• For rooted Android devices, the file names are “/system/bin/su” and “/system/xbin/su”.
Note: If creating a device profile for jailbroken iOS devices or rooted Android devices, be sure to configure a denied EPC zone for each profile and bind each of these zones to at least one community.
|
Windows
Mac OS X
Linux
Windows Mobile
Apple iOS
Android
|

(Match all)
|
|
|
iOS version
|
Platform
|
|
Type the major and minor versions, and the build number for the operating system. For example, enter Major 5, Minor 0, and Build 9A405 for the iOS 5.0.1 build 9A405 version.
The comparison Operator applies to all three values. To specify all versions of 5.0, for example, enter “greater than or equal to” (>=) as the Operator, and then type 5in the Major and 0 in the Minor text boxes. For more information, see Using Comparison Operators with Device Profile Attributes.
|
Apple iOS
|
|
|
Mac OS X version
|
Platform
|
|
Type the major and minor versions, and the build number for the operating system. Examples of versions for the Mac OS are:
• v10.2 (Jaguar)
• v10.3 (Panther)
• v10.4.4 (Tiger)
• v10.5.6 (Leopard)
The comparison Operator applies to all three values. To specify all versions of Leopard, for example, enter “greater than or equal to” (>=) as the Operator, and then type 10 in the Major and 5 in the Minor text boxes. For more information, see Using Comparison Operators with Device Profile Attributes.
|
Mac OS X
|
|
|
Personal firewall program
|
Platform
|
Match
|
|
(This attribute is available only if you have Advanced EPC.) Select the firewall programs that EPC should check for in this profile. See Advanced EPC: Extended Lists of Security Programs for more information.
If you don’t have Advanced EPC, or if you don’t see the security programs that your users require, you can still specify programs by adding them to a device profile using another attribute, such as Application or File name.
|
Windows
Mac OS X
Linux
|

(Match any)
|
|
|
Windows domain
|
Platform
|
Match
|
|
Type the domain name the computer belongs to in NetBIOS syntax (for example, mycompany), without a DNS suffix. Separate multiple entries with a semicolon. The domain can contain wildcard characters (* and ?).
Note: Due to client operating system limitations, Mobile Connect cannot convert host name, URL, or domain type resources containing wildcards to an IP address and, therefore, cannot redirect them to the appliance.
|
Windows
|

(Match any)
|
|
|
Windows registry entry
|
Platform
|
Match
|
|
Type the Key name, and optionally enter a Value name and Data, and then select a comparison Operator for the Data field. See Using Comparison Operators with Device Profile Attributes for more information.
Wildcards can be used for the value and data, but not for the key. To enter a special character (such as a wildcard or back slash), you must precede it with a back slash.
|
Windows
Windows Mobile
|

(Match all)
|
|
|
Windows version
|
Platform
|
|
Type the major version, minor version, and build number for the operating system. Example major/minor versions for Windows are:
• Windows Vista: 6/0
• Windows 2000: 5/0
The comparison Operator applies to all three values. For more information, see Using Comparison Operators with Device Profile Attributes.
|
Windows
Windows Mobile
|
|
Advanced EPC: Extended Lists of Security Programs
Advanced EPC is an optional component—licensed separately—that provides an extended and detailed list of security programs. You can configure EPC device profiles to check for personal firewall, antivirus, and spyware programs on clients running Microsoft Windows or Mac OS X, and to check for personal firewall and antivirus programs on clients running Linux.
Advanced EPC includes a built-in list of device profiles you can use as is or modify; see Advanced EPC: Using Preconfigured Device Profiles for more information.
Note The version of OESIS libraries on the client will always be the same as that of OESIS libraries configured on the connecting appliance. If there is any version mismatch, the client provisions the OESIS libraries from the appliance.
To add attributes using Advanced EPC
1. From the main navigation menu in AMC, click End Point Control.
2. Click the Edit link in the Zones and Device Profiles section. The Configure Zones and Devices page appears.
3. In the Device Profiles section, click New, then select an operating system from the list.
4. After giving the profile a Name (a Description is optional), select the Type of program that EPC should check for (for example, Antivirus program). (On the Linux platform, Antispyware program is not available.)
5. Select a Vendor and Product name. In Windows device profiles, select the Any product from this vendor check box, available for antivirus, antispyware, and personal firewall program vendors, to select all product names and create a profile that does not require updating every time the vendor releases a new version. When this option is selected, you can still specify additional criteria, such as signatures updated, file system scanned, and real-time protection enabled, as long as all the versions of all the products in the list support that functionality.
6. Specify an absolute or relative Product version.
Some products are known by several different names. For example, McAfee Inc. offers a core product nam ed McAfee VirusScan that is also known as McAfee VirusScan 2004 and McAfee VirusScan 2005. (When you select a product name that has an asterisk, you’ll see a footnote indicating its “core” product name.) Using the name indicated in the footnote is recommended so that you don’t have to update your device profile every time a core product is marketed under a new name.
7. There are optional parameters you can use to more narrowly define the security program settings that the device profile requires (not all parameters are available for each program choice—any that are not available are dimmed):
– Signatures updated: Defines how recently the list of antispyware or antivirus signatures was updated on the client device.
– File system scanned: Defines how recently the client device’s disk was scanned using this antispyware or antivirus program.
– Realtime protection required: If the device profile requires that realtime scanning for viruses and spyware is enabled, select this check box.
8. Click the Add to Current Attributes button to add an entry to the list at the bottom of the page. When you add additional programs (for example, if you want the device profile to check for any of several programs), the device profile must match all (and) or any (or) items on the device:
– Additional antivirus programs are grouped together, but the device profile requires just one of the programs for a match.
– When you specify more than one antispyware program, you can specify whether all of them are required (and), or just a single one (or).
For example, this device profile is matched if one of two antivirus programs is present, along with one of two antispyware programs:
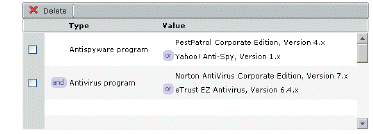
9. Click Save.
Note The product names you can choose from include some that use Far Eastern language characters. If you do not have international support enabled on your operating system, these characters may be displayed as boxes or question marks. The name of one of the Symantec products you can choose, for example, may look like this if the appropriate font support is missing:

With international support enabled, it looks like this:

Advanced EPC: Using Fallback Detection
Fallback detection uses advanced EPC to detect newer vendor software versions than are recognized by OESIS, which allows zone classification to succeed. Fallback detection supplements your fully trusted profiles with EPC definitions for the versions you want to determine fully (for example, Microsoft Security Essentials version 4.x or higher).Fallback detection, which uses the Windows Security Center (WSC), can be configured for Windows-based Antivirus, Antispyware and Personal Firewall products.
For example, users are put in the Trusted zone when they log in with McAfee Antivirus. When they update to a newer version of McAfee and log in, the WSC fallback will match for the Trusted Fallback zone, and they will be allowed access.
Once Dell Secure Mobile Access supports the new McAfee version, administrators can simply update the policy for the Trusted zone to include the new version. This allows the admin to easily distinguish between devices that match a specific antivirus version and those that do not, but do match the Fallback logic.
Note To use Fall back Detection, device profiles for the Primary EPC zone must be configured with specific versions of antivirus, antispyware, and firewall products and NOT with the Any product from this vendor option.
Perform the following steps to configure Fallback Detection:
1. Create a new device profile for trusted fallbacks with the following values.
a. From the main navigation menu in AMC, click End Point Control.
b. Click the Edit link in the Zones and Device Profiles section. The Configure Zones and Devices page appears.
c. In the Device Profiles section, click New and select Microsoft Windows.
d. Type the Name of the new device profile.
e. From the Type drop-down list, select Antivirus program, Antispyware program, or Personal firewall program.
f. From the Vendor drop-down list, select the vendor that provides the product.
g. From the Product drop-down list, select Other <vendor> <type> (for example, Other Aliant Firewall).
Do NOT use the Any product from this vendor check box.
h. Set the Product version to >= x.
i. If applicable, enable Signatures updated and Realtime protection required.
j. Click Save.
11. Create a new Trusted Fallback zone and add the Trusted Fallback profile to this zone.
Optionally, Trusted and Trusted Fallback profiles can be combined into one zone, depending on your security requirements. However, using a separate Trusted Fallback zone allows you to easily determine when users update software that is not matched by the Trusted zone, so you will know when to add new versions to the Trusted zone.
12. In your community, add the Trusted Fallback zone to the Realms list directly below the Trusted zone.
Advanced EPC: Using Preconfigured Device Profiles
To help you get started with End Point Control, there are several preconfigured device profiles, grouped by operating system, that you can use as is or copy and modify to suit your access policy and resource requirements. Click End Point Control in the main navigation menu in AMC, and then click the Edit link in the Zones and Device Profiles section to see the list:
• Home Users
• McAfee Corporate
• Norton Corporate
• Sophos Corporate
• Trend Micro Corporate
The device profile named Windows - McAfee Corporate, for example, is a Windows device profile preconfigured to require McAfee VirusScan Enterprise (version 7.50.0 or later), and either one of the specified personal firewall products:
|
Attribute type
|
Product name
|
|
Antivirus program
|
McAfee VirusScan Enterprise, version >= 7.5.0.x
|
|
AND
|
|
|
Personal firewall
|
McAfee Personal Firewall Express, version >= 5.x
|
|
|
OR
|
|
|
McAfee Personal Firewall Plus, version >= 5.x
|
|
You can use these predefined profiles as a starting point for your own. Copy one that matches your environment the closest, and then modify it, changing (for example), the acceptable product versions and the requirement for how recently the list of antispyware or antivirus signatures was updated on the client device. To delete an entire row in the list of current attributes, select the check box for that row and click Delete. To delete an item in an ORed list (one of the personal firewall products in the McAfee Corporate profile, for example), move your mouse cursor over the “or” and then click the red “X” that appears.
Using Comparison Operators with Device Profile Attributes
Some device profile attributes can be modified using comparison operators, which is useful in situations such as these:
• Keeping a device profile current with software that is automatically updated on client devices—you don’t need to manually change the profile each time the software is updated
• Specifying that a specific file detected on client machines has a timestamp greater than a certain date and time
• Specifying that the Windows operating system detected on the client device be greater than or equal to a certain version
The available comparison operators are:
|
Operator
|
Description
|
|
<
|
Less than
|
|
<=
|
Less than or equal to
|
|
=
|
Equal to
|
|
>=
|
Greater than or equal to
|
|
>
|
Greater than
|
|
!=
|
Not
|
|
Comparison operators can be used in conjunction with the following device profile attributes:
• File date or time stamp for a specific file
• File size for a specific file
• Registry entry (when value data is selected for a registry key)
• Windows version
Example
Use these steps to find a file on a PC running Microsoft Windows that has recently been updated.
To specify a relative or absolute file date
1. From the main navigation menu in AMC, click End Point Control.
2. Click the Edit link in the Zones and Device Profiles section, and then click New in the Device Profiles section.
3. Select Microsoft Windows on the menu.
4. Type a meaningful name for the device profile in the Name text box.
5. (Optional) In the Description box, type a descriptive comment about the device profile.
6. In the Add attribute(s) area, select File name in the Type list.
7. In the File name field, type weekly_timesheet.xls. The following are two examples of how to specify a time stamp for the file:
– To specify that weekly_timesheet.xls has been updated within the last five days, select <= in the Last modified list, click Relative, and then type 5 in the text box.
– To specify that the file was updated after June 1, 2006, select >= in the Last modified list, click Absolute, and then type 06/01/2006 in the text boxes.
8. Click Add to Current Attributes, and then click Save.
Using End Point Control with the Connect Tunnel Client
You can use End Point Control on devices that connect to the appliance using the Connect Tunnel client. As with other access methods, EPC for the Connect Tunnel client supports the use of device profiles and EPC zones. However, the Connect Tunnel client does not support Cache Cleaner; This data protection option is ignored by the Connect Tunnel client.
Performing Recurring EPC Checks: Example
A connection request is classified into an EPC zone based on attributes defined in a device profile. This check is always performed when the user logs in; in addition, you have the option of checking at regular intervals whether a device continues to match the profile for a particular zone.
An example illustrates how this setting might be used. In this scenario the system administrator has given each systems engineer in the organization a USB device that provides access to resources protected by the E-Class SRA appliance. This provides two-factor authentication: During a user’s session, the appliance repeatedly checks for the presence of a client certificate associated with a USB device: if the check fails, the session ends. Since an essential part of the user’s authentication (the client certificate) is on the USB device, authentication data does not remain on the system when the systems engineer removes the key.
Here’s how it looks from the systems engineer’s perspective:
1. Insert your personal USB device into any desktop or laptop device (trusted or untrusted). If the device is running Windows Vista and Internet Explorer 7, Protected Mode must be off.
2. Enter your PIN number.
3. Log in for access to the VPN and authenticate. The E-Class SRA appliance checks for your client certificate when you log in and at regular intervals thereafter (the interval is set by the E-Class SRA appliance administrator). When the USB device is removed, the check fails and the connection is ended.
Here’s an overview of the configuration steps the administrator must take:
1. To establish a trust relationship between the USB device and the appliance, you must reference a root CA certificate in the EPC device profile. If it’s not already present, import the certificate to the appliance (click SSL Settings in the main navigation menu, and then click Edit in the CA Certificates area).
2. Using Appliance Management Console, create a device profile for Windows, Mac, or Linux devices to check for the presence of a client certificate on the USB devices you plan to distribute. The certificate must descend from the root certificate from step 1. When creating a device profile for Windows, ensure both system and user certificate stores are searched.
3. Create an EPC Standard zone that requires the device profile from the preceding step.
4. When you are defining the zone, specify in the Recurring EPC area at what intervals EPC will check the client systems that are classified into this zone. In this case, you might want to perform frequent checks (for example, every minute).
Note Recurring EPC intervals of less than 10 minutes may produce unexpected results.
5. A device for which there is no profile match—the client certificate does not descend from the root CA certificate identified in the first step, or the USB device has no certificate—will “fall through” to either the Default zone or a Quarantine zone:
– To deny access to any connection requests that don’t meet your criteria, configure the Default zone to simply deny access. In the Access restrictions area on the Zone Definition page, select Block VPN access.
– If you prefer, you can create a Quarantine zone and customize the message users see; for example, you may want to explain what is required to bring the user’s system into compliance with your security policies.
Note It’s important for users to understand that their connectivity depends on the presence of the USB device. For this reason they should also not leave the USB device plugged in and unattended.
Creating Zones for Special Situations
While the majority of connection requests—those involving Microsoft Windows and Internet Explorer, Google Chrome, or Mozilla Firefox—can be accommodated by Standard zone configurations, you may need to address special situations involving other operating systems and browsers, or connection requests that don’t match any of the zones you’ve defined. You can use zones and device profiles to address the following types of situations:
• Clients that don’t match the criteria for any defined zones and device profiles.
• Clients that don’t support the EPC interrogation necessary for classifying a client into an EPC zone.
• Clients running certain Web browsers (anything other than Internet Explorer, Google Chrome, and Firefox) on Windows, or users running earlier (pre-Windows 7) versions of Windows.
• Special classes of users who require access regardless of the client device they’re running.
Be sure to configure the global Default zone, which is implicitly present in every community configured in AMC.
• Defining Zones for Certain Browsers or Earlier Versions of Windows
• Collecting Equipment IDs from Unregistered Devices
• Defining Zones for Special Classes of Users
Defining Zones for Certain Browsers or Earlier Versions of Windows
When a user connects to the E-Class SRA appliance, the appliance interrogates the user’s computer and determines (among other things) what operating system it’s running and what Web browser is in use. EPC requires Windows 7 or later, and either Internet Explorer, Google Chrome, or Firefox, but you can define a special zone for users who don’t meet those requirements. This prevents them from being placed in the Default zone, which might block their access. The only attribute used to distinguish this type of zone is the presence of the Windows system.
This configuration can also be used to define a zone for users who are running a version of Microsoft Windows that was released before Windows 7.
To define a zone for clients with non-standard browsers
1. From the main navigation menu in AMC, click End Point Control.
2. In the Zones and Device Profiles section of the End Point Control Settings page, click the Edit link. The Configure Zones and Devices page appears.
3. Click New in the Zones section, and select Standard zone from the menu. The Zone Definition page appears.
4. In the Name box, type a meaningful name for the zone.
5. In the Description box, type a descriptive comment about the special browser zone.
6. Click New in the Device Profiles section, and then select Microsoft Windows from the menu. The Device Profile Definition page appears.
7. In the Name box, type a meaningful name for the device profile.
8. In the Description box, type a descriptive comment about the device profile.
9. In the Add attribute area, select Windows version from the Type list and then click Add to current attributes. Do not specify any other attribute settings.
10. Click Save.
11. Select the check box for the browser Device profile that you want to include in the zone.
12. Use the >> button to move the items to the In use list.
13. If you want the device profile to require the presence of a data protection component, select Cache Cleaner from the Required data protection tool list.
Cache Cleaner is not supported on Linux platforms.
14. When you are finished configuring the zone, click Save.
Collecting Equipment IDs from Unregistered Devices
Every Windows desktop and mobile device has a unique identifier, and you can use this identity in a device profile to ensure that only certain devices have access to protected resources. But before you can add equipment ID data to your directory server as a user attribute, you must first collect the data. You can do this in several ways:
• By creating device profiles for unregistered devices and having users log in: the device ID is collected in the Unregistered device log. See Creating Device Profiles that Allow Unregistered Devices.
• By creating a device profile that uses a device identity, but does not have the Match Profile if user has no registered devices option enabled. See Disabling Match Profile if user has no registered devices in the Device Profile.
• By creating a quarantine zone associated with a device profile that matches users who log in using an unregistered device. See Quarantining Unregistered Devices.
• By creating a deny zone associated with a device profile that matches users who log in using an unregistered device. See Locking Out Unregistered Devices.
• By exporting the log messages for login attempts by unregistered devices to an external machine, where an IT administrator can view the list and register the devices or they can be automatically registered. See Exporting the Unregistered Device Log for External Processing.
Note When selected, the Match profile if user has no registered devices check box is applicable when the user has no devices registered in the back end AD or LDAP server and there are no hard coded devices in the device profile.
For example, consider the case where two attributes have been created for user 'test' in the AD/LDAP server, and these attributes are mapped to two policy variables. A device profile is created containing these two variables and the equipment ID "4JV5DQH1". The check box is selected. This device profile is a part of a zone called 'std_desc'. Unlike user 'test', user 'test1' has no representation in the backend LDAP/AD server.
User 'test' logs in with a device that is registered in the backend server. The zone classification is std_desc. However, user 'test1' logs in with the same device and is classified into the default zone. Note that the check box does not apply to user 'test1' in this case.
However, if you remove the device ID '4JV5DQH1' from the device profile, leaving just the two policy variables, you will see a different zone classification for user 'test1'. In this case, user 'test' logs in with a registered device and is classified into the std_desc zone. User 'test1' logs in and is also classified into the std_desc zone. Note that the check box applies in this case because user 'test1' has no devices registered, the two policy variables in the device profile of the zone return with NULL values, and there isn't the third hard coded device in the device profile.
If you are using mobile devices, you may already have the device identities entered into your database. In this case, you could simply refer to them in a profile. Users logging in from one of these devices will match this profile and qualify for the associated zone.
The device identifier is usually an attribute in the authentication directory represented by a variable; for example, {device_identity}. The format of the identifier differs, depending on the kind of device used:
• For a Microsoft Windows device, the identifier is a unique hard drive serial number; for example, WD-WMAM9SK79685.
• For a Mac OS X device, the Universal Unique Identifier (UUID) is used. A UUID is a 128-bit number that combines references to the network address of the host that generated the UUID, the timestamp, and a random number. An example of a UUID is: 951A240E-F502-5632-BDAB-D1ECA43FA371.
• For a Linux device, the UUID is the device identifier.
• For a Virtual Machine, the UUID is the device identifier.
• For a Windows Mobile 6 device, the identifier is the unique 15-digit IMEI (International Mobile Equipment Identity) code for the device; for example, 350077-52-323751-3.
• For a Nokia Symbian device, the identifier is the unique 15-digit IMEI.
• For a Google Android device, the device serial number is the identifier.
• For an Apple iPhone/iPad, the device serial number is the identifier.
• In the case of the Apple iPhone, the device prepends “Appl” to its device ID/serial number when it communicates with Exchange servers. For example: Appl828315FLY7H.
You can use the procedure in Knowledge Base article #8901 to determine the unique ID of your Windows, Mac, or Linux device. The Knowledge Base is available at:
http://www.Aventail.com/us/support/2213.html
Another method to get the correct device ID for a smartphone is to view the POST message in the AMC log after the phone attempts to connect to the appliance. Navigate to the Logging page, and select Web proxy audit log in the Log file drop-down list on the View Logs tab. The POST message looks like this:
http://10.10.11.12/Microsoft-Server-ActiveSync?User=jt&DeviceId=Appl828315FLY7H&DeviceType=iPhone&Cmd=Sync
Use the DeviceId value in your database for profiles to refer to.
Your directory server may be set up with a different attribute for each of these types of identifiers, or you can store the data in a single attribute. In this example, a single attribute and variable is used.
Creating Device Profiles that Allow Unregistered Devices
To collect equipment IDs from unregistered devices by using a device identity variable with device profiles
1. Identify or set up the AD or LDAP authentication server and realm you want users with unregistered devices to log in to. If you’re starting from scratch, see Creating Realms for more information. In this example, the realm is named Employees.
2. Create a variable named device_identity that points to an attribute in the directory server specified in step 1 (you can create the variable and capture data even if the attribute it points to doesn’t exist yet):
a. From the main navigation menu in AMC, click Resources.
b. On the Variables tab, click New, and then type the name for the variable; for example, device_identity.
c. Select User attribute from the Type list, and then make sure Employees is selected in the Realm list.
d. If the user attribute that holds device ID data already exists, enter a valid user name in the User text box, and then select the attribute from the Attribute list. If it doesn’t exist yet, just enter its name in the Attribute text box.
e. If it’s possible that some users will be associated with more than one device (for example, a desktop computer and a laptop), select Multiple results in the Output list.
6. Now create device profiles and a zone for unregistered devices. If you are collecting data from all three types of devices, you’ll need one device profile for each one:
a. From the main navigation menu in AMC, click End Point Control; make sure that EPC is enabled.
b. Click the Edit link in the Zones and Device Profiles section of the Device Profiles page, click New in the Device Profiles section, and then select Microsoft Windows, Windows Mobile, or ActiveSync.
c. Give the device profile a name (for example, Unregistered - Windows), and then select Equipment ID in the attribute Type list.
d. Select Matches as the Value. You’ll create a Standard zone later in this procedure.
e. Click the {variable} button next to the Device identifier text box, select the variable you created in step 2, and then click Insert. Click {variable} again to close the list.
f. In the Unregistered devices area, select the Match profile if user has no registered devices check box. Devices that are not already registered on the external AD/LDAP server will be a match for this profile and their identifiers will be recorded in the Unregistered device log. If you haven't already defined the variable, you'll see a warning (Undefined: {device_identity}), which can be ignored for now.
g. Click the Add to Current Attributes button, and then click Save.
h. Add a device profile for each of the other types of devices you want to accommodate. For example, Unregistered - WinMobile, or Unregistered - ActiveSync.
9. Create a Standard zone named Data collection that uses the device profiles that you created. See Creating a Device Zone for more information.
10. Now create a community named New devices in the Employees realm. On the End Point Control Restrictions page for that community, move the Data collection zone to the In use list. See Creating and Configuring Communities if you need help setting up a community.
11. When you apply and save your changes, click End Point Control in the main navigation menu; the Data collection zone should look like this:
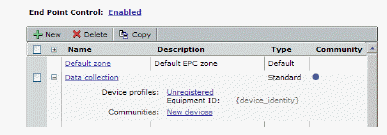
12. When an unregistered device is detected during login, the user is placed in the Data collection zone because the device matches the Unregistered profile. To see device identity details, select Unregistered device log on the Logging page in AMC.
13. Select No devices in the Device count list, and then click Refresh, so that you're sure to capture all new users. An expanded entry might look like this:
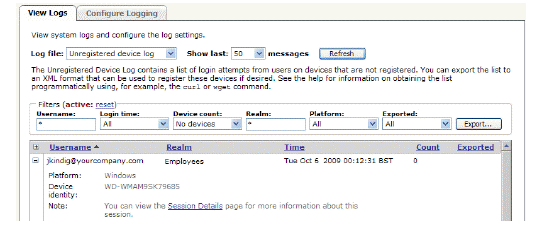
14. If you need to do any additional analysis of the logged data, export it to an XML file. You can reduce the size of the exported file by first applying filter or search criteria. The Show last <n> messages setting determines the maximum number of messages included in the exported log file.
Disabling Match Profile if user has no registered devices in the Device Profile
If you create a device profile that uses a device identity and disable the Match Profile if user has no registered devices option, a user with a new device (even if some devices are registered to that user) will not match this profile and will not be qualified into this zone. The unregistered device ID will be collected and placed into the unregistered devices list, provided that the user met all other (non-device) criteria to match the profile. The administrator can collect the device information from the unregistered device list and then register the device semi-automatically. Thus, with no user interaction, the next time the user attempts to log in using the device they may be able to classify into the zone.
Quarantining Unregistered Devices
You can create a device profile that specifies that the user does not match any of the device IDs currently registered for this user. This profile can be associated with a quarantine zone. A user with a new device will match this profile and be placed into the quarantine zone. You can configure a message to the user that the current device is unregistered, but that the device information was collected from their login attempt and their device will be registered for them, allowing their next login to qualify for the usual (non-quarantine) zone.
Locking Out Unregistered Devices
You can use a deny zone to lock out a particular device. To do this, create a device profile that contains an Equipment ID attribute and select the Does not match check box when adding the Device Identifier. This feature allows you to lock out, for example, a device that you suspect has been compromised, while not completely locking out the user who owns that device. The device information is collected from the login attempt.
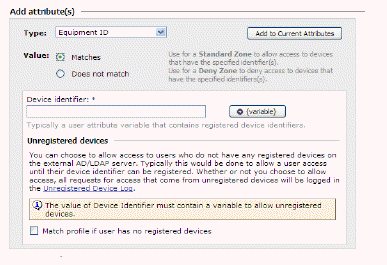
Exporting the Unregistered Device Log for External Processing
There are unregistered device log messages for every new unregistered device that is used in a login attempt. These messages can be exported in XML format to an external machine either from the Logging page in the AMC or by using a curl or wget command from an external machine. See Unregistered Device Log Messages for more information. This export feature allows you to collect these messages and then either automatically register each device, or inform a help desk of each new unregistered device that was used by each user.
Advanced: If you need be notified immediately when a user attempts to log in using an unregistered device, you can configure a Syslog server on the Configure Logging page in AMC. The appliance will generate a log message with the following format when a login or login attempt occurs:
New Equipment: user '#1', platform '#2', device '#3', existing Devices '#4'
Where:
#1 is the name of the user
#2 is the name of the platform
#3 is the ID of this device or piece of user equipment
#4 is the number of devices already registered for this user
Defining Zones for Special Classes of Users
Another method for preventing special classes of trusted users from being assigned to the Default zone (and potentially being denied access) involves creating a zone that contains no device profiles, and then assigning that zone to a community to which only those trusted users belong.
For example, if you want system administrators to be able to access network resources regardless of the client device they’re using, you could assign them to a community that contains a no-profile zone. Then when system administrators select a realm that references that community and log in, they are placed in the no-profile zone, instead of the global Default zone, which may be set up to block unrecognized clients.
To create a no-profile zone
1. From the main navigation menu in AMC, click End Point Control. The End Point Control Settings page appears.
2. In the Zones and Device Profiles section, click Edit.
3. Click New in the Zones section and select Standard zone to create. The Zone Definition page appears.
4. In the Name box, type a meaningful name for the zone.
5. In the Description box, type a descriptive comment about the zone.
6. You can optionally select a Required data protection tool for the zone. However, if you want this special class of trusted users to have flexibility regarding the types of devices they’re connecting with, leave this field set to None.
7. Click Save.
After you’ve defined the no-profile zone, you must create a realm specifically for this special class of trusted users. Configure the realm with a dedicated community so that only this special class can log in to it. For more information, see Assigning Members to a Community.
Using End Point Control Agents
Use End Point Control Agents to perform common EPC tasks such as enabling or disabling the virtual keyboard and clearing remote data from the client system after each user session.
|
Item
|
Description
|
|
Enable virtual keyboard
|
|
|
Require use of keyboard box
|
|
|
End inactive user connections
|
Select the length of time a connection is inactive before disconnecting it. Options range from 3 minutes to Never, with 10 minutes being the default inactivity time.
|
|
Enable Cache Cleaner
|
Check this check box to enable Cache Cleaner, which clears the browser cache after each user session. Cache Cleaner is available for Windows and Mac platforms only and only when End Point Control is enabled.
|
|
Allow user to disable Cache Cleaner
|
Check this check box to allow the user to close Cache Cleaner and bypass the cache-cleaning function
|
|
Clean session items only
Clean all items
|
Specify whether all browser items should be cleared, or just those related to the current session
|
|
Using the Virtual Keyboard to Enter Credentials
If there is a concern that credentials may be stolen, you can offer (or require) that users logging in to WorkPlace provide their credentials by pointing to characters on a keyboard display instead of typing them.
Because the virtual keyboard is used before a user is authenticated (and before a realm is chosen), the way in which it’s configured applies to all realms: you can’t offer the virtual keyboard to just certain groups of users, or require it only in certain cases. End Point Control does not have to be enabled in order for the virtual keyboard to be used.
The virtual keyboard settings do not apply to small form factor devices, such as smart phones; for information about optimizing WorkPlace for these devices, see Optimizing WorkPlace for Display on Small Form Factor Devices.
To configure the virtual keyboard in WorkPlace
1. From the main navigation menu in AMC, click End Point Control. The End Point Control Settings page appears.
2. In the End Point Control agents section, click Edit. The Configure End Point Control Agents page appears.
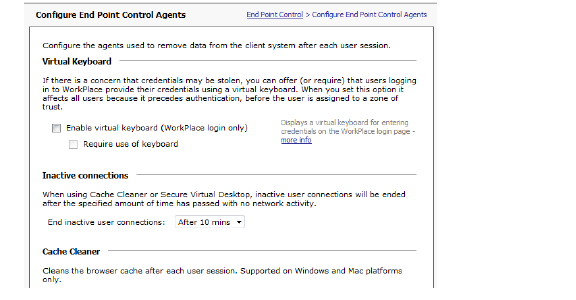
3. Check Enable virtual keyboard check box to let users enter WorkPlace login credentials using a virtual keyboard, which reduces the risk of credentials being stolen. When this setting is enabled, all WorkPlace users, regardless of login realm, have this option.
4. If the virtual keyboard is enabled, check the Require use of keyboard check box to require users to use a virtual keyboard to enter their WorkPlace login credentials.
5. Click Save.
Configuring Data Protection
Cache Cleaner is included with your appliance license.
About Cache Cleaner
When Cache Cleaner is enabled and the user logs into WorkPlace, the Cache Cleaner icon appears in the taskbar notification area. Users can access network resources as needed.
When the user ends the Cache Cleaner session, Cache Cleaner deletes all data associated with the session. All browser windows are closed by Cache Cleaner upon logout. A dialog box warns users that all browser windows will be closed on logout.
Note Because Cache Cleaner closes all browser windows on logout, make sure your users are aware: if someone is filling out a form, for example, anything that isn’t submitted when the browser window closes will be lost.
Configuring Data Protection Settings
To configure data protection in WorkPlace
1. From the main navigation menu in AMC, click End Point Control. The End Point Control Settings page appears.
2. In the End Point Control agents section, click Edit. The Configure End Point Control Agents page appears.
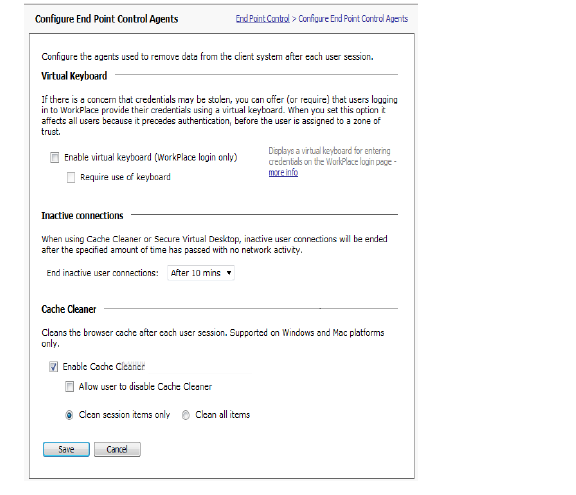
3. In the End inactive user connections drop-down list, select a timeout to automatically end inactive user connections and remove data from the client. This minimizes your exposure in case a user forgets to log out from a kiosk or other shared computer.
4. Select the Enable Cache Cleaner check box to clean the user’s browser cache after each session. Cache Cleaner is not supported on Linux platforms.
5. To allow the user to close Cache Cleaner and bypass the cache-cleaning function, select the Allow user to disable Cache Cleaner check box.
6. Specify whether all browser items should be cleared, or just those related to the current session: Clean session items only or Clean all items.
7. Click Save.
Application Access Control
Companies want to empower their employees to be productive and responsive from anywhere at anytime using their own personal devices. However, companies must balance this openness with the need to ensure that corporate data and networks are not compromised and that corporate compliance and legal requirements are met. As companies open up to BYOD devices, they must make sure that:
• Corporate data and network resources are secure
• Users are made aware of and agree with corporate policies and privacy ramifications associated with personal device accessing corporate networks
• Admins can keep track of and monitor the use of personal devices by employees
Application Access Control addresses all these concerns. It allows administrators to control which applications can access enterprise data resources from a personal device by combining the power of SonicWALL Mobile Connect on the client and Dell Secure Mobile Access on the appliance.
Client (SonicWALL Mobile Connect)
Application Access Control uses SonicWALL Mobile Connect on supported client devices (iOS/Mac OS/Android) to handle applications as follows:
• Applications selected from an application list - traffic destined for the corporate network from those applications is allowed to enter the tunnel. Information is provided to the server to identify the application.
• Applications on the list that are unchecked (or any other application on the device) - traffic destined for the corporate network is blocked and dropped by Mobile Connect and will NOT enter the tunnel.
• All applications (whether they are on the application list or not) - if the traffic is NOT destined for the corporate network the traffic is sent using the device’s default interface.
Appliance (Dell Secure Mobile Access)
After an application zone has been created and users with the proper devices can classify into the zone, configure the following:
• Applications that should be granted access to the corporate network,
• Users who can use each allowed application
• Destinations on the corporate network that each application can access.
Application Access Control is available for iOS 7+, Mac OS Mavericks 10.9+, and Android 4.0+ devices.
How Application Access Control Works
Secure Mobile Access and Mobile Connect work together as follows to provide a secure and manageable environment where personal devices can be used to easily access corporate resources:
1. The Administrator creates an application zone that enables the appliance to allow personal devices to access the corporate network and resources.
2. The user connects using a personal device that is not registered with the appliance. The user is prompted to register the device and agree to the personal device corporate policies and privacy policies to access corporate resources.
Once the user consents to the corporate policies for a device, the device’s unique Device ID is determined and the appliance registers the device to the user. Subsequent connections from this device do not require device authorization.
3. The user accesses network resources allowed by the application zone used to grant access.
4. The Administrator monitors usage of personal devices that have accessed the appliance.
Configuring Application Access Control
To configure Application Access Control perform the following steps in the order listed:
1. Create an Application Zone Profile, as explained in To define an Application zone profile
2. Configure an Application Zone, as explained in To create an Application zone.
3. Add the Application Zone to a Community. To do so, on the End Point Control Restrictions page for the community, move the Application zone to the In use list. See Creating and Configuring Communities if you need help setting up a community.
4. Create a Client Application List, as explained in Creating a Client Application List
5. Create or modify an Access Control Rule for the Application zone, as explained in Adding Access Control Rules for Application Access Control. Access Control rules control which applications can send data through the tunnel and the destinations on the corporate network those applications are allowed to access.
6. Identify a trusted learning device, as explained in Identifying a Trusted Learning Device. A trusted learning device is bestowed special rights to perform signature lookups as a part of learning application version information.
7. Learn the apps, as explained in Learning an App.
8. Approve adding learned apps to the Client Application List, as explained in Approving a Learned App.
9. View user access, as explained in Viewing User Sessions.
Creating a Client Application List
A Client Application List contains a list of applications and their version and signatures used by platforms to identify them. Applications in this list are referenced in Access Control rules and are enforced by Mobile Connect when a user attempts to access the remote network using an application defined in the list and referenced in the Access Control rule.
Some common apps like Safari and Email are preconfigured in every list. To find and add additional apps to the Client Application List used by a zone, you must first identify the App ID of the apps you want to add:
From an iOS or Mac OS device:
1. Use the Search link on the Resources > Add Client Application page to search for an app from within AMC.
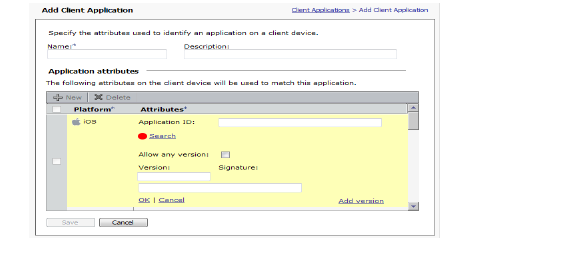
2. Alternatively, search the iTunes Store for an app by using the link.
https://itunes.apple.com/search?term=dell&entity=software&limit=10
SMA uses the bundleid field received from the iTunes store as the App ID value.
3. Download the app to an iOS or Mac OS device.
From an Android device:
Perform the following steps to add an Android app:
1. On an Android device, download and install an app like APK Extractor that will extract and read Apk files from apps. Apk Extractor is a free app that can be downloaded from the Google Play store.
2. Launch the extractor app, and scroll down until you find the application you want to add to the zone.
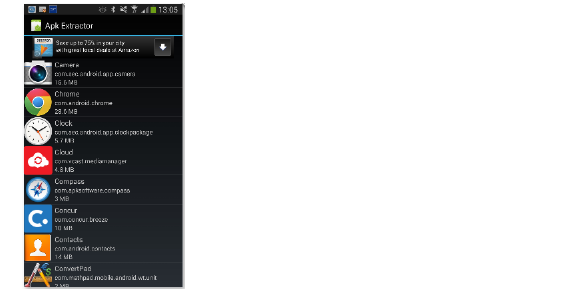
Using Chrome as an example, the App ID is com.android.chrome.
Create the Client Application List
Once you identify the App ID of each app you want to add to the Client Application List, create the list.
1. In AMC, navigate to Resources > Client Applications tab and click New to display the Add Client Application page.
2. In the Name field, type a friendly name for the app that will be used to identify the app to users.
3. (Optional) In the Description field, type a brief description to further identify the app.
4. In the Application attributes section of the Add Client Application page, click New and select the required platform the signature applies to (iOS, Mac OS, or Android) from the drop-down list.
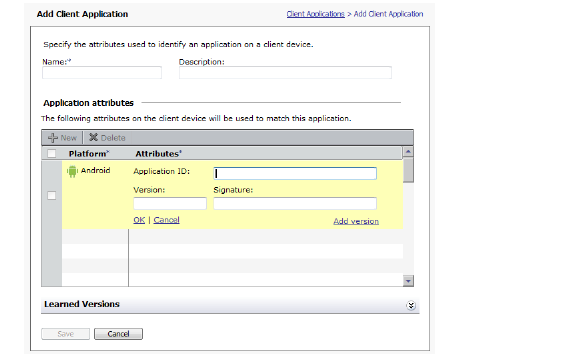
5. In the Application ID field, type the App ID of an app you want to add to the list. The remaining attributes will be detected when the app is learned.
Note: All versions of an app must share the same signature.
6. Click OK.
Identifying a Trusted Learning Device
A trusted learning device is assigned special privileges to perform signature lookups as a part of learning application version information. A trusted device is also used by End Point Control to check attributes on an endpoint device to discover its security state. Once a device is added to the Application Learning tab the device can learn application versions.
To identify a trusted learning device:
1. From the main navigation menu, click End Point Control.
2. Click Edit in the Device Profiles section and then click the Application Learning tab.
3. Click New to display the entry fields.
4. In the Description field, type a brief description to identify the device.
5. In the Device Identifier field, type the device ID of the device you want to make a trusted learning device.
6. Check the Enable application learning mode for the following devices check box to enable the appliance to recognize the device as a trusted learning device.
7. Click Save.
Learning an App
Once you have configured Application Access Control, added any additional apps, and identified the learning device, learn each app configured for Application Access Control:
Note Due to Apple limitations, the version for iOS apps cannot be learned with a trusted learning device and must be configured manually. The version is shown as Unknown on all AMC pages.
1. Launch Mobile Connect on a trusted device and connect to the SMA appliance.
After the device is successfully authenticated, applications that need versions to be learned are displayed.
2. Launch an application in the list.
3. Access a corporate network resource.
4. Verify that the application has a version pending approval by refreshing the display and confirming that a  Pending icon is displayed next to the application.
Pull down the main screen to refresh the Mobile Connect display.
5. Repeat the preceding steps for each listed application.
6. Once a version number is displayed in the Pending Versions list, login to AMC and approve the application:
– Navigate to Resources > Client Applications > Application.
– Select the application.
– Select the item from the Learned Versions list and click Approve.
– Click Save to save the client application.
– Approve each application awaiting approval.
– Apply the changes.
7. When the client application version(s) is approved, return to the trusted device and refresh the Mobile Connect display. The Pending icon should change to an Approved icon, which indicates the application is ready for general use.
Approving a Learned App
Apps are added to the Learned Versions section of the Client Application page when they are learned. You must approve a learned app before it can be added to the list.
1. In AMC, navigate to Resources > Client Applications tab and select the Client Application List where the app will be used, which displays the Edit Client Application page.
2. Expand the Learned.Versions section, select a learned app, and click the Approve button to add it to the application list. Only the most recent entry for each version is displayed.
3. (Optional) To remove an app from the list, select an app and click Discard.
4. Click Save.
Viewing User Sessions
User Sessions page provides an aggregate view of all users logged in to the appliance along with information about each users Realm, Community, EPC, Access Agent, and License status. This page also shows the connected duration, average speed, and total bytes transferred.


 Pending icon is displayed next to the application.
 Approved icon, which indicates the application is ready for general use.