SSLVPN_EPC
The following sections describe the Remote Access End Point Control (EPC) feature:
• Configuring Remote Access EPC
This section provides an introduction to the Remote Access EPC feature. This section contains the following subsections:
Traditional VPN solutions typically provide access only from the relative safety of a corporate laptop. These VPNs are primarily designed to prevent unauthorized network access, and they typically are not designed to verify that the user’s computer is secure. Corporate IT departments configure computers under their control with antivirus software, firewalls, and other safeguards designed to protect them from malicious software.
Because SSL VPN solutions can provide network access from any web-enabled device—such as public computers at cafes, airports, or hotels—extra care must be taken to verify that the user’s environment is secure. These unmanaged computers can easily be infected by keystroke recorders, viruses, Trojan horses, and other hazards that can compromise your network.
Remote Access End Point Control (EPC) verifies that remote users’s computers are secure before allowing network access.
Remote Access EPC guards against threats when your network is accessed from remote, insecure environments. Remote Access EPC is a two-part process:
1. Evaluates the Security Attributes of a user’s computer.
The user’s computer is checked against a number of configurable Security Attributes, such as antivirus, anti-spyware, or personal firewall programs, client certificates, registry entry, or Windows version.
2. Assigns the user session to a Device Profile that grants an appropriate level of network access over SSL VPN, depending on the security of the user’s computer.
The user session is assigned to a Device Profile that will either allow or block network access. If the computer does not meet the security requirements, a message can be displayed to instruct the user on how to secure the computer. Multiple Device Profiles can be configured to provide different levels of network access,
Device Profiles
There are three categories of Device Profiles that you can customize, plus a built-in default Device Profile.
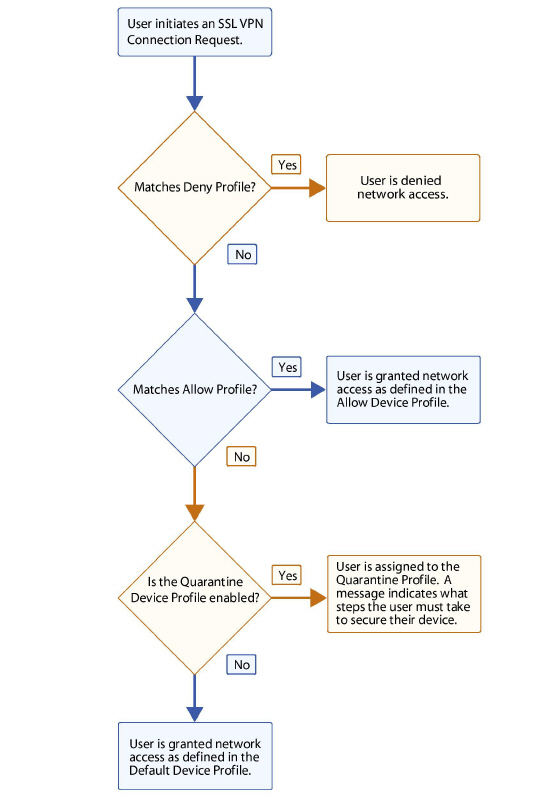
• Deny – Deny Device Profiles are evaluated first. The appliance tries to find a match in the list of Deny Device Profiles, starting with the one at the top. If the device matches a Deny Device Profile (for example, when a specified file is found on the device), the user is denied access to the network. A message is displayed informing the user and optionally providing direction on how to secure their device.
• Allow – If the device does not match the criteria for a Deny Device Profile, the appliance tries to find a match in the list of Allow Device Profiles, starting with the one at the top. If no match is found, the device is placed in the Default Device Profile, or in a Quarantine zone (if one is defined).
• Quarantine – If the device does not match any of the configured Deny or Allow profiles, it is placed in either the Quarantine Device Profile or Default Device Profile. The Quarantine profile does not allow the user access to the network. A customizable message is displayed. The message can be used to explain what is required to bring the user’s system into compliance with your security policies and to provide links to download security components. There can be only one Quarantine Device Profile.
• Default – The Default Device Profile is global and implicitly present in every OS type configured in UTM. When a device does not match any other profile, the device can either be assigned to the Quarantine profile or to the Default Profile. There are three separate Default Device Profiles for Windows, Linux, and MacOS platform devices.
Note When Remote Access EPC is disabled, the Default Device Profile is used to configure SSL VPN access. With Remote Access EPC disabled, only the Settings, Client Routes, and Client Settings options can be configured. The Security Attributes settings are not available when EPC is disabled.
Figure 69:26 illustrates the order in which the device profiles are evaluated when a user initiates an SSL VPN session.
Figure 69:26 Remote Access End Point Control Process
Security Attributes
Security Attributes are the critical component of Remote Access EPC. Each Device Profile can contain multiple Security Attributes. In order for the client to match the Device Profile, it must satisfy all of the configured Security Attributes.
SonicWALL Remote Access EPC currently supports the following eleven types of Security Attributes:
• Antivirus program
• Antispyware program
• Application
• Client certificate
• Directory name
• Equipment ID
• File name
• Personal firewall program
• Windows domain
• Windows registry entry
• Windows version
SonicWALL platform support:
• Remote Access EPC is available on all SonicWALL security appliances running SonicOS release 5.9 and above that are licensed for the SSL VPN feature.
NetExtender client support:
• Windows NetExtender client: Remote Access EPC is fully supported.
• Linux and MacOS NetExtender clients: Remote Access EPC supports a configurable default Device Profile. Currently, custom profiles cannot be created for Linux and MacOS.
To configure Remote Access EPC, perform the following steps:
Step 1 Navigate to the SSL VPN > Remote Access EPC page of the SonicWALL GUI.
Step 2 Select the Enable Remote Access EPC checkbox. When EPC is disabled, only the Default Device Profile can be configured, but without the Security Attribute settings. The Remote Access EPC page is divided into the following sections:
• Device Profiles OS Type
• Deny Device Profiles
• Allow Devices Profiles
• Device Profile failback options
• Quarantine Device Profile
• Default Device Profile
Step 3 SonicWALL recommends beginning by configuring the Default Device Profile. Scroll to the bottom of the Remote Access EPC page and click the Configure icon. See Configuring Remote Access EPC Device Profiles for full instructions on configuring the Device Profile.
Step 4 Click the Add button to configure additional Device Profiles. See Configuring Remote Access EPC Device Profiles for full instructions.
Step 5 If you will support SSL VPN sessions from Linux or MacOS devices, click the appropriate button in the OS Type menu.
Step 6 Click the Configure icon to configure the Default Device Profile for Linux and/or MacOS.
Note SonicOS currently does not support Remote Access EPC Security Attributes for Linux or MacOS; but in order to support Linux and MacOS users, you must configure the network address and client routes for the Linux and MacOS Default Device Profile.
Step 7 In the Device Profile Fallback options section, select how you want to treat users who do not match any of the Deny or Allow Device profiles:
• Place into default device profile – Users are granted network access as defined in the Default Device Profile.
• Place into quarantine device profile – Users are not granted network access. A pop-up window displays a administrator-configurable message that
Step 8 To configure the message that is displayed to quarantined users, click the configure icon for the Quarantine Device Profile.
Step 9 Click the Example Template to auto-populate the Quarantine Message with formatted HTML text. The quarantine pop-up message is displayed in a window that is 500 pixels wide. Edit the text of the message and click Preview to view how it will be displayed to quarantined users.
Configuring a Remote Access EPC Device Profile is a four-part process:
1. Configuring Device Profile Settings (for all Device Profiles)
2. Configuring Security Attributes (for all Device Profiles)
3. Configuring Client Routes (only for Allow Device Profiles)
4. Configuring Client Settings (only for Allow Device Profiles)
Step 1 On the SSL VPN > Remote Access EPC page, click the Add button. The Edit Device Profile window displays.
Enter the following information on the Settings tab:
• Name – A brief name for the Device Profile.
• Description – (Optional) A description of the Device Profile.
• Action – Select whether it is an Allow Device Profile or Deny Device Profile.
• Zone – (Only for Allow Device Profiles) Select the zone that clients will be assigned to when matching this Device Profile. Only zones with type “SSL VPN” can be selected.
• Network Address – (Only for Allow Device Profiles) Select the Address Object for the IP address pool for this device profile. Clients that match this profile will be assigned an IP address from the pool. Only Address Objects for the zone selected above can be used for the Device Profile. Each Device Profile must use a unique Address Object.
Select Create net network to create a new Address Object. For the Zone Assignment, select the same zone you selected above. For Type, select Range.
• Deny Message – (Only for Deny Device Profiles) Enter the HTML text for the message that is displayed to users who are denied access. Click the Example Template to auto-populate the Quarantine Message with formatted HTML text. The pop-up message is displayed in a window that is 500 pixels wide. Edit the text of the message and click Preview to view how it will be displayed to users.
Step 1 Click on the Security Attributes tab.
Step 2 In the Select Attribute(s) pulldown menu, select the appropriate type of attribute. The following sections describe how to configure the Security Attributes:
Step 3 Complete the attribute-specific configuration (described below) and click Add to current attributes.
Step 4 Repeat as needed to configure multiple attributes. When more than one Security Attribute is configured, the device must match all of them in order for it to match the Device Profile.
Step 5 When finished click the Client Routes tab and continue to Configuring Client Routes.
The Device Profile checks that the specified Antivirus program is installed.
The following information is used to define the Antivirus program attribute:
• Vendor – Select the vendor for the Antivirus program.
• Product name – Select the supported Antivirus programs.
• Product version – After you select an Antivirus program, the supported product version numbers are displayed. Select the appropriate version number and a comparison operator.
Tip For all of these numeric searches in Security Attributes, you can specify one of five types of comparison operators in the pulldown menu: greater than (>), greater than or equal to (>=), equal to (=), less than (<), or less than or equal to (<=).
• Signature updated – Enter a value in days for how recently the client device has updated its Antivirus signature and select a comparison operator type.
• File system scanned – Enter a value in days for how recently the client device has been scanned by the Antivirus program and select a comparison operator type
• Realtime protection required – Select this checkbox to require that realtime protection be enabled on the Antivirus program.
The Device Profile checks that the specified Antispyware program is installed.
The following information is used to define the Antispyware program attribute:
• Vendor – Select the vendor for the Antispyware program.
• Product name – Select the supported Antispyware programs.
• Product version – After you select an Antispyware program, the supported product version numbers are displayed. Select the appropriate version number and a comparison operator.
• Signature updated – Enter a value in days for how recently the client device has updated its Antispyware signature and select a comparison operator.
• File system scanned – Enter a value in days for how recently the client device has been scanned by the Antispyware program and select a comparison operator.
• Realtime protection required – Select this checkbox to require that realtime protection be enabled on the Antivirus program.
The Device Profile checks that the specified application is installed.
Enter the file name of the application. Wildcard characters (* and ?) can be used, and the entry is not case sensitive.
The Device Profile checks that a Certificate Authority (CA) certificate is installed.
Select the certificate from the CA certificate pulldown menu. All of the certificates installed on the SonicWALL security appliance are displayed in the pulldown menu. In order for a client device to match this profile, the appliance must be configured with the root certificate for the CA that issued the client certificate to your users (intermediate certificates do not work).
Select the certificate store(s) you want searched:
• System store only – Searches HKLM\SOFTWARE\Microsoft\SystemCertificates.
• System store and user store – The system store directory is searched first, followed by the user store: HKCU\Software\Microsoft\SystemCertificates.
The Device Profile checks that a specific directory is present on the device’s file system.
Enter the Directory name that must be present on the hard disk of the device. Directory names are not case-sensitive.
The Device Profile verifies the Equipment ID, a unique hardware identifier, of the device.
Enter the Device identifier for the user’s device. Only one device will be able to match this Device Profile. The device identifier is usually an attribute in the authentication directory represented by a variable; for example, {unique_id}.
A hard disk utility program such as HD Tune can be used to determine the Device Identifier. In the following screenshot of HD Tune, the Device Identifier is listed as “Serial number.”
The Device Profile checks that a specific file is installed.
The following information is used to define the file name attribute:
• File name – Enter the name of the file, including its extension and full path. File names are not case-sensitive. You can use wildcard characters (* and ?) or environment variables (such as %windir% or %userprofile%).
• File size – Enter the file size in bytes and select a comparison operator.
• Last modified – You can either select an absolute time by entering a date (in mm/dd/yyyy) format, or a relative time by entering the number of days (and optionally hours, minutes and seconds), since the file was modified.
• Validate file integrity – Select this checkbox to validate the file using either an MD5 or SHA-1 has, or a Windows catalog file.
The Device Profile checks that a personal firewall program is installed.
The following information is used to define the Personal firewall program attribute:
• Vendor – Select the vendor for the Personal firewall program.
• Product name – Select the supported Personal firewall programs.
• Product version – After you select an Personal firewall program, the supported product version numbers are displayed. Select the appropriate version number and a comparison operator.
The Device Profile checks that the specified Windows domain is present.
In the Computer is a member of domain field, enter one or more domain names, without a DNS suffix. Multiple entries can be separated with semicolons. The domain can contain wildcard characters (* and ?).
The Device Profile checks that the specified Windows registry entry is present.
The following information is used to define the Windows registry entry attribute:
• Key name – Enter the Windows registry entry.
• Value name – (Optional) Enter a specific value for registry entry.
• Registry entry – (Optional) Enter a numeric value for the registry entry and select a comparison operator.
Wildcards can be used for the Value name and Registry entry fields, but not for the key. To enter a special character (such as a wildcard or backslash), you must precede it with a backslash.
The Device Profile checks the version of Windows that the device is running.
The following information is used to define the Windows version search:
• Operator – Select greater than (>), greater than or equal to (>=), equal to (=), less than (<), or less than or equal to (<=).
• Major – Enter the Windows major version number.
• Minor – Enter the Windows minor version number.
• Build – (Optional) Enter the Windows build version number.
• The recent Windows versions are defined with the following Major and Minor release numbers:
– Windows 2000 – Major: 5, Minor: 0
– Windows XP – Major: 5, Minor: 1
– Windows Vista – Major: 6, Minor: 0
– Windows 7 – Major: 6, Minor: 1
The comparison Operator applies to all three values.
When you have completed the Security Attributes configuration, click on the Client Routes tab.
The Client Routes tab is used to govern the network access that is granted to SSL VPN users.
Select Enabled from the Tunnel All Mode drop-down list to force all traffic for NetExtender users over the SSL VPN NetExtender tunnel—including traffic destined for the remote user’s local network. This is accomplished by adding the following routes to the remote client’s route table:
|
NetExtender also adds routes for the local networks of all connected Network Connections. These routes are configured with higher metrics than any existing routes to force traffic destined for the local network over the SSL VPN tunnel instead. For example, if a remote user is has the IP address 10.0.67.64 on the 10.0.*.* network, the route 10.0.0.0/255.255.0.0 is added to route traffic through the SSL VPN tunnel.
Note In addition to configuring Tunnel All Mode, you must also configure the individual SSL VPN user accounts. See Configuring Users and Groups for Client Routes and Tunnel All Mode.
To configure client routes to grant SSL VPN users network access, perform the following steps:
Step 1 Select the appropriate Address Object in the Networks list.
Step 2 Click the -> button to add it to the Client Routes list.
Step 3 Repeat for any additional Address Objects.
Step 4 When finished, click on the Client Settings tab. When you are finished with configuring the Device Profile, see the following section on how to configure SSL VPN users and groups for SSL VPN access.
Configuring Users and Groups for Client Routes and Tunnel All Mode
Note After completing the Client Routes configuration in the Device Profile, you must also assign all SSL VPN users and groups access to these routes on the Users > Local Users or Users > Local Groups pages.
To configure SSL VPN NetEextender users and groups to access Client Routes, perform the following steps.
Step 1 Navigate to the Users > Local Users or Users > Local Groups page.
Step 2 Click on the Configure button for the SSL VPN NetExtender user or group.
Step 3 Click on the VPN Access tab.
Step 4 Select the address object for the Client Route, and click the right arrow (->) button.
Step 5 Click OK.
Step 6 Repeat steps 1 through 5 for all local users and groups that use SSL VPN NetExtender.
To configure SSL VPN users and groups for Tunnel All Mode, perform the following steps.
Step 1 Navigate to the Users > Local Users or Users > Local Groups page.
Step 2 Click on the Configure button for an SSL VPN NetExtender user or group.
Step 3 Click on the VPN Access tab.
Step 4 Select the WAN RemoteAccess Networks address object and click the right arrow (->) button.
Step 5 Click OK.
Step 6 Repeat steps 1 through 5 for all local users and groups that use SSL VPN NetExtender.
The Client Settings tab is used to configure the DNS settings for SSL VPN clients as well as several options for the NetExtender client.
To configure Client Settings, perform the following tasks:
Step 1 Click the Default DNS Settings to use the default DNS settings of the SonicWALL security appliance. The DNS and WINS configuration is auto-propagated.
Step 2 Or you can manually configure the DNS information. In the DNS Server 1 field, enter the IP address of the primary DNS server, or click the Default DNS Settings to use the default settings.
Step 3 (Optional) In the DNS Server 2 field, enter the IP address of the backup DNS server.
Step 4 DNS Search List
Step 5 (Optional) In the WINS Server 1 field, enter the IP address of the primary WINS server.
Step 6 (Optional) In the WINS Server 2 field, enter the IP address of the backup WINS server.
Step 7 Configure the following NetExtender client settings to customize the behavior of NetExtender when users connect and disconnect:
• Enable Client Autoupdate - The NetExtender client checks for updates every time it is launched.
• Exit Client After Disconnect - The NetExtender client exits when it becomes disconnected from the SSL VPN server. To reconnect, users will have to either return to the SSL VPN portal or launch NetExtender from their Programs menu.
• Uninstall Client After Disconnect - The NetExtender client automatically uninstalls when it becomes disconnected from the SSL VPN server. To reconnect, users will have to return to the SSL VPN portal.
• Create Client Connection Profile - The NetExtender client will create a connection profile recording the SSL VPN Server name, the Domain name and optionally the username and password.
• User Name & Password Caching - Provide flexibility in allowing users to cache their usernames and passwords in the NetExtender client. The three options are Allow saving of user name only, Allow saving of user name & password, and Prohibit saving of user name & password. These options enable administrators to balance security needs against ease of use for users.
Step 8 Click OK to complete the Device Profile configuration process.