|
1
|
Navigate to SonicPoint > SonicPoints page.
|
|
2
|
To add a new SonicPoint NDR profile, click the Add SonicPoint NDR Profile button in the SonicPoint N Provisioning Profiles table. To edit an existing profile, select the profile and click the Configure icon in the same line as the profile you want to edit. The Add/Edit SonicPoint NDR Profile dialog displays.
|
You configure the SonicPoint NDR through options on these tabs:
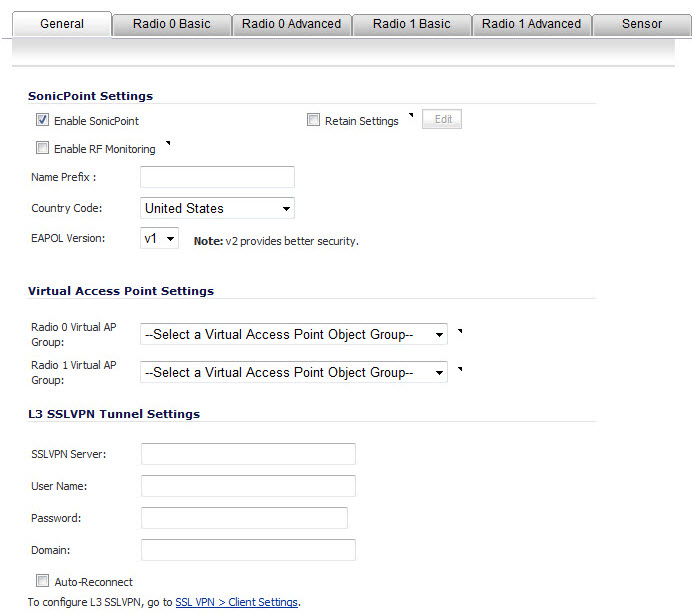
In the General tab, configure the desired settings:
|
1
|
Check Enable SonicPoint to enable each SonicPoint NDR automatically when it is provisioned with this profile. This option is selected by default.
|
|
2
|
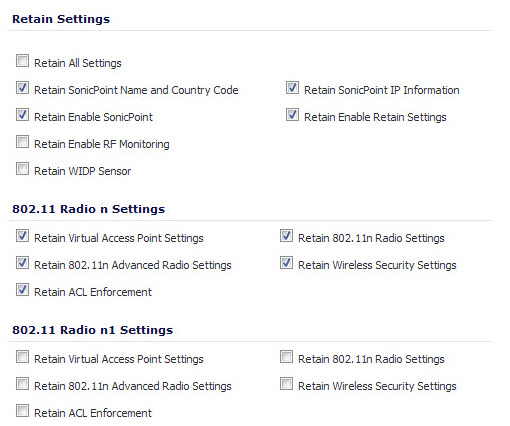
Optionally, check Retain Settings to have the SonicPoint NDRs provisioned by this profile retain customized settings until system restart or reboot. This option is not selected by default.
|
If you select this option, the Edit button becomes active and the Retain Settings dialog displays. To specify the settings to retain:
|
a
|
If you are editing an existing SonicPoint NDR profile, click the Edit button. The Retain Settings dialog displays.
|
|
•
|
Check the Retain All Settings box; all the other options become dimmed.
|
|
c
|
Click OK.
|
|
3
|
Optionally, check the Enable RF Monitoring box to enable wireless RF Threat Real Time Monitoring and Management. This option is not selected by default.
|
|
4
|
Enter a prefix for the names of all SonicPoint NDRs connected to this zone in the Name Prefix field. This prefix assists in identifying SonicPoint NDR on a zone. When each SonicPoint NDR is provisioned, it is given a name that consists of the name prefix and a unique number, for example: SonicPoint NDR 126008.
|
|
5
|
Select the country where you are operating the SonicPoint NDRs from the Country Code drop-down menu. The country code determines which regulatory domain the radio operation falls under.
|
|
6
|
From the EAPOL Version drop-down menu, select the version of EAPoL (Extensible Authentication Protocol over LAN) to use: v1 or v2. The default is v1, but v2 provides better security.
|
|
1
|
Optionally, select an 802.11n Virtual Access Point (VAP) group to assign these SonicPoint NDRs to a VAP from the 802.11n Radio 0 Virtual AP Group and 802.11n Radio 1 Virtual AP Group drop-down menus. The drop-down menus allow you to create a new VAP group. For more information on VAPs, see SonicPoint > Virtual Access Point.
|
|
1
|
In the SSL VPN Server field, enter the IP address of the SSL VPN server.
|
|
2
|
In the User Name field, enter the User Name of the SSL VPN server.
|
|
3
|
In the Password field, enter the Password for the SSL VPN server.
|
|
4
|
In the Domain field, enter the domain that the SSL VPN server is located in.
|
|
5
|
Click the Auto-Reconnect check box for the SonicPoint to auto-reconnect to the SSL VPN server.
|
|
NOTE: The sections and options displayed on the 802.11n Radio 0/1 tabs change depending on whether you selected a VAP group in the 802.11n Radio 0/1 Virtual AP Group drop-down menus on the General tab and the mode you select in the Mode drop-down menu. These choices apply only to the radio for which they were selected.
|
|
1
|
Click the 802.11n Radio 0/1 tab.
|

|
1
|
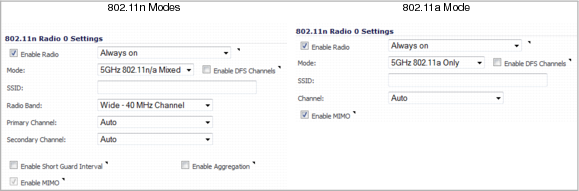
Check the Enable Radio check box to automatically enable the 802.11n radio bands on all SonicPoint NDRs provisioned with this profile. This option is selected by default.
|
|
•
|
From the Enable Radio drop-down menu, select a schedule for when the 802.11n radio is on or create a new schedule; default is Always on. You can create a new schedule by selecting Create new schedule.
|
|
2
|
Select your preferred radio mode from the Mode drop-down menu. The wireless security appliance supports the modes shown in Mode Options.
|
|
Select this mode if only 802.11a clients access your wireless network. |
||
|
TIP: For 802.11n clients only, for optimal throughput speed solely, SonicWall recommends the 802.11n Only radio mode. Use the 802.11n/b/g Mixed radio mode for multiple wireless client authentication compatibility.
|
|
NOTE: The available 801.11n Radio 0/1 S.ettings options change depending on the mode selected. If the wireless radio is configured for a mode that:
|
|
3
|
Optionally, select Enable DFS Channels to enable the use of Dynamic Frequency Selection (DFS), which allows wireless devices to share the same spectrum with existing radar systems within the 5 GHz band.
|
|
NOTE: If you select this option, choose either Standard - 2MHz Channel or Wide - 40 MHz Channel as the Radio Band. The Primary Channel and Standard Channel drop-down menus then display a choice of available sensitive channels.
|
|
NOTE: This option only appears on the 802.11n Radio 0 tab as the 802.11n Radio 1 does not have a wireless speed connection mode of at least 5 GHz.
|
|
4
|
In the SSID field, enter a recognizable string for the SSID of each SonicPoint NDR using this profile. This is the name that will appear in clients’ lists of available wireless connections.
|
|
•
|
|
•
|
Auto - Allows the appliance to automatically detect and set the optimal channel for wireless operation based on signal strength and integrity. This is the default setting. Use Auto unless you have a specific reason to use or avoid specific channels.
|
|
•
|
Specific channel – You can select a single channel within the range of your regulatory domain. Selecting a specific channel also can help with avoiding interference with other wireless networks in the area.
|
|
7
|
For (802.11n only): from the Radio Band drop-down menu, select the band for the 802.11n radio:
|
|
•
|
Auto - Allows the appliance to automatically detect and set the optimal channel for wireless operation based on signal strength and integrity. Both the Primary Channel and Secondary Channel are set to Auto also. This is the default setting.
|
|
•
|
Standard - 20 MHz Channel—Specifies that the 802.11n radio will use only the standard 20 MHz channel. When this option is selected, the Standard Channel drop-down menu is displayed instead of the Primary Channel and Secondary Channel options.
|
|
•
|
Standard Channel—This drop-down menu only displays when the 20 MHz channel is selected. By default, this is set to Auto, which allows the appliance to set the optimal channel based on signal strength and integrity.
|
|
•
|
Wide - 40 MHz Channel—Specifies that the 802.11n radio will use only the wide 40 MHz channel. When this option is selected, the Primary Channel and Secondary Channel drop-down menus are active:
|
|
•
|
Primary Channel—By default this is set to Auto. Optionally, you can specify a specific primary channel. The available channels are the same as for 802.11a in Step 5.
|
|
•
|
Secondary Channel—Is set to Auto regardless of the setting of Primary Channel.
|
|
8
|
Enable Short Guard Interval—Specifies the short guard interval of 400ns (as opposed to the standard guard interval of 800ns).
|
The 802.11n standard specifies two guard intervals: 400ns (short) and 800ns (long).
|
9
|
Select Enable Aggregation to enable 802.11n frame aggregation, which combines multiple data frames in a single transmission to reduce overhead and increase throughput.
|
Ensure the wireless client also can support aggregation to avoid compatibility issues.
|
TIP: The Enable Short Guard Interval and Enable Aggregation options can slightly improve throughput. They both function best in optimum network conditions where users have strong signals with little interference. In networks that experience less than optimum conditions (interference, weak signals, etc.), these options may introduce transmission errors that eliminate any efficiency gains in throughput.
|
|
10
|
The Enable MIMO option enables/disables MIMO (multiple-input multiple output). Enabling this option increases 802.11n throughput by using multiple-input/multiple-output antennas. This option is enabled by default for all 802.11n modes and is dimmed to ensure it is not disabled. The option is activated and selected by default if 5GHZ 802.11a Only or 2.4GHz 802.11g Only mode is selected.
|
|
NOTE: If a VAP was selected in the 802.11n Radio Virtual AP Group drop-down menu on the Settings tab, this section is not available. Instead, the Virtual Access Point Encryption Settings section is displayed. Go to Virtual Access Point Encryption Settings Section.
The options change depending on the authentication type you select. |

The Wireless Security sections of both 802.11n Radio 0 and 802.11n Radio 1 tabs are the same as for the SonicPoint N 802.11n Radio tab. For how to configure the Wireless Security settings, see Wireless Security section.
|
NOTE: This section displays only if a VAP was selected from the 802.11n Radio 0/1 Virtual AP Group drop-down menus in the Virtual Access Point Settings section of the General tab.
|
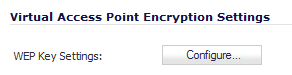
The Virtual Access Point Encryption Settings section of both 802.11n Radio 0 and 802.11n Radio 1 tabs are the same as for the SonicPoint N 802.11n Radio tab. For how to configure the Virtual Access Point Encryption Settings settings, see Virtual Access Point Encryption Settings Section.

The ACL Enforcement section of both 802.11n Radio 0 and 802.11n Radio 1 tabs are the same as for the SonicPoint N 802.11n Radio tab. For how to configure the ACL Enforcement settings, see ACL Enforcement section.
|
NOTE: If a VAP was selected in the 802.11n Radio Virtual AP Group drop-down menu on the Settings tab, this section is not available. Go to Radio 0 Advanced and Radio 1 Advanced Tabs.
|

The Remote MAC Address Access Control Settings section of both 802.11n Radio 0 and 802.11n Radio 1 tabs are the same as for the SonicPoint N 802.11n Radio tab. For how to configure the Virtual Access Point Encryption Settings settings, see Remote MAC Address Access Control Settings section.
The Radio 0 Advanced and Radio 1 Advanced tabs are quite similar; the difference is that the Radio 1 Advanced tab has more options.
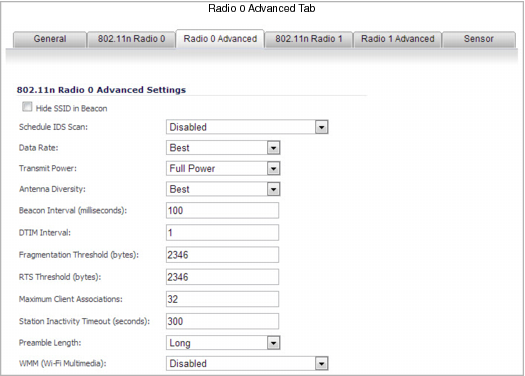
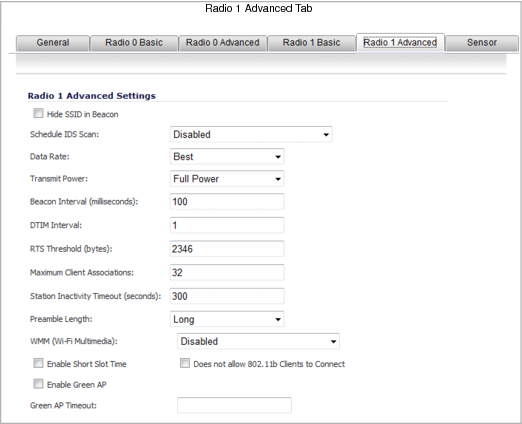
The options on the Radio 0 Advanced and Radio 1 Advanced tabs are the same as for the SonicPoint N Advanced tab. For how to configure the Virtual Access Point Encryption Settings settings, see Advanced Tab.
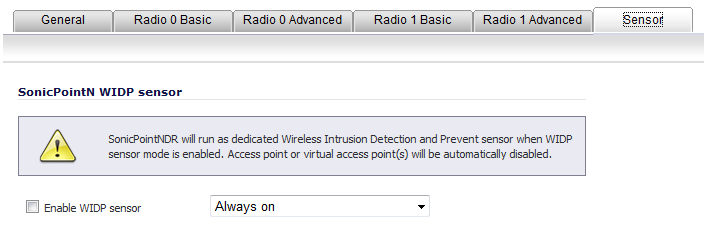
In the Sensor tab, you enable or disable Wireless Intrusion Detection and Prevention (WIDP) mode.
|
1
|
Select Enable WIDF sensor to have the SonicPoint N operate as a dedicated WIDP sensor.
|
|
2
|
From the drop-down menu, select the schedule for when the SonicPoint N operates as a WIDP sensor or select Create new schedule… to specify a different time; default is Always on.
|