Users can access NetExtender in two ways:
|
•
|
|
•
|
|
•
|
For supported browser releases, see the latest Dell™ SonicWALL™ SonicOS 6.2.1 Release Notes.
|
2
|
|
3
|
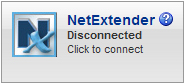
Click the NetExtender button.
|
|
4
|
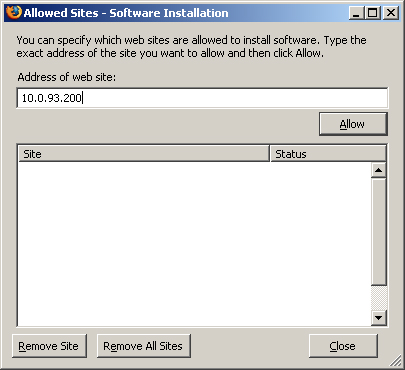
The Allowed Sites - Software Installation dialog displays, with the address of the Virtual Office server in the address field.
|
5
|
Click Allow to allow Virtual Office to install NetExtender.
|
|
6
|
Click Close.
|
|
7
|
Return to the Virtual Office dialog.
|
|
8
|
|
9
|
After a five second countdown, the Install Now button becomes active. Click it.
|
NetExtender is installed as a Firefox extension.

When NetExtender completes installing, the NetExtender Status dialog displays, indicating that NetExtender successfully connected.
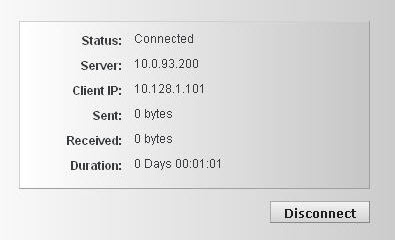
Closing the dialog (clicking the X button in the upper right corner of the dialog) does not close the NetExtender session, but minimizes it to the system tray for continued operation.
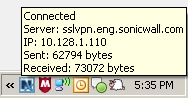
The NetExtender icon displays in the task bar.
|
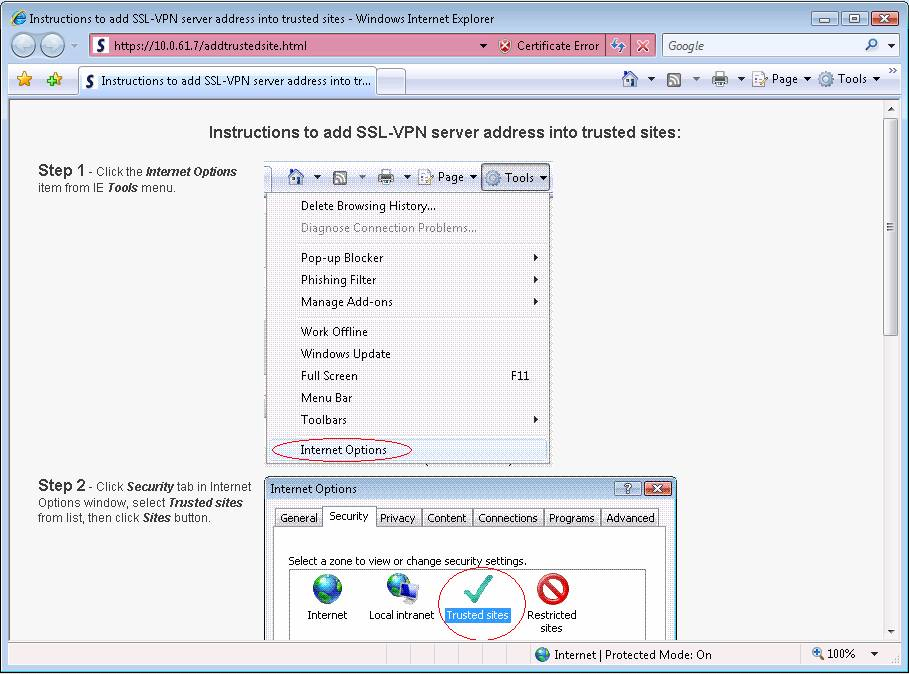
1
|
|
2
|
|
3
|
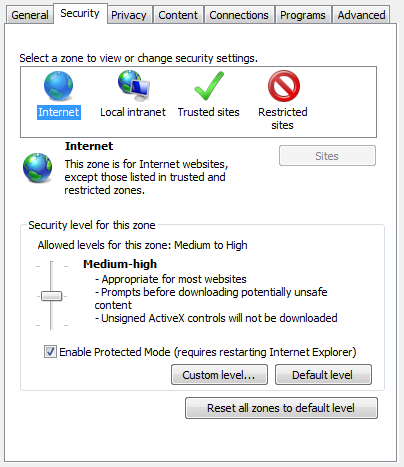
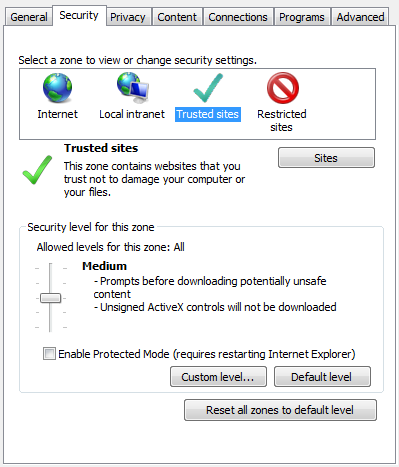
Click on the Trusted Sites icon.
|
|
4
|
|
5
|
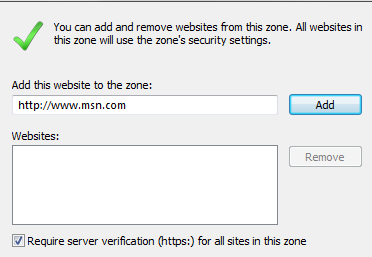
Enter the URL or domain name of your firewall in the Add this Web site to the zone field.
|
|
IMPORTANT: If the Require server verification (https:) for all sites in this zone checkbox is selected, the URL must use the https:// prefix. If the URL does not, this message displays:
|
|
6
|
Click Close.
|
|
7
|
Click OK.
|
|
2
|
|
3
|
Click the NetExtender button.
|
|
5
|
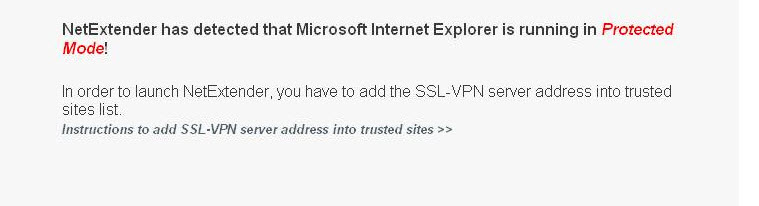
Click Instructions to add SSL VPN server address into trusted sites for help.
|
|
8
|
Click on the NetExtender button. The portal installs the NetExtender stand-alone application automatically on your computer. The NetExtender installer dialog opens.
|

|
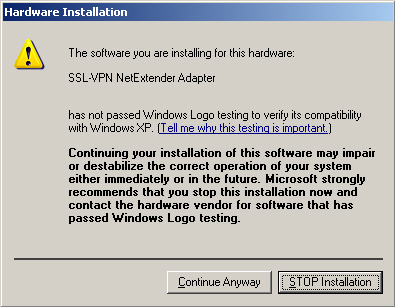
10
|
If a warning message that NetExtender has not passed Windows Logo testing is displayed, click Continue Anyway. SonicWALL testing has verified that NetExtender is fully compatible with Windows Vista Service Pack 2 and later.
|
|
11
|
When NetExtender completes installing, the NetExtender Status dialog displays, indicating that NetExtender successfully connected.
|
|
1
|
Navigate to Start > All Programs.
|
|
2
|
Select SSL VPN NetExtender folder.
|
|
3
|
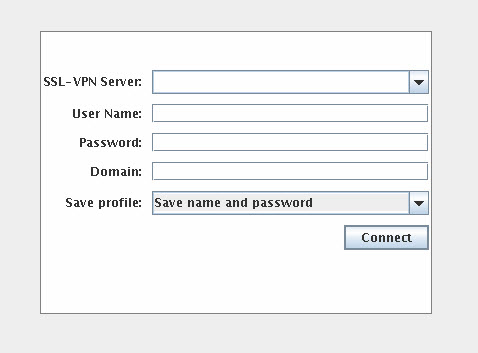
Click on SonicWALL SSL VPN NetExtender. The NetExtender login dialog displays.
|
|
4
|
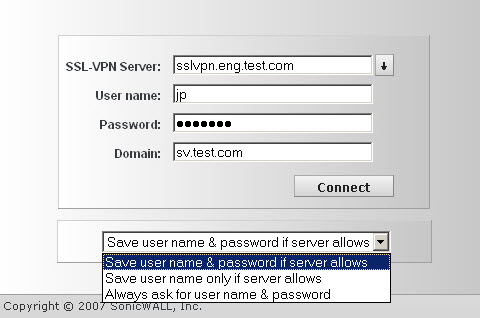
The IP address of the last server to which you connected is displayed in the SSL VPN Server field. To display a list of recent servers you have connected to, click on the down arrow button.
|
|
6
|
The last domain you connected to is displayed in the Domain field.
|
|
1
|
Right click on the NetExtender icon in the system tray.
|
|
2
|
The Connection Profiles tab displays the SSL VPN connection profiles you have used, including the IP address of the server, the domain, and the username.

|
3
|
To delete a profile, highlight it by clicking on it, and then clicking the Remove button. Click the Remove All buttons to delete all connection profiles.
|
|
4
|
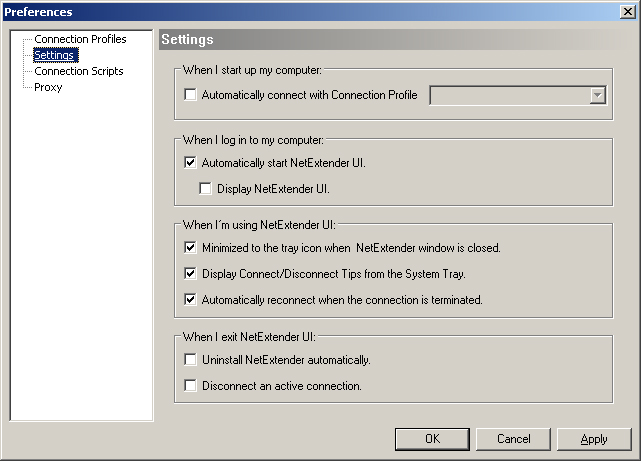
To customize the behavior of NetExtender, click the Settings tab.
|
|
a
|
Check the Automatically connect with Connection Profile checkbox.
|
|
6
|
To have NetExtender launch when you log in to your computer, check the Automatically start NetExtender UI. NetExtender starts, but only displays in the system tray.
|
|
7
|
To display the NetExtender login dialog, check the Display NetExtender UI checkbox.
|
|
8
|
To have the NetExtender icon display in the system tray, select Minimize to the tray icon when NetExtender dialog is closed. If this option is not checked, you will only be able to access the NetExtender UI through Window’s program menu.
|
|
9
|
To have NetExtender display tips when you mouse over the NetExtender icon, select Display Connect/Disconnect Tips from the System Tray.
|
|
10
|
To have NetExtender attempt to reconnect when it loses connection, select Automatically reconnect when the connection is terminated.
|
|
11
|
To have NetExtender uninstall every time you end a session, select Uninstall NetExtender automatically.
|
|
12
|
To have NetExtender log out of all of your SSL VPN sessions when you exit a NetExtender session, select Disconnect an active connection.
|
|
13
|
Click Apply.
|
|
1
|
Right click on the NetExtender icon in the task bar.
|
|
2
|
|
3
|
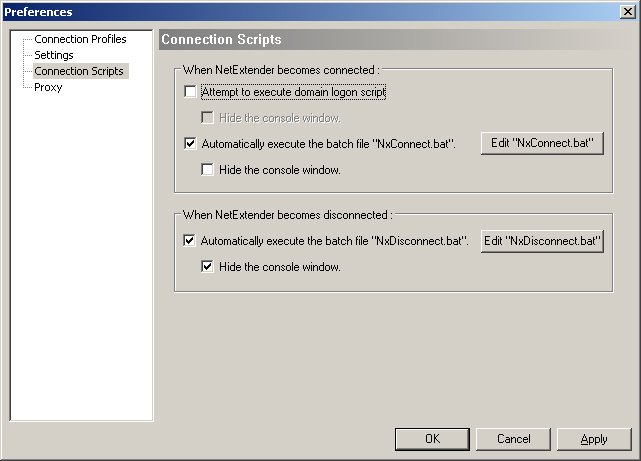
Click on Connection Scripts.
|
|
4
|
To enable the domain login script, select the Attempt to execute domain login script checkbox. When enabled, NetExtender attempts to contact the domain controller and execute the login script.
|
|
5
|
To enable the script that runs when NetExtender connects, select the Automatically execute the batch file “NxConnect.bat” checkbox.
|
|
6
|
To enable the script that runs when NetExtender disconnects, select the Automatically execute the batch file “NxDisconnect.bat” checkbox.
|
|
7
|
To hide either of the console windows, select the appropriate Hide the console window checkbox. If this checkbox is not selected, the DOS console window remains open while the script runs.
|
|
8
|
Click Apply.
|
NetExtender Connection Scripts can support any valid batch file commands. For more information on batch files, see the following Wikipedia entry: http://en.wikipedia.org/wiki/.bat.
To configure the script that runs when NetExtender connects or disconnects, click the Edit “NxConnect.bat” button. The NxConnect.bat file displays. By default, the NxConnect.bat file contains examples of commands that can be configured, but no actual commands. Too add commands, scroll to the bottom of the file. Table 90 lists some commonly used batch file commands.
|
For example, to if the drive letter is z, the server name is engineering, the share is docs, the password is 1234, the user’s domain is eng and the username is admin, the command would be: |
|
|
net use drive-letter: /delete
For example, to disconnect network drive z, enter this command: |
|
|
For example, to launch Microsoft Outlook, enter the following command: |
|
|
start http://www.website.com
|
|
When you have finished editing the scripts, save the file and close it.
|
1
|
Right click on the NetExtender icon in the task bar.
|
|
2
|
|
3
|
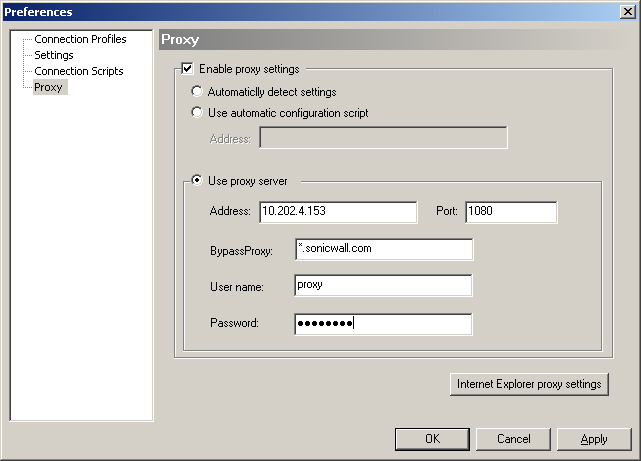
Click Proxy.
|
|
4
|
|
•
|
Automatically detect settings - To use this setting, the proxy server must support Web Proxy Auto Discovery Protocol (WPAD)), which can push the proxy settings script to the client automatically.
|
|
•
|
Use automatic configuration script - If you know the location of the proxy settings script, select this option and enter the URL of the scrip in the Address field.
|
|
•
|
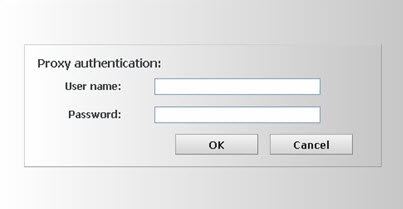
Use proxy server - Select this option to enter the Address and Port of the proxy server. Optionally, you can enter an IP address or domain in the BypassProxy field to allow direct connections to those addresses that bypass the proxy server. If required, enter a User name and Password for the proxy server. If the proxy server requires a username and password, but you do not specify them in the Preferences dialog, a NetExtender pop-up dialog prompts you to enter them when you first connect.
|
|
6
|
Click the Internet Explorer proxy settings button to open Internet Explorer’s proxy settings.
|
The NetExtender log displays information on NetExtender session events. The log is a file named NetExtender.dbg stored in the directory: C:\Program Files\SonicWALL\SSL VPN\NetExtender.
|
1
|
Right click on the NetExtender icon in the system tray.
|
|
2
|
Click View Log.
|
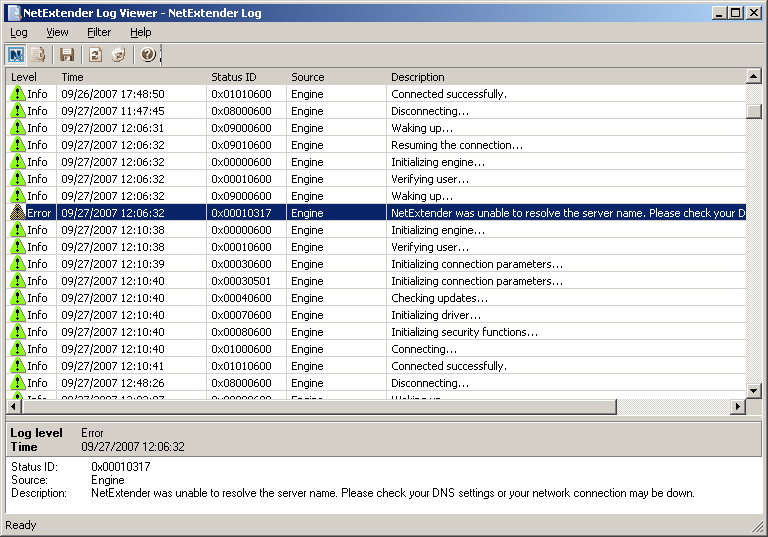
To view details of a log message, either:
|
•
|
|
•
|
Click the Export icon.
|
|
•
|
Go to Log > Export.
|
|
1
|
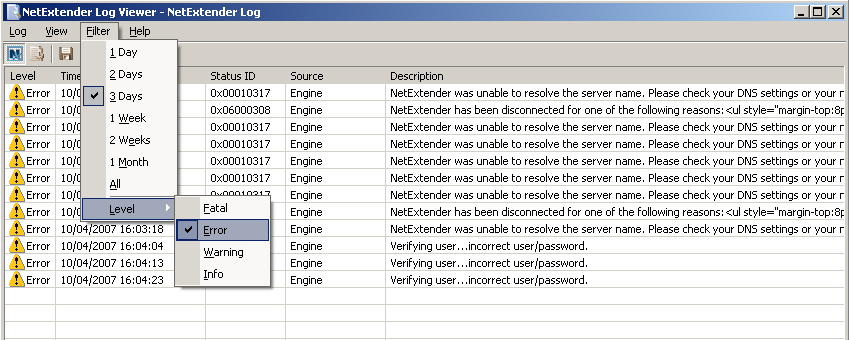
Go to the Filter menu.
|
|
1
|
Go to Filter > Level.
|
|
•
|
|
•
|
|
•
|
|
•
|
The log displays all entries that match or exceed the severity level. For example, when selecting the Error level, the log displays all Error and Fatal entries, but not Warning or Info entries.
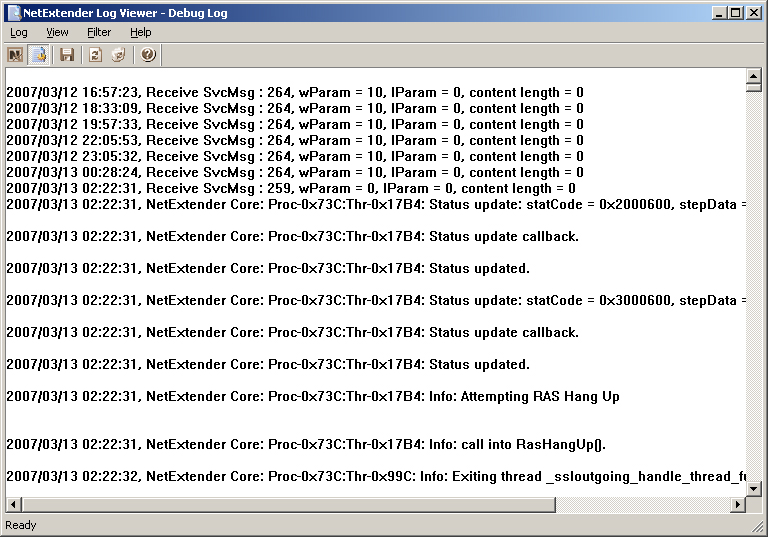
To view the Debug Log, either:
|
•
|
Click the Debug Log icon.
|
|
•
|
Go to Log > Debug Log.
|
To clear the log, click on Log > Clear Log.
To disconnect NetExtender, either:
|
•
|
Right click on the NetExtender icon in the system tray to display the NetExtender icon menu and then click Disconnect.
|
Wait several seconds. The NetExtender session disconnects.
|
•
|
Double click the NetExtender icon to open the NetExtender dialog, and then click the Disconnect button.
|
When NetExtender becomes disconnected, the NetExtender dialog displays and gives you the option to either Reconnect or Close NetExtender.
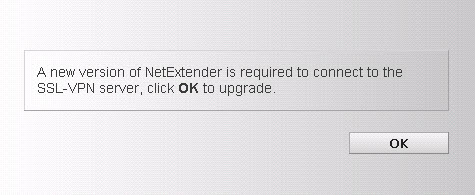
You can configure NetExtender to notify users automatically when an updated version of NetExtender is available. Users are prompted to click OK, and NetExtender downloads and installs the update from the firewall.
|
1
|
Click Start > All Programs.
|
|
2
|
Click SonicWALL SSL VPN NetExtender.
|
|
3
|
Click Uninstall.
|
|
1
|
Right click the NetExtender icon in the system tray.
|
|
2
|
|
3
|
Click the Settings tab.
|
|
4
|
Select Uninstall NetExtender automatically to have NetExtender uninstall every time you end a session.
|
To view options in the NetExtender system tray, right click on the NetExtender icon in the system tray.
To display the routes that NetExtender has installed on your system, click the Route Information option in the system tray menu. The system tray menu displays the default route and the associated subnet mask.
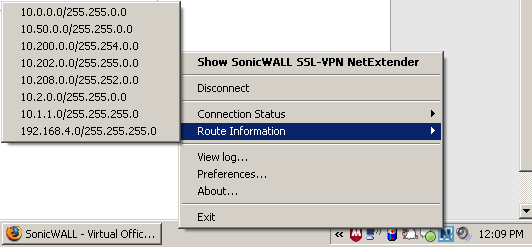
You can display connection information by mousing over the NetExtender icon in the system tray.
|
2
|
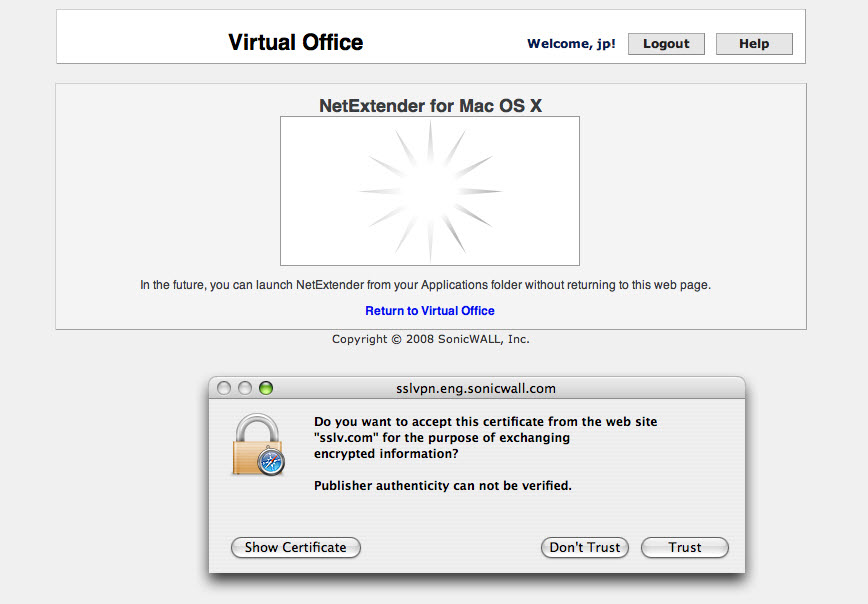
Click the link at the bottom of the Login page that says Click here for sslvpn login. The Virtual Office dialog displays.
|
|
3
|
Click the NetExtender button. The Virtual Office displays the status of NetExtender installation. A pop-up dialog may appear, prompting you to accept a certificate.
|
|
4
|
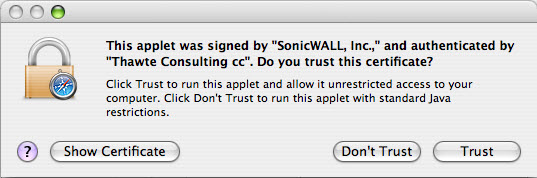
Click Trust. A second pop-up dialog may appear, prompting you to accept a certificate.
|
|
5
|
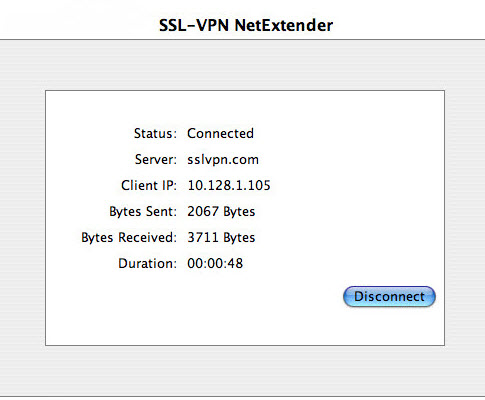
Click Trust. When NetExtender is successfully installed and connected, the SSL-VPN NetExtender Status dialog displays.
|
|
1
|
|
2
|
Double click on NetExtender.app.
|
|
3
|
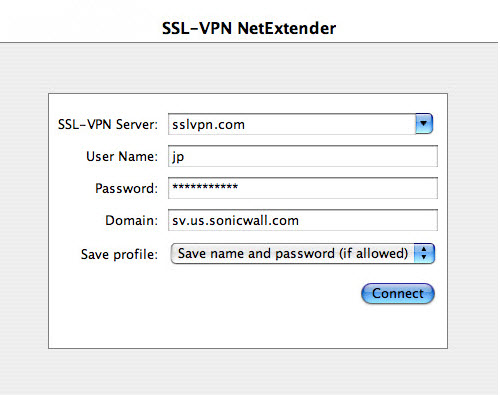
The first time you connect, you must enter the server name or IP address in the SSL VPN Server field.
|
|
5
|
The first time you connect, you must enter the domain name.
|
|
6
|
Click Connect.
|
|
7
|
You can instruct NetExtender remember your profile server name in the future. In the Save profile drop-down menu, you can select:
|
|
•
|
Save username only (if allowed)
|
|
8
|
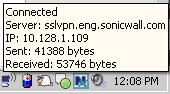
When NetExtender is connected, the NetExtender icon displays in the status bar at the top right of your display. To display NetExtender options, click the icon.
|
|
•
|
|
9
|
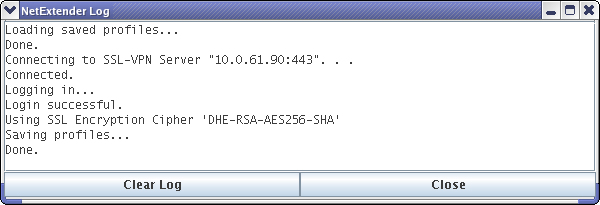
To view the NetExtender Log, go to Dialog > Log.
|
|
10
|
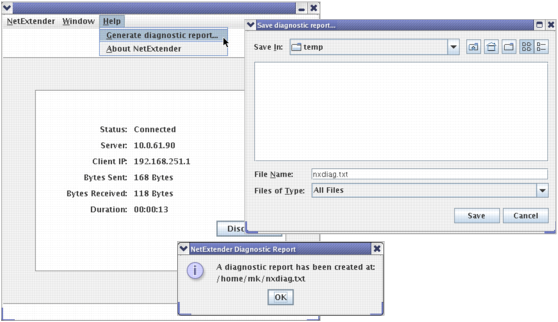
To generate a diagnostic report with detailed information on NetExtender performance, go to Help > Generate diagnostic report.
|
|
11
|
Click Save to save the diagnostic report using the default nxdiag.txt file name in your NetExtender directory.
|
You can install NetExtender from the user interface or from the CLI.
|
NOTE: You must be logged in as root to install NetExtender, although many Linux systems allow the sudo ./install command to be used if you are not logged in as root.
|
|
2
|
Click the link at the bottom of the Login page that says Click here for sslvpn login.
|
|
3
|
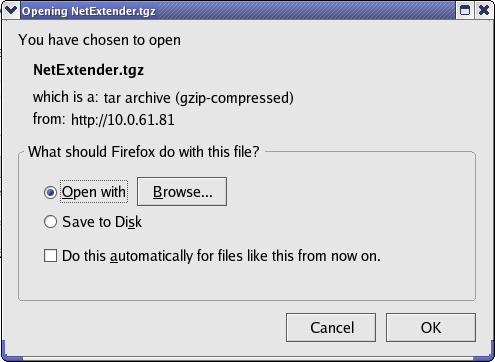
Click the NetExtender button. A pop-up dialog indicates that you have chosen to open the NetExtender.tgz file.
|
|
4
|
Click OK to save it to your default download directory.
|
|
1
|
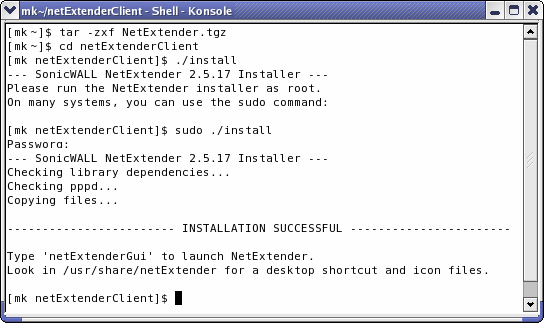
Navigate to the directory where you saved NetExtender.tgz.
|
|
2
|
Enter the tar -zxf NetExtender.tgz command.
|
|
3
|
Type the cd netExtenderClient command.
|
|
4
|
Type ./install to install NetExtender.
|
|
5
|
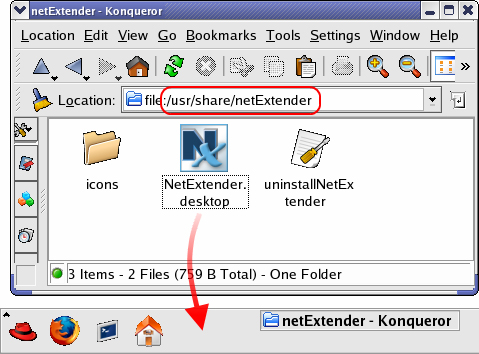
Launch the NetExtender.tgz file,
|
|
7
|
The first time you connect, you must enter the server name or IP address in the SSL VPN Server field. NetExtender remembers the server name in the future.
|
|
9
|
The first time you connect, you must enter the domain name. NetExtender remembers the domain name in the future.
|
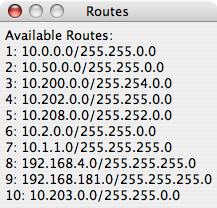
To view the NetExtender routes, go to the NetExtender menu and select Routes.
![]()
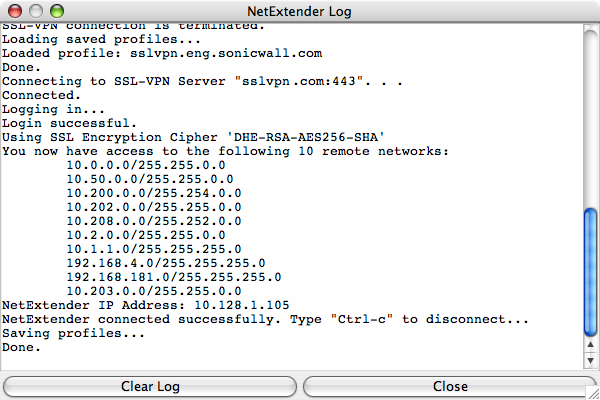
To view the NetExtender Log, go to NetExtender > Log.
|
1
|
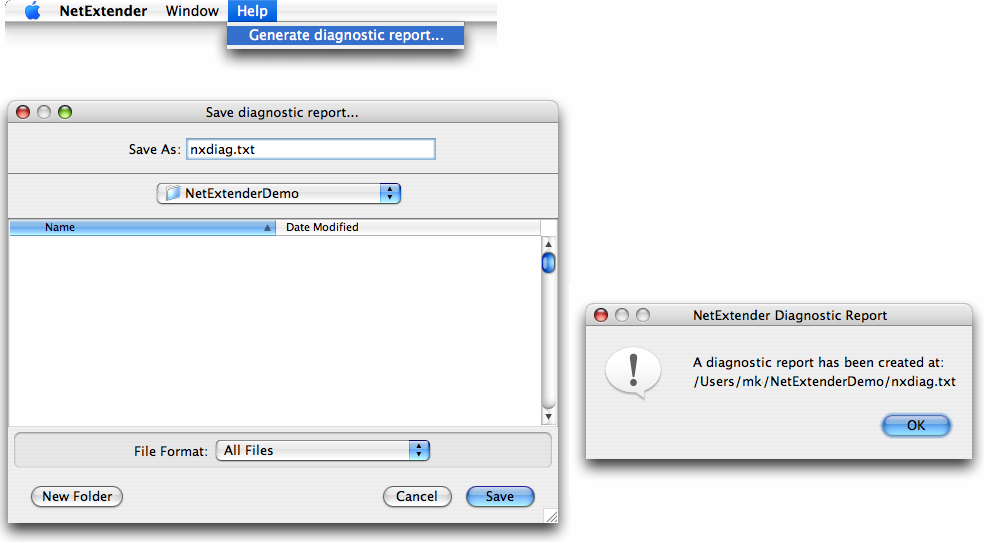
Go to Help > Generate diagnostic report.
|
|
2
|
Click Save to save the diagnostic report using the default nxdiag.txt file name in your NetExtender directory.
|