Configuring Client DPI-SSL

The Client DPI-SSL deployment scenario typically is used to inspect HTTPS traffic when clients on the LAN browse content located on the WAN. In this scenario, the firewall typically does not own the certificates and private keys for the content it is inspecting. After performing DPI-SSL inspection, the appliance re-writes the certificate sent by the remote server and signs this newly generated certificate with the certificate specified in the Client DPI-SSL configuration. By default, this is the firewall certificate authority (CA) certificate, but a different certificate can be specified. Users should be instructed to add the certificate to their browser’s trusted list to avoid certificate trust errors.

Topics:

Configuring General Client DPI-SSL Settings

To enable Client DPI-SSL inspection:
1
Navigate to the General Settings section of the DPI-SSL > Client SSL page.

2
Select the Enable SSL Client Inspection checkbox. By default, this checkbox is not enabled.
3
4
Click Accept.

Selecting the Re-Signing Certificate Authority

The re-signing certificate replaces the original certificate signing authority only if that authority certificate is trusted by the firewall. If the authority is not trusted, then the certificate is self-signed. To avoid certificate errors, choose a certificate that is trusted by devices protected by DPI-SSL.

NOTE: For information about requesting/creating a DPI SSL Certificate Authority (CA) certificate, see the Knowledge Base article, How to request/create DPI-SSL Certificate Authority (CA) certificates for the purpose of DPI-SSL certificate resigning (SW14090) in the Dell Support Site.
Topics:
Selecting a Re-Signing Certificate
To select a re-signing certificate
1
Navigate to the Certificate re-signing Authority section of the DPI-SSL > Client SSL page.

2
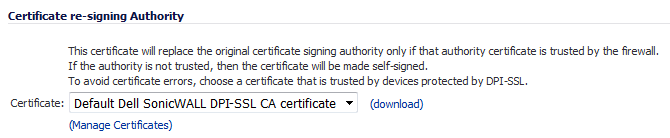
Select the certificate to use from the Certificate drop-down menu. By default, DPI-SSL uses the Default Dell SonicWALL DPI-SSL CA certificate to re-sign traffic that has been inspected.
NOTE: If the certificate you want is not listed, you can import it from the System > Certificates page by clicking on the (Manage Certificates) link. See Importing Certificates . For PKCS-12-formatted certificates, see Creating PKCS-12 Formatted Certificate File .
3
To download the selected certificate to the firewall, click the (download) link. The Opening filename dialog appears.
TIP: To view available certificates, click on the (Manage Certificates) link to display the System > Certificates page

a
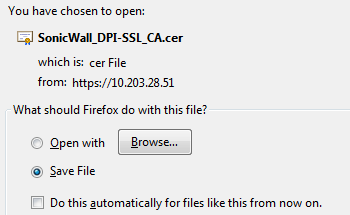
Ensure the Save File radio button is selected.
b

The file is downloaded.

4
Click Accept.
Adding Trust to the Browser

For a re-signing certificate authority to successfully re-sign certificates, browsers have to trust the certificate authority. Such trust can be established by having the re-signing certificate imported into the browser's trusted CA list. Follow your browser’s instructions for importing re-signing certificates.

Creating PKCS-12 Formatted Certificate File for Linux

PKCS12 formatted certificate file can be created using Linux system with OpenSSL. To create a PKCS-12 formatted certificate file, you have to have two main components of the certificate:

Private key (typically a file with .key extension or the word key in the filename)
Certificate with a public key (typically a file with .crt extension or the word cert as part of filename).

For example, Apache HTTP server on Linux has its private key and certificate in the following locations:

/etc/httpd/conf/ssl.key/server.key

/etc/httpd/conf/ssl.crt/server.crt

With these two files available, run the following command:

openssl pkcs12 -export -out out.p12 -inkey server.key -in server.crt

In this example, out.p12 becomes the PKCS-12-formatted certificate file, and server.key and server.crt are the PEM-formatted private key and certificate file respectively.

After the above command, you are prompted for the password to protect/encrypted the file. After the password is chosen, the creation of the PKCS-12-formatted certificate file is complete, and it can be imported into the appliance.

Configuring Exclusions and Inclusions

By default, when DPI-SSL is enabled, it applies to all traffic on the appliance. You can customize to which traffic DPI-SSL inspection applies:

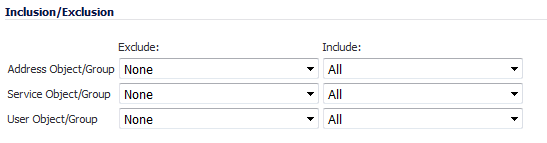
Exclusion/Inclusion lists exclude/include specified objects and groups
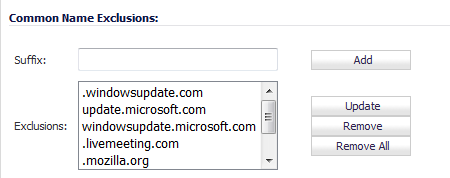
Common Name exclusions excludes specified host names
CFS Category-based Exclusion/Inclusion excludes or includes specified categories based on CFS categories

This customization allows individual exclusion/inclusion of alternate names for a domain that is part of a list of domains supported by the same server (certificate). In deployments that process a large amount of traffic, to reduce the CPU impact of DPI-SSL and to prevent the appliance from reaching the maximum number of concurrent DPI-SSL inspected connections, it can be useful to exclude trusted sources.

As Google uses one certificate for all its applications, excluding these domains allows Google applications to bypass DPI-SSL.

Alternatively, exclude the client machines from DPI-SSL.

Topics:
Excluding/Including Objects/Groups
To customize DPI-SSL client inspection:
1
Navigate to the Inclusion/Exclusion section of the DPI-SSL > Client SSL page.

2
From the Address Object/Group Exclude and Include drop-down menus, select an address object or group to exclude or include from DPI-SSL inspection. By default, Exclude is set to None and Include is set to All.
TIP: The Include drop-down menu can be used to fine tune the specified exclusion list. For example, by selecting the Remote-office-California address object in the Exclude drop-down menu and the Remote-office-Oakland address object in the Include drop-down menu.
3
From the Service Object/Group Exclude and Include drop-down menus, select an address object or group to exclude or include from DPI-SSL inspection. By default, Exclude is set to None and Include is set to All.
4
From the User Object/Group Exclude and Include drop-down menus, select an address object or group to exclude or include from DPI-SSL inspection. By default, Exclude is set to None and Include is set to All.
5
Click Accept.
Excluding/Including by Common Name

You can add trusted domain names to the exclusion list. Adding trusted domains to the Built-in exclusion database reduces the CPU effect of DPI-SSL and prevents the appliance from reaching the maximum number of concurrent DPI-SSL inspected connections.

Topics:
Excluding/Including Common Names
To exclude/include entities by common name:
1
Navigate to the Common Name Exclusions section of the DPI-SSL > Client SSL page.

2
a
b
Click the Add button.
3
Click Accept at the top of the page to confirm the configuration.
Deleting Custom Common Names
To delete custom common names:
1
2
Click the Remove button.
3
Click Accept.

Client DPI-SSL Examples

Topics:
Content Filtering
To perform SonicWALL Content Filtering on HTTPS and SSL-based traffic using DPI-SSL:
1
Navigate to the DPI-SSL > Client SSL page.

2
Select the Enable SSL Inspection checkbox.
3
Select the Content Filter checkbox.
4
Click Apply.
5
Navigate to the Content Filter Type section of the Security Services > Content Filter page.

6
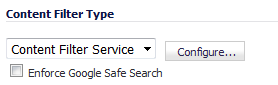
Ensure Content Filter Service is selected from the drop-down menu.
7
Click the Configure button. The Filter Properties dialog displays.

8
Clear the Enable HTTPS Content Filtering checkbox.
9
10
11
Click Accept.
12
App Rules Filtering

To filter by application firewall rules, you need to enable them on both the DPI-SSL > Client SSL page and the App Rules > Policies page.

To filter by application firewall rules:
1
Navigate to General Settings section of the DPI-SSL > Client SSL page.

2
Select the Enable SSL Client Inspection checkbox.
3
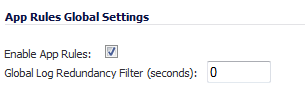
Select the Application Firewall checkbox.
4
Click Apply.
5
Navigate to App Rules Global Settings section of the Firewall > App Rules page.

6
Select the Enable App Rules.
7
Configure an HTTP Client policy to block Microsoft Internet Explorer browser with block page as an action for the policy. For how to configure an App Rule, see Configuring an App Rules Policy .
8
Click Apply.
9