|
1
|
Go to Users > Settings.
|
|
2
|
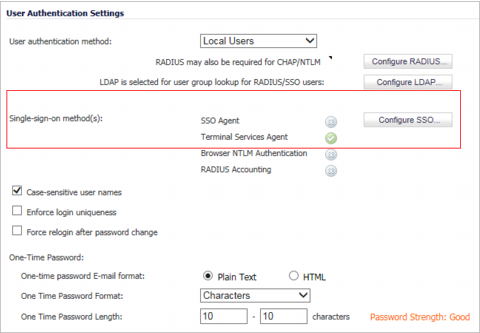
From the Single-sign-on method(s) radio buttons, select SSO Agent. Use this choice to add and configure a TSA as well as an SSO Agent for the SSO method.
|
|
3
|
|
•
|
|
•
|

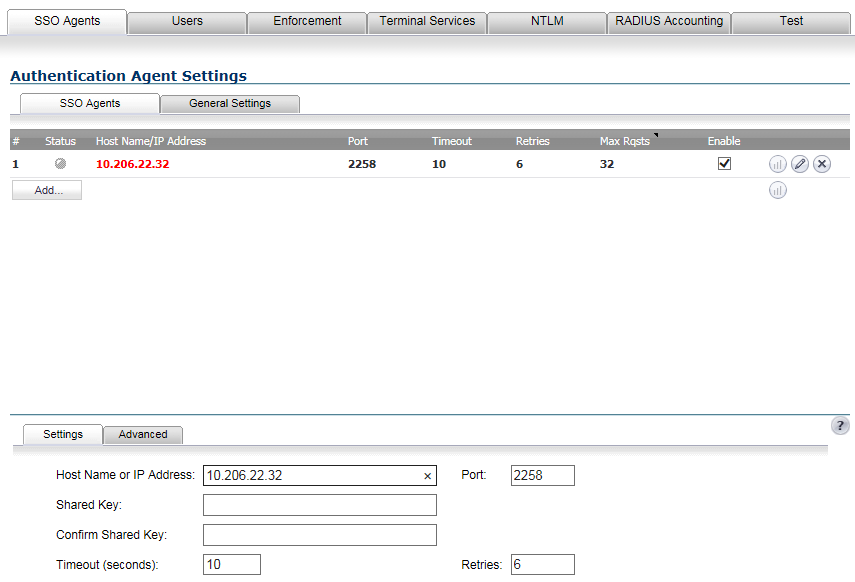
On the SSO Agents tab under Authentication Agent Settings you can view any SSO Agents already configured:
|
•
|
The LEDs are dynamically updated using AJAX.
|
1
|
Click the Add button to create an agent. The page is updated to display a new row in the SSO Agents table at the top and two new tabs (Settings and Advanced) in the lower half of the page.
|
 |
|
2
|
Enter the following information in the Settings tab. As you type in values for the fields, the row at the top is updated in red to highlight the new information.
|
|
•
|
For Host Name or IP Address, enter the name or IP address of the workstation on which SonicWALL SSO Agent is installed. By default, 0.0.0.0 is entered.
|
|
•
|
At Port, enter the port number that the SonicWALL SSO Agent is using to communicate with the appliance. The default port is 2258.
|
|
•
|
At Shared Key, enter the shared key that you created or generated in the SonicWALL SSO Agent. The shared key must match exactly. Re-enter the shared key in the Confirm Shared Key field.
|
|
•
|
At Timeout (seconds), enter a number of seconds before the authentication attempt times out. This field is automatically populated with the default of 10 seconds.
|
|
•
|
|
3
|
Click the Advanced tab.
|

|
4
|
At Maximum requests to send at a time, enter the maximum number of simultaneous requests to send from the appliance to the agent at one time. The default is 32.
|
On the other hand, if the number of simultaneous requests sent from the appliance is too low, some requests will have to wait, possibly causing ring buffer overflows. Too many requests waiting could lead to slow response times in Single Sign On authentication. If this setting cannot be increased high enough to avoid ring buffer warnings without getting a significant numbers of timeouts, then consider moving the agent to a higher-performance, dedicated machine, or possibly adding additional agents. For more information about checking for ring buffer overflows and related statistics in the SonicOS TSR, see Single Sign-On Advanced Features .
|
TIP: Look at the statistics in the Single Sign On Authentication section of the Tech Support Report. If significant numbers of timeouts are shown, then decreasing this value may help. If the Maximum time spent on ring approaches or exceeds the polling rate (configured on the Users tab) or if any ring buffer overflows are shown, then this value should probably be increased.
|
|
5
|
|
•
|
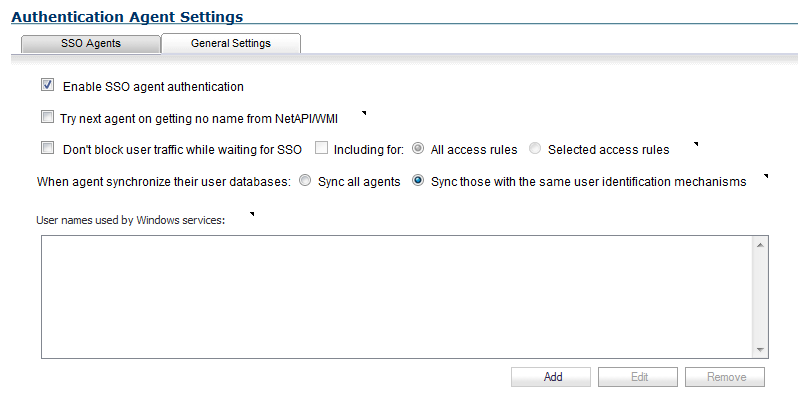
Select the Enable SSO agent authentication checkbox to use the SSO Agent for user authentication. This setting is selected by default.
|
|
•
|
Select the Try next agent on getting no name from NetAPI/WMI checkbox to force a retry of the authentication via a different SSO agent if there is no response or error from the first agent. This setting is not selected by default.
|
|
IMPORTANT: See also the Poll the same agent that authenticated the user setting on the Users tab, which needs to be set if this setting is enabled.
|
If you see authentication failures logged as SSO agent returned no user name when you think the users should have been identified, try enabling this setting. If this setting is enabled when the appliance receives a no-user-name response from an agent, the appliance treats the response as an error and retries the request via a different agent.
|
•
|
Select the Don't block user traffic while waiting for SSO checkbox to use the default policy while the user is being identified. This prevents browsing delays. This setting is not selected by default.
|
|
•
|
Select the Including for checkbox and either the All access rules (default) or the Selected access rules radio button to allow traffic affected by access rules that require user authentication, while waiting for user identification.
|
|
•
|
Sync all agents – To synchronize together no matter what identification mechanisms they use, thus giving a single, homogenous user database duplicated on every agent.
|
|
•
|
Synch those with the same user identification mechanisms – To synchronize only those databases using the same identification mechanism; this is the default.
|
|
•
|
Configure the list of Windows service user names in the User names used by Windows services table. You can list up to 64 user names that may be used by services on the end-users’ PCs; any log ins with these names are assumed to be service log ins and are ignored by the SSO agent(s).
|
|
a
|
![]()
|
c
|
Click OK.
|
|
1
|

|
•
|
Select the Allow only users listed locally checkbox to allow only users listed locally on the appliance to be authenticated. This setting is disabled by default.
|
|
•
|
Select the Simple user names in local database checkbox to use simple user names. This setting is disabled by default.
|
User names returned from the authentication agent or from NTLM authentication usually include a domain component, for example, domain1/bob. When this setting is selected, the domain component of a user name is ignored, and just the user name component is matched against names in the Dell SonicWALL appliance’s local user database. If this box is not checked, local user account names that are to match SSO-authenticated users must conform to the full user name, including any domain component.
|
|
•
|
Select the Allow limited access for non-domain users checkbox to allow limited access to users who are logged in to a computer but not into a domain. These users are not given membership in the Trusted Users user group, even when set locally, and so do not get any access set for Trusted Users. The are given access through policies, etc., that apply to Everyone or that specifically list them as allowed users. This setting is disabled by default.
|
These users are identified in logs as computer-name/user-name. When using the local user database to authenticate users and the Simple user names in local database option is disabled, user names must be configured in the local database using the full computer-name/user-name identification.
|
•
|
|
a
|
Select the Probe user for checkbox.
|
|
•
|
|
•
|
If the Probe users for setting is enabled, it causes the firewall to probe for a response on the NetAPI/WMI port before requesting that the SSO Agent identify a user. The Probe timeout (seconds) is set to 5 seconds by default.
|
|
•
|
Select the Probe test mode checkbox to test that SSO probes are functioning correctly during SSO without interfering with user authentications. Probes are sent after initiating user authentication through the SSO agent. This setting is disabled by default.
|
|
•
|
For the Mechanism for setting user group memberships, select either:
|
|
•
|
Use LDAP to retrieve user group information radio button to use LDAP to retrieve user information. This option is selected by default.
|
|
•
|
To configure the LDAP settings click Configure. The LDAP Configuration dialog displays. For configuration information for this dialog, refer to Advanced LDAP Configuration .
|
|
•
|
Local configuration radio button to use locally configured user group settings.
|
|
•
|
In the Polling rate (minutes) field, enter a polling interval, in minutes (the default is 5). After a user has been identified and logged in, the Dell SonicWALL polls the authentication agent at this rate to verify the user is still logged on.
|
|
•
|
Select the Poll the same agent that authenticated the user checkbox if the network topology requires that particular agents be used depending on the location of users, rather than polling any agent to determine if the user is still logged in. This setting is disabled by default.
|
|
IMPORTANT: The Try next agent on getting no name from NetAPI/WMI setting on the SSO Agents General Settings tab also needs to be set if this is set.
|
|
•
|
In the Hold time after (minutes) field, enter a time, in minutes, that the security appliance waits before trying again to identify traffic after an initial failure to do so. This feature rate limits requests to the agent to avoid possibly flooding it with requests if further traffic continues to be received from sources that repeatedly fail SSO. The default is 1 minute.
|
|
•
|
In the …after finding no user field, enter the number of minutes that the appliance should wait before trying again if it gets errors from the SSO agent or when the agent reports that no user is logged in. The default is 1 minute.
|
|
2
|
To give consistent naming for a domain in logging, select one of the following radio buttons for When different SSO sources report different name variants for a user’s domain:
|
|
•
|
Use the domain name as received (default)
|
|
•
|
|
a
|
If you have selected Always use a consistent domain name, click the Select button. The Select the name variant to use for each domain pop-up dialog lists known domains from which you can select the names to use is displayed.
|

|
b
|
Select the variant(s) to use. The initial default variant for each domain is None, which means that behavior of using whatever domain name is reported to the appliance via SSO does not change until Always use a consistent domain name is enabled and the domain name to use is selected here.
|
|
c
|
Click OK.
|
If, when using Single Sign On, you see unexpected user names shown on the Users > Status page, or logs of user login or user login failure with unexpected user names, those may be due to Windows service logins and those user names should be configured here so that the SSO agent will know to ignore them.
|
1
|
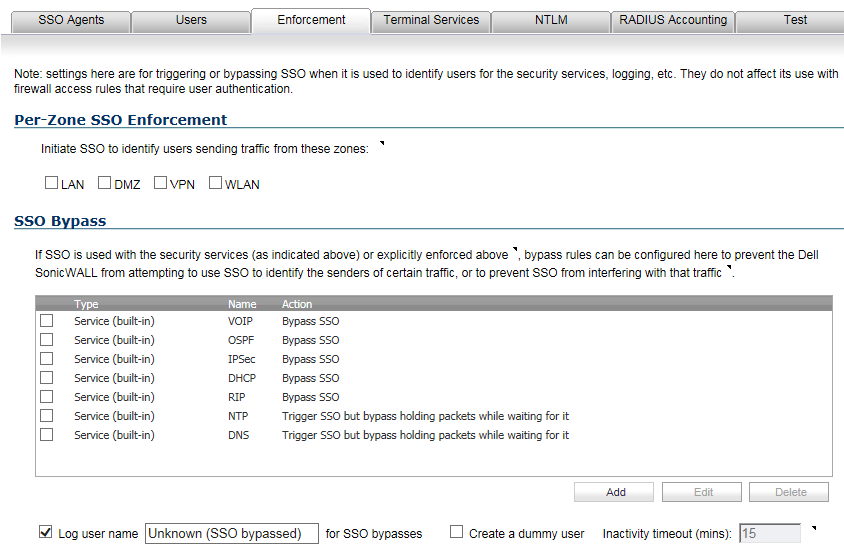
Click the Enforcement tab if you want to either trigger SSO on traffic from a particular zone, or bypass SSO for traffic from non-user devices such as internal proxy web servers or IP phones.
|
|
2
|
Under Per-Zone SSO Enforcement, select the checkboxes for any zones on which you want to trigger SSO to identify users when traffic is sent:
|
|
•
|
|
•
|
|
•
|
|
•
|
|
3
|
To bypass SSO for traffic from certain services or locations and apply the default content filtering policy to the traffic, select the appropriate service or location from the list in the SSO Bypass table or add a new service or location to the table. The table displays the built-in services that bypass SSO; these services cannot be delete.
|
|
NOTE: SSO bypass settings do not apply when SSO is triggered by firewall access rules requiring user authentication. To configure this type of SSO bypass, add separate access rules that do not require user authentication for the affected traffic. See Adding Access Rules for more information on configuring access rules.
By default, Linux and Mac users who are not authenticated by SSO via Samba are assigned the default content filtering policy. To redirect all such users who are not authenticated by SSO to manually enter their credentials, create an access rule from the WAN zone to the LAN zone for the HTTP service with Users Allowed set to All. Then configure the appropriate CFS policy for the users or user groups. See Adding Access Rules for more information on configuring access rules. |
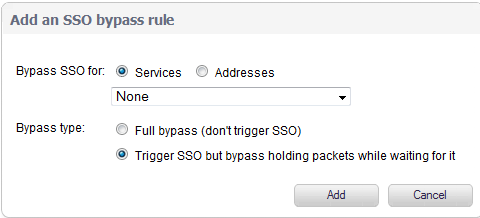
SSO bypass may be necessary, for example, for:
|
a
|
|
b
|
|
d
|
Select the Bypass type:
|
|
e
|
Click Add. The entry is added to the table
|
|
a
|
This setting is selected by default, and a default name of SSO Bypass is specified.If this setting is enabled, then when traffic bypasses SSO (as configured here), the traffic is shown in logs and AppFlow Monitor with the given user name rather than as from an unknown user, thus allowing it to be differentiated from traffic sent by users whom SSO could not identify.
|
6
|
Optionally, select Create a dummy user checkbox. This setting is not selected by default.
|
If this setting is enabled, on receiving SSO bypass traffic, a dummy user entry is created with the given user name for the originating IP address. Then, in addition to the name appearing in logs and the AppFlow Monitor, the dummy user entry displays on the Users > Status page. The dummy name remains in existence until traffic from the IP address stops for the given inactivity time or, in the case of bypass services, until non-bypass traffic is received from it.
|
NOTE: The logging part of this option also can be configured by the For logging of connections on which the user is not identified option in the User Session Settings section of the Users > Settings page
|
|
a
|
Optionally, specify an inactivity timeout, in minutes, in the Inactivity timeout (mins) field. The default is 15 minutes.
|
|
1
|
|
2
|
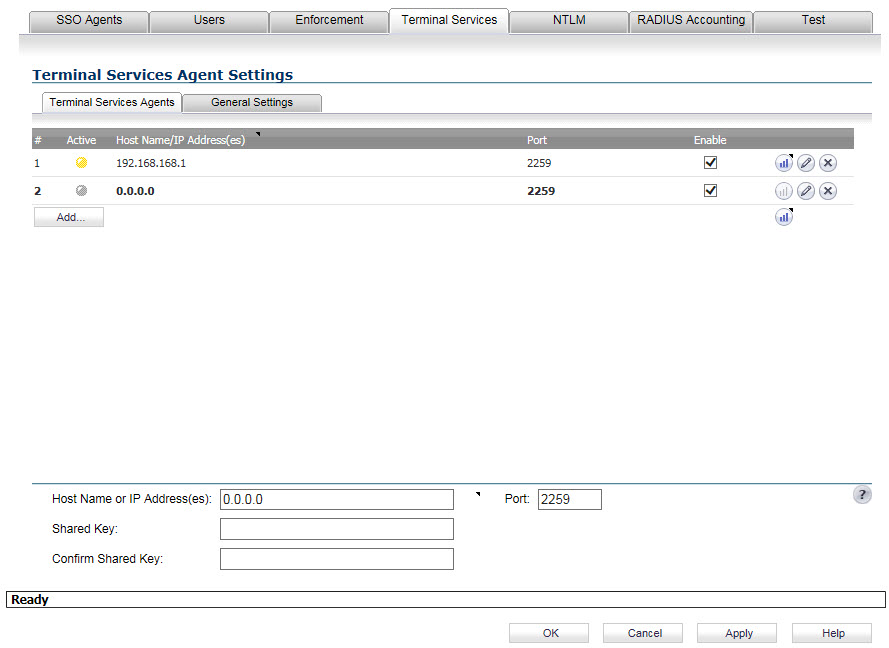
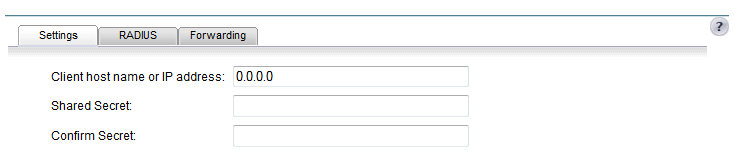
To add agents, click the Add button. The page is updated to display a new row in the table at the top and new input fields in the lower half of the page. For existing agents:
|
|
•
|
In the Host Name or IP Address(es) field, enter the name or IP address of the terminal server on which SonicWALL TSA is installed. If the terminal server is multi-homed (has multiple IP addresses) and you are identifying the host by IP address rather than DNS name, enter all the IP addresses as a comma-separated list.
|
|
•
|
At Port, enter the port number that the SonicWALL TSA is using to communicate with the appliance. The default port is 2259.
|
|
•
|
In the Shared Key field, enter the shared key that you created or generated in the SonicWALL TSA. The shared key must match exactly. Re-enter the shared key in the Confirm Shared Key field.
|
|
3
|
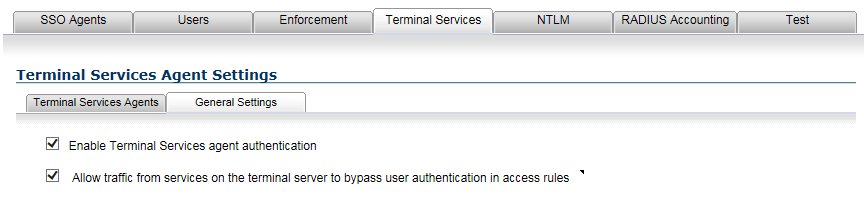
Click the General Settings tab under Terminal Services Agent Settings to configure the following options:
|
|
•
|
Select the Enable Terminal Services agent authentication checkbox to use the TSA for user authentication. This setting is not enabled by default.
|
|
•
|
The Allow traffic from services on the terminal server to bypass user authentication in access rules checkbox is selected by default. This allows service traffic, such as Windows updates or anti-virus updates not associated with any user login session, to pass without authentication. That traffic normally would be blocked if the applicable firewall rules are set to require user authentication.
|
If you clear this checkbox, traffic from services can be blocked if firewall access rules require user authentication. In this case, you can add rules to allow access for All to the services traffic destinations, or configure the destinations as HTTP URLs that can bypass user authentication in access rules.
|
1
|
Click the NTLM tab.
|
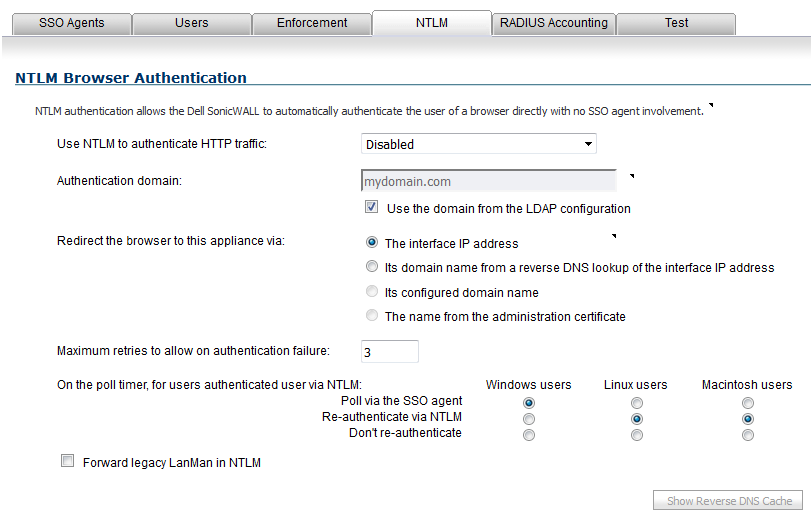
Consult the tooltips on this tab for additional details, and see How Does Browser NTLM Authentication Work? for more information.
|
•
|
Select one of the following choices from the Use NTLM to authenticate HTTP traffic drop-down menu:
|
|
•
|
Never – Will never use NTML authentication
|
|
•
|
Before attempting SSO via the agent – Try to authenticate users with NTLM before using the SonicWALL SSO agent
|
|
•
|
Only if SSO via the agent fails – Try to authenticate users via the SSO agent first; if that fails, try using NTLM
|
|
•
|
For Authentication domain, do one of the following:
|
|
•
|
Select the Use the domain from the LDAP configuration checkbox to use the same domain that is used in the LDAP configuration.
|
|
•
|
For Redirect the browser to this appliance via, select one of the following options to determine how a user’s browser is initially redirected to the firewall’s own Web server:
|
|
•
|
The interface IP address – Select this to redirect the browser to the IP address of the appliance Web server interface.
|
|
•
|
Its domain name from a reverse DNS lookup of the interface IP address – Enables the Show Reverse DNS Cache button at the bottom of the dialog; when clicked, a popup displays the appliance Web server’s Interface, IP Address, DNS Name, and TTL in seconds. Click the button to verify the domain name (DNS name) being used for redirecting the user’s browser.
|
|
•
|
Its configured domain name – Use the firewall's domain name as configured on the System > Administration page.
|
|
•
|
The name from the administration certificate – Use the imported certificate that is selected for HTTPS Web Management on the System > Administration page.
|
|
•
|
Enter a number of retries in the Maximum retries to allow on authentication failure.
|
|
•
|
To detect when users log out, select the polling method to be used by the appliance for Windows, Linux, and Macintosh users in the On the poll timer, for users authenticated user via NTLM options. Select the radio button for one of the following methods for users on each type of computer:
|
|
•
|
Poll via the SSO agent – If you are using an SSO Agent in your network, select this to use it to poll users; for users authenticated via NTLM, the user name that the agent learns must match the name user for the NTLM authentication, or the login session will be terminated. You may want to select a different polling method for Linux or MacOS users, as those systems do not support the Windows networking requests used by the SSO agent.
|
|
•
|
Re-authenticate via NTLM – This method is transparent to the user if the browser is configured to store the domain credentials, or the user instructed the browser to save the credentials.
|
|
•
|
Don’t re-authenticate – If you select this option, logout will not be detected other than via the inactivity timeout.
|
|
NOTE: When multiple Content Filter policies are configured and NTLM is enabled for Single Sign-On enforcement, an HTTP/HTTPS access rule with Trusted Users as Users Allowed must be added to the LAN to WAN rules in the Firewall > Access Rules page. This rule triggers an NTLM authentication request to the user. Without the access rule, restrictive CFS policies might block the user from Internet access and prevent authentication.
|
|
•
|
If you are using older legacy servers that require legacy LAN Manager components to be included in NTLM messages, select the Forward legacy LanMan in NTLM checkbox. This may cause authentication to fail in newer Windows servers that don’t allow LanMan in NTLM by default because it is not secure.
|
|
1
|

The Status column shows the current status for each RADIUS accounting client listed in the panel:
|
2
|
To add a new RADIUS client, click the Add… button. The RADIUS Accounting Single-Sign-On tabs, Settings, RADIUS, and Forwarding, appear in a view/edit pane in the lower half of the dialog.
|
|
NOTE: Changes made in the view/edit pane are instated directly into the highlighted entry in the Accounting Clients table as they are made. On completion, click anywhere outside of the pane to close it. Individual fields in the Accounting Clients table also can be updated by clicking on them directly in the table.
|
|
3
|
In the Client host name or IP address field, enter the name or the IP address for the RADIUS client host.
|
|
4
|
|
5
|
Click the RADIUS tab.
|

|
6
|
From the User-Name attribute format drop-down menu, select the format for the user name login.
|
|
•
|
Other – Non-standard format
|
|
IMPORTANT: The pre-defined formats are for common cases. If those do not match what your network access server sends, then you must select Other as the User-Name attribute format and then enter a customized format.
|
|
•
|
If you select Other, more settings appear so you can configure the components to be found in the attribute:
|

|
•
|
|
a
|
In the Format field, enter a limited scanf-style string, with either a %s or %[…] directive for each component. This directive tells the appliance what the network access device (NAS) sends in the User-Name attribute. This format is not specified by the RADIUS Accounting RFC. Devices are not constrained as to what they can send in this attribute, so, its content can be very variable. What you set here specifies how the appliance must decode the User-Name attribute to extract the user name, domain, and/or DN.
|
|
TIP: When you select Other, these fields are set to the format string and components of the previously selected format. So, first select the pre-defined format that most closely matches what your network access server sends. This gives you a good starting point for entering your customized format. Then, change to Other.
|
|
b
|
From the Component drop-down menu, select one of the following:
|
|
•
|
|
•
|
User-Name (default)
|
|
•
|
|
•
|
The components that you enter as a limited scanf-style string in the Format field consist of one or more of the following items:
|
•
|
|
NOTE: You can double click in the Components drop-down menu to display a tooltip with instructions on how to enter the scanf-style format.
|
|
c
|
|
NOTE: If you understand the scanf-style format, you can edit the Format field directly instead of using the Add component button.
TIP: Use %s for a component that is followed by white space or is at the end. For a component followed by some other character, use %[^x]x. For example, the Format string for the name@domain format would be %[^@]@%s, with the three components set to User-Name, Domain, and Not used.
|

|
d
|
Select the type of component from the Component to add drop-down menu:
|
|
•
|
|
•
|
DN (default)
|
|
e
|
Enter text to separate entries in the Preceding text after the User-name field.
|
|
f
|
Enter text to follow the entries in the Any text that follows it field.
|
|
g
|
Click Add. the Accounting Clients table is updated, and more options appear in the Radius view/edit pane.
|
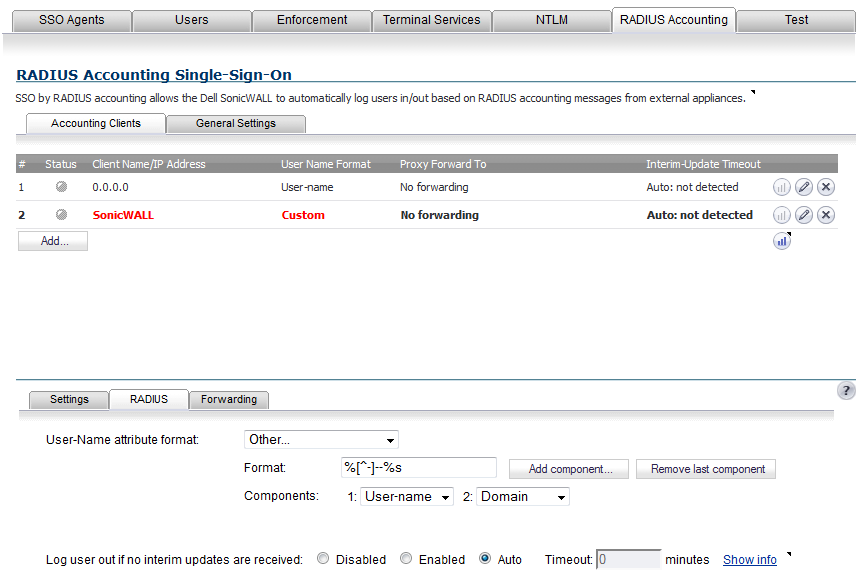
To delete the last component you added, click Remove last component.
Select a Log user out if no accounting interim updates are received option:
|
•
|
Disabled – to not have messages sent.
|
|
•
|
Enabled – to manually specify the Timeout interval. Set the timeout value greater than the period at which the RADIUS Accounting client sends the Interim-Update messages, and for dropped/missed Interim-Update messages, set the Timeout value at least 2 to 3 times greater than the period.
|
|
•
|
Auto (default) – to have the appliance detect automatically whether Interim-Update message are being sent periodically and, if they are, to use them as specified under Enabled and setting automatically the timeout accordingly.
|
|
|
|
TIP: To rerun auto-detection, change the setting to Disabled and then back to Auto, clicking Apply after each change.
|
|
9
|
Click the Forwarding tab.
|

|
10
|
Under the Forwarding tab, you can enter up to four RADIUS accounting servers in these fields:
|
|
•
|
Port (default 1813)
|
|
•
|
Shared Secret for the RADIUS accounting servers to which you want the client to forward message
|
When you enter this information for a server, the Select from drop-down menu displays.
|
11
|
For each server, from the Select from drop-down menu, select either:
|
If requests from more than one client are to be forwarded to the same accounting server, then after it has been configured for any one client, it can be selected from the Select from drop-down menu for the others. All the information for the selected accounting server, including its shared secret, is copied and instated for this client.
|
12
|
In the Timeout (seconds) field and Retries field, enter the timeout period in seconds and the number of retries. The default for Timeout (seconds) is 10 seconds, and the default for Retries is 3.
|
|
14
|
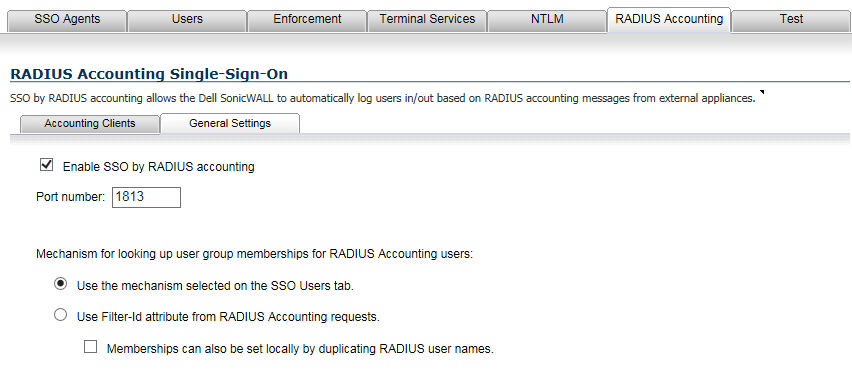
Select the General Settings tab.
|
|
15
|
Enable SSO or RADIUS accounting by selecting the Enable SSO or RADIUS accounting checkbox. This setting is enabled by default.
|
|
16
|
Select this option to set group membership according to the options selected on the Users tab.
|
2
|
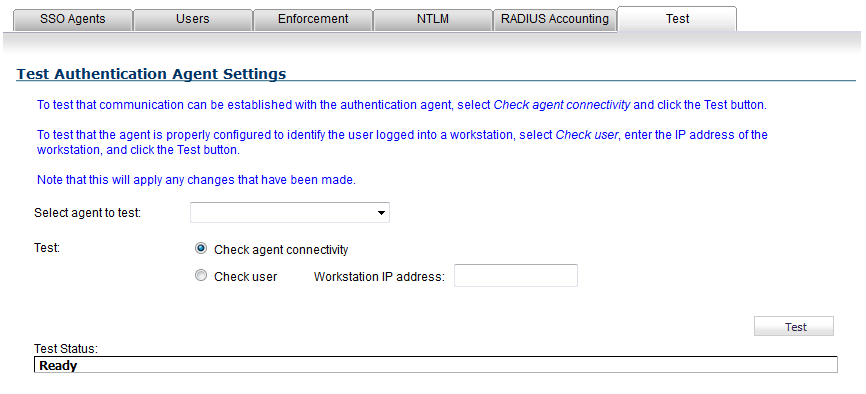
If you have multiple agents configured, select the SSO agent or TSA to test from the Select agent to test drop-down menu. The drop-down menu includes SSO agents at the top, and TSA’s at the end under the heading --Terminal Server Agents--.
|
|
•
|
To test communication with the authentication agent, select the Check agent connectivity radio button. If the firewall can connect to the SSO agent, the message Agent is ready displays. If testing a TSA, the Test Status field displays the message, and the version and server IP address are displayed in the Information returned from the agent field.
|

|
•
|
To test if the SSO agent is properly configured to identify the user logged into a workstation, select the Check user radio button and enter the IP address of a workstation in the Workstation IP address field.
|
|
TIP: If the messages Agent is not responding or Configuration error display, check your settings and perform these tests again.
|
|
4
|
RADIUS accounting for Single Sign-On is configured on the Users > Settings page.
|
1
|
Display the Users > Settings page.
|

|
2
|
|
3
|
Click the RADIUS Accounting tab. For the procedure to configure RADIUS Accounting, see Radius Accounting Tab .
|
|
4
|
Click Apply.
|
If you selected Use LDAP to retrieve user group information on the Users tab as described in Configuring SonicOS to Use the SonicWALL SSO Agent , you must configure your LDAP settings.
|
1
|
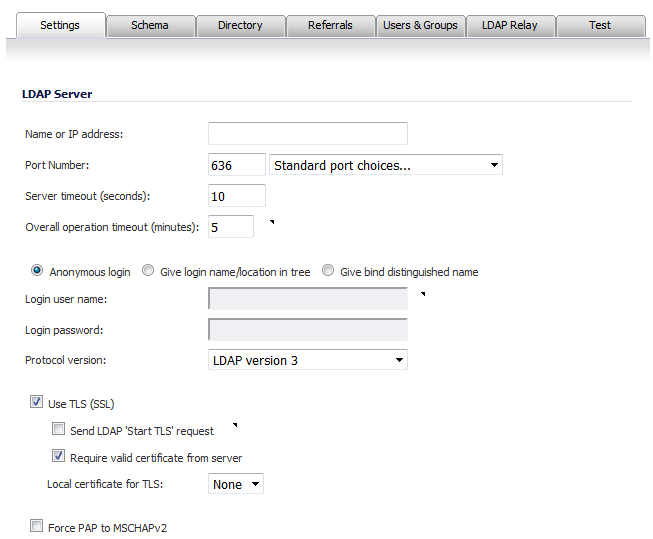
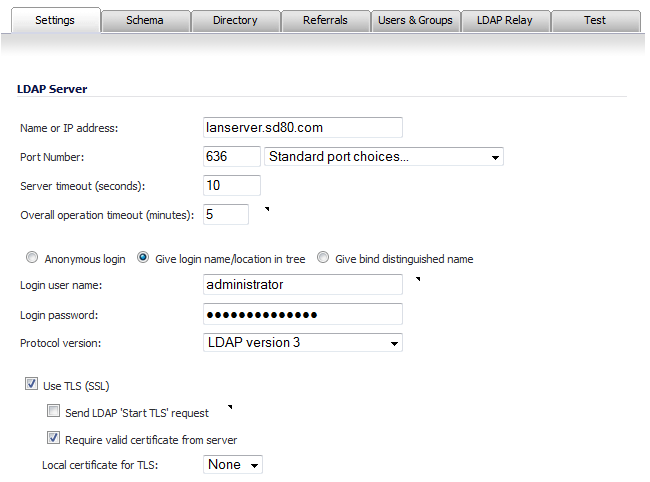
On the Users tab in the SSO Authentication Configuration dialog, click the Configure button next to the Use LDAP to retrieve user group information option. The LDAP Configuration dialog displays.
|
|
•
|
|
2
|
|
3
|
In the Port Number field, enter the port number of your LDAP server. The default LDAP ports, which you can select from the drop-down menu, are:
|
|
•
|
Default LDAP port – 389
|
|
•
|
|
•
|
Windows Global Catalog port – 3268
|
|
•
|
Global Catalog over TLS port – 3269
|
|
4
|
In the Server timeout (seconds) field, enter a number of seconds the firewall will wait for a response from the LDAP server before the attempt times out. Allowable values are 1 to 99999. The default is 10 seconds.
|
|
5
|
In the Overall operation timeout (minutes) field, enter a number of minutes the firewall will spend on any automatic operation before timing out. Allowable values are 1 to 99999. The default is 5 minutes.
|
|
•
|
Anonymous login to login anonymously. Some LDAP servers allow for the tree to be accessed anonymously. If your server supports this (Microsoft Active Directory generally does not), you may select this option. The Login user name and Login password fields remain dimmed. Go to Step 10.
|
|
•
|
Give login name/location in tree to access the tree with the login name. The Login user name and Login password fields become active. Go to Step 7.
|
|
NOTE: Be sure to enter the user tree in the User tree for log in to server field on the Directory tab.
|
|
•
|
Give bind distinguished name to access the tree with the distinguished name. The Login user name field changes to Bind distinguished name field, and it and the Login password field become active. Go to Step 8.
|
|
7
|
To login with a user’s name, enter the user’s name in the Login user name field. The login name is presented automatically to the LDAP server in full dn notation. Go to Step 9.
|
|
NOTE: Use the user’s name (that is in the first component of the user’s distinguished name, in the Login user name field, not a username or login ID. For example, John Doe may normally log in as jdoe, but would log in here as John Doe, not jdoe.
|
|
8
|
In the Bind distinguished name field, specify the full distinguished name (DN) to use to bind to the LDAP server.
|
|
9
|
Enter a password in the Login password field.
|
|
10
|
Select the LDAP version from the Protocol version drop-down menu, either LDAP version 2 or LDAP version 3 (default). Most implementations of LDAP, including Active Directory, employ LDAP version 3.
|
|
11
|
Select the Use TLS (SSL) checkbox to use Transport Layer Security (SSL) to login to the LDAP server. This option is selected by default.
|
|
12
|
Optionally, select the Send LDAP ‘Start TLS’ request checkbox to allow the LDAP server to operate in TLS and non-TLS mode on the same TCP port. This option is not selected by default.
|
|
NOTE: Only check the Send LDAP ‘Start TLS’ request box if your LDAP server uses the same port number for TLS and non-TLS, and it should only be selected if required by your LDAP server.
|
|
13
|
Select the Require valid certificate from server checkbox to require a valid certificate from the server. The certificate presented by the server is validated during the TLS exchange by matching the name specified above to the name on the certificate. This option is selected by default.
|
|
14
|
Select a local certificate from the Local certificate for TLS drop-down menu. This is optional, to be used only if the LDAP server requires a client certificate for connections. This feature is useful for LDAP server implementations that return passwords to ensure the identity of the LDAP client (Active Directory does not return passwords). This setting is not required for Active Directory. The default is None.
|
|
15
|
Click Apply.
|
|
1
|
Click the Schema tab.
|

|
2
|
From the LDAP Schema drop-down menu, select one of the following LDAP schemas. Selecting any of the predefined schemas automatically populates the fields used by that schema with their correct values.
|
|
•
|
Microsoft Active Directory (default)
|
|
•
|
User defined – Allows you to specify your own values.
|
|
3
|
The Object class field defines which attribute represents the individual user account to which the next two fields apply. This field is not modifiable unless you select User defined.
|
|
4
|
The Login name attribute field defines which attribute is used for login authentication. This field is not modifiable unless you select User defined.
|
|
5
|
If the Qualified login name attribute field is not empty, it specifies an attribute of a user object that sets an alternative login name for the user in name@domain format. This may be needed with multiple domains in particular, where the simple login name may not be unique across domains. This is set to mail for Microsoft Active Directory and RFC2798 inetOrgPerson.
|
|
6
|
The User group membership attribute field contains the information in the user object of which groups it belongs to. This is memberOf in Microsoft Active Directory. The other predefined schemas store group membership information in the group object rather than the user object, and therefore do not use this field. This field is not modifiable unless you select User defined.
|
|
7
|
The Additional user group ID user attribute, along with the Additional user group match user group attribute set in the User Group Objects section, allow for a schema that sets additional memberships for a user in addition to those found via member/memberOf attributes, for example, Active Directory’s primary group attribute.
|
If the Additional user group ID user attribute is specified and its use enabled by selecting the Use checkbox, then when a user object is found with one or more instances of this attribute, a search for additional user groups matching those is made in the LDAP directory. If a group is found with the Additional user group match attribute set to that value, then the user is also made a member of that group.
|
TIP: With Active Directory, enabling the use of these attributes set to primaryGroupID and primary Group Token gives users membership of their primary user group, typically, Domain Users.
|
|
8
|
The Framed IP address attribute field can be used to retrieve a static IP address that is assigned to a user in the directory. Currently it is only used for a user connecting using L2TP with the firewall L2TP server. In future releases, this may also be supported for the SonicWALL Global VPN Client (GVC). In Active Director, the static IP address is configured on the Dial-in tab of a user’s properties.
|
|
9
|
The Object class field defines the type of entries that an LDAP directory may contain. A sample object class, as used by AD, would be user or group.
|
|
10
|
The Member attribute field defines which attribute is used for login authentication. Select whether the attribute is a:
|
|
•
|
|
11
|
|
12
|
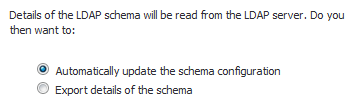
Optionally, to read the details of the schema, click the Read from server button. The LDAP Read Schema dialog displays.
|
|
•
|
|
b
|
Click OK.
|
|
1
|
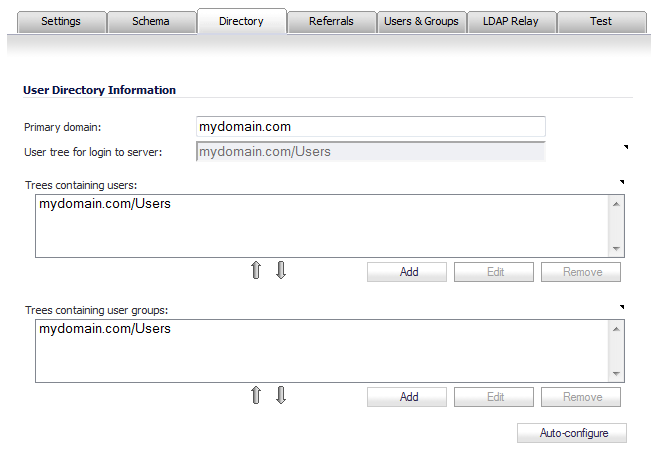
Select the Directory tab.
|
|
2
|
In the Primary Domain field, specify the user domain used by your LDAP implementation. For AD, this will be the Active Directory domain name, such as yourADdomain.com. Changes to this field will, optionally, automatically update the tree information in the rest of the page. This is set to mydomain.com by default for all schemas except Novell eDirectory, for which it is set to o=mydomain.
|
|
3
|
In the User tree for login to server field, specify the tree in the directory that holds the user object for the user account specified in the Login user name field on the Settings tab resides. For example, in Active Directory (AD) the administrator account’s default tree is the same as the user tree.
|
|
4
|
The Trees containing users table lists the trees where user objects commonly reside in the LDAP directory. During user authentication, the listed trees are searched to locate the user. One default value, mydomain.com/user, is provided that can be edited, a maximum of 64 DN values may be provided, and the firewall searches the directory until a match is found, or the list is exhausted.
|
|
a
|
![]()
You can specify a tree in either:
|
•
|
Path format (for example, domain.com/people)
|
|
•
|
Distinguished name format (for example, ou=people,dc=domain,dc=com); this format may be necessary for trees having DNs with non-standard formatting. When using this format, any period (.) or slash (/) character must be preceded by a backslash (\). For additional escaping requirements for characters in distinguished names, see RFC2253.
|
|
c
|
Click OK. The tree is added to the table.
|
To edit an existing tree in the table:
|
b
|
Click Edit.
|
|
d
|
Click OK. The changes are made to the tree in the table.
|
To remove an existing tree in the table:
|
b
|
Click Remove.
|
|
b
|
|
6
|
In the Trees containing user groups specify the trees where user group objects commonly reside in the LDAP directory. A maximum of 32 DN values may be provided. These are only applicable when there is no user group membership attribute in the schema's user object, and are not used with AD. To add new trees:
|
|
a
|

|
c
|
Click OK. The tree is added to the table.
|
To edit an existing tree in the table:
|
b
|
Click Edit.
|
|
d
|
Click OK. The changes are made to the tree in the table.
|
To remove an existing tree in the table:
|
b
|
Click Remove.
|
|
b
|
|
8
|
The Auto-configure button causes the firewall to auto-configure the Trees containing users and Trees containing user groups fields by scanning through the directory/directories looking for all trees that contain user objects. The Primary Domain and User tree for login to server must first be set.
|
|
a
|

|
•
|
Append to existing trees – New trees are added to the current configuration
|
|
•
|
Replace existing trees – Remove all currently configured trees first before adding new trees
|
|
c
|
Click OK.
|
|
NOTE: This may take some time.
|
|
TIP: If using multiple LDAP/AD servers with referrals, this process can be repeated for each, replacing the Domain to search accordingly and selecting Append to existing trees on each subsequent run.
|
|
9
|
Click Apply.
|
|
1
|
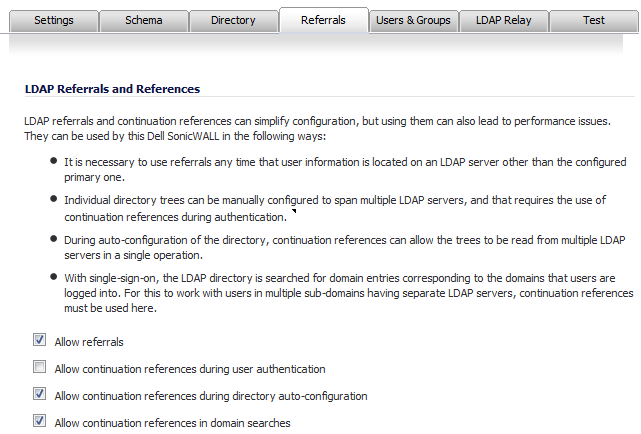
Select the Referrals tab.
|
|
•
|
Allow referrals – Select when user information is located on an LDAP server other than the primary one. This setting is enabled by default.
|
|
•
|
Allow continuation references during user authentication – Select when individual directory trees span multiple LDAP servers.
|
|
•
|
Allow continuation references during directory auto-configuration – Select to read directory trees from multiple LDAP servers in the same operation. This setting is enabled by default.
|
|
•
|
Allow continuation references in domain searches – Select to search for sub-domains in multiple LDAP servers. This setting is enabled by default.
|
|
3
|
Click Apply.
|
|
1
|
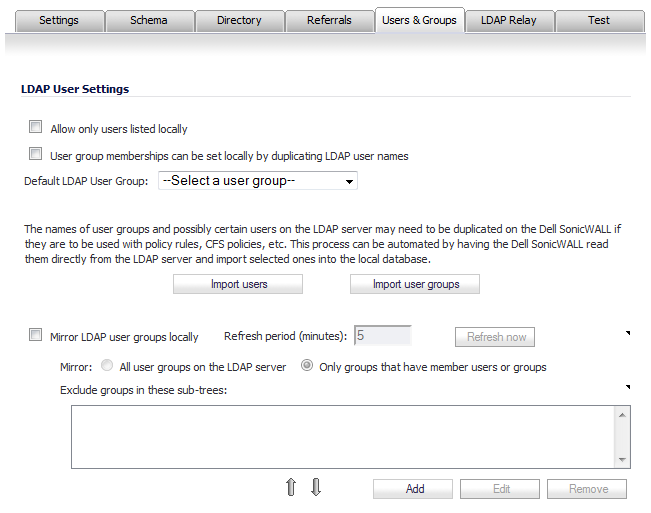
Select the Users & Groups tab.
|
|
2
|
Check the Allow only users listed locally checkbox to require that LDAP users also be present in the firewall local user database for logins to be allowed.
|
|
3
|
Check the User group membership can be set locally by duplicating LDAP user names checkbox to allow for group membership (and privileges) to be determined by the intersection of local user and LDAP user configurations.
|
|
4
|
From the Default LDAP User Group drop-down menu, select a default group on the firewall to which LDAP users will belong in addition to group memberships configured on the LDAP server.
|
|
TIP: Group memberships (and privileges) can also be assigned simply with LDAP. By creating user groups on the LDAP/AD server with the same name as built-in groups (such as Guest Services, Content Filtering Bypass, Limited Administrators), and by assigning users to these groups in the directory, or by creating user groups on the firewall with the same name as existing LDAP/AD user groups, group memberships are automatically granted to users upon successful LDAP authentication.
|
|
5
|
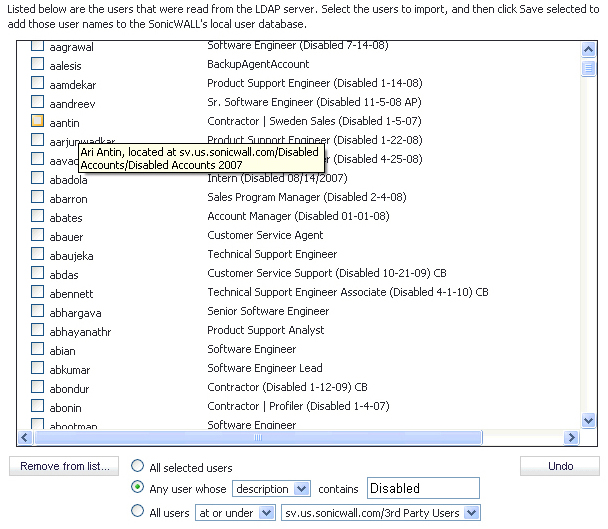
Click the Import users button to configure local users on the Dell SonicWALL by retrieving the user names from your LDAP server. The LDAP Import Users dialog displays, listing the user names available for import to the Dell SonicWALL.
|
|
b
|
Click Save selected.
|
The list of users read from the LDAP server can be quite long, and you might not want to import all of them. A Remove from list button is provided, along with several methods of selecting unwanted users.You can use these options to reduce the list to a manageable size and then select the users to import.
|
6
|
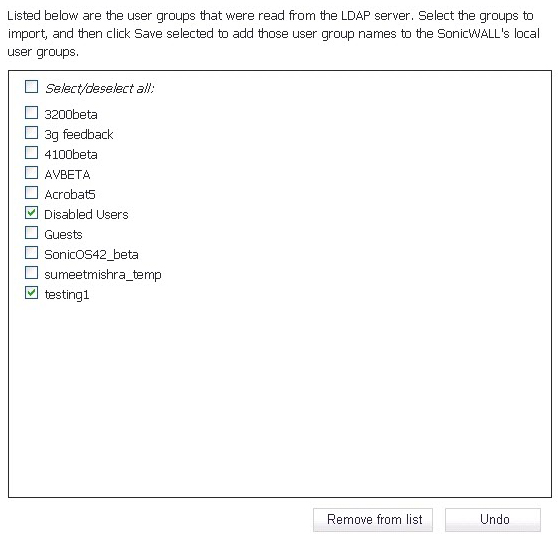
The names of user groups on the LDAP server need to be duplicated on the SonicWALL appliance if they are to be used in policy rules, CFS policies, etc. Click the Import user groups button to import user groups to the Dell SonicWALL appliance from the LDAP server. The Import user groups from LDAP dialog displays.
|

|
•
|
The LDAP Import User Groups dialog displays.
|
c
|
Click Save selected.
|
The list of user groups read from the LDAP server can be quite long, and you might not want to import all of them. A Remove from list button is provided, along with several methods of selecting unwanted users.You can use these options to reduce the list to a manageable size and then select the users to import.
|
7
|
To enable LDAP user group mirroring, select the Mirror LDAP user groups locally checkbox.
|
These mirror user groups are listed separately on the Users > Local Groups page and have names that include the domain in which they are located. The groups can be selected in access rules, CFS policies, and so forth, just as other local user groups, although there are a few restrictions, for example, they cannot have other user groups added as members locally on the Dell SonicWALL appliance, although they can be made members of other local user groups and local users can be made members of them.
|
https://<ip—address>/ldapMirror.xml. You can also determine the maximum number of user groups by displaying the tooltip for this setting. |
The groups are imported from the directory trees configured in the Trees containing user groups table on the Directory tab (see Directory Tab ). Filters can be configured in the Exclude groups in these sub-trees table below.
|
8
|
When the Mirror LDAP user groups locally is selected, the Refresh period (minutes) field becomes active. Enter the maximum time between refreshes. The default is 5 minutes.
|
|
9
|
Optionally, to refresh immediately, click the Refresh now button.
|
|
•
|
|
11
|
Exclude sub-trees in the LDAP directory from mirroring by adding sub-trees to the Exclude groups in these sub-trees table. You can exclude up to 32 sub-trees in the LDAP directory; any user groups located in or under the given sub-trees are not mirrored.
|
|
a
|
|
c
|
Click OK. The tree is added to the table.
|
To edit an existing tree in the table:
|
b
|
Click Edit.
|
|
d
|
Click OK. The changes are made to the tree in the table.
|
To remove an existing tree in the table:
|
b
|
Click Remove.
|
|
b
|
|
13
|
Click Apply.
|
|
1
|
|
2
|
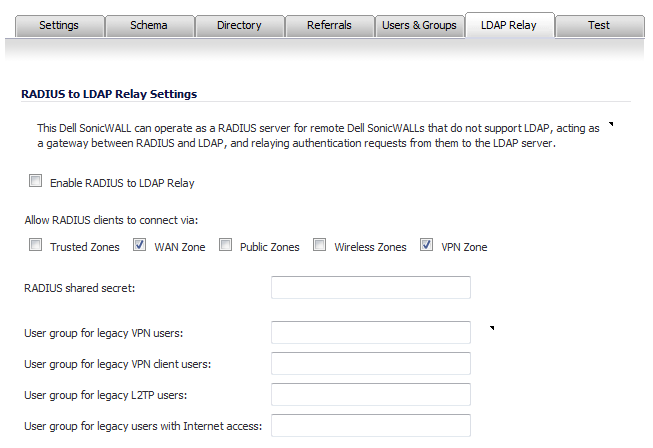
Select the Enable RADIUS to LDAP Relay checkbox to enable RADIUS to LDAP relay. This setting is not enabled by default.
|
|
3
|
Under Allow RADIUS clients to connect via, select the relevant checkboxes and policy rules will be added to allow incoming RADIUS requests accordingly. The options are:
|
|
•
|
WAN Zone (default)
|
|
•
|
VPN Zone (default)
|
|
4
|
In the RADIUS shared secret field, enter a shared secret common to all remote firewalls.
|
|
5
|
In the user groups for legacy users fields, define the user groups that correspond to the legacy users:
|
|
6
|
Click Apply.
|
|
1
|
Select the Test tab.
|
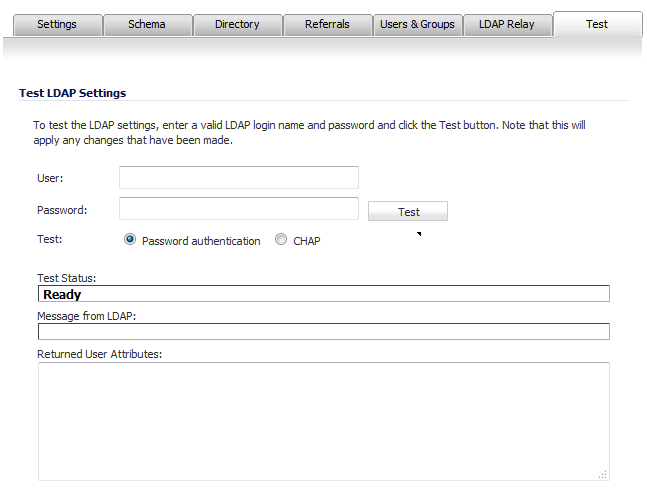
The Test tab tests the configured LDAP settings by attempting authentication with specified user and password credentials. Any user group memberships and/or framed IP address configured on the LDAP/AD server for the user will be displayed.
|
2
|
In the Username and Password fields, enter a valid LDAP login name for the LDAP server you configured.
|
|
3
|
|
4
|
Click Test. Status and information returned from the LDAP server are displayed in the Test Status, Message from LDAP, and Returned User Attributes fields.
|
|
5
|
Click Apply.
|
|
6
|
Click OK.
|