Use_Cases
Importing CA Certificates on Windows
• Creating Unique Access Policies for AD Groups
Importing CA Certificates on Windows
Two certificates are imported in this use case, a goDaddy certificate and a server certificate. See the following sections:
• Importing a goDaddy Certificate on Windows
• Importing a Server Certificate on Windows
Importing a goDaddy Certificate on Windows
In this use case, we format a goDaddy Root CA Certificate on a Windows system and then import it to our SRA appliance.
1. Double-click on the goDaddy.p7b file to open the Certificates window, and navigate to the goDaddy certificate.
The .p7b format is a PKCS#7 format certificate file, a very common certificate format.
2. Double-click the certificate file and select the Details tab.
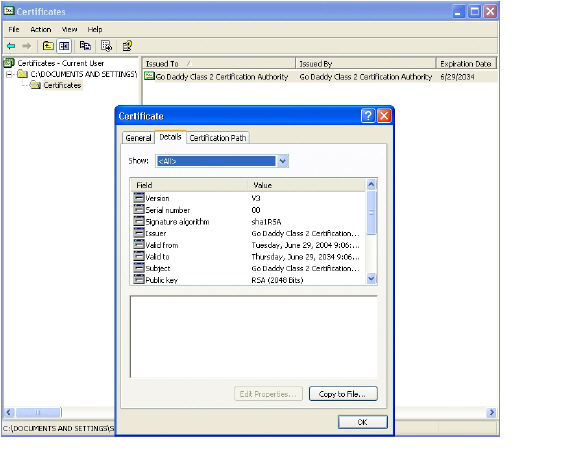
3. Click Copy to File. The Certificate Export Wizard launches.
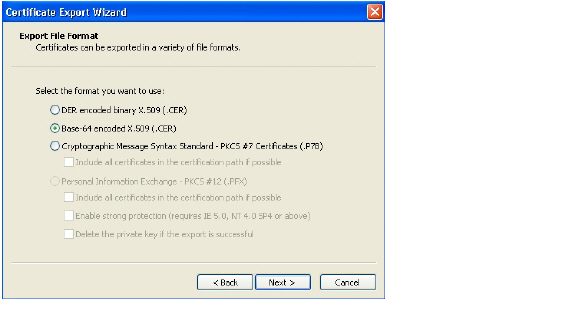
4. In the Certificate Export Wizard, click Next.
5. Select Base-64 encoded X.509 (.CER) and then click Next.
6. In the File to Export screen, type the file name in as goDaddy.cer and then click Next.
7. In the Completing the Certificate Export Wizard screen, verify the path and format and then click Finish.
8. Click OK in the confirmation dialog box.
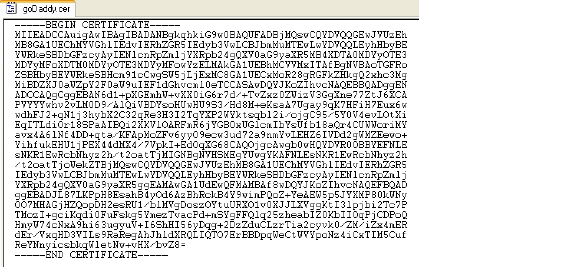
The certificate is exported in base-64 encoded format. You can view it in a text editor.
9. In the SRA management interface, navigate to System > Certificates.

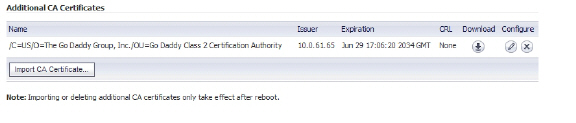
10. In the Additional CA Certificates section, click Import CA Certificate. The Import Certificate window appears.
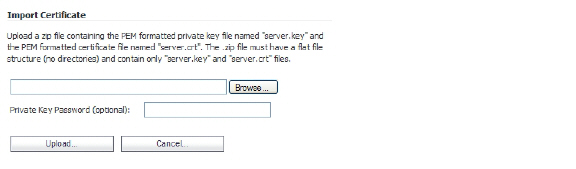
11. In the Import Certificate window, click Browse and navigate to the goDaddy.cer file on your Windows system and double-click it.
12. Click Upload. The certificate will be listed in the Additional CA Certificates table.
13. Navigate to System > Restart and restart the SRA appliance for the CA certificate to take effect.
Importing a Server Certificate on Windows
In this use case, we import a Microsoft CA server certificate to a Windows system. In this case, the purpose is to use an SSL certificate for application offloading to a mail server.
The server certificate is mail.chaoslabs.nl. This certificate needs to be exported in base-64 format as the server.crt file that is put in a .zip file and uploaded as a Server Certificate.
The private key is not included in the .p7b file. The private key needs to be exported from wherever it is and saved in a base-64 format and included in a server.key file in the .zip file.
1. Double-click on the mail.chaoslabs.nl.pb7 file and navigate to the certificate.

2. Double-click the certificate file and select the Details tab.
3. Click Copy to File.
4. In the Certificate Export Wizard, select Base-64 encoded X.509 (.CER).
5. Click Next and save the file as server.crt on your Windows system.
The certificate is exported in base-64 encoded format.
6. Add the server.crt file to a .zip file.
7. Separately save the private key in base-64 format as server.key.
8. Add the server.key file to the .zip file that contains server.crt.
9. Upload the .zip file to the server as a Server Certificate.
Creating Unique Access Policies for AD Groups
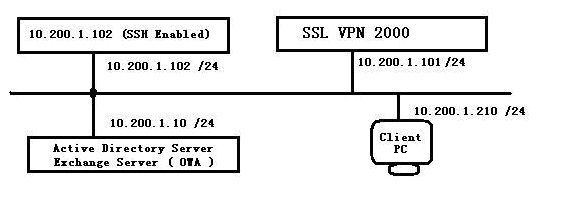
In this use case, we add Outlook Web Access (OWA) resources to the SRA appliance, and need to configure the access policies for users in multiple Active Directory (AD) groups. We will create a local group for each AD group and apply separate access policies to each local group.
While Active Directory allows users to be members in multiple groups, the SRA appliance only allows each user to belong to a single group. It is this group that determines the access policies assigned to the user.
When importing a user from AD, the user will be placed into the local SRA group with which they have the most AD groups in common. For example: Bob belongs to the Users, Administrators, and Engineering AD groups. If one SRA group is associated with Users, and another is associated with both Administrators and Engineering, Bob will be assigned to the SRA group with both Administrators and Engineering because it matches more of his own AD groups.
The goal of this use case is to show that Dell SonicWALL SRA firmware supports group-based access policies by configuring the following:
• Allow Acme Group in Active Directory to access the 10.200.1.102 server using SSH
• Allow Mega Group in Active Directory to access Outlook Web Access (OWA) at 10.200.1.10
• Allow IT Group in Active Directory to access both SSH and OWA resources defined above
• Deny access to these resources to all other groups
This example configuration is provided courtesy of Vincent Cai, June 2008.
Figure C:29 Network Topology
Perform the tasks in order of the following sections:
• Creating the Active Directory Domain
• Adding a Global Deny All Policy
• Adding the SSHv2 PERMIT Policy
• Adding the OWA PERMIT Policies
• Verifying the Access Policy Configuration
Creating the Active Directory Domain
This section describes how to create the SRA Local Domain, SNWL_AD. SNWL_AD is associated with the Active Directory domain of the OWA server.
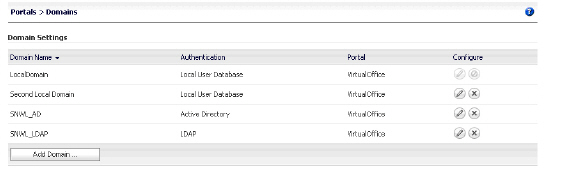
1. Log in to the SRA management interface and navigate to the Portals > Domains page.
2. Click Add Domain. The Add Domain window appears.
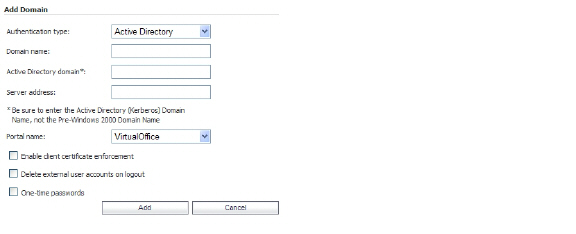
3. In the Authentication type drop-down list, select Active Directory.
4. In the Domain name field, type SNWL_AD.
5. In the Active Directory domain field, type the AD domain name, in.loraxmfg.com.
6. In the Server address field, type the IP address of the OWA server, 10.200.1.10.
7. Click Add.
8. View the new domain in the Portals > Domains page.
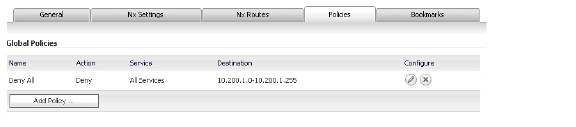
Adding a Global Deny All Policy
This procedure creates a policy that denies access to the OWA resources to all groups, except groups configured with an explicit Permit policy.
The SRA default policy is Allow All. In order to have more granular control, we add a Deny All policy here. Later, we can add Permit policies for each group, one at a time.
1. Navigate to the Users > Local Users page.

2. Click the Configure button ![]() in the Global Policies row. The Edit Global Policies window appears.
in the Global Policies row. The Edit Global Policies window appears.
3. In the Edit Global Policies window, click the Policies tab.
4. Click Add Policy. The Add Policy window appears.
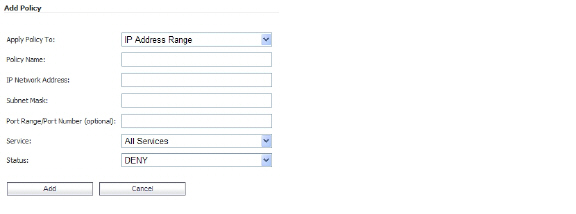
5. Select IP Address Range from the Apply Policy To drop-down list.
6. In the Policy Name field, type the descriptive name Deny All.
7. In the IP Network Address field, type the network address, 10.200.1.0.
8. In the Subnet Mask field, type the mask in decimal format, 255.255.255.0.
9. In the Service drop-down list, select All Services.
10. In the Status drop-down list, select DENY.
11. Click Add.
12. In the Edit Global Policies window, verify the Deny All policy settings and then click OK.
This procedure creates Local Groups that belong to the SNWL_AD domain on the SRA appliance. We create one local group for each Active Directory group.
Adding the Local Groups
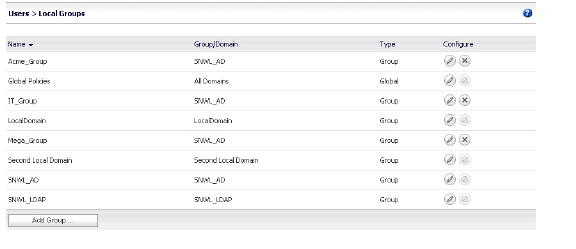
1. Navigate to the Users > Local Groups page and click Add Group. The Add Local Group window appears. We will add three local groups, corresponding to our Active Directory groups.

2. In the Add Local Group window, type Acme_Group into the Group Name field.
3. Select SNWL_AD from the Domain drop-down list.
4. Click Add.
5. On the Users > Local Groups page, click Add Group to add the second local group.
6. In the Add Local Group window, type Mega_Group into the Group Name field.
7. Select SNWL_AD from the Domain drop-down list.
8. Click Add.
9. On the Users > Local Groups page, click Add Group to add the second local group.
10. In the Add Local Group window, type IT_Group into the Group Name field.
11. Select SNWL_AD from the Domain drop-down list.
12. Click Add.
13. View the added groups on the Users > Local Groups page.
Configuring the Local Groups
In this procedure we will edit each new local group and associate it with the corresponding Active Directory Group.
1. Click the Configure button in the Acme_Group row. The Edit Group Settings window appears.
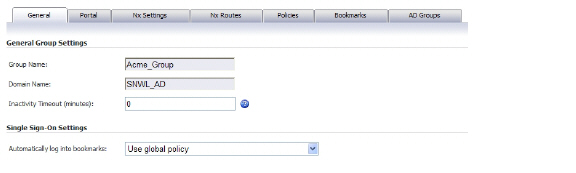
2. In the Edit Group Settings window, click the AD Groups tab.
3. On the AD Groups tab, click the Add Group button.
4. In the Edit Active Directory Group window, select Acme Group from the Active Directory Group drop-down list.

5. Click Edit.
Acme Group is listed in the Active Directory Groups table on the AD Groups tab.

6. In the Edit Group Settings window, click OK.
7. On the Users > Local Groups page, click the Configure button in the Mega_Group row. The Edit Group Settings window appears.
8. In the Edit Group Settings window, click the AD Groups tab and then click the Add Group button.
9. In the Edit Active Directory Group window, select Mega Group from the Active Directory Group drop-down list and then click Edit.
Mega Group is listed in the Active Directory Groups table on the AD Groups tab.
10. In the Edit Group Settings window, click OK.
11. On the Users > Local Groups page, click the Configure button in the IT_Group row. The Edit Group Settings window appears.
12. In the Edit Group Settings window, click the AD Groups tab and then click the Add Group button.
13. In the Edit Active Directory Group window, select IT Group from the Active Directory Group drop-down list and then click Edit.
IT Group is listed in the Active Directory Groups table on the AD Groups tab.
14. In the Edit Group Settings window, click OK.
At this point, we have created the three Local Groups and associated each with its Active Directory Group.
Adding the SSHv2 PERMIT Policy
In this section, we will add the SSHv2 PERMIT policy for both Acme_Group and IT_Group to access the 10.200.1.102 server using SSH.
This procedure creates a policy for the SRA Local Group, Acme_Group, and results in SSH access for members of the Active Directory group, Acme Group.
Repeat this procedure for IT_Group to provide SSH access to the server for members of the Active Directory group, IT Group.
1. On the Users > Local Groups page, click the Configure button in the Acme_Group row. The Edit Group Settings window appears.
2. In the Edit Group Settings window, click the Policies tab.
3. On the Policies tab, click Add Policy.
4. In the Add Policy window, select IP Address in the Apply Policy To drop-down list.
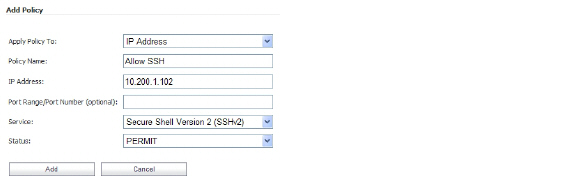
5. In the Policy Name field, enter the descriptive name, Allow SSH.
6. In the IP Address field, enter the IP address of the target server, 10.202.1.102.
7. In the Services drop-down list, select Secure Shell Version 2 (SSHv2).
8. In the Status drop-down list, select PERMIT, and then click Add.
9. In the Edit Group Settings window, click OK.
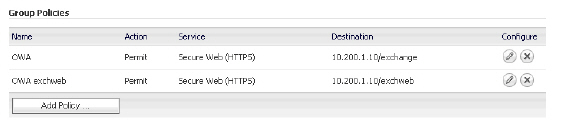
Adding the OWA PERMIT Policies
In this section, we will add two OWA PERMIT policies for both Mega_Group and IT_Group to access the OWA service using Secure Web (HTTPS).
This procedure creates a policy for the SRA Local Group, Mega_Group, and results in OWA access for members of the Active Directory group, Mega Group.
To access the Exchange server, adding a PERMIT policy to the 10.200.1.10/exchange URL Object itself is not enough. Another URL Object policy is needed that permits access to 10.200.1.10/exchweb, because some OWA Web contents are located in the exchweb directory.
Repeat this procedure for IT_Group to provide OWA access for members of the Active Directory group, IT Group.
Note In this configuration, members of IT_Group and Mega_Group are denied access to the https://owa-server/public folder, because these groups have access only to the /exchange and /exchweb subfolders.
The OWA policies are applied to Exchange server URL Objects rather than server IP addresses since OWA is a Web service.
1. In the Users > Local Groups page, click the Configure button in the Mega_Group row. We will create two PERMIT policies for Mega_Group to allow access to the OWA Exchange server.
2. In the Edit Group Settings window, click the Policies tab, and then click Add Policy.
3. In the Add Policy window, select URL Object in the Apply Policy To drop-down list.
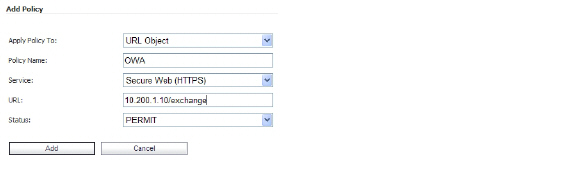
4. In the Policy Name field, enter the descriptive name, OWA.
5. In the Service drop-down list, select Secure Web (HTTPS).
6. In the URL field, enter the URL of the target application, 10.200.1.10/exchange.
7. In the Status drop-down list, select PERMIT, and then click Add.
8. In the Edit Group Settings window on the Policies tab, click Add Policy.
9. In the Add Policy window, select URL Object in the Apply Policy To drop-down list.
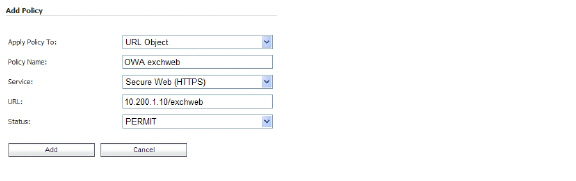
10. In the Policy Name field, enter the descriptive name, OWA exchweb.
11. In the Service drop-down list, select Secure Web (HTTPS).
12. In the URL field, enter the URL of the target application, 10.200.1.10/exchweb.
13. In the Status drop-down list, select PERMIT, and then click Add.
14. In the Edit Group Settings window, click OK. We are finished with the policies for Mega_Group. Repeat this procedure for IT_Group to provide OWA access for members of the Active Directory group, IT Group.
Verifying the Access Policy Configuration
At this point:
• Acme_Group users are allowed to access SSH to 10.200.1.102
• Mega_Group users are allowed to access OWA at 10.200.1.10
• IT_Groups users are allowed to access both SSH and OWA as defined above
The configuration can be verified by logging in as different AD group members to the SNWL_AD domain on the SRA appliance, and attempting to access the resources.
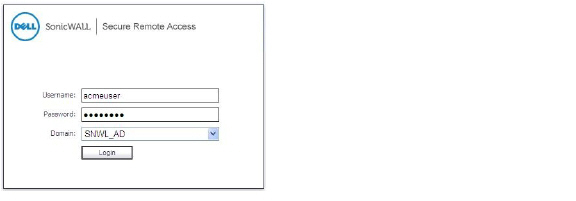
Test Result: Try Acmeuser Access
Acmeuser logs into the SNWL_AD domain.
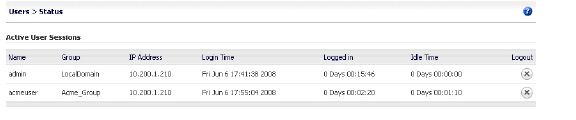
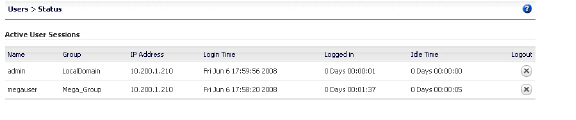
The Users > Status page shows that acmeuser is a member of the local group, Acme_Group.
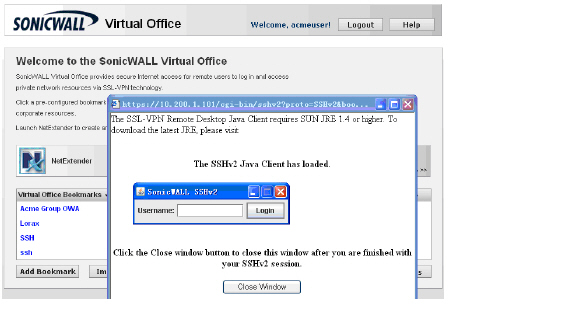
Acmeuser can access SSH, as expected.
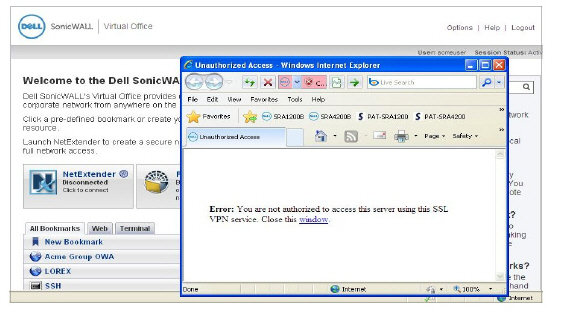
Acmeuser tries to access to other resources like OWA 10.200.1.10, but is denied, as expected.
Test Result: Try Megauser Access
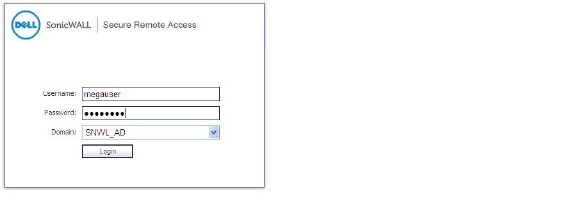
Megauser logs into the SNWL_AD domain.
The Users > Status page shows that megauser is a member of the local group, Mega_Group.
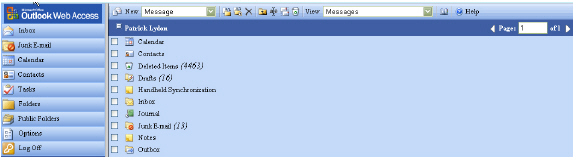
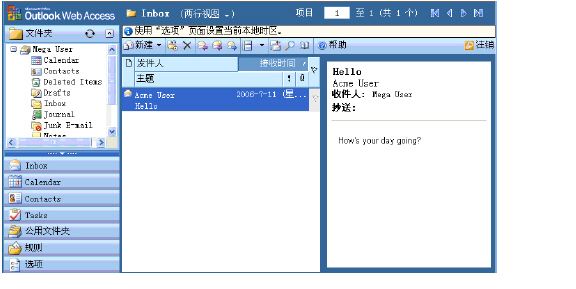
Megauser can access OWA resources, as expected.
Megauser tries to access SSH, but is denied, as expected.

Test Result: Try Ituser Access
Ituser logs into the SNWL_AD domain. The Users > Status page shows that ituser is a member of the local group, IT_Group.

Ituser can access SSH to 10.200.1.102, as expected.
Ituser can access OWA resources, as expected.