|
1
|
Click on the Edit icon in the Configure column for the Interface of the expansion module you want to configure. The Edit Interface dialog displays.
|
|
2
|
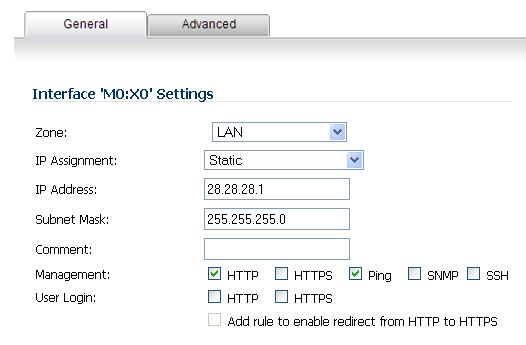
If you’re configuring an Unassigned Interface, you can select any zone from the Zone menu. LAN is already selected in the Zone menu.
|
Select one of the following LAN Network Addressing Modes from the IP Assignment menu.
|
•
|
Static - configures the interface for a network that uses static IP addresses.
|
|
•
|
Transparent - configures the interface to use interfaces as the top level of the management hierarchy and span multiple interfaces.
|
|
4
|
If you want to enable remote management of the SonicWall security appliance from this interface, select the supported management protocol(s): HTTP, HTTPS, SSH, Ping, SNMP, and/or SSH. You can also select HTTP for management traffic. However, bear in mind that HTTP traffic is less secure than HTTPS. You can also use a checkbox to add a rule to redirect from HTTP to HTTPS to enforce security on the interface.
|
|
5
|
Click OK to configure the interface.
|
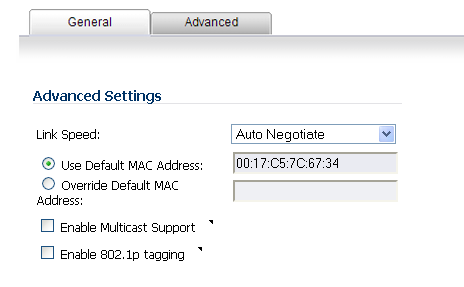
The Advanced tab includes settings for forcing an Ethernet speed and duplex, overriding the Default MAC address, enabling multicast support on the interface, and enabling 802.1p tagging. Packets sent out with 802.1p tagging are tagged VLAN id=0 and carry 802,1p priority information. Devices connected to this interface need to support priority frames.
|
7
|
For each interface, on the General tab of the Edit Interface window, select LAN from the Zone menu. Fill in the desired IP assignment. The subnet will be assigned for you. Add the desired management options and click OK. Then configure the Advanced settings.