For an introduction to RADIUS authentication in SonicOS, see Using RADIUS for Authentication . If you selected RADIUS or RADIUS + Local Users from the Authentication method for login drop-down menu on the Users > Settings page, the Configure RADIUS button becomes available.
A separate Configure button for RADIUS is also available if you selected Browser NTLM authentication only from the Single-sign-on method drop-down list. The configuration process is the same.
|
1
|
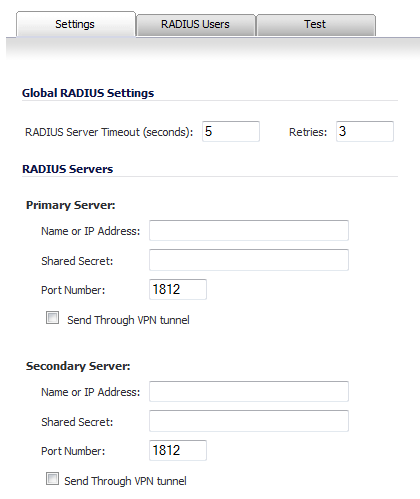
Click Configure RADIUS to set up your RADIUS server settings in SonicOS. The RADIUS Configuration window is displayed.
|
|
2
|
Under Global RADIUS Settings, type in a value for the RADIUS Server Timeout (seconds). The allowable range is 1-60 seconds with a default value of 5.
|
|
3
|
In the Retries field, enter the number of times SonicOS will attempt to contact the RADIUS server. If the RADIUS server does not respond within the specified number of retries, the connection is dropped. This field can range between 0 and 10, with a recommended setting of 3 RADIUS server retries.
|
|
4
|
In the RADIUS Servers section, designate the primary RADIUS server. In the Primary Server section, type the host name or IP address of the RADIUS server in the Name or IP Address field.
|
|
5
|
Type the RADIUS server administrative password or “shared secret” in the Shared Secret field. The alphanumeric Shared Secret can range from 1 to 31 characters in length. The shared secret is case sensitive.
|
|
6
|
Type the Port Number for the RADIUS server to use for communication with SonicOS. The default is 1812.
|
|
7
|
In the Secondary Server section, optionally type the host name or IP address of the secondary RADIUS server in the Name or IP Address field.
|
|
8
|
Optionally, select Send Through VPN tunnel.
|
|
9
|
|
10
|
|
•
|
OK if you have finished configuring the RADIUS server.
|
|
•
|
Apply, to continue configuring RADIUS users and/or testing the settings.
|
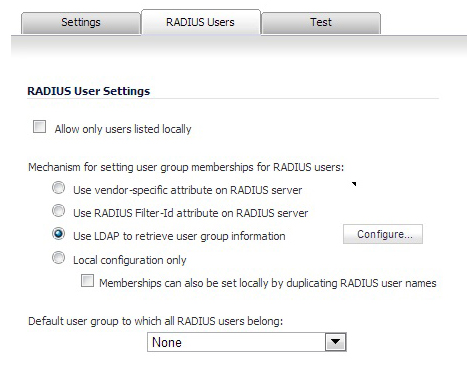
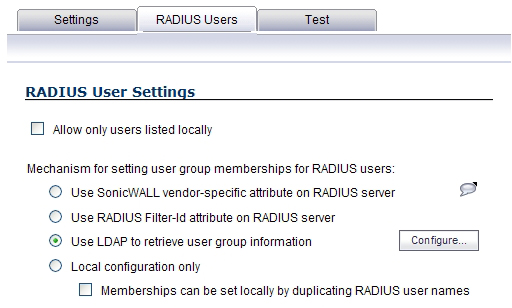
On the RADIUS Users tab you can specify what types of local or LDAP information to use in combination with RADIUS authentication. You can also define the default user group for RADIUS users.
|
1
|
On the RADIUS Users tab, select Allow only users listed locally if only the users listed in the SonicOS database are authenticated using RADIUS.
|
|
•
|
Select Use SonicWALL vendor-specific attribute on RADIUS server to apply a configured vendor-specific attribute from the RADIUS server. The attribute must provide the user group to which the user belongs.
|
|
•
|
Select Use RADIUS Filter-ID attribute on RADIUS server to apply a configured Filter-ID attribute from the RADIUS server. The attribute must provide the user group to which the user belongs.
|
|
•
|
Select Use LDAP to retrieve user group information to obtain the user group from the LDAP server. You can click the Configure button to set up LDAP if you have not already configured it or if you need to make a change. For information about configuring LDAP, see Configuring the Dell SonicWALL Network Security Appliance for LDAP .
|
|
•
|
If you do not plan to retrieve user group information from RADIUS or LDAP, select Local configuration only.
|
|
•
|
For a shortcut for managing RADIUS user groups, check Memberships can be set locally by duplicating RADIUS user names. When you create users with the same name locally on the security appliance and manage their group memberships, the memberships in the RADIUS database will automatically change to mirror your local changes.
|
|
3
|
If you have previously configured User Groups in SonicOS, select the group from the Default user group to which all RADIUS users belong drop-down menu.
|
In the RADIUS User Settings window, you can create a new group by choosing Create a new user group... from the Default user group to which all RADIUS users belong drop-down menu:
|
1
|
|
2
|
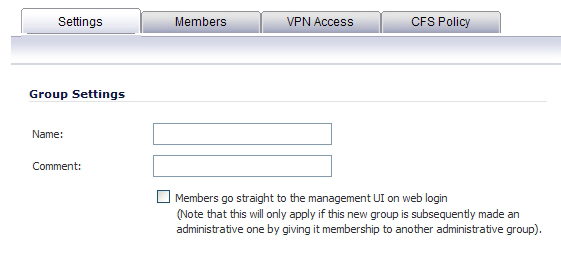
In the Settings tab, enter a name for the group. You may enter a descriptive comment as well.
|
|
3
|
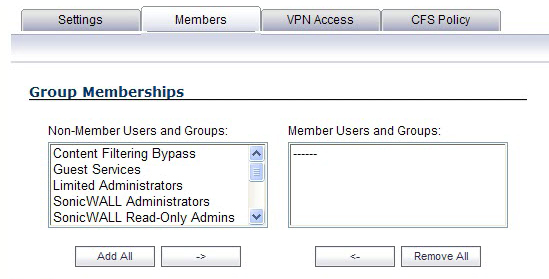
In the Members tab, select the members of the group. Select the users or groups you want to add in the left column and click the -> button. Click Add All to add all users and groups.
|
|
NOTE: You can add any group as a member of another group except Everybody and All RADIUS Users. Be aware of the membership of the groups you add as members of another group.
|
|
4
|
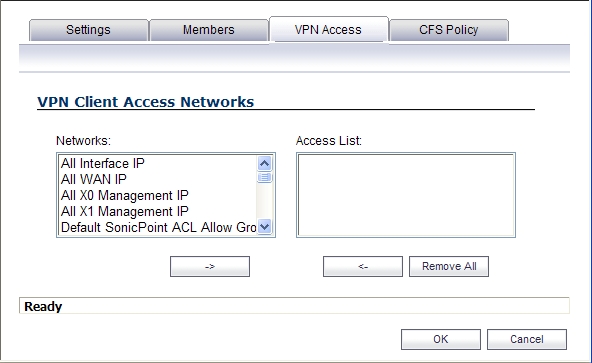
In the VPN Access tab, select the network resources to which this group will have VPN Access by default.
|
|
5
|
If you have Content Filtering Service (CFS) on your security appliance, you can configure the content filtering policy for this group on the CFS Policy tab. See Security Services > Content Filter for instructions on registering for and managing the SonicWALL Content Filtering Service.
|
When Use LDAP to retrieve user group information is selected, after authenticating a user via RADIUS, his/her user group membership information will be looked up via LDAP in the directory on the LDAP/AD server.
|
NOTE: If this mechanism is not selected, and one-time password is enabled, a RADIUS user will be receive a one-time password fail message when attempting to login through SSL VPN.
|
Clicking the Configure button launches the LDAP configuration window.
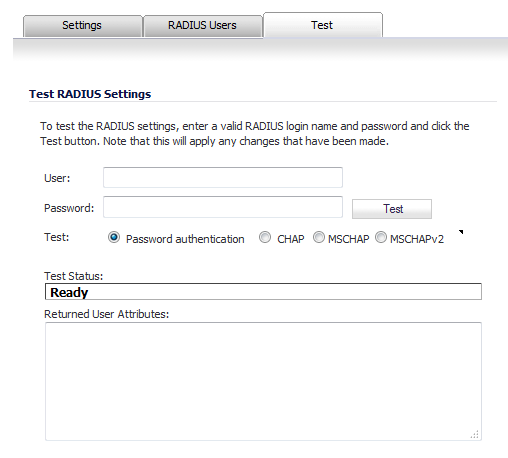
In the RADIUS Configuration dialog box, you can test your RADIUS Client user name, password and other settings by typing in a valid user name and password and selecting one of the authentication choices for Test. Performing the test will apply any changes that you have made.
|
1
|
In the User field, type a valid RADIUS login name.
|
|
2
|
In the Password field, type the password.
|
|
3
|
For Test, select one of the following:
|
|
•
|
Password authentication: Select this to use the password for authentication.
|
|
•
|
CHAP: Select this to use the Challenge Handshake Authentication Protocol. After initial verification, CHAP periodically verifies the identity of the client by using a three-way handshake.
|
|
•
|
MSCHAP: Select this to use the Microsoft implementation of CHAP. MSCHAP works for all Windows versions before Windows Vista.
|
|
•
|
MSCHAPv2: Select this to use the Microsoft version 2 implementation of CHAP. MSCHAPv2 works for Windows 2000 and later versions of Windows.
|
|
4
|
Click the Test button. If the validation is successful, the Status messages changes to Success. If the validation fails, the Status message changes to Failure.
|