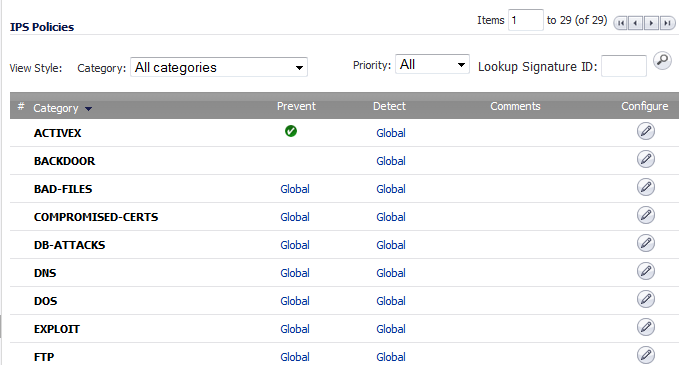
The IPS Policies section allows you to view SonicWall IPS signatures and configure the handling of signatures by category groups or on a signature-by-signature basis. Categories are signatures grouped together based on the type of attack, such as ACTIVEX or WEB-ATTACKS. All the entries displayed in the IPS Policies table are from the SonicWall GAV signature database downloaded to your SonicWall security appliance.
You can display the signatures in a variety of views using the View Style Category drop-down menu and Priority filter drop-down menu or the Lookup Signature ID field. The information the IPS Policies table displays changes according to how you view the signatures:
|
•
|
All Categories — Lists all the signature categories in the SonicWall GAV signature database.
|

|
•
|
Category — Lists the categories in ascending alphabetic order. Reorder the categories in descending order by clicking the column heading.
|
|
•
|
Prevent — Displays whether IPS prevention of the entire category is enabled (
 ), disabled (blank), or uses Global Settings (Global; set in the Signature Groups table in the Anti-Spyware Global Settings section). You can sort the table by prevention. ), disabled (blank), or uses Global Settings (Global; set in the Signature Groups table in the Anti-Spyware Global Settings section). You can sort the table by prevention. |
|
•
|
Detect — Displays whether IPS detection and logging of the entire category is enabled, disabled, or uses Global Settings. You can sort the table by detection.
|
|
•
|
Comments — Displays icons whenever changes have been made to:
|
|
•
|
User Settings (
|
|
•
|
Address Objects (
 ): inclusions and exclusions ): inclusions and exclusions |
|
•
|
|
•
|
Configure — Contains a configure icon that displays the Edit IPS Category window when clicked.
|
|
•
|
All Signatures — Displays all the signatures in the table in alphanumeric order by name, in each category:
|
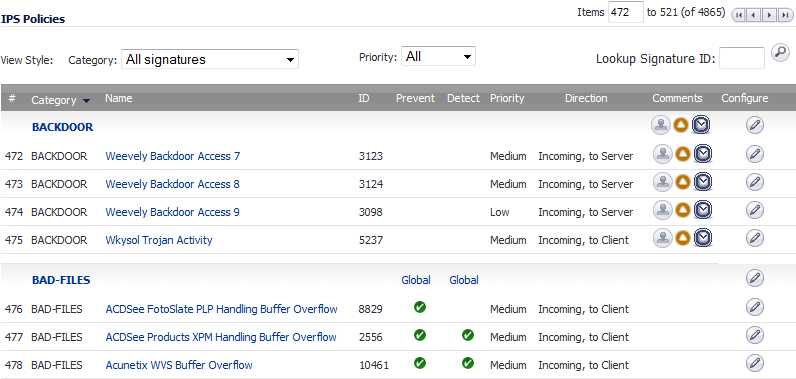
Displays all the information displayed by All Categories, plus this information:
|
•
|
# — Lists the sequential number of the signatures, which can be used in the Items field. This number changes if the ordering of the signatures is changed.
|
|
•
|
Name — Displays the name of the signature. Clicking on the signature name displays the SonicAlert page for that signature. The table is sorted automatically in ascending alphanumeric order within Category order. By clicking on Name, you can sort the table in descending order by Name only.
|

|
•
|
ID — Displays the Lookup Signature ID of the signature, which can be entered into the Lookup Signature ID field. You can sort the table in ascending or descending ID number.
|
|
•
|
Priority — Displays whether the signature is considered a High, Medium, or Low attack risk. You can sort the table by ascending or descending priority.
|
|
•
|
Direction — Displays the direction, Incoming or Outgoing, and if its target is general or the Client, the Server, or both.
|
|
•
|
Individual category — Displays only those signatures belonging to the category selected from the drop-down menu. The information is the same as for All Signatures except for the Category column
|
|
•
|
Filters — You can filter the display by using one or more of these:
|
|
•
|
Priority - Displays signature names or categories containing signatures with the priority you select from the drop-down menu: All (default), High, Medium, Low.
|
|
•
|
Items — Moves the display to the sequential signature number you enter in the Items field.
|
|
•
|
Lookup Signature ID — Displays the Edit IPS Signature window for the specified signature.
|
By default, Categories are enabled or disabled according to the IPS Global Settings table.
|
1
|
|
2
|
Click the Configure icon in the Configure column for the Category to be configured. The Edit IPS Category dialog displays.
|

|
3
|
|
NOTE: For both the Prevention and Detection options, if the Global Settings have not been set in the IPS Global Settings section, the Use Global Setting choice will indicate it is (Disabled). If they have been set, the choice will indicate it is (Enabled).
|
|
4
|
|
5
|
Optionally, select a user or group category to be included in IPS protection from the Included Users/Groups drop-down menu. The default is All.
|

|
6
|
Optionally, select a user or group category to be excluded from IPS protection from the Excluded Users/Groups drop-down menu. The default is None.
|
|
7
|
Optionally, select an IP category to be included in IPS protection from the Included IP Address Range drop-down menu. The default is All.
|

|
8
|
Optionally, select an IP category to be excluded from IPS protection from the Excluded IP Address Range drop-down menu. The default is None.
|
|
9
|
Optionally, select the time and days IPS protection is in force from the Schedule drop-down menu. The default is Always on.
|
|
10
|
Optionally, specify the duration between logging attacks with the Log Redundancy Filter (seconds) option. By default, the Use Global Settings checkbox is selected. To specify a different duration, deselect the Use Global Settings checkbox and enter the time, in seconds, in the following field.
|
|
11
|
By default, all anti-virus signatures are enabled or disabled according to the IPS Global Settings table and the settings of the signature’s Category. You can configure a particular anti-virus signature by clicking the Configure icon in the Configure column for that anti-virus signature. The Edit IPS Signature dialog displays.
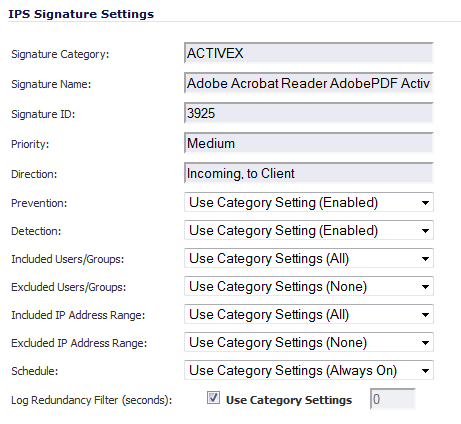
The options are the same as those for configuring a Category; follow the steps in Configuring Categories, except in Step 1, select either All Signatures or a specific category, such as ACTIVEX; do not select All Categories.
 )
)