|
1
|
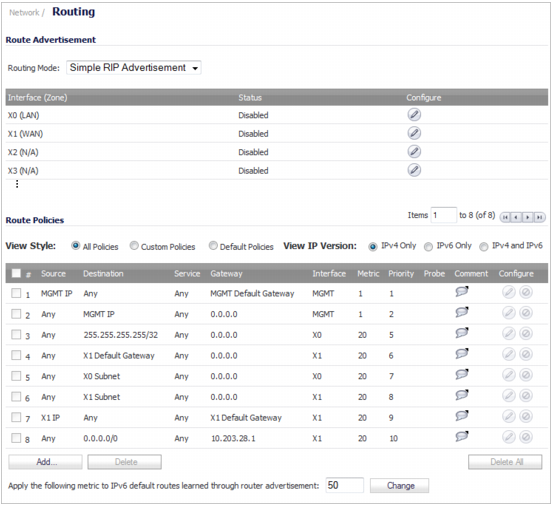
Click the Edit icon in the Configure column for the interface. The Interface Route Advertisement Configuration dialog displays.
|
|
2
|
Select one of the following types from the RIP Advertisements drop-down menu:
|
|
•
|
Disabled (default) - Disables RIP advertisements.
|
|
•
|
RIPv1 Enabled - RIPv1 is the first version of Routing Information Protocol.
|
|
•
|
RIPv2 Enabled (multicast) - To send route advertisements using multicasting (a single data packet to specific notes on the network).
|
|
•
|
RIPv2 Enabled (broadcast) - To send route advertisements using broadcasting (a single data packet to all nodes on the network).
|
By selecting a type other than Disable, the other options become available.
|
3
|
|
•
|
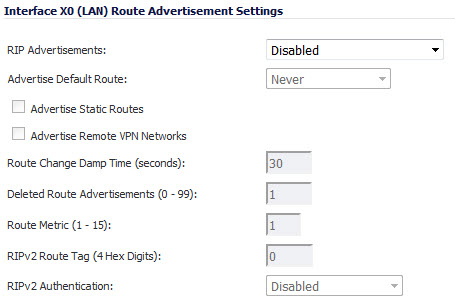
Never (default)
|
|
•
|
When WAN is up (not available for a WAN interface)
|
|
•
|
|
4
|
Enable Advertise Static Routes if you have static routes configured on the firewall, enable this feature to exclude them from Route Advertisement.
|
|
5
|
|
6
|
Enter a value in seconds between advertisements broadcast over a network in the Route Change Damp Time (seconds) field. The default value is 30 seconds, the minimum is 1 second, and the maximum is 99 seconds. A lower value corresponds with a higher volume of broadcast traffic over the network. The Route Change Damp Time (seconds) setting defines the delay between the time a VPN tunnel changes state (up or down) and the time the change is advertised with RIP. The delay, in seconds, prevents ambiguous route advertisements sent as a result of a temporary change in the VPN tunnel status.
|
|
7
|
Enter the number of advertisements that a deleted route broadcasts until it stops in the Deleted Route Advertisements (0-99) field. The default value is 1.
|
|
8
|
Enter a value from 1 (default) to 15 in the Route Metric (1-15) field. This is the number of times a packet touches a router from the source IP address to the destination IP address.
|
|
NOTE: The following options are available only if a RIPv2 advertisement option is selected in the RIP Advertisements drop-down menu. If you selected RIPv1 Enabled, go to Step 11.
|
|
9
|
You can enter a value for the route tag in the RIPv2 Route Tag (4 HEX Digits) field. This value is implementation-dependent and provides a mechanism for routers to classify the originators of RIPv2 advertisements. The default value is 0.
|
|
10
|
If you want to enable RIPv2 authentication, select one of the following options from the RIPv2 Authentication drop-down menu (the default is Disabled):
|
|
•
|
User defined - Two fields display:
|
|
•
|
Authentication Type (4 Hex Digits) – Enter 4 hex digits in the field. The default is 0.
|
|
•
|
Authentication Data (32 Hex Digits) – Enter 32 hex digits in the field.
|
|
•
|
Cleartext Password - The Authentication Password field displays. Enter a password of up to 16 characters in the field.
|
|
•
|
MD5 Digest - Enter a numerical value from 0-255 in the Authentication Key-Id (0-255) field. Enter a 32 hex digit value for the Authentication Key (32 hex digits) field, or use the generated key.
|
|
•
|
Authentication Key-Id (0-255) – Enter up to 255 characters in the field. The default is 1.
|
|
•
|
Authentication Key – Enter up to 32 characters in the field.
|
|
11
|
Click OK.
|