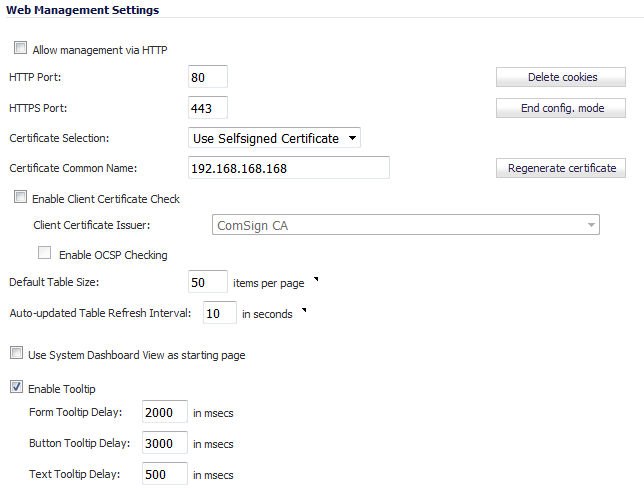

To use HTTP management, select the Allow management via HTTP checkbox to enable HTTP management globally. Deselect the checkbox to disable HTTP management. This option is not selected by default.
The default port for HTTP is port 80, but you can configure access through another port. Type the number of the desired port in the HTTP Port field, and click Accept. If you configure another port for HTTP management, however, you must include the port number when you use the IP address to log into the SonicWALL security appliance. For example, if you configure the port to be 76, then you must type <LAN IP Address>:76 into the Web browser; for example, http://192.168.168.1:76.
The default port for HTTPS management is 443. You can add another layer of security for logging into the SonicWALL security appliance by changing the default port. To configure another port for HTTPS management, type the preferred port number into the HTTPS Port field. If you configure another port for HTTPS management, however, you must include the port number when you use the IP address to log into the SonicWALL security appliance. For example, if you configure the HTTPS Management Port to be 700, then you must log into the SonicWALL using the port number as well as the IP address by typing <LAN IP Address>:700, for example, https://192.168.168.1:700.
The Delete Cookies button removes all browser cookies saved by the SonicWALL appliance, which clears any choices remembered by the browser. Deleting cookies causes you to lose any unsaved changes made in the Management interface. If you click Delete Cookies, a warning message displays:

You can toggle between configuration mode and non-config mode by:
|
•
|
|
•
|
Clicking the End config. mode button in the Web Management Settings section. If you click the button, the SonicOS management interface goes into Non-Config mode, and the button becomes the Configuration mode button. Click this button, and the SonicOS management interface goes into Configuration mode.
|
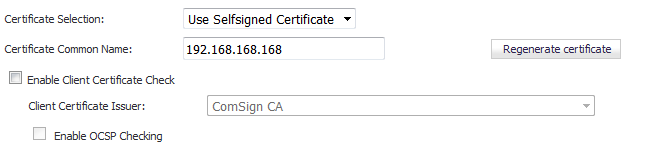
The Certificate Selection drop-down menu allows you to select:
|
•
|
Use Self-signed Certificate (default) – Allows you to continue using a certificate without downloading a new one each time you log into the SonicWALL security appliance.
|
|
•
|
Import Certificate – Allows you to select an imported certificate from the System > Certificates page to use for authentication to the management interface. A warning message displays:
|
![]()

The Enable Client Certificate Check checkbox allows you to enable or disable client certificate checking and CAC support on the SonicWALL security appliance.
The Client Certificate Issuer drop-down menu lists the Certification Authority (CA) certificate issuers that are available to sign the client certificate. If the appropriate CA is not listed, you need to import that CA into the SonicWALL security appliance.
The Enable OCSP Checking checkbox allows you to enable or disable the Online Certificate Status Protocol (OCSP) check for the client certificate to verify that the certificate is still valid and has not been revoked.
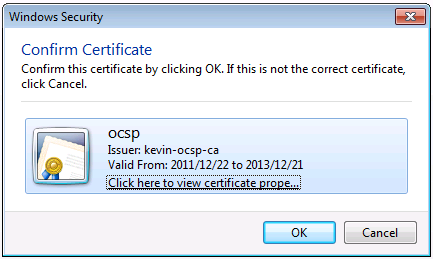
Client Certificate OCSP Checking.....
If no match is found, the browser displays the following message:
OCSP Checking fail! Please contact system administrator!
|
•
|
Enable Client Certificate Check is checked, but no client certificate is installed on the browser.
|
|
•
|
Enable Client Certificate Check is checked and a client certificate is installed on the browser, but either no Client Certificate Issuer is selected or the wrong Client Certificate Issuer is selected.
|
|
•
|
Enable OSCP Checking is enabled, but either the OSCP server is not available or a network problem is preventing the SonicWALL security appliance from accessing the OSCP server.
|
To restore access to a user that is locked out, the following CLI commands are provided:
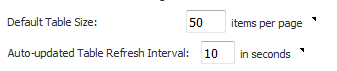
You can change the default size for management interface tables and their refresh rate.
The Dell SonicWALL Management Interface allows you to control the display of large tables of information across all tables in the management Interface. You can change the default table page size in all tables displayed in the Management Interface from the default 50 items per page to any size ranging from 1 to 5,000 items. Some tables, including Active Connections Monitor, VPN Settings, and Log View, have individual settings for items per page that are initialized at login to the value configured here. After these pages are viewed, their individual settings are maintained. Subsequent changes made here affect these pages only following a new login.
|
1
|
![]()
|
2
|
Click Accept.
|
You can set the interval for background auto-refresh of across all tables in the management Interface, such as Process Monitor, Active Connections Monitor, and Interface Traffic Statistics. You can change the default auto-refresh rate in all tables from the default 10 seconds to any rate ranging from 1 to 300 seconds.
|
1
|
Enter a refresh interval in he Auto-updated Table Refresh Interval: __ in seconds field.
|
![]()
|
2
|
Click Accept.
|
![]()
To see the Dashboard > Threat Reports page first when you login, select the Use System Dashboard View as starting page checkbox. This is not selected by default.
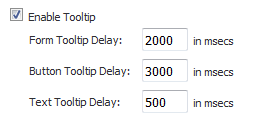
Tooltips are enabled by default. To disable Tooltips, deselect the Enable Tooltip checkbox, which is selected by default. You can configure the duration before Tooltips display for forms, buttons, and text.
|
•
|
Form Tooltip Delay - Duration, in milliseconds, before Tooltips display for forms (fields where you enter text). The default is 2000 ms, the minimum is 500, and the maximum is 5000.
|
|
•
|
Button Tooltip Delay - Duration, in milliseconds, before Tooltips display for buttons, radio buttons, and checkboxes. The default is 3000 ms, the minimum is 500, and the maximum is 5000.
|
|
•
|
Text Tooltip Delay - Duration, in milliseconds, before Tooltips display for UI text. The default is 500 ms, the minimum is 500, and the maximum is 5000.
|