Access rules can be displayed in multiple views using SonicOS. You can select the type of view from the selections in the View Style section. The following View Styles are available:
|
•
|
All Rules - Select All Rules to display all access rules configured on the Dell SonicWALL security appliance.
|
|
•
|
Matrix - Displays as From/To with LAN, WAN, VPN, or other interface in the From row, and LAN, WAN, VPN, or other interface in the To column. Select the Edit icon in the table cell to view the access rules.
|
|
•
|
Drop-down Boxes - Displays two drop-down menus: From Zone and To Zone. Select an interface from the From Zone menu and select an interface from the To Zone menu. Click OK and access rules defined for the two interfaces are displayed.
|
|
TIP: You can also view access rules by zones. Use the Option checkboxes in the From Zone and To Zone column. Select LAN, WAN, VPN, ALL from the From Zone column. And then select LAN, WAN, VPN, ALL from the To Zone column. Click OK to display the access rules.
|
Each view displays a table of defined network access rules. For example, selecting All Rules displays all the network access rules for all zones.
To display the Access Rules for a specific zone select a zone from the Matrix, Drop-down Boxes, or All Rules view.
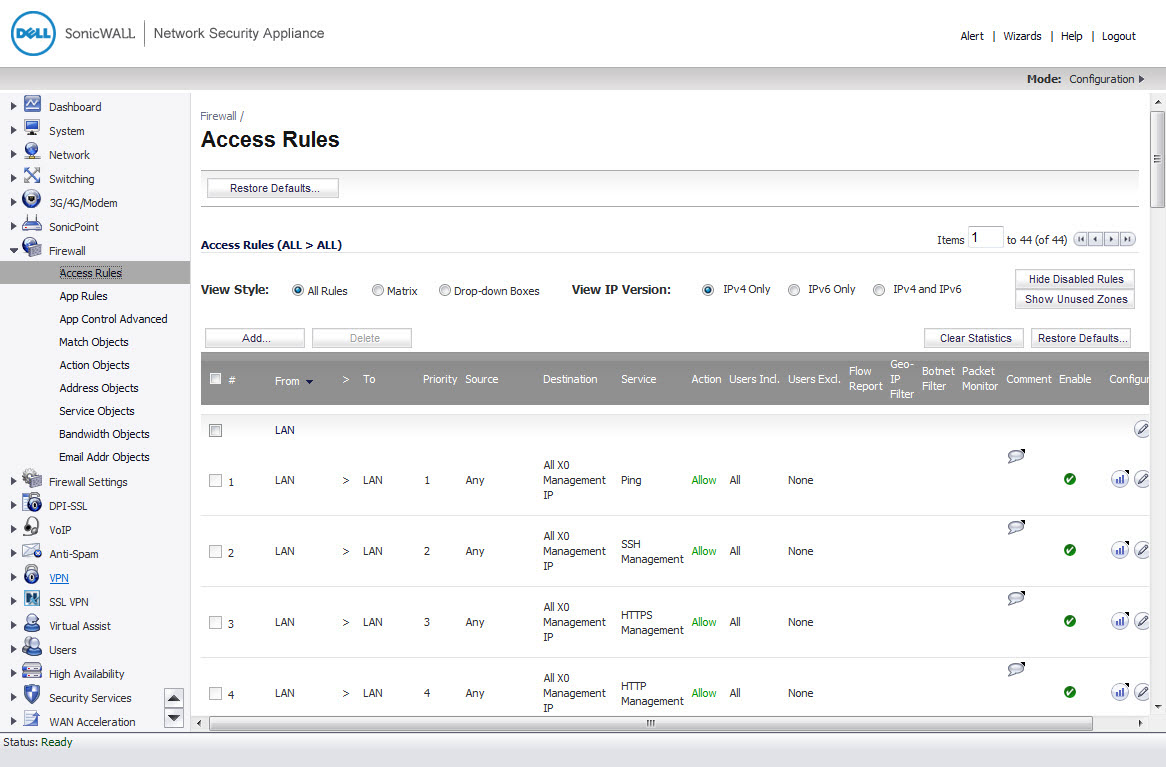
The access rules are sorted from the most specific at the top, to less specific at the bottom of the table. At the bottom of the table is the Any rule. The default access rule is all IP services except those listed in the Access Rules page. Access rules can be created to override the behavior of the Any rule; for example, the Any rule allows users on the LAN to access all Internet services, including NNTP News.
You can change the priority ranking of an access rule by clicking the Arrows icon in the Priority column. The Change Priority window is displayed. Enter the new priority number (1-10) in the Priority field, and click OK.
|
TIP: If the Delete or Edit icons are dimmed (unavailable), the access rule cannot be changed or deleted from the list.
|
|
1
|
|
2
|
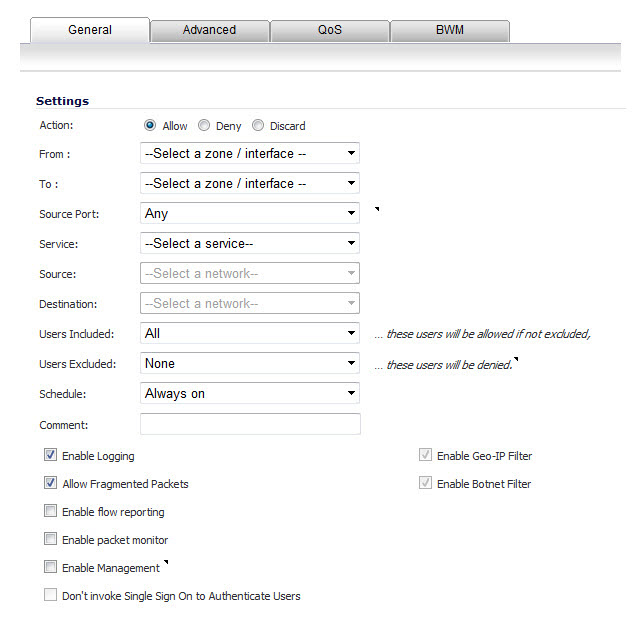
In the General tab, select Allow | Deny | Discard from the Action list to permit or block IP traffic.
|
|
3
|
|
4
|
Select the service or group of services affected by the access rule from the Service list. The Default service encompasses all IP services.
|
If the service is not listed, you must define the service in the Add Service window. Select Create New Service or Create New Group to display the Add Service window or Add Service Group window.
|
5
|
Select the source of the traffic affected by the access rule from the Source list. Selecting Create New Network displays the Add Address Object window.
|
|
6
|
If you want to define the source IP addresses that are affected by the access rule, such as restricting certain users from accessing the Internet, type the starting IP addresses of the address range in the Address Range Begin field and the ending IP address in the Address Range End field. To include all IP addresses, type * in the Address Range Begin field.
|
|
7
|
Select the destination of the traffic affected by the access rule from the Source list. Selecting Create New Network displays the Add Address Object window.
|
|
8
|
From the Users Allowed menu, add the user or user group affected by the access rule.
|
|
9
|
|
10
|
Enter any comments to help identify the access rule in the Comments field.
|
|
11
|
The Allow Fragmented Packets check box is enabled by default. Large IP packets are often divided into fragments before they are routed over the Internet and then reassembled at a destination host. One reason to disable this setting is because it is possible to exploit IP fragmentation in Denial of Service (DoS) attacks.
|
|
12
|
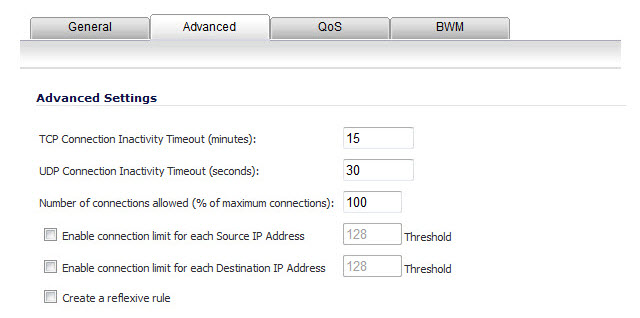
Click on the Advanced tab.
|
|
13
|
If you would like for the access rule to timeout after a period of TCP inactivity, set the amount of time, in minutes, in the TCP Connection Inactivity Timeout (minutes) field. The default value is 5 minutes.
|
|
14
|
If you would like for the access rule to timeout after a period of UDP inactivity, set the amount of time, in minutes, in the UDP Connection Inactivity Timeout (minutes) field. The default value is 30 minutes.
|
|
15
|
Specify the number of connections allowed as a percent of maximum number of connections allowed by the Dell SonicWALL security appliance in the Number of connections allowed (% of maximum connections) field. Refer to Connection Limiting Overview , for more information on connection limiting.
|
|
16
|
Select Create a reflexive rule if you want to create a matching access rule to this one in the opposite direction--from your destination zone or address object to your source zone or address object.
|
|
17
|
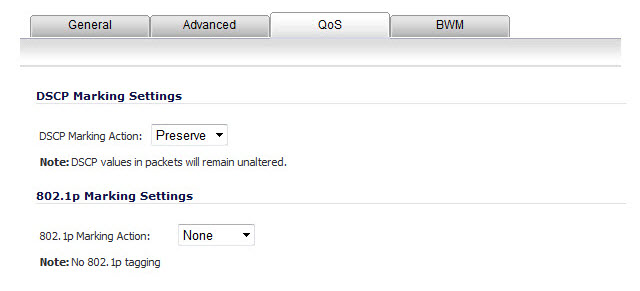
Click on the QoS tab if you want to apply DSCP or 802.1p Quality of Service management to traffic governed by this rule.
|
|
18
|
Under DSCP Marking Settings select the DSCP Marking Action. You can select None, Preserve, Explicit, or Map. Preserve is the default.
|
|
•
|
None: DSCP values in packets are reset to 0.
|
|
•
|
Preserve: DSCP values in packets will remain unaltered.
|
|
•
|
Explicit: Set the DSCP value to the value you select in the Explicit DSCP Value field. This is a numeric value between 0 and 63. Some of the standard values are:
|
|
•
|
0 - Best effort/Default (default)
|
|
•
|
8 - Class 1
|
|
•
|
10 - Class 1, Gold (AF11)
|
|
•
|
12 - Class 1, Silver (AF12)
|
|
•
|
14 - Class 1, Bronze (AF13)
|
|
•
|
16 - Class 2
|
|
•
|
18 - Class 2, Gold (AF21)
|
|
•
|
20 - Class 2, Silver (AF22)
|
|
•
|
22 - Class 2, Bronze (AF23)
|
|
•
|
24 - Class 3
|
|
•
|
26 - Class 3, Gold (AF31)
|
|
•
|
27 - Class 3, Silver (AF32)
|
|
•
|
30 - Class 3, Bronze (AF33)
|
|
•
|
32 - Class 4
|
|
•
|
34 - Class 4, Gold (AF41)
|
|
•
|
36 - Class 4, Silver (AF42)
|
|
•
|
38 - Class 4, Bronze (AF43)
|
|
•
|
40 - Express Forwarding
|
|
•
|
46 - Expedited Forwarding (EF)
|
|
•
|
48 - Control
|
|
•
|
56 - Control
|
|
•
|
Map: The QoS mapping settings on the Firewall > QoS Mapping page will be used. If you select Map, you can select Allow 802.1p Marking to override DSCP values.
|
|
19
|
Under 802.1p Marking Settings select the 802.1p Marking Action. You can select None, Preserve, Explicit, or Map. None is the default.
|
|
•
|
None: No 802.1p tagging is added to the packets.
|
|
•
|
Preserve: 802.1p values in packets will remain unaltered.
|
|
•
|
Explicit: Set the 802.1p value to the value you select in the Explicit 802.1p Value field. This is a numeric value between 0 and 7. The standard values are:
|
|
•
|
0 - Best effort (default)
|
|
•
|
1 - Background
|
|
•
|
2 - Spare
|
|
•
|
3 - Excellent effort
|
|
•
|
4 - Controlled load
|
|
•
|
5 - Video (<100ms latency)
|
|
•
|
6 - Voice (<10ms latency)
|
|
•
|
7 - Network control
|
|
•
|
Map: The QoS mapping settings on the Firewall > QoS Mapping page will be used.
|
|
20
|
Click OK to add the rule.
|
To display the Edit Rule window (includes the same settings as the Add Rule window), click the Edit icon.
To delete the individual access rule, click on the Delete icon. To delete all the checkbox selected access rules, click the Delete button.
To enable or disable an access rule, click the Enable checkbox.
To remove all end-user configured access rules for a zone, click the Default button. This will restore the access rules for the selected zone to the default access rules initially setup on the Dell SonicWALL network security appliance.
Move your mouse pointer over the Graph icon to display the following access rule receive (Rx) and transmit (Tx) traffic statistics:
|
•
|
|
•
|
This section provides a configuration example for an access rule to allow devices on the DMZ to send ping requests and receive ping responses from devices on the LAN. By default your Dell SonicWALL network security appliance does not allow traffic initiated from the DMZ to reach the LAN. Once you have placed one of your interfaces into the DMZ zone, then from the Firewall > Access Rules window, perform the following steps to configure an access rule that allow devices in the DMZ to send ping requests and receive ping responses from devices in the LAN.
|
1
|
|
2
|
Select the Allow radio button.
|
|
3
|
|
4
|
|
5
|
|
6
|
Click OK.
|
|
1
|
|
2
|
|
3
|
Select NNTP from the Service menu. If the service is not listed in the list, you must to add it in the Add Service window.
|
|
4
|
|
5
|
|
6
|
Select the schedule from the Schedule menu.
|
|
7
|
Enter any comments in the Comment field.
|
|
8
|
Click Add.
|
|
1
|
On the Firewall > Access Rules page, display the LAN > WAN access rules.
|
|
2
|
|
3
|
|
4
|
Select one of the following services from the Service menu:
|
|
•
|
|
•
|
|
•
|
|
•
|
|
5
|
|
6
|
|
7
|
Select the user or group to have access from the Users Allowed menu.
|
|
8
|
Select the schedule from the Schedule menu.
|
|
9
|
Enter any comments in the Comment field.
|
|
10
|
Click Add.
|