|
1
|
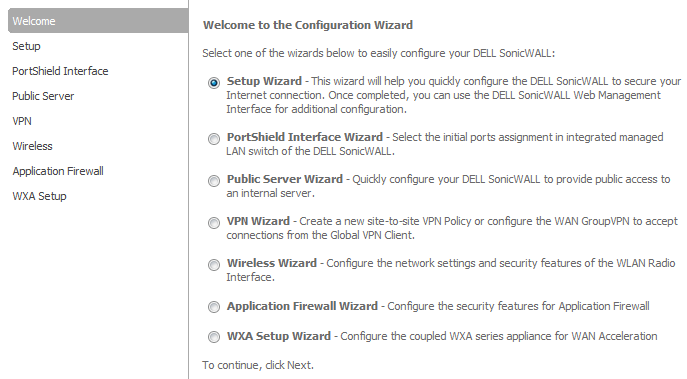
Click Wizard on the top right corner of the SonicOS management interface. The Configuration Wizard Welcome page displays.
|
|
2
|
Select VPN Wizard.
|
|
3
|
Click Next. The VPN Policy Type page displays.
|
|
4
|
Select Site-to-Site.
|
|
5
|
|
•
|
Policy Name: Enter a name you can use to refer to the policy. For example, Boston Office.
|
|
•
|
Preshared Key: Enter a character string to use to authenticate traffic during IKE Phase 1 negotiation. You can use the default SonicWall generated Preshared Key.
|
|
•
|
I know my Remote Peer IP Address (or FQDN): If you check this option, this SonicWall appliance can initiate the contact with the named remote peer.
|
For this example, leave the option unchecked.
|
•
|
Remote Peer IP Address (or FQDN): If you checked the option above, enter the IP address or Fully Qualified Domain Name (FQDN) of the remote peer (For example, boston.yourcompany.com).
|
|
7
|
|
•
|
Local Networks: Select the local network resources protected by this SonicWall that you are connecting with this VPN. You can select any address object or group on the device, including networks, subnets, individual servers, and interface IP addresses. The default is Firewalled Subnets.
|
If the object or group you want has not been created yet, select Create new Address Object or Create new Address Group. Create the new object or group in the dialog box that pops up. Then select the new object or group. For this example, select LAN Subnets.
|
•
|
Destination Networks: Select the network resources on the destination end of the VPN Tunnel. If the object or group does not exist, select Create new Address Object or Create new Address Group. For example:
|
|
a)
|
Select Create new Address Group.
|
|
b)
|
|
c)
|
In the list on the left, select LAN Subnets and click the Right Arrow button. Do the same for DMZ Subnets,
|
|
d)
|
|
9
|
In the Destination Networks field, select the newly created group.
|
|
10
|
|
•
|
DH Group: The Diffie-Hellman (DH) group are the group of numbers used to create the key pair. Each subsequent group uses larger numbers to start with. You can choose Group 1, Group 2 (default), Group 5, or Group 14. The VPN Uses this during IKE negotiation to create the key pair.
|
|
•
|
Encryption: This is the method for encrypting data through the VPN Tunnel. DES is the least secure and the and takes the least amount of time to encrypt and decrypt. AES-256 is the most secure and takes the longest time to encrypt and decrypt. You can choose. DES, 3DES (default), AES-128, AES-256, or AES-192. The VPN uses this for all data through the tunnel
|
|
•
|
Authentication: This is the hashing method used to authenticate the key, once it is exchanged during IKE negotiation. You can choose MD5, SHA-1 (default), SHA256, SHA384, or SHA512.
|
|
•
|
Life Time (seconds): This is the length of time the VPN tunnel stays open before needing to re-authenticate. The default is eight hours (28800 seconds).
|
|
12
|
Click Next.The Configuration Summary page displays, detailing the settings that will be pushed to the security appliance when you apply the configuration.
|
|
14
|
Click Accept to create the VPN and apply the configuration to your SonicWall appliance.
|
When the configuration has been updated, the VPN Wizard Complete page displays.
|
15
|
Click Close.
|