NOTE: For complete instructions on setting up Dell SonicWALL Gateway Anti-Virus, refer to the Dell SonicWALL Gateway Anti-Virus Administrator’s Guide available on the Dell support site: http://support.software.dell.com.
|
NOTE: For complete instructions on setting up Dell SonicWALL Gateway Anti-Virus, refer to the Dell SonicWALL Gateway Anti-Virus Administrator’s Guide available on the Dell support site: http://support.software.dell.com.
|
The Security Services > Gateway Anti-Virus page provides the settings for configuring Dell SonicWALL GAV on your Dell SonicWALL security appliance as well as displays both the anti-virus status and the anti-virus signatures.

You must select Enable Gateway Anti-Virus checkbox in the Gateway Anti-Virus Global Settings section to enable Dell SonicWALL GAV on your Dell SonicWALL security appliance.
![]()
You must specify the zones you want Dell SonicWALL GAV protection on the Network > Zones page.
You apply Dell SonicWALL GAV to zones when you add or edit a zone on the Network > Zones page. From the Security Services > Gateway Anti‑Virus page, you can quickly display the Network > Zones page by clicking the link in the Note: Enable the Gateway Anti‑Virus per zone from the Network > Zones page. in the Gateway Anti‑Virus Status section.
The Gateway Anti-Virus Status section shows the state of the anti-virus signature database, including the database's timestamp, and the time the Dell SonicWALL signature servers were last checked for the most current database version. The Dell SonicWALL security appliance automatically attempts to synchronize the database on startup, and once every hour.
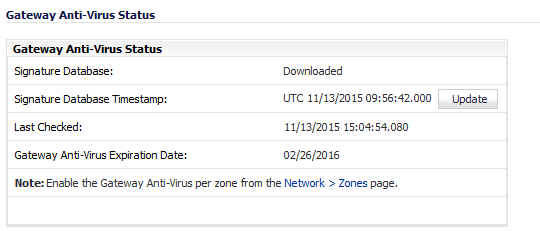
The Gateway Anti-Virus Status section displays the following information:
|
•
|
Signature Database indicates whether the signature database needs to be downloaded or has been downloaded.
|
|
•
|
Signature Database Timestamp displays the last update to the Dell SonicWALL GAV signature database, not the last update to your Dell SonicWALL security appliance.
|
|
•
|
Last Checked indicates the last time the Dell SonicWALL security appliance checked the signature database for updates. The Dell SonicWALL security appliance automatically attempts to synchronize the database on startup, and once every hour.
|
|
•
|
Gateway Anti-Virus Expiration Date indicates the date when the Dell SonicWALL GAV service expires. If your Dell SonicWALL GAV subscription expires, the Dell SonicWALL IPS inspection is stopped and the Dell SonicWALL GAV configuration settings are removed from the Dell SonicWALL security appliance. These settings are automatically restored after renewing your Dell SonicWALL GAV license to the previously configured state.
|
The Gateway Anti-Virus Status section displays Note: Enable the Gateway Anti-Virus per zone from the Network > Zones page. Clicking on the Network > Zones link displays the Network > Zones page for applying Dell SonicWALL GAV on zones.
By default, the Dell SonicWALL security appliance running Dell SonicWALL GAV automatically checks the Dell SonicWALL signature servers once an hour. There is no need for an administrator to constantly check for new signature updates. You can also manually update your Dell SonicWALL GAV database at any time by clicking the Update button located in the Gateway Anti-Virus Status section.

By default, Dell SonicWALL GAV inspects all inbound HTTP, FTP, IMAP, SMTP and POP3 traffic. Generic TCP Stream can optionally be enabled to inspect all other TCP based traffic, such as non-standard ports of operation for SMTP and POP3, and IM and P2P protocols.
Within the context of Dell SonicWALL GAV, the Enable Inbound Inspection protocol traffic handling refers to the following; see Table 99:
The Enable Outbound Inspection feature is available for HTTP, FTP, SMTP, and TCP traffic.
For each protocol, except TCP Stream, you can restrict the transfer of files with specific attributes by clicking on the Settings button under the protocol in the Gateway Anti-Virus Global Settings section.
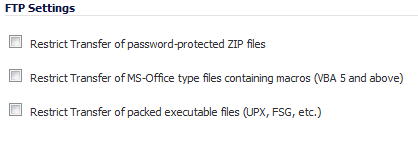
These restrict-transfer FTP Settings include:
|
•
|
Restrict Transfer of password-protected Zip files - Disables the transfer of password protected ZIP files over any enabled protocol. This option only functions on protocols (for example, HTTP, FTP, SMTP) that are enabled for inspection.
|
|
•
|
Restrict Transfer of MS-Office type files containing macros (VBA 5 and above) - Disables the transfers of any MS Office 97 and above files that contain VBA macros.
|
|
•
|
Restrict Transfer of packed executable files (UPX, FSG, etc.) - Disables the transfer of packed executable files. Packers are utilities which compress and sometimes encrypt executables. Although there are legitimate applications for these, they are also sometimes used with the intent of obfuscation, so as to make the executables less detectable by anti-virus applications. The packer adds a header that expands the file in memory, and then executes that file. Dell SonicWALL Gateway Anti-Virus currently recognizes the most common packed formats: UPX, FSG, PKLite32, Petite, and ASPack. additional formats are dynamically added along with Dell SonicWALL GAV signature updates.
|
|
1
|
To reset all Gateway Anti-Virus (AV) settings to factory default values, click the Reset Gateway AV Settings button. A confirmation message displays.
|
![]()
|
2
|
Click OK.
|
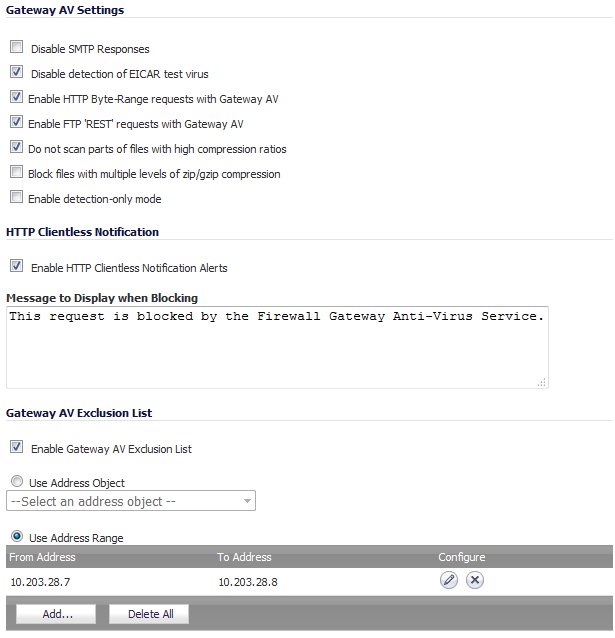
Clicking the Configure Gateway AV Settings button at the bottom of the Gateway Anti-Virus Global Settings section displays the Gateway AV Config View dialog, which allows you to configure clientless notification alerts and create a Dell SonicWALL GAV exclusion list.
|
1
|
To suppress the sending of e-mail messages (SMTP) to clients from Dell SonicWALL GAV when a virus is detected in an e-mail or attachment, select the Disable SMTP Responses checkbox. This option is not selected by default.
|
|
2
|
The EICAR Standard Anti-Virus Test file is a special virus simulator file that checks and confirms the correct operation of the Dell SonicWALL Gateway AV service. To suppresses the detection of the EICAR, select the Disable detection of EICAR test virus checkbox. This setting is selected by default.
|
|
3
|
To allow the sending of byte serving, the process of sending only a portion of an HTTP message or file, select the Enable HTTP Byte-Range requests with Gateway AV checkbox. This setting is selected by default.
|
|
4
|
To allow the use of the FTP REST request to retrieve and reassemble sectional messages and files, select the Enable FTP ‘REST’ requests with Gateway AV checkbox. This setting is selected by default.
|
|
5
|
To suppresses the scanning of files, or parts of files, that have high compression rates, select the Do not scan parts of files with high compression rates checkbox. This setting is selected by default.
|
|
6
|
To block files containing multiple levels of zip and/or gzip compression, select the Block files with multiple levels of zip/gzip compression checkbox. This setting is not selected by default.
|
|
7
|
To have the Gateway AV service in detection-only mode, which only detects and logs virus traffic without stopping such traffic, select the Enable detection-only mode checkbox. This setting is not selected by default.
|
|
1
|
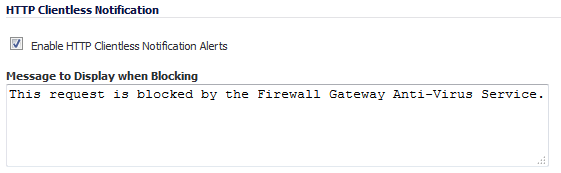
Select the Enable HTTP Clientless Notification Alerts checkbox. This option is selected by default.
|
|
2
|
Optionally, enter a message in the Message to Display when Blocking field. The default message is This request is blocked by the Firewall Gateway Anti-Virus Service.
|
|
TIP: You can configure a timeout for the HTTP Clientless Notification on the Security Services > Summary page under the Security Services Summary heading.
|
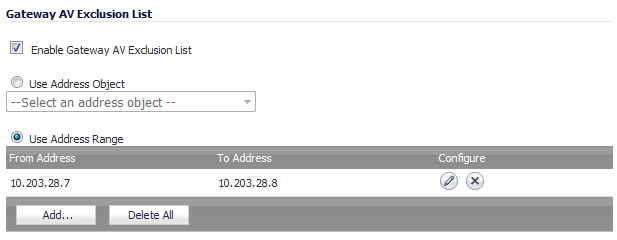
Any IP addresses listed in the exclusion list bypass virus scanning on their traffic.The Gateway AV Exclusion List section provides the ability to either select an Address Object or define a range of IP addresses whose traffic will be excluded from Dell SonicWALL GAV scanning.
|
1
|
Select the Enable Gateway AV Exclusion List checkbox in the Gateway AV Exclusion List section to enable the exclusion list.
|
|
•
|
Use Address Object radio button
|
|
•
|
Use Address Range radio button.
|
|
a
|
![]()
|
b
|
|
c
|
|
NOTE: To change an entry, click the Edit icon in the Configure column or to delete an entry, click the Delete icon. To delete all entries in the exclusion list, click the Delete All button.
|
|
3
|
Click OK.
|
|
1
|
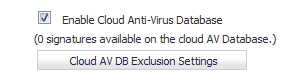
Select the Enable Cloud Anti-Virus Database checkbox. This option is selected by default.
|
|
1
|
|
2
|
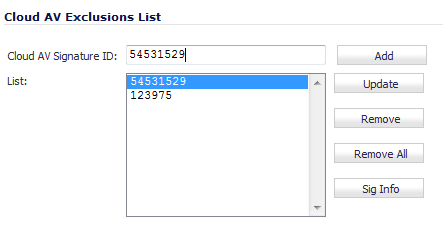
Enter the signature ID in the Cloud AV Signature ID field. The ID must be a numeric value.
|
|
3
|
|
a
|
Select the signature ID in the List field.
|
|
b
|
Enter the updated signature in the Cloud AV Signature ID field.
|
|
c
|
Click Update.
|
|
•
|
|
•
|
All signatures, click the Remove All button.
|
|
7
|
Optionally, to view the latest information on a signature, select the signature ID in the list and click the Sig Info button. The information for the signature is displayed on the SonicALERT website.
|
|
8
|