The Firewall > App Control Advanced page provides a way to configure global App Control policies using categories, applications, and signatures. Policies configured on this page are independent from App Rules policies, and do not need to be added to an App Rules policy to take effect.
While these application control settings are independent from App Rules policies, you can also create application match objects for any of the categories, applications, or signatures available here, and use those match objects in an App Rules policy. See Application List Objects for more information.
|
VIDEO: Informational videos with App Control Advanced configuration examples are available online. For example, see How to Block Dropbox using App Control Advanced. Additional videos are available at: https://support.software.dell.com/videos-product-select.
|
The Firewall > App Control Advanced page provides the following global settings:
|
1
|
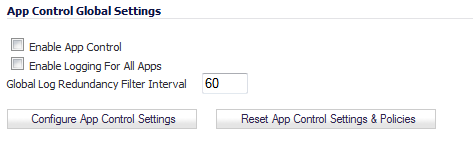
To globally enable App Control, select the Enable App Control checkbox.
|
|
2
|
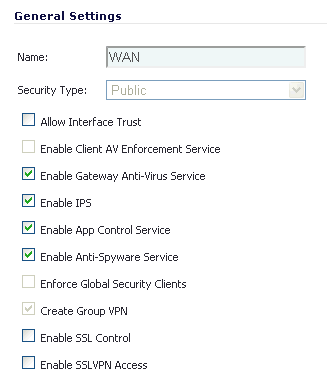
To enable App Control on a network zone, navigate to the Network > Zones page, and click the Configure icon for the desired zone.
|
|
3
|
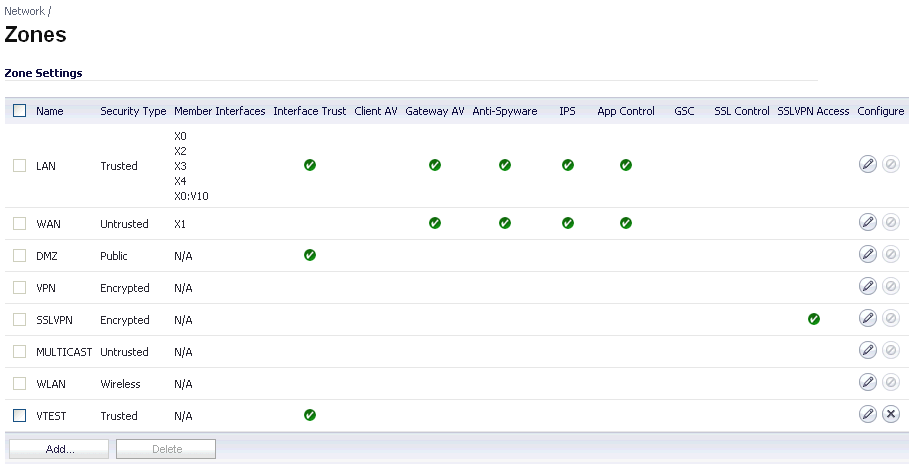
The Network > Zones page displays a green indicator in the App Control column for any zones that have the App Control service enabled.
|
4
|
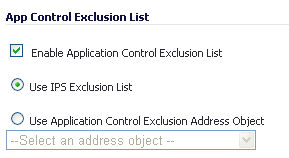
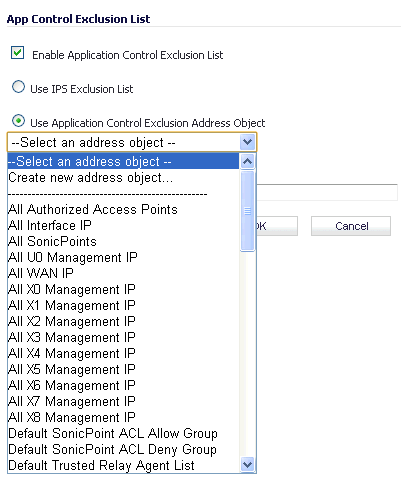
You can configure a global exclusion list for App Control policies on the Firewall > App Control Advanced page. To configure the exclusion list, click the Configure App Control Settings button. The App Control Exclusion List window opens.
|
|
5
|
To use the IPS exclusion list, which can be configured from the Security Services > Intrusion Prevention page, select the Use IPS Exclusion List radio button.
|
|
6
|
To use an address object for the exclusion list, select the Use Application Control Exclusion Address Object radio button, and then select an address object from the drop-down list.
|
|
7
|
Click OK.
|
|
1
|
|
2
|
Click OK in the confirmation dialog box.
|
|
1
|
In the App Control Global Settings section of the Firewall > App Control Advanced page, select the Enable Logging For All Apps checkbox.
|
|
2
|
Enter an interval, in seconds, for the global log redundancy filter in the Global Log Redundancy Filter Interval field. The range is 0 to 86400 seconds, and the default is 60 seconds.
|
|
3
|
Click the Accept button.
|
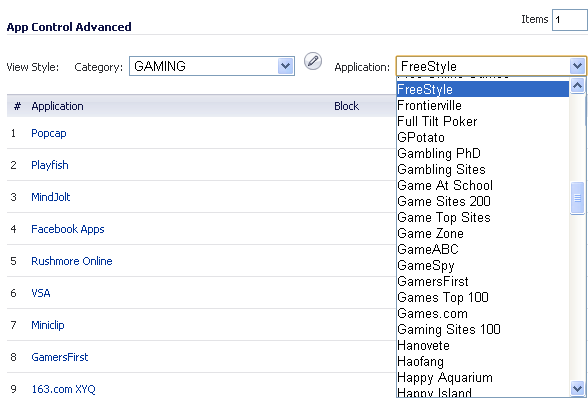
Category based configuration is the most broadly based method of policy configuration on the Firewall > App Control Advanced page. The list of categories is available in the Category drop-down list.

|
1
|
Navigate to the Firewall > App Control Advanced page.
|
|
2
|
Under App Control Advanced, select an application category from the Category drop-down list. A Configure button appears to the right of the field as soon as a category is selected.
|
|
3
|
Click the Configure button to open up the App Control Category Settings window for the selected category.
|

|
4
|
|
5
|
To create a log entry when applications in this category are detected, select Enable in the Log drop-down list.
|
|
6
|
To target the selected block or log actions to a specific user or group of users, select a user group or individual user from the Included Users/Groups drop-down list. Select All to apply the policy to all users.
|
|
7
|
To exclude a specific user or group of users from the selected block or log actions, select a user group or individual user from the Excluded Users/Groups drop-down list. Select None to apply the policy to all users.
|
|
8
|
To target the selected block or log actions to a specific IP address or address range, select an Address Group or Address Object from the Included IP Address Range drop-down list. Select All to apply the policy to all IP addresses.
|
|
9
|
To exclude a specific IP address or address range from the selected block or log actions, select an Address Group or Address Object from the Excluded IP Address Range drop-down list. Select None to apply the policy to all IP addresses.
|
|
10
|
|
•
|
Always on – Enable the policy at all times.
|
|
•
|
Work Hours – Enable the policy Monday through Friday, 8:00 AM to 5:00 PM.
|
|
•
|
M-T-W-T-F 08:00 to 17:00 – Enable the policy Monday through Friday, 8:00 AM to 5:00 PM.
|
|
•
|
After Hours – Enable the policy Monday through Friday, 5:00 PM to 8:00 AM.
|
|
•
|
M-T-W-T-F 00:00 to 08:00 – Enable the policy Monday through Friday, midnight to 8:00 AM.
|
|
•
|
M-T-W-T-F 17:00 to 24:00 – Enable the policy Monday through Friday, 5:00 PM to midnight.
|
|
•
|
SU-S 00:00 to 24:00 – Enable the policy at all times (Sunday through Saturday, 24 hours a day).
|
|
•
|
Weekend Hours – Enable the policy Friday at 5:00 PM through Monday at 8:00 AM.
|
|
11
|
To specify a delay between log entries for repetitive events, type the number of seconds for the delay into the Log Redundancy Filter field.
|
|
12
|
Click OK.
|
Application based configuration is the middle level of policy configuration on the Firewall > App Control Advanced page, between the category based and signature based levels.
|
1
|
Navigate to the Firewall > App Control Advanced page.
|
|
2
|
|
3
|
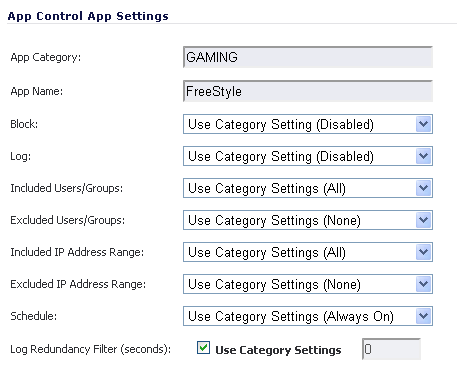
Next, select an application in this category from the Application drop-down list. A Configure button appears to the right of the field as soon as an application is selected.
|

|
4
|
Click the Configure button to open up the App Control App Settings window for the selected application. The fields at the top of the window are not editable. These fields display the values for the Application Category and Application Name. The application configuration parameters default to the current settings of the category to which the application belongs. To retain this connection to the category settings for one or more fields, leave this selection in place for those fields.
|
|
5
|
|
6
|
|
7
|
To target the selected block or log actions to a specific user or group of users, select a user group or individual user from the Included Users/Groups drop-down list. Select All to apply the policy to all users.
|
|
8
|
To exclude a specific user or group of users from the selected block or log actions, select a user group or user from the Excluded Users/Groups drop-down list. Select None to apply the policy to all users.
|
|
9
|
To target the selected block or log actions to a specific IP address or address range, select an Address Group or Address Object from the Included IP Address Range drop-down list. Select All to apply the policy to all IP addresses.
|
|
10
|
To exclude a specific IP address or address range from the selected block or log actions, select an Address Group or Address Object from the Excluded IP Address Range drop-down list. Select None to apply the policy to all IP addresses.
|
|
11
|
|
•
|
Always on – Enable the policy at all times.
|
|
•
|
Work Hours – Enable the policy Monday through Friday, 8:00 AM to 5:00 PM.
|
|
•
|
M-T-W-T-F 08:00 to 17:00 – Enable the policy Monday through Friday, 8:00 AM to 5:00 PM.
|
|
•
|
After Hours – Enable the policy Monday through Friday, 5:00 PM to 8:00 AM.
|
|
•
|
M-T-W-T-F 00:00 to 08:00 – Enable the policy Monday through Friday, midnight to 8:00 AM.
|
|
•
|
M-T-W-T-F 17:00 to 24:00 – Enable the policy Monday through Friday, 5:00 PM to midnight.
|
|
•
|
SU-S 00:00 to 24:00 – Enable the policy at all times (Sunday through Saturday, 24 hours a day).
|
|
•
|
Weekend Hours – Enable the policy Friday at 5:00 PM through Monday at 8:00 AM.
|
|
12
|
To specify a delay between log entries for repetitive events, type the number of seconds for the delay into the Log Redundancy Filter field.
|
|
13
|
To see detailed information about the application, click here in the Note at the bottom of the window.
|
|
14
|
Click OK.
|
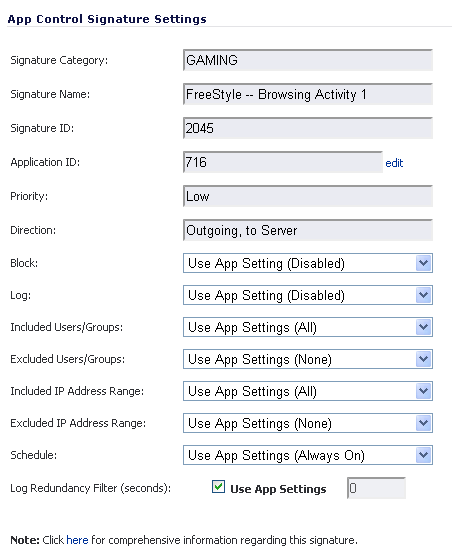
Signature based configuration is the lowest, most specific, level of policy configuration on the Firewall > App Control Advanced page.
|
1
|
Navigate to the Firewall > App Control Advanced page.
|
|
2
|
|
3
|
Next, select an application in this category from the Application drop-down list.
|
|
4
|
To display the specific signatures for this application, select Signature in the Viewed by drop-down list. The Freestyle gaming application has two signatures.
|
|
5
|
Click the Configure button in the row for the signature you want to work with. The App Control Signature Settings window opens. The fields at the top of the window are not editable. These fields display the values for the Signature Category, Signature Name, Signature ID, Priority, and Direction of the traffic in which this signature can be detected.
|
|
6
|
|
7
|
|
8
|
To target the selected block or log actions to a specific user or group of users, select a user group or individual user from the Included Users/Groups drop-down list. Select All to apply the policy to all users.
|
|
9
|
To exclude a specific user or group of users from the selected block or log actions, select a user group or individual user from the Excluded Users/Groups drop-down list. Select None to apply the policy to all users.
|
|
10
|
To target the selected block or log actions to a specific IP address or address range, select an Address Group or Address Object from the Included IP Address Range drop-down list. Select All to apply the policy to all IP addresses.
|
|
11
|
To exclude a specific IP address or address range from the selected block or log actions, select an Address Group or Address Object from the Excluded IP Address Range drop-down list. Select None to apply the policy to all IP addresses.
|
|
12
|
|
•
|
Always on – Enable the policy at all times.
|
|
•
|
Work Hours – Enable the policy Monday through Friday, 8:00 AM to 5:00 PM.
|
|
•
|
M-T-W-T-F 08:00 to 17:00 – Enable the policy Monday through Friday, 8:00 AM to 5:00 PM.
|
|
•
|
After Hours – Enable the policy Monday through Friday, 5:00 PM to 8:00 AM.
|
|
•
|
M-T-W-T-F 00:00 to 08:00 – Enable the policy Monday through Friday, midnight to 8:00 AM.
|
|
•
|
M-T-W-T-F 17:00 to 24:00 – Enable the policy Monday through Friday, 5:00 PM to midnight.
|
|
•
|
SU-S 00:00 to 24:00 – Enable the policy at all times (Sunday through Saturday, 24 hours a day).
|
|
•
|
Weekend Hours – Enable the policy Friday at 5:00 PM through Monday at 8:00 AM.
|
|
13
|
To specify a delay between log entries for repetitive events, type the number of seconds for the delay into the Log Redundancy Filter field.
|
|
14
|
To see detailed information about the signature, click here in the Note at the bottom of the window.
|
|
15
|
Click OK.
|