You can customize SonicWALL content filtering features included with SonicOS from the SonicWALL Filter Properties window. A valid subscription to SonicWALL CFS Premium on a firewall running SonicOS allows you to create custom policies to apply to specified user groups. The Default CFS Premium policy is used as the content filtering basis for all users not assigned to a specific custom policy.
|
NOTE: SonicWALL recommends that you make the Default CFS Premium policy the most restrictive policy. CFS custom policies are subject to content filter inheritance. This means that all CFS custom policies inherit the filters from the Default CFS policy. To ensure proper content filtering, the Default CFS policy should be configured to be the most restrictive policy, then each custom policy should be configured to grant privileges that are otherwise restricted by the Default policy.
|
To display the SonicWALL Filter Properties window:
|
1
|
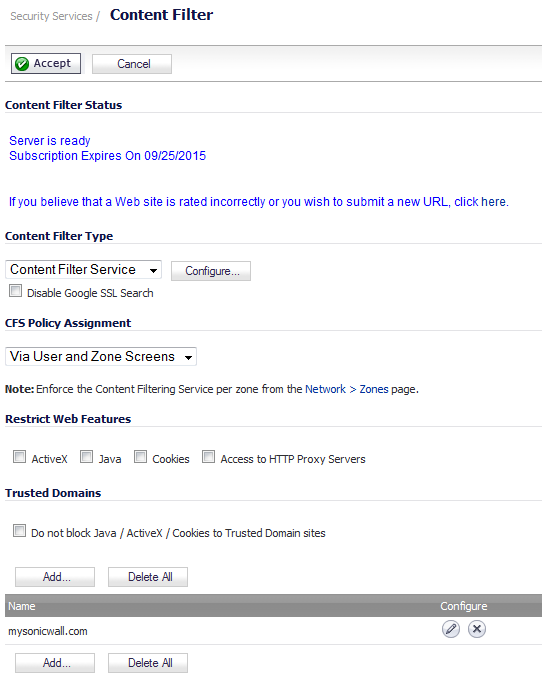
Select Content Filter Service from the Content Filter Type drop-down menu on the Security Services > Content Filter page.
|
|
2
|
|
•
|
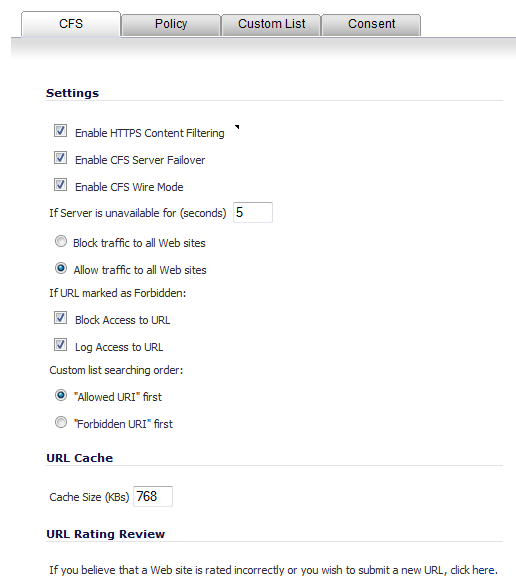
The CFS tab allows you to enable IP-based HTTPS Content Filtering, block or allow traffic to sites when the server is unavailable, and set preferences for your URL cache.
|
•
|
The Settings section allows you to enable HTTPS content filtering, select what you want the firewall to do if the server is unavailable, and what it should do when access is attempted to a forbidden Web site.
|
•
|
Enable HTTPS Content Filtering - Select this checkbox to enable HTTPS content filtering. HTTPS content filtering is IP- and hostname-based, and does not inspect the URL. While HTTP content filtering can perform redirects to enforce authentication or provide a block page, HTTPS filtered pages are blocked silently. You must provide the IP address for any HTTPS web sites to be filtered.
|
|
•
|
Enable CFS Server Failover—Select this checkbox to provide CFS server redundancy and high availability.
|
|
•
|
Enable CFS Wire Mode—Select this checkbox to enable CFS for Wire Mode deployments.
|
|
•
|
If Server is unavailable for (seconds) - Sets the amount of time after the content filter server is unavailable before the firewall takes action to either block access to all Web sites or allow traffic to continue to all Web sites. The default is 5 seconds.
|
|
NOTE: If the server is unavailable, the firewall can allow access to Web sites in the cache memory. This means that by selecting the Block traffic to all Web sites checkbox, the firewall will only block Web sites that are not in the cache memory.
|
|
•
|
Block traffic to all Web sites - Select this feature if you want the firewall to block access to all Web sites until the content filter server is available.
|
|
•
|
Allow traffic to all Web sites - Select this feature if you want to allow access to all Web sites when the content filter server is unavailable. If Forbidden URI (Universal Resource Identifier) and Forbidden Keywords are enabled, however, they are still blocked. This option is selected by default.
|
|
•
|
If URL marked as Forbidden - If you have enabled blocking by Categories and the URL is blocked by the server, there are two options available, both of which are selected by default:
|
|
•
|
Block Access to URL - Selecting this option prevents the browser from displaying the requested URL to the user.
|
|
•
|
Log Access to URL - Selecting this option records the requested URL in the log file.
|
|
•
|
Custom list searching order — you can specify which list is searched first:
|
|
•
|
“Allowed URL” first (default)
|
The URL Cache section allows you to configure the URL cache size on the firewall. The default size is 768 KBs.
If you believe that a Web site is rated incorrectly or you wish to submit a new URL to be rated, you can click the here link to display the SonicWALL CFS URL Rating Review Request form for submitting the request. This can also be used to view the rating of a URL.
In the SonicWALL CFS URL Rating Review Request form, enter a URL and then click the Submit button. A description of the URL is displayed. You can then select Rating Request to request that a URL be rated or that the rating be changed.
The Policy tab is only visible if the firewall has a current subscription to SonicWALL CFS Premium. The Policy tab allows you to modify the Default CFS policy and create CFS custom policies, which you can then apply to specific user groups in the Users > Local Groups page. The Default CFS policy is always inherited by every user. A CFS custom policy allows you to modify the default CFS configuration to tailor content filtering policies for particular user groups on your network.
|
NOTE: To ensure proper content filtering, the Default CFS policy should be configured to be the most restrictive policy, and then each custom policy should be configured to grant privileges that are otherwise restricted by the Default policy.
|
|
1
|
|
2
|
Enter a name for the policy in the Name field.
|
|
3
|
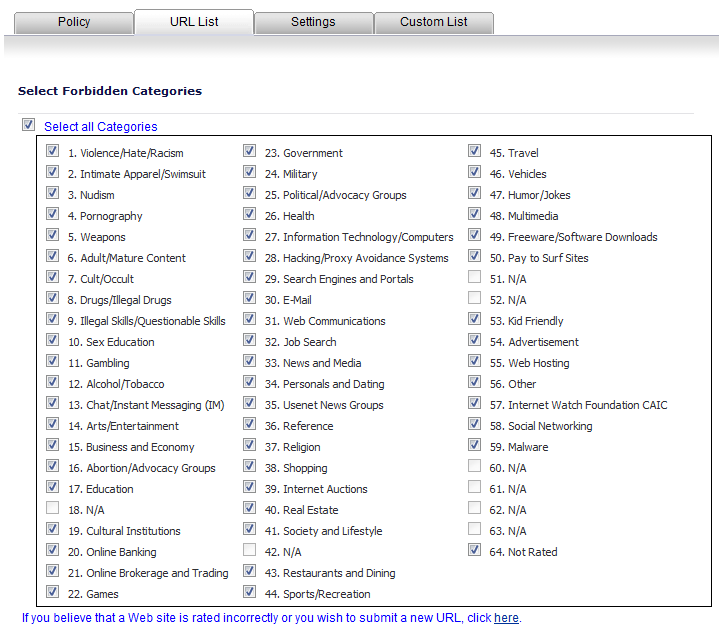
Click the URL List tab. By default, all non-N/A categories are selected.
|
|
4
|
In the Select Forbidden Categories list, clear any category to which you want to allow access.Select the Select all categories check box if you want to block all categories, or clear the box to deselect all categories and then selectively check only those you want to designate forbidden.
|
|
5
|
Click the Settings tab.
|
|
6
|
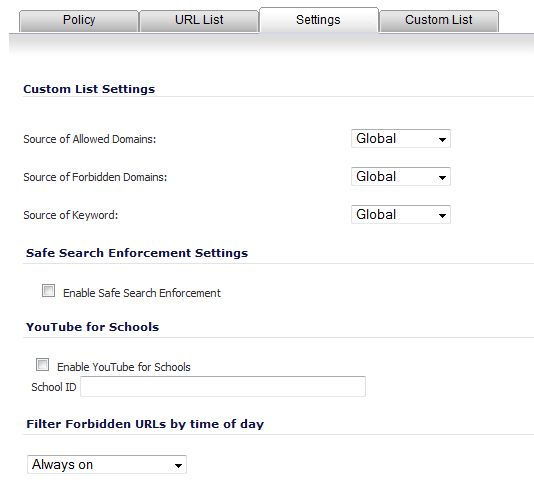
Under Custom List Settings, select any of the following settings:
|
|
•
|
Source Of Allowed Domains - from this drop-down menu, select the source of allowed domains/URLs that are listed on the Custom List tab:
|
|
•
|
|
•
|
Global (default)
|
|
•
|
Source Of Forbidden Domains - from this drop-down menu, select the source of forbidden domains/URLs that are listed on the Custom List tab:
|
|
•
|
|
•
|
Global (default)
|
|
•
|
Source Of Keyword - from this drop-down menu, select the source to enable keyword blocking for the URLs that are listed in the Keyword Blocking section on the Custom List tab.
|
|
•
|
|
•
|
Global (default)
|
|
7
|
Under Safe Search Enforcement Settings, select Enable Safe Search Enforcement to enable the safe search function for all search engines. This setting is disabled by default.
|
|
8
|
To configure the schedule for Content Filtering enforcement, select a schedule from the drop-down menu under Filter Forbidden URLs by time of day. The default is Always on; when selected, Content Filtering is enforced at all times.
|
|
9
|
Click the Custom List tab.
|
|
10
|
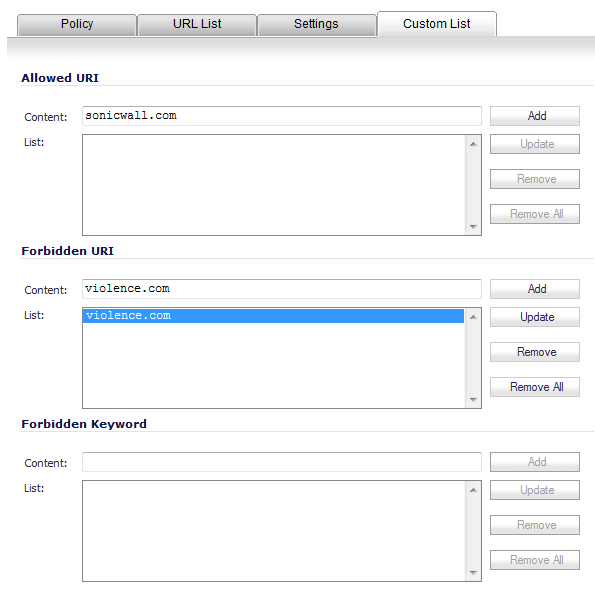
Enter a URI in the Allowed URI Content field. A URL can be up to 80 characters.
|
|
11
|
Click the Add button.
|
|
13
|
Enter a URL in the Forbidden URI Content field. A URI can be up to 80 characters.
|
|
14
|
Click the Add button.
|
|
16
|
Enter a keyword in the Forbidden Keyword Content field. Each keyword can be up to 16 characters, and you can add up to 100 keywords.
|
|
17
|
Click the Add button.
|
|
19
|
Click OK.
|
|
1
|
Navigate to the Security Services > Content Filter page.
|
|
2
|
In the Content Filter Type section, click the Configure button. The Filter Properties dialog displays.
|
|
4
|
Click the Edit icon in the Configure column for the Default policy. The Edit CFS Policy window is displayed.
|
|
5
|
Click the URL List tab.
|
|
6
|
|
7
|
Click OK.
|
|
TIP: Time-of-day restrictions only apply to the Content Filter List, Customized blocking and Keyword blocking. Consent and Restrict Web Features are not affected. The Filter Forbidden URLs by time of day drop-down menu on the Settings tab is set to Always on and dimmed so it cannot be changed.
|
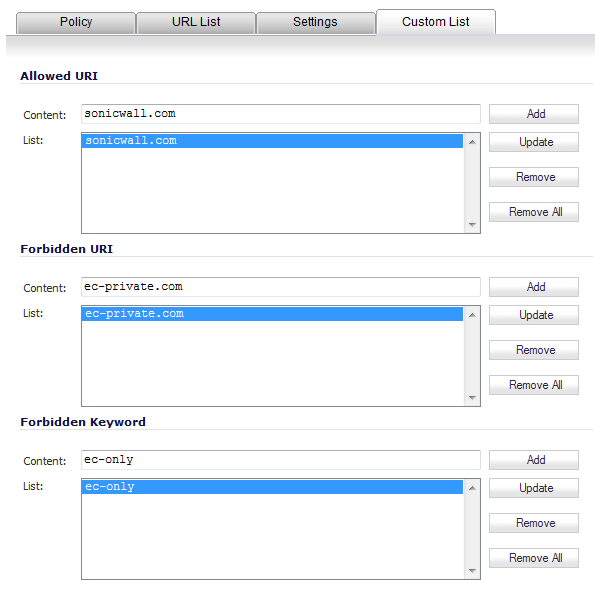
You can customize your URL list to include Allowed URI and Forbidden URI. By customizing your URL list, you can include specific URLs to be accessed, blocked, and include specific keywords to block sites. The settings available on the Custom List tab are different for an appliance with a valid SonicWALL CFS Premium subscription than they are for an appliance with no CFS Premium license. The image below shows the Custom List tab for an appliance with an active CFS Premium subscription.
For an appliance with or without a CFS Premium subscription, these features are controlled by each Policy. To enable or disable any of the features on this page, see Enabling or Disabling Allowed/Forbidden URI or Keyword Blocking .
In either the Allowed URI list or the Forbidden URI list, you can specify paths, but not pages. For example:
|
•
|
www.example.org/wiki/Main_Page is valid.
|
|
•
|
example.org/resource.txt is not valid.
|
|
CAUTION: Do not include the prefix http:// in either the Allowed URI or Forbidden URI fields. All subdomains are affected. For example, entering yahoo.com applies to mail.yahoo.com and my.yahoo.com.
|
|
1
|
To allow access to a Web site that is blocked by the Content Filter Service, in the Allowed URI field, enter the host name, such as www.ok-site.com. You can add up to 1,024 entries, and each entry can be up to 46 characters long.
|
|
2
|
Click Add.
|
|
3
|
To block a Web site that is not blocked by the Content Filter Service, enter the host name, such as www.bad-site.com into the Forbidden URI field. You can add up to 1,024 entries, and each entry can be up to 80 characters long.
|
|
4
|
Click Add.
|
|
5
|
To enable blocking using keywords, in the Forbidden Keyword field, enter the keyword to block. A keyword can contain up to 16 characters, and you can add up to 100 keywords.
|
|
6
|
Click Add.
|
|
7
|
Click OK.
|
|
2
|
Click Remove.
|
|
4
|
By default, the Allowed URI list is disabled, and the Forbidden URI list and Keyword Blocking list are enabled. When SonicWALL CFS Premium is licensed on the appliance, these settings are controlled on a per-policy basis. Without a current SonicWALL CFS Premium subscription, these settings are available on the Custom List tab at the bottom of the page.
To enable or disable the Allowed/Forbidden Domains or Keyword Blocking features when the firewall has a current subscription to SonicWALL CFS Premium:
|
1
|
On the Security Services > Content Filter page, select Content Filter Service under Content Filter Type.
|
|
2
|
|
3
|
Click the Policy tab.
|
|
4
|
Click the Edit icon in the Configure column of the Policy on which to enable or disable these features. The Edit CFS Policy dialog displays.
|
|
5
|
Click the Settings tab.
|
|
6
|
Under Custom List Settings, select any of the following settings:
|
|
•
|
Source Of Allowed Domains - select this setting to disable the allowed domains/URLs that are listed on the Custom List tab. The domains in the Allowed Domains list will not be exempt from content filtering.
|
|
•
|
Source Of Forbidden Domains - select this setting to enable filtering (blocking) of forbidden domains/URLs that are listed on the Custom List tab.
|
|
•
|
Source Of Keyword - select this setting to enable keyword blocking for the URLs that are listed in the Keyword Blocking section on the Custom List tab.
|
|
7
|
Click OK.
|
|
1
|
On the Custom List tab, at the bottom of the page, select any of the following settings:
|
|
•
|
Source Of Allowed Domains - select this setting to disable the allowed domains/URls that are listed on the Custom List tab. The domains/URls in the Allowed Domains list are not exempt from content filtering.
|
|
•
|
Source Of Forbidden Domains - select this setting to enable filtering (blocking) of forbidden domains/URls that are listed on the Custom List tab.
|
|
•
|
Source Of Keyword - select this setting to enable keyword blocking for the URLs that are listed in the Keyword Blocking section on the Custom List tab.
|
|
2
|
Click OK.
|
Selecting the Disable Web traffic except for Allowed Domains check box causes the firewall to allow Web access only to sites on the Allowed Domains list. With careful screening, this can be nearly 100% effective at blocking pornography and other objectionable material.
The Disable Web traffic except for Allowed Domains check box is not available when the firewall has a valid SonicWALL CFS subscription. In this case, you can configure a CFS Policy to block undesirable Web sites.
The Consent tab allows you to enforce content filtering on designated computers and provide optional filtering on other computers. Consent can be configured to require the user to agree to the terms outlined in an Acceptable Use Policy window before Web browsing is allowed.
To enable the Consent properties, select Require Consent.
|
•
|
Maximum Web Usage (minutes) - In an environment where there are more users than computers, such as a classroom or library, time limits are often imposed. The firewall can be used to remind users when their time has expired by displaying the page defined in the Consent page URL field. Enter the time limit, in minutes, in the Maximum Web usage field. The minimum time is 1 minute, the maximum is 9999, and the default is 15. Entering a value of 0 (zero) disables this feature.
|
|
•
|
Consent Page URL (optional filtering) - When a user opens a Web browser on a computer requiring consent, they are shown a consent page and given the option to access the Internet with or without content filtering. This page must reside on a Web server and be accessible as a URL by users on the network. It can contain the text from or links to an Acceptable Use Policy (AUP). This page must contain links to two pages contained in the firewall, which, when selected, tell the firewall if the user wishes to have filtered or unfiltered access:
|
|
•
|
Unfiltered access link must be 192.168.168.168/iAccept.html
|
|
•
|
Filtered access link must be 192.168.168.168/iAcceptFilter.html
|
|
•
|
Consent Accepted URL (filtering off) - When a user accepts the terms outlined in the Consent page and chooses to access the Internet without the protection of Content Filtering, they are shown a Web page confirming their selection. Enter the URL of this page in the Consent Accepted (filtering off) field.
|
|
•
|
Consent Accepted URL (filtering on) - When a user accepts the terms outlined in the Consent page and chooses to access the Internet with the protection of Content Filtering, they are shown a Web page confirming their selection. Enter the URL of this page in the Consent Accepted (filtering on) field.
|
|
•
|
Consent Accepted Redirect Page URL (filtering off) - optional: If a URL is entered in this field, when a user accepts the terms in the Consent page and chooses to have unfiltered access, they are redirected to this URL.
|
|
•
|
Consent Accepted Redirect Page URL (filtering on) - optional: If a URL is entered in this field, when a user accepts the terms in the Consent page and chooses to have filtered access, they are redirected to this URL.
|
This Web page must reside on a Web server and be accessible as a URL by users on the LAN. This page must also contain a link to a page contained in the firewall that tells the device that the user agrees to have filtering enabled. The link must be 192.168.168.168/iAcceptFilter.html, where the SonicWALL LAN IP address is used instead of 192.168.168.168.
Enter the URL of this page in the Consent Page URL (mandatory filtering) field and click OK. When the firewall is updated, a message confirming the update is displayed at the bottom of the Web browser window.
|
1
|
|
2
|
Enter the IP address of the computer in the Add New Address field.
|
|
3
|
Click the OK button.
|
|
4
|
To add more IP addresses to the list, repeat Step 1 through Step 3 for each address. You can enter up to 128 IP address.
|
To delete all of the IP addresses, click Delete All.
|
1
|
Highlight the IP address in the Filtered IP Address table,
|
|
2
|
Click Delete.
|
|
1
|
Highlight the IP address in the Filtered IP Address table.
|
|
2
|
|
4
|
Click OK.
|

