|
1
|
Navigate to the Network > Zones page.
|
|
2
|
Click the Add button by Zone Settings table. To modify an existing zone, click the Edit icon for the zone. The Add Zone/Edit Zone dialog displays.
|
|
NOTE: If you are editing an existing zone, the Edit Zone dialog displays the options as you have configured them.
|
|
3
|
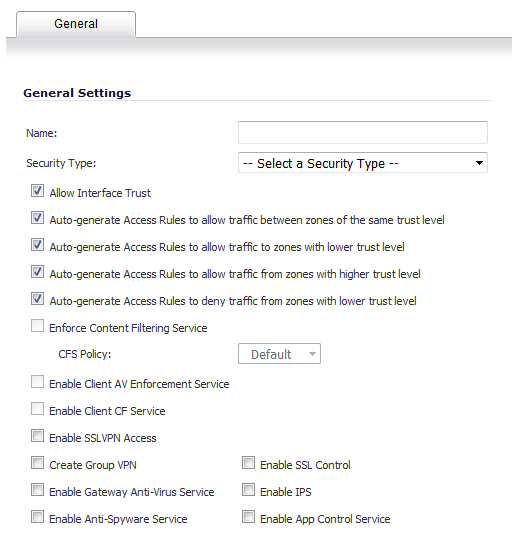
Type a friendly name for the new zone in the Name field.
|
|
4
|
From the Security Type drop-down menu, select a security type:
|
|
•
|
Trusted – for zones you want to assign the highest level of trust, such as internal LAN segments.
|
|
•
|
Public – for zones with a lower level of trust requirements, such as a DMZ interface.
|
|
•
|
Wireless – for the WLAN interface.
|
|
•
|
|
For Trusted, Public, and Wireless security types, a Guest Services tab appears. For how to configure guest services, see Configuring a Zone for Guest Access. For Wireless security type, a Wireless tab also appears. For how to configure wireless settings, see Configuring the WLAN Zone. |
|
5
|
To allow communication within Zones by creating automatically Access Rules that allow traffic to flow between the interfaces of a Zone instance, select Allow Interface Trust. Otherwise, deselect the Allow Interface Trust check box. This option is enabled by default, but is often disabled when setting up Guest Services.
|
The Allow Interface Trust feature automates the creation of Access Rules to allow traffic to flow between the interfaces of a zone instance. For example, if the LAN zone has both the LAN and X3 interfaces assigned to it, checking Allow Interface Trust on the LAN zone creates the necessary Access Rules to allow hosts on these interfaces to communicate with each other.
|
6
|
|
•
|
Auto-generate Access Rules to allow traffic between zones of the same trust level – Allow Access Rules between equal trust zones, such as:
|
|
•
|
Auto-generate Access Rules to allow traffic to zones with lower trust level – Allow Access Rules to lower trust zones, such as:
|
|
•
|
Auto-generate Access Rules to allow traffic from zones with higher trust level – Allow Access Rules from higher trust zones, such as:
|
|
•
|
Auto-generate Access Rules to deny traffic from zones with lower trust level – Deny Access Rules to lower trust zones, such as:
|
|
7
|
Select any of the SonicWall Security Services you want to enforce on the zone. See Enabling SonicWall Security Services on Zones for more information on these services. These options are disabled by default.
|
|
•
|
Enforce Content Filtering Service – Enforces content filtering services to restrict web access and trusted domains.
|
|
•
|
Enable Client AV Enforcement Service – Enforces managed anti-virus protection on clients connected to multiple interfaces in the same Zone.
|
|
•
|
Enforce Client CF Service – Enforces content filtering on multiple interfaces in the same Trusted, Public and WLAN zones.
|
|
•
|
Enable SSL VPN Access – Enables the establishment of SSL VPN connections to the zone. This option is dimmed (unavailable) if SSLVPN is selected for Security Type.
|
|
•
|
Create Group VPN – Creates a GroupVPN policy for the zone. This option is dimmed (unavailable) if SSlVPN is selected for Security Type.
|
|
•
|
Enable SSL Control – Requires inspection of all new SSL connections initiated from the zone.
|
|
•
|
Enable Gateway Anti-Virus Service – Enforces anti-spyware detection and prevention on multiple interfaces in the same Trusted, Public or WLAN zones.
|
|
•
|
Enable IPS – Enforces intrusion detection and prevention on multiple interfaces in the same Trusted, Public or WLAN zones.
|
|
•
|
Enable Anti-Spyware Service – Enforces anti-spyware detection and prevention on multiple interfaces in the same Trusted, Public or WLAN zones.
|
|
•
|
Enable App Control Service – Enforces App Control to create network policy object-based control rules to filter network traffic flows.
|
|
8
|
Click OK. The new zone is now added to the SonicWall security appliance.
|