Configuring the SSL VPN Settings

To configure the SSL VPN Settings:
1
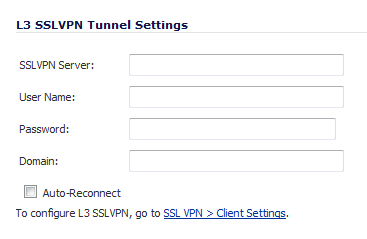
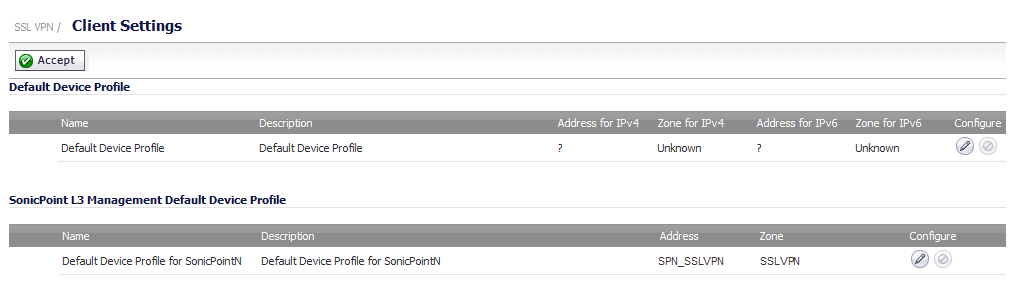
Go to the SSL VPN > Client Settings page.

2
Click the Configure button for the Default Device Profile for SonicPoint.

3
Under Basic Settings, enter the Name and Description that you want for the SonicPoint device.
4
In the Zone IP V4 drop-down menu, select SSLVPN.
5
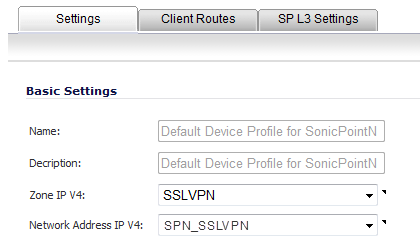
In the Network Address IP V4 drop-down menu, select:
Select Create new network to create a new network object, create the network object, then select it from the Network Address IP V4 drop-down menu.
6
Click the Client Routes tab.

7
In the Networks list, select the subnet interface to which the WLAN Tunnel Interface has been bound.
8
Click the Right Arrow button to add it to the Client Routes list.
9
Select the SP L3 Settings tab.

10
Select the WLAN Tunnel Interface to which you want to bind the remote SonicPoint device.
11
Click OK.
Creating a User for the SSL VPN Client
To create a user for an SSL VPN Client:
1
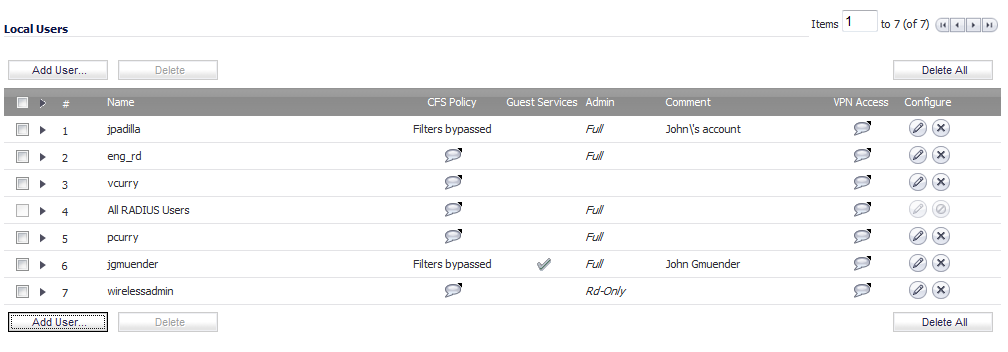
Go to the Users > Local Users page.

2
Click the Add User button or the Edit button for the user you want to edit.
3
The Add/Edit User dialog appears.
4
Click the Groups tab.
5
Add SSL VPN Services to the Member of field.
6
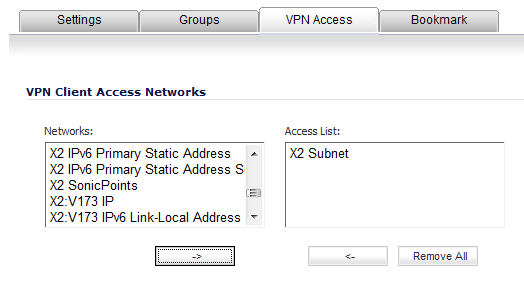
Click the VPN Access tab.

7
8
Click OK.
SonicPoint Traffic Routing

In addition to the route to the subnet of the WLAN Tunnel Interface (X2 Subnet), users can also add other routes under the Client Route tab of the SSL VPN Edit Device dialog.

Adding other routes will enable remote wireless clients to access internal networks via the SSL VPN tunnel of the SonicPoint and the SonicOS. The traffic to other destinations will be routed locally on the SonicPoint without tunneling to the SonicOS side.

Provisioning SSL VPN Server Information to SonicPoint
To provision SSL VPN Server information to a SonicPoint device:
1
Go to the SonicPoint > SonicPoints page.
2

3
Under L3 SSLVPN Tunnel Settings, enter the SSL VPH Server, User Name, Password, and Domain.
4
Select the Auto Reconnect option.
5

To push the settings to the SonicPoint device, connect the SonicPoint device to SSL VPN Server via a Layer 2 connection.

Establishing an SSL VPN Tunnel to a Remote Network

If the remote network site supports DHCP, set the SonicPoint to the factory default settings and connect it the network. The SonicPoint will get the IP address and the Gateway automatically from DHCP. The SSL VPN server information will be saved after factory default settings are in place. After the SonicPoint gets its DHCP lease, it will connect to the remote SonicWall Gateway.

If the remote network site does not support DHCP, set the SonicPoint to the factory default settings and set the network parameters. Then the SonicPoint will automatically connect to remote SonicWall Gateway.