When user bookmarks are defined, they are displayed on the SSL VPN > Virtual Office page. Users can modify or delete their own bookmarks, but cannot modify or delete bookmarks created by the administrator.
|
1
|
Go to the SSL VPN > Virtual Office page.
|
|
2
|
|
3
|
In the Bookmark Name field, type a descriptive name for the bookmark.
|
|
4
|
In the Name or IP Address field, enter the fully qualified domain name (FQDN) or the IPv4 address of a host machine on the LAN.
|
Some services run on non-standard ports, and some services expect a path when connecting. The format for the Name or IP Address field is shown in Formats for the Name or IP Address Field and is listed by the service you select from the Service menu in Step 5.
|
10.20.30.4:5901 (mapped to session 1) JBJONES-PC.sv.us.SonicWall.com
NOTE: Do not use 10.20.30.4:1
TIP: For a bookmark to a Linux server, see the Tip below this table. |
||
|
5
|
In the Service menu, select the service that you want.
|
|
NOTE: Depending on the Service you select, different menus, input boxes, and options are displayed in the Add Portal Bookmark dialog.
|
|
TIP: In some environments, you can enter the host name only, such as a Virtual Network Computing (VNC) bookmark for a Windows local network. When creating a Virtual Network Computing (VNC) bookmark to a Linux server, in the Name or IP Address box, you must specify the Linux server IP address, the port number, and the server number, in the format ipaddress:port:server. For example, if the Linux server IP address is 192.168.2.2, the port number is 5901, and the server number is 1, you would enter 192.168.2.2:5901:1 in the Name or IP Address box.
|
|
If you are using a browser other than Internet Explorer, if you select Terminal Services (RDP5 - ActiveX), the selection is automatically switched to Terminal Services (RDP5 - Java), and a pop-up dialog notifies you of the switch. |
|
6
|
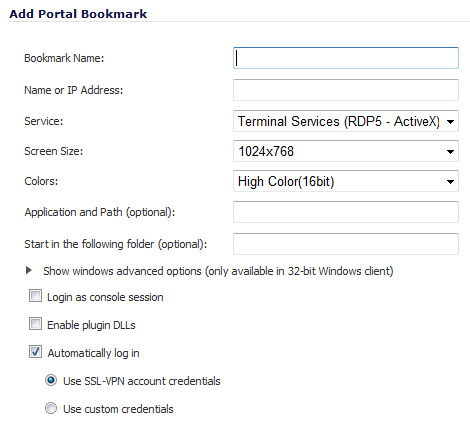
If you select Terminal Services (RDP5 - ActiveX) or Terminal Services (RDP5 - Java) from the Service menu, configure the following fields:
|
|
a
|
From the Screen Size menu, select the default screen size to be used on the terminal service screen when users execute this bookmark.
|
|
b
|
From the Colors menu, select the default color depth for the terminal service screen when users execute this bookmark.
|
|
c
|
In the Application Path box, enter the path where the client application resides on the remote device. (Optional)
|
|
d
|
In the Start in the following folder box, enter the local folder in which to execute application commands.
|
|
e
|
If you want to use Windows advanced options, expand Show windows advanced options (only available in 32-bit Windows client) and select any of the following redirect options:
|

|
NOTE: To see local printers on your remote device, select both Redirect Printers and Redirect Ports.
|
|
•
|
|
NOTE: Remote Application enables you to monitor the server and client connection. You must register remote applications in the Windows 2008 RemoteApp list. If Remote Application is selected, the Java Console displays messages regarding connectivity with the terminal server.
|
|
f
|
To allow login as console, select the Login as console session option.
|
|
g
|
For Windows clients, if you selected Terminal Services (RDP5 - ActiveX), you can select Enable plugin DLLs and enter the name(s) of client DLLs, which must be accessed by the remote desktop or terminal service, in the PluginDLLs box.
|

Multiple entries in the PluginDLLs box must be separated by a comma with no spaces.
|
NOTE: The Enable plugin DLLs option is not available for Terminal Services (RDP5 - Java). Terminal Services (RDP5 - Java) on Windows is a native RDP client that supports Plugin DLLs by default. See Enabling Plugin DLLs.
|
|
h
|
For automatic login, select Automatically log in and select Use SSL VPN account credentials to forward the current SSL VPN session credentials to the RDP server.
|
|
i
|
To enter a custom username, password, and domain for this bookmark, select Use custom credentials. For more information about custom credentials, see Creating Bookmarks with Custom SSO Credentials.
|
|
•
|
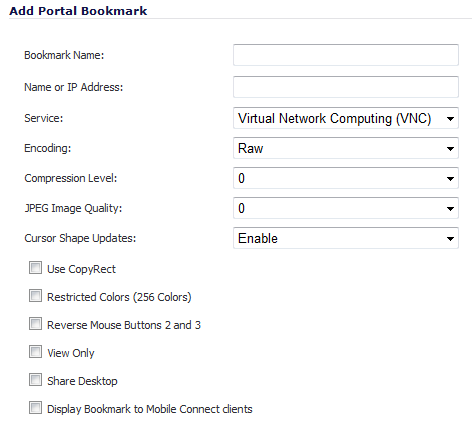
If you select Virtual Network Computing (VNC) from the Service drop-down menu, the dialog displays as follows with the fields shown.
|
|
•
|
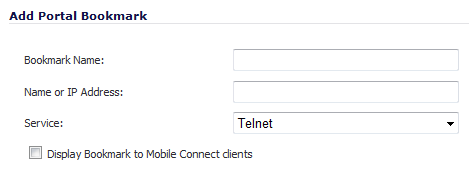
If you select Telnet from the Service drop-down menu, the dialog displays as follows with the fields shown.
|
|
•
|
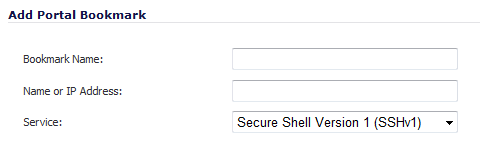
If you select Secure Shell version 1 (SSHv1) from the Service drop-down menu, the dialog displays as follows with the fields shown.
|
|
•
|
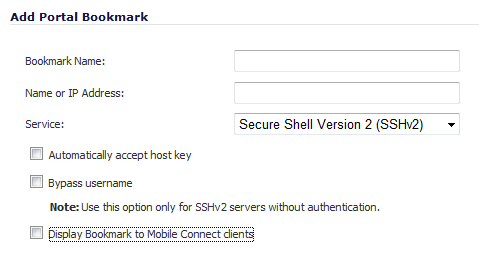
If you select Secure Shell version 2 (SSHv2) from the Service drop-down menu, the dialog displays as follows with the fields shown.
|
|
•
|
Select Automatically accept host key if you want it. (Optional)
|
|
•
|
If you are using an SSHv2 server without authentication, such as a SonicWall firewall, select the Bypass username option. (Optional)
|
|
•
|
Select Display Bookmark to Mobile Connect clients if you want it.
|
|
7
|
Click OK to update the configuration.
|
To install and launch Mobile Connect and Mobile Connect Bookmark, refer to the Mobile Connect documentation for your device. Go to https://support.sonicwall.com/ and select Mobile Connect product. Then filter on device type.