|
•
|
Primary—Only one member can be the Primary per Group. This member always appears first or at the top of the Member List. Note that although a group can be configured with an empty member list, it is impossible to have members without a Primary.
|
|
•
|
Alternate—More than one member can be an Alternate, however, it is not possible to have a Group of only Alternate members.
|
|
•
|
Last-Resort—Only one member can be designed as Last-Resort. Last-Resort can only be configured with other group members.
|
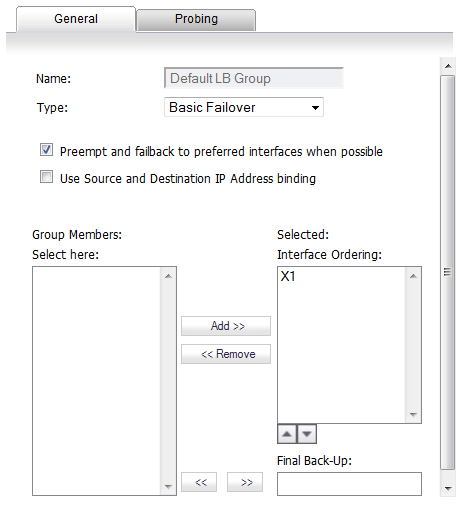
To configure the Group Member Rank settings, click the Configure icon of the Group you wish to configure on the Network > Failover & LB page. The Edit LB Group dialog displays.
The General tab allows you to modify the following settings:
|
•
|
Display name—Edit the display name of the Group
|
|
•
|
Type (or method) of LB—Choose the type of LB from the drop-down list (Basic Failover, Round Robin, Spillover-Based, or Ratio).
|
|
•
|
Basic Failover—The WAN interfaces use ‘rank’ to determine the order of preemption when the Preempt checkbox has been enabled. Only a higher-ranked interface can preempt an Active WAN interface.
|
|
•
|
Round Robin—This option allows the user to re-order the WAN interfaces for Round Robin selection. The order is as follows: Primary WAN, Alternate WAN #1, Alternate WAN #2, and Alternate WAN #3; the Round Robin will then repeat back to the Primary WAN and continue the order.
|
|
•
|
Spillover—The bandwidth threshold applies to the Primary WAN. Once the threshold is exceeded, new traffic flows are allocated to the Alternates in a Round Robin manner. Once the Primary WAN bandwidth goes below the configured threshold, Round Robin stops, and outbound new flows will again be sent out only through the Primary WAN.
|
|
•
|
Ratio—Percentages can be set for each WAN in the LB group. To avoid problems associated with configuration errors, please ensure that the percentage correctly corresponds to the WAN interface it indicates.
|
|
•
|
Add/delete member interfaces—Members can be added by selecting a displayed interface from the “Group Members:” column, and then clicking the Add>> button. Note that the interface listed at the top of the list is the Primary. Members can be deleted from the “Selected:” column by selecting the displayed interface, and then clicking the Remove>> button.
|
To configure the probing options for a specific Group, click the Configure icon of the Group you wish to configure on the Network > Failover & LB page. Then, click the Probing tab.
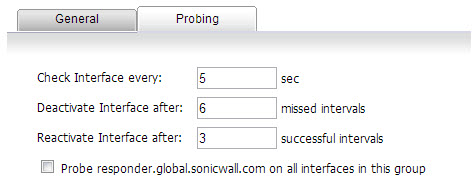
The Probing tab allows you to modify the following settings:
|
•
|
Check Interface—The interval of health checks in units of seconds
|
|
•
|
Deactivate Interface—After a series of failed health checks, the interface sets to “Failover”
|
|
•
|
Reactivate Interface—After a series of successful health checks, the interface sets to “Available”
|
|
•
|
Probe responder.global.SonicWall.com on all interfaces in this group—Enable this checkbox to automatically set Logical/Probe Monitoring on all interfaces in the Group. When enabled, this sends TCP probe packets to the global SNWL host that responds to SNWL TCP packets, responder.global.SonicWall.com, using a target probe destination address of 204.212.170.23:50000. Once this checkbox is selected, the rest of the probe configuration will automatically enable built-in settings. The same probe will be applied to all WAN Ethernet interfaces. Note that the Dialup WAN probe setting also defaults to the built-in settings.
|