Log > Syslog
|
NOTE: Syslog output may be affected by changes to Event Priority for event, group, or global categories made on the Log > Settings page. For more information, see Configuring Event Attributes Globally .
|
To display the Dashboard > Log Monitor page, click on the Show Log Monitor  icon in the upper right corner of the page.
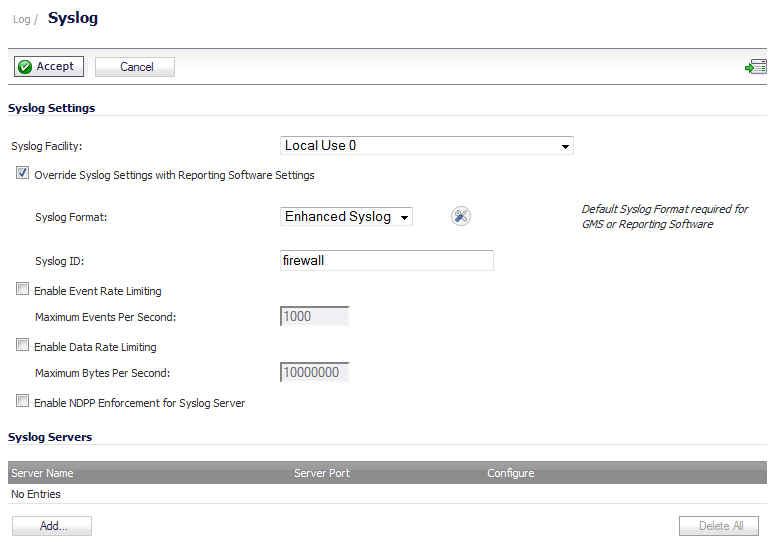
The Log > Syslog page enables you to configure the various settings you want when you send the log to a Syslog server. You can choose the Syslog facility and the Syslog format that you want.
|
NOTE: If you are using Dell SonicWALL’s Global Management System (GMS) to manage your firewall, the Syslog Format is fixed to Default and the Syslog ID is fixed to firewall. Thus, these fields are greyed-out and can't be modified. All other fields, however, can still be customized as needed.
|
To configure Syslog settings on your firewall:
|
1
|
|
2
|
The Syslog Facility may be left as the factory default. Optionally, however, in the Syslog Settings section, from the Syslog Facility menu, select the Syslog Facility appropriate to your network:
|
|
•
|
|
3
|
(Optional) If you want to override the Syslog settings and use the reporting software settings if you are using DELL Reporting Software, select the Override Syslog Settings with Reporting Software Settings option.
|
|
NOTE: When ViewPoint mode or Analyzer mode is enabled, the Override Syslog Settings with Reporting Software Settings option is automatically selected. When this option is checked, the Syslog format is always reset to the Default format.
|
|
4
|
From the Syslog Format menu list, select the Syslog format that you want. The following Syslog formats are listed:
|
|
•
|
Default – Use the default SonicWALL Syslog format.
|
|
•
|
WebTrends – Use the WebTrends Syslog format. You must have WebTrends software installed on your system.
|
|
•
|
Enhanced Syslog – Use the Enhanced Dell SonicWALL Syslog format.
|
|
•
|
ArcSight – Use the ArcSight Syslog format. The Syslog server must be configured with the ArcSight Logger application to decode the ArcSight messages.
|
When you select Enhanced Syslog or Arcsight, the Configure icon  becomes active. Clicking on the configure icon launches a configuration dialog where you can select the specific settings that you want to log.
|
•
|
Enhanced Syslog, go to Step 6.
|
|
6
|
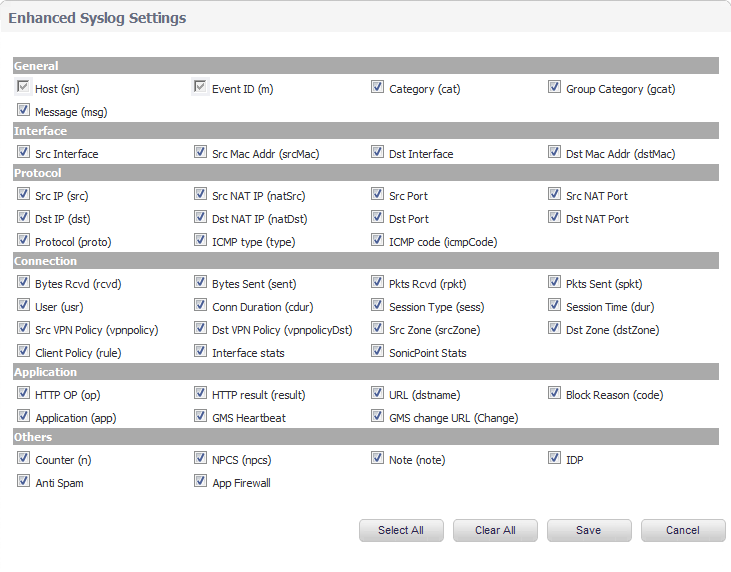
(Optional) If you selected Enhanced Syslog, click the Configure icon
|
|
7
|
(Optional) Select the Enhanced Syslog options you want to log. To select all options, click Select All. To deselect all options, click Clear All.
|
|
8
|
Click Save.
|
|
10
|
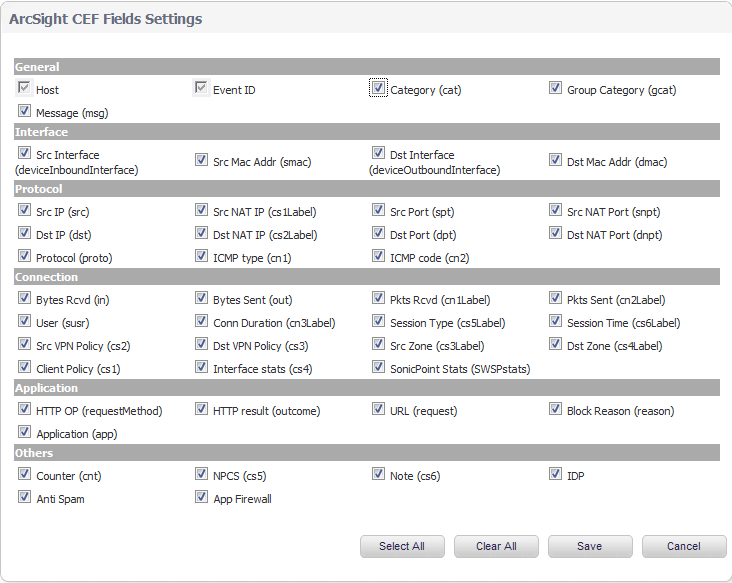
(Optional) If you selected ArcSight, click the Configure icon
|
|
11
|
(Optional) Select the ArcSight options that you want to log. To select all options, click Select All. To deselect all options, click Clear All.
|
|
12
|
Click Save.
|
|
13
|
In the Syslog ID box, enter the Syslog ID that you want.
|
A Syslog ID field is included in all generated Syslog messages, prefixed by “id= ". Thus, for the default value, firewall, all Syslog messages include "id=firewall." The ID can be set to a string consisting of 0 to 32 alphanumeric and underscore characters.
|
NOTE: The Syslog ID field is fixed to firewall when the Override Syslog Settings with Reporting Software Settings option is enabled, and therefore, cannot be modified.
|
|
14
|
(Optional) Select Enable Event Rate Limiting if you want it. This control allows you to enable rate limiting of events to prevent the internal or external logging mechanism from being overwhelmed by log events. Specify the maximum number of events in the Maximum Events Per Second field; the minimum number is 0, the maximum is 1000, and the default is 1000 per second.
|
|
15
|
(Optional) Select the Enable Data Rate Limiting if you want it. This control allows you to enable rate limiting of data to prevent the internal or external logging mechanism from being overwhelmed by log events. Specify the maximum number of bytes in the Maximum Bytes Per Second field; the minimum is number is 0, the maximum is 1000000000, and the default is 10000000 bytes per second.
|
|
16
|
(Optional) Select the Enable NDPP Enforcement for Syslog Server if you want it.
|
|
17
|
When you’ve finished setting the Syslog options, click Accept at the top of the page.
|