In the DHCP Advanced Settings page, you can enable the Trusted Relay Agent List option using the Default Trusted Relay Agent List Address Group or create another Address Group using existing Address Objects.
|
1
|
In the left-hand navigation panel, navigate to the Network > DHCP Server page.
|
|
2
|
Under DHCP Server Settings, click the Advanced button.
|
|
3
|
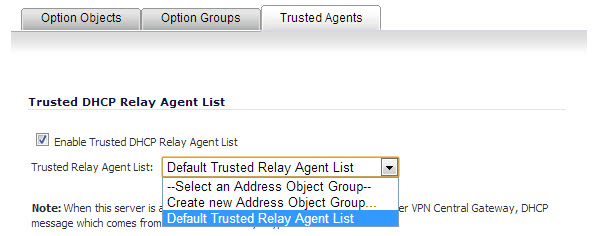
On the DHCP Advanced Settings page, click the Trusted Agents tab.
|
|
4
|
Select the Enable Trusted DHCP Relay Agent List check box. The Trusted Relay Agent List drop-down list becomes available. The drop-down list includes all existing address groups as well as the Create new Address Object Group option.
|
|
5
|
To use the Default Trusted Relay Agent List Address Group or another existing Address Group, select it from the drop-down list.
|
|
6
|
To create a custom Address Group for this option, select Create new Address Object Group. The Add Address Object Group dialog displays. Perform the following steps:
|
|
a
|
Fill in the Name field with a descriptive name for the Address Group.
|
|
c
|
Click OK.
|
In the DHCP Advanced Settings dialog, the new Address Group is displayed in the Trusted Relay Agent List drop-down menu. The new Address Group is now available on the Network > Address Objects page, and can be edited or deleted there.
|
7
|
On the DHCP Advanced Settings page, click OK to enable the Trusted Relay Agent List option with the selected Address Group.
|