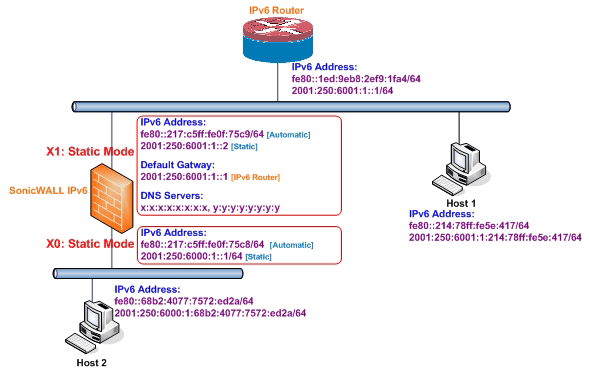
The following diagram shows a sample topology with IPv6 configured in static mode.
Sample IPv6 Static Mode Configuration
Three types of IPv6 address are possible to assign under this mode:
|
1
|
Navigate to the Network > Interfaces page.
|
|
2
|
Click on the IPv6 button at the top right corner of the page. IPv6 addresses for the appliance are displayed.
|
|
3
|
Click on the Configure icon for the interface you want to configure an IPv6 address for. The Edit Interface dialog displays.
|
|
NOTE: The zone assignment for interfaces must be configured on the IPv4 addressing page. To modify the zone assignment for an IPv6 interface, click the IPv4 button at the top right of the page, modify the zone for the interface, and then return to the IPv6 interface page.
|
|
4
|
|
5
|
Enter the IPv6 Address for the interface.
|
|
6
|
Enter the Prefix Length for the address.
|
|
7
|
If this is the primary WAN interface, enter the IPv6 address of the Default Gateway. If this is not the primary WAN interface, any Default Gateway entry will be ignored, so you can leave this as ::. (The double colon is the abbreviation for an empty address, or 0:0:0:0:0:0:0:0.)
|
|
8
|
If this is the primary WAN interface, enter up to three DNS Server IPv6 addresses. Again, if this is not the primary WAN interface, any DNS Server entries will be ignored.
|
|
9
|
Select Enable Router Advertisement to make this an advertising interface that distributes network and prefix information.
|
|
10
|
Select Advertise Subnet Prefix of IPv6 Primary Static Address to add a default prefix into the interface advertising prefix list. This prefix is the subnet prefix of interface IPv6 primary static address. This option will help all hosts on the link stay in the same subnet.
|