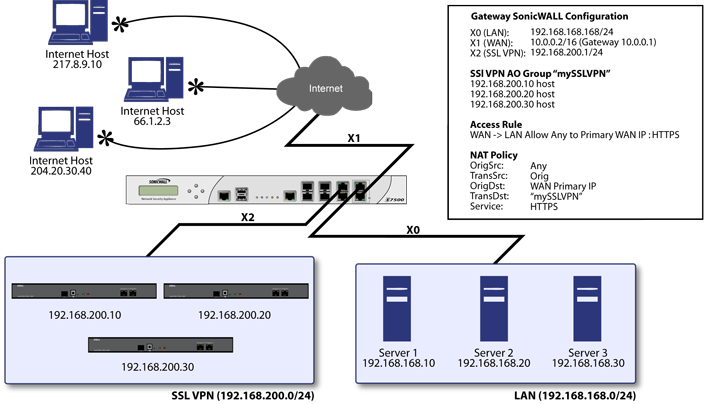
Sample One-to-Many NAT Load Balancing Configuration
|
1
|
|
2
|
Click on the Add… button to bring up the pop-up access policy screen.
|
|
•
|
Action: Allow
|
|
•
|
Service: HTTPS
|
|
•
|
Source: Any
|
|
•
|
Destination: WAN Primary IP
|
|
•
|
Users Allowed: All
|
|
•
|
Schedule: Always on
|
|
•
|
Comment: Descriptive text, such as SSLVPN LB
|
|
•
|
Logging: Checked
|
|
•
|
Allow Fragmented Packets: Unchecked
|
|
4
|
Create the following NAT policy by selecting Network > NAT Policies and clicking on the Add... button:
|
|
•
|
Original Source: Any
|
|
•
|
Translated Source: Original
|
|
•
|
Original Destination: WAN Primary IP
|
|
•
|
Translated Destination: Select Create new address object... to bring up the Add Address Object screen.
|
|
•
|
Name: A descriptive name, such as mySSLVPN
|
|
•
|
Zone assignment: LAN
|
|
•
|
Type: Host
|
|
•
|
IP Address: The IP addresses for the devices to be load balanced (in the topology shown above, this is 192.168.200.10, 192.168.200.20, and 192.168.200.30.)
|
|
•
|
Original Service: HTTPS
|
|
•
|
Translated Service: HTTPS
|
|
•
|
Inbound Interface: Any
|
|
•
|
Outbound Interface: Any
|
|
•
|
Comment: Descriptive text, such as SSLVPN LB
|
|
•
|
Enable NAT Policy: Checked
|
|
•
|
Create a reflective policy: Unchecked
|