App Control provides two ways to create policies for controlling applications. On the Firewall > App Control Advanced page, you can quickly create a policy for a specific category, application, or signature. You can select blocking, logging, or both to control the traffic. While a category includes many applications, this method does not allow you to control applications belonging to more than one category with a single policy. Similarly, while an application can include multiple signatures, you cannot include signatures from different applications in a policy, unless you create a policy for the whole category.
By using the Add Application List Object feature on the Firewall > Match Objects page, you can achieve more granularity and select specific applications from different categories. Then, this object can be used in an App Rules policy.
To include signatures from different applications in a single policy, you need to use the Add New Match Object feature with a Match Object Type of Application Signature List. This allows you to select any signature from the same database that is used for Firewall > App Control Advanced, no matter what category or application the signature belongs to, and add them into a single match object. You can then create an App Rules policy using this match object to control those specific signatures.
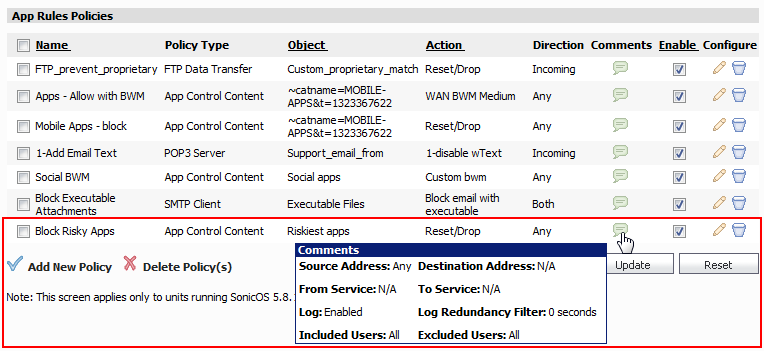
Our example in this use case uses the Add Application List Object feature to create an object containing the riskiest applications in the database. We then create an App Rules policy using this object, and block the application traffic using the predefined Reset/Drop action.
|
2
|
|
3
|
Click Add Application List Object.
|
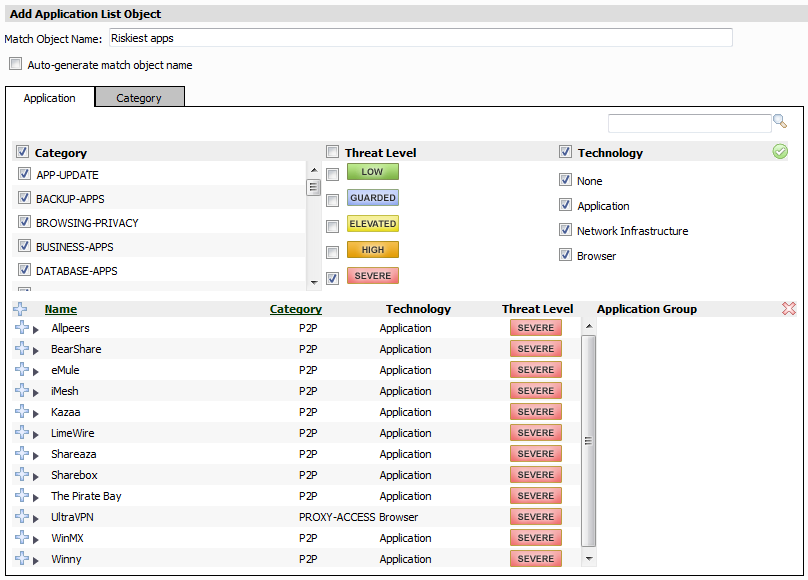
The Add Application List Object screen displays.
|
4
|
On the Application tab, to name this object, clear Auto-generate match object name and then type a name such as “Riskiest apps” for the object in the Match Object Name field.
|
|
5
|
Leave all category check boxes selected under Category at the top left.
|
|
6
|
Under Threat Level, clear all threat level check boxes except for the one next to SEVERE. The list of applications in the lower panel changes as you clear the threat level check boxes.
|
|
7
|
Leave all technology check boxes selected under Technology.
|
|
8
|
In the application list where you see the names of all the SEVERE rated applications, click the Plus sign next to Name to select all of the listed applications for your object. A dialog box pops up to warn you that selecting the entire list might take awhile. In our case, it will not take too long because there are only a dozen or so applications in the list.
|
|
9
|
Click OK in the warning dialog box. All of the Plus signs change to green check marks, and the applications that are added to the Application Group field are on the right.
|
|
10
|
|
11
|
|
12
|
Click Accept to save the object with the selected schedule.
|
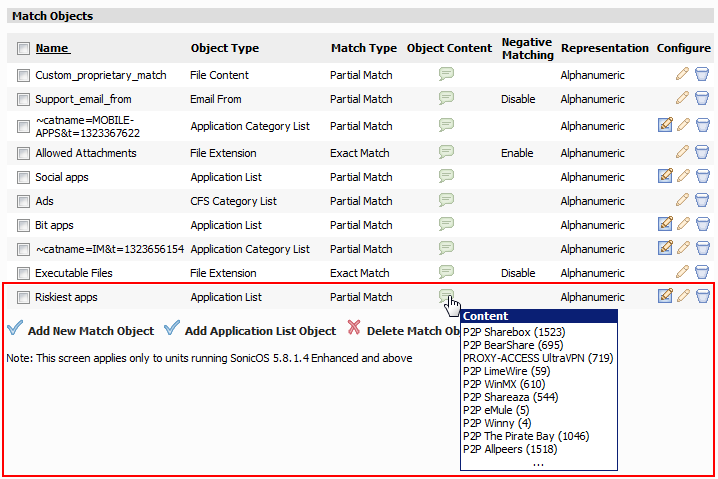
The new object is listed on the Firewall > Match Objects page.
|
1
|
|
2
|
In the App Control Policies Settings window, type a descriptive name such as “Block Risky Apps” into the Policy Name field.
|
|
3
|
|
4
|
|
5
|
|
6
|
|
7
|
|
8
|
For Users/Groups, select All from the pull-down list under Included and select None in the Excluded pull-down list.
|
|
9
|
|
10
|
Optionally select Enable Flow Reporting to enable internal and external flow reporting based on data flows, connection related flows, non-connection related flows regarding applications, viruses, spyware, intrusions, and other information.
|
|
11
|
Select Enable Logging. This causes the policy to create a log entry when a match is found.
|
|
12
|
Optionally, to record more details in the log, select Log individual object content.
|
|
13
|
Select Log using App Control message format. This changes logging to display the category in the log entry as “Application Control,” and to use a prefix such as “Application Control Detection Alert” in the log message. This is useful if you want to use log filters to search for Application Control alerts.
|
|
14
|
For Log Redundancy Filter, select Global Settings. This uses the global value set on the Firewall > App Rules page. Alternatively, you can enter a number of seconds to delay between each log entry for this policy. The local setting overrides the global setting only for this policy; other policies are not affected.
|
|
15
|
|
16
|
|
17
|
|
18
|
Click Accept to save the policy with the selected schedule.
|
The new policy is listed on the Firewall > App Rules page.