App Control can be very effective for certain types of email control, especially when a blanket policy is desired. For example, you can prevent sending attachments of a given type, such as .exe, on a per-user basis, or for an entire domain. However, because the file name extension is being matched in this case, changing the extension before sending the attachment bypasses filtering. Note that you can also prevent attachments in this way on your email server if you have one. If not, then App Control provides the functionality.
|
1
|
|
2
|
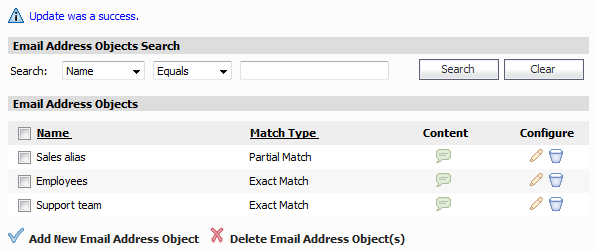
In the Email Address Object page, type a descriptive name for the object into the Email Address Object Name field, such as “Support team.”
|
|
3
|
Select Exact Match from the Match Type pull-down list. For an exact match, you must provide both the username and the domain parts of the email addresses to include in the object.
|
|
4
|
In the Content field, type in the first email address or alias used by the Support team, then click Add. The address is copied into the List box.
|
|
5
|
If more than one email address is used by the Support team, repeat Step 4 until all desired email addresses are included in the List box.
|
|
6
|
|
7
|
To view all the options for Schedule, click the arrow to its right.
|
|
8
|
For this example, select Immediate to create the object immediately.
|
|
9
|
Click Accept to save the email address object with the selected schedule.
|
The new object is listed on the Firewall > Email Address Objects page.
Next, create a match object that matches file names with extensions such as .exe, indicating that they are executable:
|
1
|
|
2
|
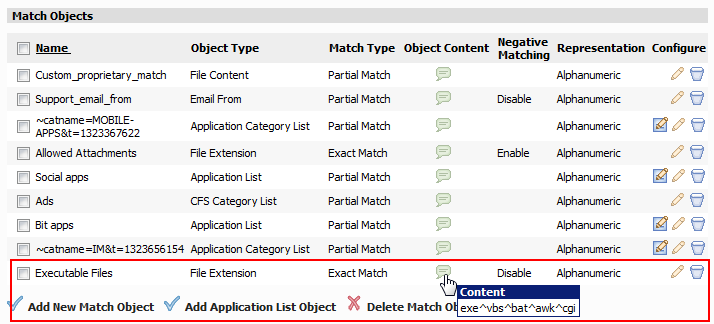
In the Match Object Settings window, in the Object Name text box, type a descriptive name for the object, such as “Executable Files.”
|
|
3
|
|
4
|
The Match Type field is set to Exact Match; there are no other choices in this case.
|
|
5
|
|
6
|
Leave Enable Negative Matching cleared.
|
|
7
|
In the Content text box, type the executable file name extensions to match, and then click Add after each one. For this case, we add exe, vbs, bat, awk, and cgi, The extensions appear in the List text box.
|
|
8
|
|
9
|
|
10
|
Click Accept to save the match object with the selected schedule.
|
The new object is listed on the Firewall > Match Objects page.
Now we need to create an action object that blocks the email when executable attachments are found. We could use the predefined Block SMTP E-Mail Without Reply action, but we will create a custom action object that provides an explanation of why the attachment was blocked. However, it would be more secure to use the predefined action in most situations.
|
1
|
|
2
|
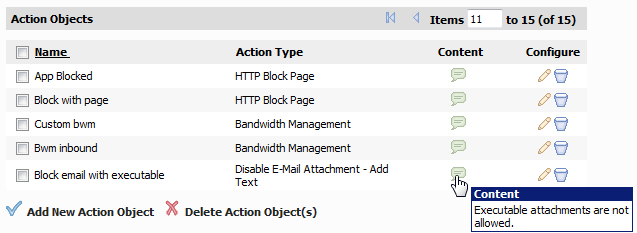
In the Action Object Settings window, in the Action Name text box, type a descriptive name for the object, such as “Block email with executable.”
|
|
3
|
|
4
|
In the Content text box, type the explanation that you want users to see, such as “Executable attachments are not allowed.”
|
|
5
|
|
6
|
|
7
|
Click Accept to save the action object with the selected schedule.
|
The new object is listed on the Firewall > Action Objects page.
|
1
|
|
2
|
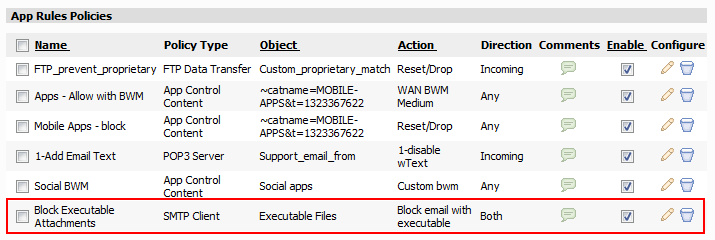
In the App Control Policies Settings window, type a descriptive name such as “Block Executable Attachments” into the Policy Name field.
|
|
3
|
|
4
|
|
5
|
The Service pull-down lists do not provide a choice of service. The Source is Any, and the Destination is SMTP (send E-Mail).
|
|
6
|
|
7
|
|
8
|
|
9
|
For Users/Groups, select All from the pull-down list under Included and select None in the Excluded pull-down list.
|
|
10
|
For MAIL FROM, select Any from the pull-down list under Included and select the Support team email address object in the Excluded pull-down list. The Support team email addresses are not affected by the policy.
|
|
11
|
For RCPT TO, select Any from the pull-down list under Included and select None in the Excluded pull-down list.
|
|
12
|
|
13
|
Leave Enable Flow Reporting cleared.
|
|
14
|
|
15
|
To record more details in the log, select Log individual object content.
|
|
16
|
For Log Redundancy Filter, select Use Global Settings to use the global value set on the Firewall > App Rules page.
|
|
17
|
|
18
|
|
19
|
|
20
|
|
21
|
Click Accept to save the policy with the selected schedule.
|
The new policy is listed on the Firewall > App Rules page.