Policy Configuration : Understanding the Network Access Rules Hierarchy

Configuring SSL Control
SonicWALL appliances running SonicOS Enhanced 4.0 and higher allow SSL Control, a system for providing visibility into the handshake of SSL sessions, and a method for constructing policies to control the establishment of SSL connections. SSL (Secure Sockets Layer) is the dominant standard for the encryption of TCP based network communications, with its most common and well-known application being HTTPS (HTTP over SSL). SSL provides digital certificate-based endpoint identification, and cryptographic and digest-based confidentiality to network communications.
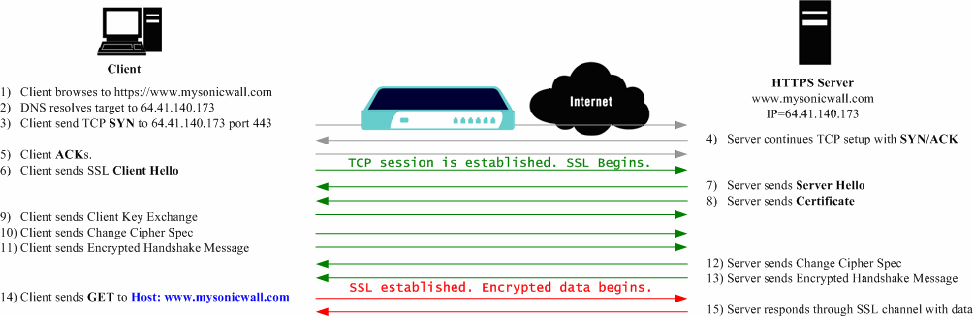
An effect of the security provided by SSL is the obscuration of all payload, including the URL (Uniform Resource Locator, for example, https://www.mysonicwall.com) being requested by a client when establishing an HTTPS session. This is because of the fact that HTTP is transported within the encrypted SSL when using HTTPS. It is not until the SSL session is established (step 14) that the actual target resource (www.mysonicwall.com) is requested by the client, but because the SSL session is already established, no inspection of the session data by the SonicWALL firewall appliance or any other intermediate device is possible. As a result, URL based content filtering systems cannot consider the request to determine permissibility in any way other than by IP address.
While IP address based filtering does not work well for unencrypted HTTP because of the efficiency and popularity of Host-header based virtual hosting (defined in Key Concepts below), IP filtering can work effectively for HTTPS because of the rarity of Host-header based HTTPS sites. But this trust relies on the integrity of the HTTPS server operator, and assumes that SSL is not being used for deceptive purposes.
For the most part, SSL is employed legitimately, being used to secure sensitive communications, such as online shopping or banking, or any session where there is an exchange of personal or valuable information. The ever decreasing cost and complexity of SSL, however, has also spurred the growth of more dubious applications of SSL, designed primarily for the purposes of obfuscation or concealment rather than security.
An increasingly common camouflage is the use of SSL encrypted Web-based proxy servers for the purpose of hiding browsing details, and bypassing content filters. While it is simple to block well known HTTPS proxy services of this sort by their IP address, it is virtually impossible to block the thousands of privately-hosted proxy servers that are readily available through a simple Web-search. The challenge is not the ever-increasing number of such services, but rather their unpredictable nature. Because these services are often hosted on home networks using dynamically addressed DSL and cable modem connections, the targets are constantly moving. Trying to block an unknown SSL target would require blocking all SSL traffic, which is practically infeasible.
SSL Control provides a number of methods to address this challenge by arming the security administrator with the ability to dissect and apply policy based controls to SSL session establishment. While the current implementation does not decode the SSL application data, it does allow for gateway-based identification and disallowance of suspicious SSL traffic.
For more information about SSL Control, see the SonicOS Enhanced 4.0 Administrator’s Guide.
To configure SSL Control, complete the following steps:
1
2
Expand the Firewall tree and click SSL Control. The SSL Control page displays.
 
3
Under General Settings, select Enable SSL Control to enable SSL Control for the selected group or appliance.
4
Log the event—If an SSL policy violation, as defined within the Configuration section below, is detected, the event is logged, but the SSL connection is allowed to continue.
Block the connection and log the event—In the event of a policy violation, the connection is blocked and the event is logged.
5
Enable Blacklist—Controls detection of the entries in the blacklist, as configured in the Custom Lists section below.
Enable Whitelist—Controls detection of the entries in the whitelist, as configured in the Custom Lists section below. Whitelisted entries take precedence over all other SSL control settings.
Detect Expired Certificates—Controls detection of certificates whose start date is before the current system time, or whose end date is beyond the current system time. Date validation depends on the SonicWALL’s System Time. Make sure your System Time is set correctly, preferably synchronized with NTP, on the System > Time page.
Detect SSLv2—Controls detection of SSLv2 exchanges. SSLv2 is known to be susceptible to cipher downgrade attacks because it does not do integrity checking on the handshake. Best practices recommend using SSLv3 or TLS instead of SSLv2.
Detect Self-Signed Certificates—Controls the detection of certificates where both the issuer and the subject have the same common name.
Detect Certificate signed by an Untrusted CA—Controls the detection of certificates where the issuer’s certificate is not in the SonicWALL’s System > Certificates trusted store.
Detect Weak Ciphers(< 64bits)—Controls the detection of SSL sessions negotiated with symmetric ciphers less than 64 bits, commonly indicating export cipher usage.
6
a
To add an entry to the Blacklist, type it into the Black List field and then click Add.
b
To add an entry to the Whitelist, type it into the White List field and then click Add.
7
When finished, click Update. To return to default values and start over, click Reset.