IPv6 is supported for Access Rules. Search for IPv6 Access Rules in the Access Rules Search section. A list of results displays in a table.
From there you can click the Configure icon for the Access Rule you want to edit. The IPv6 configuration for Access Rules is almost identical to IPv4.
|
2
|
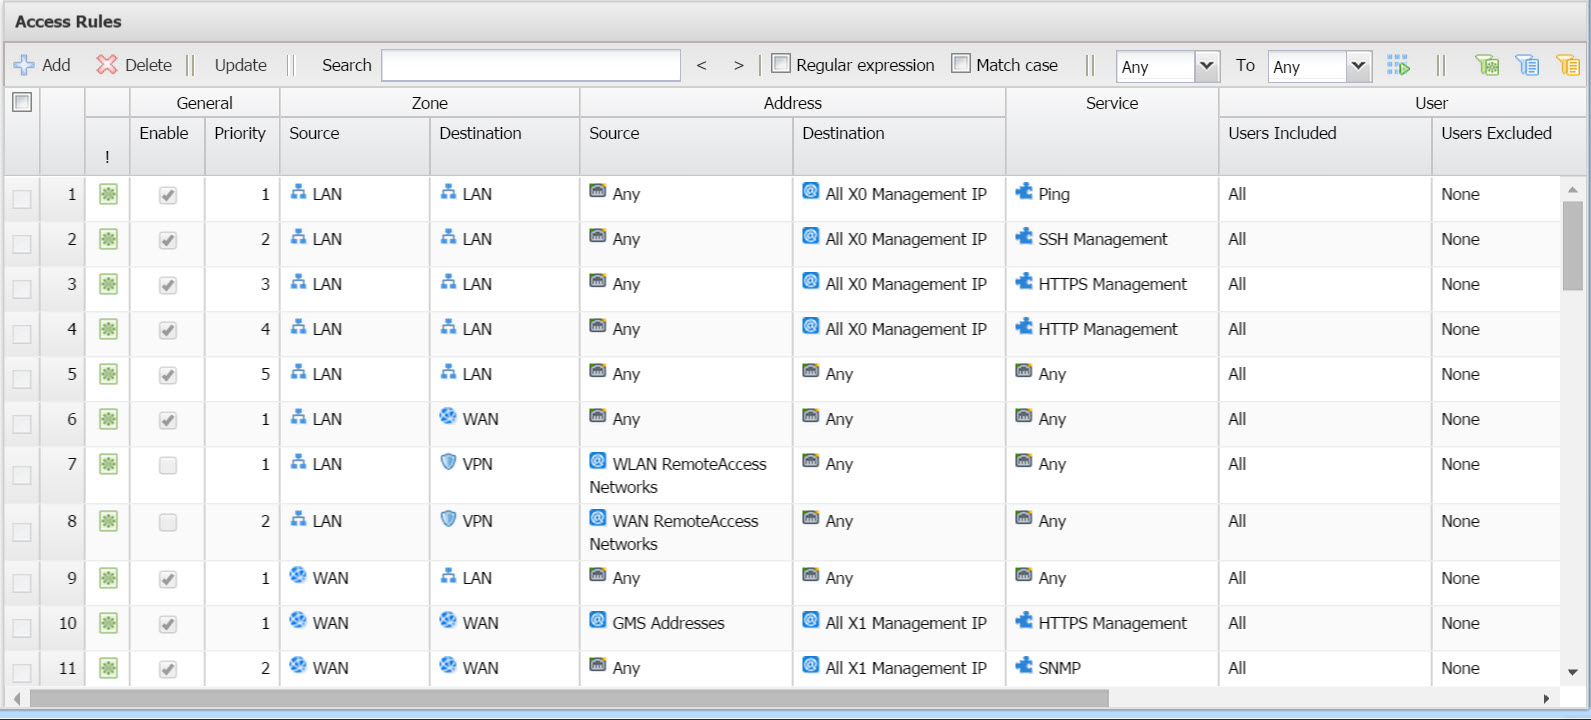
Expand the Firewall tree and click Access Rules. The Access Rules page displays. The Firewall > Access Rules page enables you to select multiple views of Access Rules.
|
|
3
|
From the Access Rules View, click the Edit icon (
|
|
5
|
Click the Action tab.
|
|
7
|
Click the Zone tab.
|
|
8
|
|
9
|
Click the Service tab.
|
|
10
|
Select a service object from the from the Service list box. If the service does not exist, refer to Configuring Service Objects .
|
|
11
|
Click the Address tab.
|
|
12
|
Select the source network Address Object from the Source list box.
|
|
13
|
Select the destination network Address Object from the Destination list box.
|
|
14
|
Click the User tab.
|
|
15
|
Specify if this rule applies to all users or to an individual user or group in the Users Included list box.
|
|
16
|
Click the Schedule tab.
|
|
17
|
Specify when the rule will be applied by selecting a schedule or Schedule Group from the Schedule list box. If the rule is always applied, select Always on. If the schedule does not exist, refer to Configuring Schedules .
|
|
18
|
Click the Action tab.
|
|
19
|
To enable logging for this rule, select Enable Logging.
|
|
20
|
Check Allow Fragmented Packets to allow fragmented packets.
|
|
21
|
Check Enable flow reporting to allow flow reporting.
|
|
22
|
Check Enable packet monitor to allow packets to be monitored.
|
|
23
|
(optional) Click Enable Management. If this option is enabled, both management and non-management traffic is allowed.
|
|
24
|
Add any comments to the Comment field.
|
|
25
|
Click the Advanced tab.
|
|
26
|
Specify how long (in minutes) TCP connections might remain idle before the connection is terminated in the TCP Connectivity Inactivity Timeout field.
|
|
27
|
Specify how long (in seconds) UDP connections might remain idle before the connection is terminated in the UDP Connectivity Inactivity Timeout field.
|
|
28
|
Specify the percentage of the maximum connections this rule is to allow in the Number of connections allowed (% of maximum connections) field.
|
|
29
|
Set a limit for the maximum number of connections allowed per source IP Address by selecting Enable connection limit for each Source IP Address and entering the value in the Threshold field.(Only available for Allow rules).
|
|
30
|
Click the QoS tab. For information on configuring the QoS tab, refer to Configuring Quality of Service Mapping .
|
|
31
|
Click the Bandwidth tab. The Bandwidth page displays.
|
|
33
|
To enable outbound bandwidth management for this service, select Enable Outbound Bandwidth Management.
|
|
a
|
Enter the amount of bandwidth that is always available to this service in the Guaranteed Bandwidth field, and select either % or Kbps in the pull-down list. Keep in mind that this bandwidth is permanently assigned to this service and not available to other services, regardless of the amount of bandwidth this service does or does not use.
|
|
b
|
Enter the maximum amount of bandwidth that is available to this service in the Maximum Bandwidth field.
|
|
c
|
Select the priority of this service from the Bandwidth Priority list box. Select a priority from 0 (highest) to 7 (lowest).
|
|
34
|
To enable inbound bandwidth management for this service, select Enable Inbound Bandwidth Management.
|
|
a
|
Enter the amount of bandwidth that is always available to this service in the Guaranteed Bandwidth field, and select either % or Kbps in the pull-down list. Keep in mind that this bandwidth is permanently assigned to this service and not available to other services, regardless of the amount of bandwidth this service does or does not use.
|
|
b
|
Enter the maximum amount of bandwidth that is available to this service in the Maximum Bandwidth field.
|
|
c
|
Select the priority of this service from the Bandwidth Priority list box. Select a priority from 0 (highest) to 7 (lowest).
|
|
35
|
To track bandwidth usage for this service, select Enable Tracking Bandwidth Usage.
|
|
36
|
To add this rule to the rule list, click OK. You are returned to the Access Rules page.
|
|
37
|
If the network access rules have been modified or deleted, you can restore the Default Rules. The Default Rules prevent malicious intrusions and attacks, block all inbound IP traffic and allow all outbound IP traffic. To restore the network access rules to their default settings, click Restore Rules to Defaults and then click Update. A task is scheduled to update the rules page for each selected SonicWALL appliance.
|
|
38
|
To modify a rule, click its Edit icon (
|
|
39
|
To enable logging for a rule, select Logging.
|