The Firewall > Match Objects page also contains Add Application List Object that opens the Add Application List Object screen. This screen provides another interface for creating an application list object and an application category list object, both of which are specific types of match objects.
|
•
|
Application – You can create an application list object on this tab. This screen allows selection of the application category, threat level, and type of technology. After selections are made, the list of applications matching those criteria is displayed, and you can select one or more for the object.
|
|
•
|
Category – You can create a category list object on this tab. A list of application categories and their descriptions are provided.
|
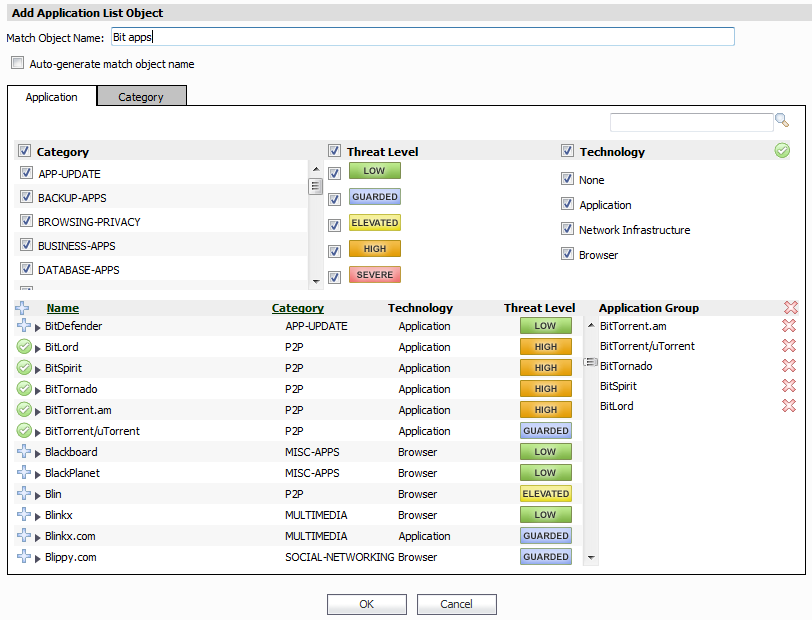
The Application tab provides a list of applications for selection. Each application includes one or more signatures. You can control which applications are displayed by selecting one or more application categories, threat levels, and technologies. To select all application categories, threat levels, and technologies, click the green check mark below the Search button near the top right of the display.
To search for a keyword in all application names and signatures, type it into the Search field and click Search. For example, type “bittorrent” into the Search field and click Search to find multiple applications with “bittorrent” (not case-sensitive) in the application name or in the name of a signature under the application. To display the signatures included by an application, click the arrow next to the application name to expand the details for it.
|
1
|
On the Firewall > Match Objects page, click Add Application List Object. The Add Application List Object screen displays.
|
|
2
|
On the Application tab, to name this object, clear Auto-generate match object name and then type a name for the object in the Match Object Name field. To use automatic naming, leave the field blank and leave Auto-generate match object name selected.
|
|
3
|
Clear specific category check boxes or clear Category to clear all category check boxes, then select the check boxes for the desired categories. Use the scroll bar in this section to view the entire category list. The list of applications in the lower panel changes as you clear and select categories.
|
|
4
|
Clear specific threat level check boxes or clear Threat Level to clear all threat level check boxes, then select the check boxes for the desired threat levels. The list of applications in the lower panel changes as you clear and select threat levels.
|
|
5
|
Clear specific technology check boxes or clear Technology to clear all technology check boxes, then select the check boxes for the desired technologies. The list of applications in the lower panel changes as you clear and select technologies.
|
|
6
|
|
7
|
|
8
|
A description is automatically added in the Description field. Optionally change the description.
|
|
9
|
For Schedule, select one of the following radio buttons and set any associated fields:
|
|
•
|
Default – Use the default schedule configured for the Agent that manages this unit
|
|
•
|
Immediate – Create the object immediately
|
|
•
|
At – Select the exact time to activate this object using the pull-down lists for the hour, minute, time zone, month, and year. If your GMS deployment includes Agents in different time zones, you can select among them in the time zone pull-down list. Select the date from the calendar.
|
|
10
|
Click Accept to save the match object with this schedule. Click Cancel to exit without saving the match object.
|
You will see the object name listed on the Firewall > Match Objects page with an object type of Application List. This object can then be selected when creating an App Rules policy.
Match Objects created using the Auto-generate match object name option display a tilde (~) as the first character of the object name.
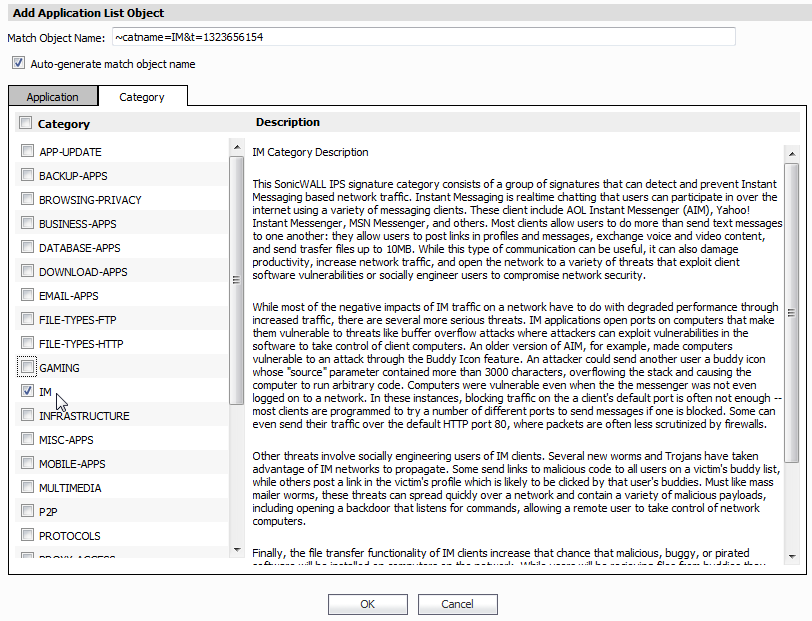
The Category tab provides a list of application categories for selection. You can select any combination of categories and then save your selections as an application category list object with a custom or automatic name.
|
1
|
On the Firewall > Match Objects page, click Add Application List Object. The Add Application List Object screen displays.
|
|
2
|
Click the Category tab.
|
|
3
|
To name this object, clear Auto-generate match object name and then type a name for the object in the Match Object Name field. To use automatic naming, leave the field blank and leave Auto-generate match object name selected.
|
|
4
|
Clear specific category check boxes or clear Category to clear all category check boxes, then select the check boxes for the desired categories. Use the scrollbar in this section to view the entire category list.
|
|
5
|
|
6
|
A description is automatically added in the Description field. Optionally change the description.
|
|
7
|
For Schedule, select one of the following radio buttons and set any associated fields:
|
|
•
|
Default – Use the default schedule configured for the Agent that manages this unit
|
|
•
|
Immediate – Create the object immediately
|
|
•
|
At – Select the exact time to activate this object using the pull-down lists for the hour, minute, time zone, month, and year. If your GMS deployment includes Agents in different time zones, you can select among them in the time zone pull-down list. Select the date from the calendar.
|
|
8
|
Click Accept to save the match object with this schedule. Click Cancel to exit without saving the match object.
|
You will see the object name listed on the Firewall > Match Objects page with an object type of Application Category List. This object can then be selected when creating an App Rules policy.
Match Objects created using the Auto-generate match object name option display a tilde (~) as the first character of the object name.