Application layer bandwidth management (BWM) allows you to create policies that regulate bandwidth consumption by specific file types within a protocol, while allowing other file types to use unlimited bandwidth. This enables you to distinguish between desirable and undesirable traffic within the same protocol. Application layer bandwidth management is supported for all Application matches, as well as custom App Rules policies using HTTP client, HTTP Server, Custom, and FTP file transfer types. For details about policy types, see Policy Types .
If the Bandwidth Management Type on the Firewall > BWM page is set to Global, application layer bandwidth management functionality is supported with eight predefined, default BWM priority levels, available for selection on the Firewall > Action Objects page. There is also a customizable Bandwidth Management type action, available when adding a new action object.
All application bandwidth management is tied in with global bandwidth management, which is configured on the Firewall > BWM page. Two types of bandwidth management are available: WAN and Global. The None option allows you to specify no bandwidth management. When the type is set to WAN, bandwidth management is allowed only on interfaces in the WAN zone. With a type of Global, interfaces in all zones can be configured with bandwidth management. All App Control screens that offer an option for bandwidth management provide a link to the Firewall > BWM page so that you can easily configure global bandwidth management settings for the type and configure the guaranteed and maximum percentages allowed for each priority level.
The Firewall > BWM page is shown in the following figure.
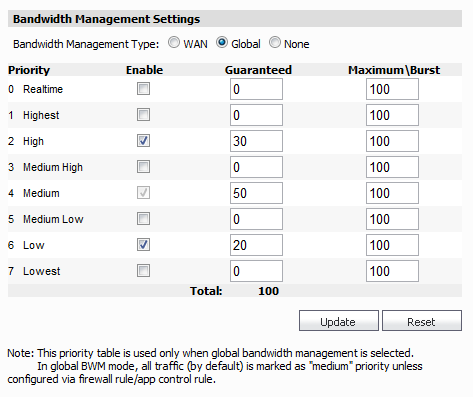
Changing the Bandwidth Management Type on the Firewall > BWM page between WAN and Global causes BWM to be disabled in all Firewall Access Rules, while default BWM action objects in App Rules policies convert accordingly to correspond to the new bandwidth management type.
When you change the Bandwidth Management Type from Global to WAN, the default BWM actions that are in use in any App Rules policies are automatically converted to WAN BWM Medium, no matter what level they were set to before the change.
When you change the Type from WAN to Global, the default BWM actions are converted to BWM Global-Medium. The firewall does not store your previous action priority levels when you switch the Type back and forth. You can view the conversions on the Firewall > App Rules page.
Custom bandwidth management actions behave differently than the default BWM actions. Custom BWM actions are configured by adding a new action object from the Firewall > Action Objects page and selecting the Bandwidth Management action type. Custom bandwidth management actions and policies using them retain their priority level setting when the Bandwidth Management Type is changed from Global to WAN, and from WAN to Global.
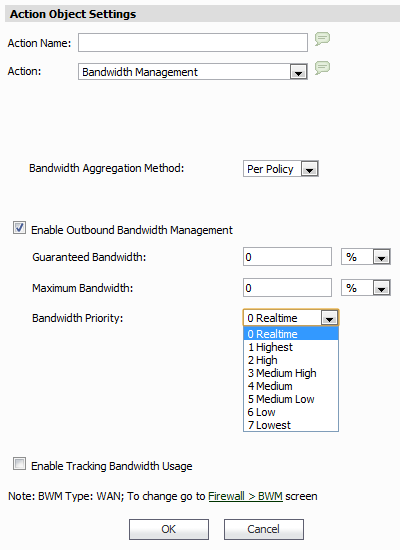
When the Bandwidth Management Type is set to Global, the Add/Edit Action Object screen provides the Bandwidth Priority option, but uses the values that are specified in the Priority table on the Firewall > BWM page for Guaranteed Bandwidth and Maximum Bandwidth. The Per Action or Per Policy Bandwidth Aggregation Method options are not available for Action Objects when Bandwidth Management Type is set to Global.
When the Bandwidth Management Type is set to WAN, the Add/Edit Action Object screen provides Per Action or Per Policy Bandwidth Aggregation Method options and you can specify values for Guaranteed Bandwidth, Maximum Bandwidth, and Bandwidth Priority.
When configuring a Bandwidth Management action, you can select either Per Action or Per Policy. Per Policy means that when you create a limit of 10Mbps in an Action Object, and three different policies use the Action Object, then each policy can consume up to 10Mbps of bandwidth. Per Action means that the three policies combined can only use 10Mbps.
When using Per Action, multiple policies are subject to a single aggregate bandwidth management setting when they share the same action. For example, consider the following two App Rules policies:
|
•
|
Using the Per Action aggregation method, the downloads of executable files and traffic from P2P applications combined cannot exceed 500Kbit/sec.
|
|
•
|
Using the Per Policy bandwidth aggregation method, a bandwidth of 500Kbit/sec is allowed for executable file downloads while concurrent P2P traffic is also allowed a bandwidth of 500Kbit/sec.
|
Application layer bandwidth management configuration is handled in the same way as the Ethernet bandwidth management configuration associated with Firewall > Access Rules. Both are tied in with the global bandwidth management settings. However, with App Control you can specify all content type, which you cannot do with access rules.
When the Bandwidth Management Type on the Firewall > BWM page is set to WAN, bandwidth management policies defined with Firewall > Access Rules always have priority over application layer bandwidth management policies. Thus, if an access rule bandwidth management policy is applied to a certain connection, then an application layer bandwidth management policy are never applied to that connection.
When the Bandwidth Management Type is set to Global, the reverse is true, giving App Control bandwidth management policies priority over Firewall Access Rule bandwidth management policies.
To use application layer bandwidth management, you must first enable bandwidth management on the interface that will handle the traffic. After enabled, you can select Bandwidth Management in the Action pull-down list when creating an action object.
If the global bandwidth management settings have the Bandwidth Management Type set to WAN on the Firewall > BWM page, then only interfaces in WAN zones can have assigned guaranteed and maximum bandwidth settings and have prioritized traffic. If the Bandwidth Management Type is set to Global, then all zones can have assigned guaranteed and maximum bandwidth settings and have prioritized traffic.
|
2
|
|
3
|
|
4
|
In the Edit Interface window, click the Advanced tab.
|
|
•
|
|
•
|
|
6
|
Click OK.
|
After bandwidth management is enabled on the interface, you can configure Bandwidth Management for an action object in App Control.
To configure Bandwidth Management in an action object:
|
2
|
|
3
|
To edit an existing action object, click the pencil icon
|
|
4
|
In the Action Name field, type a descriptive name for the action.
|
If the Bandwidth Management Type is set to WAN on the Firewall > BWM page, the screen displays the following options that are not displayed if Bandwidth Management Type is set to Global:
When the BWM type is Global, the global values for these options are used for the action. In case of a BWM type of WAN, the configuration of these options is included in the following steps.
|
5
|
In the Bandwidth Aggregation Method pull-down list, select one of the following:
|
|
•
|
Per Policy – When multiple policies are using the same Bandwidth Management action, each policy can consume up to the configured bandwidth even when the policies are active at the same time.
|
|
•
|
Per Action – When multiple policies are using the same Bandwidth Management action, the total bandwidth is limited as configured for all policies combined if they are active at the same time.
|
|
6
|
To manage outbound bandwidth, select Enable Outbound Bandwidth Management.
|
|
7
|
To specify the Guaranteed Bandwidth, optionally enter a value either as a percentage or as kilobits per second. In the pull-down list, select either % or Kbps.
|
If you plan to use this custom action for rate limiting rather than guaranteeing bandwidth, you do not need to change the Guaranteed Bandwidth field.
|
8
|
To specify the Maximum Bandwidth, optionally enter a value either as a percentage or as kilobits per second. In the pull-down list, select either % or Kbps.
|
If you plan to use this custom action for guaranteeing bandwidth rather than rate limiting, you do not need to change the Maximum Bandwidth field.
|
9
|
For Bandwidth Priority, select a priority level from the pull-down list, where 0 is the highest and 7 is the lowest.
|
|
10
|
Optionally select Enable Tracking Bandwidth Usage to track the usage. When bandwidth usage tracking is enabled, you can view the usage in the Action Properties tooltip by mousing over the Action of a policy on the Firewall > App Rules page.
|
|
11
|
|
12
|
A description is automatically added in the Description field. Optionally change the description.
|
|
13
|
For Schedule, select one of the following radio buttons and set any associated fields:
|
|
•
|
Default – Use the default schedule configured for the Agent that manages this unit
|
|
•
|
Immediate – Activate the configuration immediately
|
|
•
|
At – Select the exact time to activate this configuration using the pull-down lists for the hour, minute, time zone, month, and year. If your GMS deployment includes Agents in different time zones, you can select among them in the time zone pull-down list. Select the date from the calendar.
|
|
14
|
Click Accept to configure bandwidth settings with this schedule. Click Cancel to exit without saving the action object.
|
You can see the resulting action in the Action Objects screen.