|
1
|
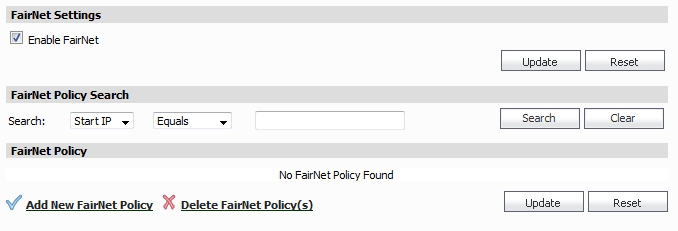
Navigate to the SonicPoint > FairNet page.
|
|
2
|
Select Enable FairNet.
|
|
3
|
Click Update at the left of the page.
|
|
4
|
Click Add New FairNet Policy to add a SonicPoint FairNet policy for an IP address or range of addresses. The Add FairNet Policy window displays.
|
|
5
|
By default the Enable Policy option is checked. Disable this check box to disable the FairNet policy.
|
|
6
|
In the Direction pull-down menu, select whether the bandwidth limits for the policy applies to clients uploading content, downloading content, or both directions:
|
|
7
|
|
8
|
In the Min Rate(kbps) field, enter the minimum bandwidth that clients are guaranteed.
|
|
9
|
In the Max Rate(kbps) field, enter the maximum bandwidth that clients are allowed.
|
|
10
|
In the Interface pull-down menu, select the WLAN interface that corresponds to the IP address range you configured. The menu lists all interfaces configured for the WLAN zone, except for W0.
|
|
11
|
Click OK.
|
|
1
|
|
2
|
Select whether to search for the Start IP in the policy (the first IP address in the IP address range) or the End IP.
|
|
3
|
|
5
|