The Date Selector allows you to generate a report for only a specific date and time range. Use the right and left quick-link arrows to move backward and forward in time, a day at a time. Clicking the time field on the Date Selector brings up a pull-down menu that allows you to customize your time and date ranges.
By default, summary reports display only information for a single date. However, by using the Time Selector pull-down menu, you can fine-tune the time, date, or range of times and dates you want to see. Over-time reports display information over a date range.
The Time Selector allows you to specify any time or date interval desired, whether by day, or in hour/minute intervals. To select a single date for a report, either use the Date Selector bar and the left and right arrows to page through reports by date, or click on the displayed date field in the Time Selector to display the pull-down schedule menu.
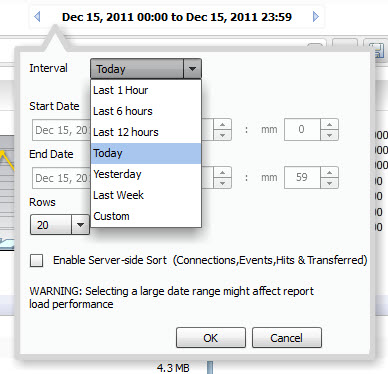
In the pull-down schedule menu, you can specify a recent time snapshot, or click on Custom to select the starting and ending dates and times. The Custom option allows you to select a specific time and date or range from the Interval menu.
|
1
|
|
3
|
The Interval menu also lets you set how many lines of information appears in the graph view. Click the date, and when the Interval pull-down appears, specify the number of rows. Select 5, 10, 20, 50, or 100 from the Rows pull-down list to limit the display to a the specified number of lines, for easier viewing.
|
|
4
|
Click OK to generate the report.
|