Reporting : GMS Reporting Overview

Adding Filters
Filters can be added in two ways, either explicitly through the Filter Bar, or implicitly by clicking on the hyperlinks in the grid sections of a displayed report. As hyperlinks are clicked, those link criteria are added to the Filter bar as if it was added explicitly. Refer to Adding Filters Implicitly for more information.
Use the Filter Bar to add pre-defined filters from a pull-down menu and to specify parameters for those filters. Filter values will be matched in the database during report generation.
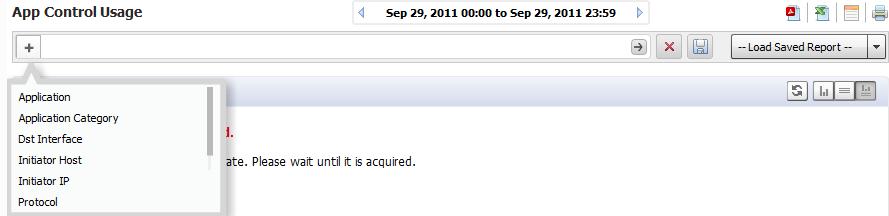
Click Add Filter (+) on the left to display a pull-down menu that can then be used to fine-tune the report data by selecting categories.
Filters can also be added by right-clicking on a column entry and selecting the Filter option from the pull-down menu.
Filter criteria are context-dependant, meaning that Dell SonicWALL GMS finds the specific filter operators applicable to the entry. Many filter operators are used in connection with a text string or numeric filter input value that determines what data to include in the report. This control uses auto-complete to suggest a set of candidate values, or you can manually enter a different value. Manually-entered values should be checked for blanks, illegal characters, and so on.
Operators are specified by clicking on the default operator to bring up the pull-down menu of available operators.
Depending on the selected field type, text string or numeric, several filter operators are available. The filter operators are used with a filter input value to restrict the information displayed in the Detail report.
The operators are defined in the table that follows:
 
Table 50. Operators
You can also use wild-cards (*) in filters to match anything. For instance, you might want to match a user name. You would select LIKE as the operator, and use * in connection with a string. For example, “joh*” would match all users starting with “joh” such as John, Johnny, Johan, and so on.
Using the Filter Bar
Use the Filter Bar to manually (explicitly) add filters.
1
2
Click Go (right-hand arrow) to add a filter Each filter must be applied by clicking on Go before you can select and apply the next filter. The filter bar shows all filters added, whether added from the menu bar or pull-down menu.
As filters are added, items that have been filtered out disappear from the listings, reappearing only when the associated filter, or all filters, are removed.
3
To remove a filter, click the + (plus) next to the filter in the menu bar and click Go (right arrow). To clear all filters, click the Clear Filter (x) next to the filter fields.
Adding Filters Implicitly
Dell SonicWALL GMS also allows adding filters directly to a drillable (hypertext-linked) column to create a “criteria control,” where you can set a value for the filter. Adding a filter to a column allows you to restrict the display to view only the data related to the entry of interest.
In second-level reports with multiple subsections, filters can be added simply by clicking on the hyperlinked data in the report section.
1
Because the filter is context-sensitive, it might suggest a set of candidate values, or you can manually enter a different value. A new filter is automatically added to the filter bar, and the report is updated accordingly.
After added, the filter is added to the filter area of the Search Bar and no longer appears in the pull-down list. The report displays only results restricted by that filter.
2
To remove the filter, click the x next to that filter, or clear all filters by clicking the red X to the right of the field.
Saving/Viewing a Filtered Report
The Save Report pop-up menu allows you to save the currently-displayed report with a specified name of no more than 20 characters. You can also overwrite an already-saved report with the current report or overwrite the report to show a new date range.
Saved reports, even if created for a specific unit, are available for all units of that appliance type. For example, if a report for the X1 interface was created for a specific unit, this report is available from any unit: there is no need to create a X1 report for different units.
1
2
3
To view a saved Custom Report, click Custom Reports to bring up a menu that contains a list of all saved Custom reports available for viewing. Selecting a Custom Report from this pull-down loads data for the selected report into the Report Data Container.
4
You can also load a saved report from the Report tab on the middle bar menu. Click Custom Reports on the Reports tab and select the desired report to load it into the Data Container.
5