BGP transmits packets in the clear. Therefore for strong security, SonicWALL recommends configuring an IPsec tunnel to use for BGP sessions. The configurations of the IPsec tunnel and of BGP are independent of each other. The IPsec tunnel is configured completely within the VPN configuration section of the SonicOS GUI, while BGP is enabled on the Network > Routing page and then configured on the SonicOS Command Line Interface. When configuring BGP over IPsec, first configure the IPsec tunnel and verify connectivity over the tunnel before configuring BGP.
|
1
|
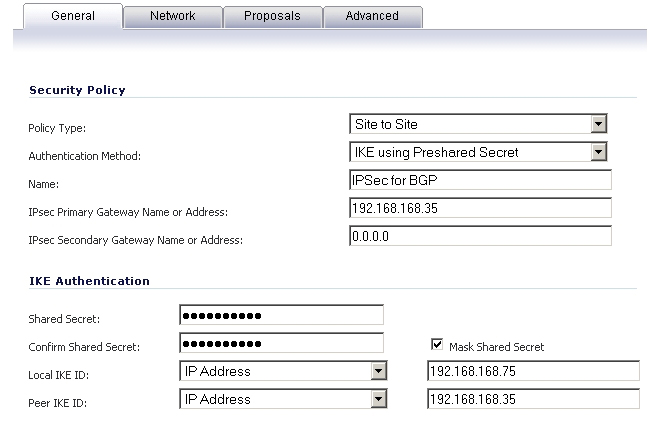
Navigate to the VPN > Settings page and click the Add button under the VPN Policies section. The VPN Policies dialog displays.
|
|
2
|
|
3
|
|
4
|
Enter a Name for the VPN policy.
|
|
5
|
In the IPsec Primary Gateway Name or Address field, enter the IP address of the remote peer (for this example it is 192.168.168.35).
|
|
6
|
In the IPsec Secondary Gateway Name or Address field, enter 0.0.0.0.
|
|
7
|
Enter a Shared Secret and confirm it.
|
|
8
|
In the Local IKE ID field, enter the IP address of the SonicWall (for this example it is 192.168.168.75)
|
|
9
|
In the Peer IKE ID field, enter the IP address of the remote peer (192.168.168.35).
|
|
10
|
Click on the Network tab.
|
|
11
|
|
12
|
For the remote network, select the remote peer’s IP address from the Choose destination network from list drop-down menu, which is 192.168.168.35 for this example. If the remote IP address is not listed, select Create new address object to create an address object for the IP address.
|
|
13
|
Click on the Proposals tab. You can either use the default IPsec proposals or customize them as you see fit.
|
|
14
|
Click on the Advanced tab.
|
|
15
|
Check the Enable Keep Alive check box.
|
|
16
|
Click OK.
|
The VPN policy is now configured on the SonicWALL appliance. Now complete the corresponding IPsec configuration on the remote peer. When that is complete, return to the VPN > Settings page and check the Enable check box for the VPN policy to initiate the IPsec tunnel.