SSL VPN access must be enabled on a zone before users can access the Virtual Office web portal. SSL VPN Access can be configured on the Network > Zones page by clicking the Configure icon for the zone.
|
NOTE: For SonicOS to terminate SSL VPN sessions, HTTPS for Management or User Login must be enabled on the Network > Interfaces page, in the Edit Interface dialog for the WAN interface.
|
|
1
|

|
2
|
|
3
|
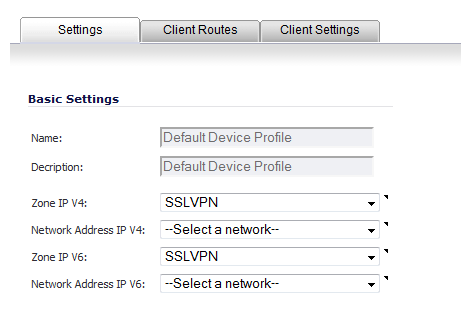
For the zone binding for this profile, on the Settings tab, select SSLVPN or a custom zone from the Zone IP V4 drop-down menu.
|
|
4
|
From the Network Address IP V4 drop-down menu, select the IPv4 NetExtender address object that you created. See Creating an Address Object for the NetExtender Range for instructions. This setting selects the IP Pool and zone binding for this profile. The NetExtender client gets the IP address from this address object if it matches this profile.
|
|
5
|
Select SSLVPN or a custom zone from the Zone IP V6 drop-down menu. This is the zone binding for this profile.
|
|
6
|
From the Network Address IP V6 drop-down menu, select the IPv6 NetExtender address object that you created.
|
|
7
|
Click the Client Routes tab to proceed with the client settings configuration. See Configuring the Client Routes Tab .
|
The Client Routes tab allows you to control the network access allowed for SSL VPN users. The NetExtender client routes are passed to all NetExtender clients and are used to govern which private networks and resources remote users can access via the SSL VPN connection.
The following tasks are configured on the Client Routes tab:
Select Enabled from the Tunnel All Mode drop-down list to force all traffic for NetExtender users over the SSL VPN NetExtender tunnel—including traffic destined for the remote user’s local network. This is accomplished by adding the following routes to the remote client’s route table:
|
1
|
|
2
|
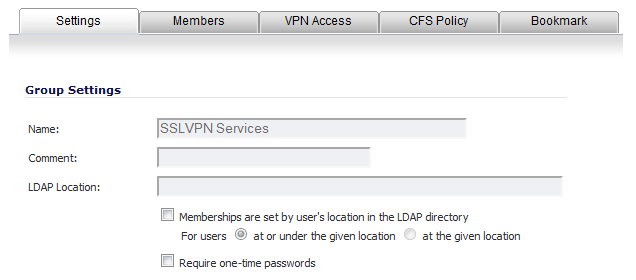
Click on the Configure button for an SSL VPN NetExtender user or group. The Edit Group dialog displays.
|
|
3
|
Click on the VPN Access tab.
|

|
4
|
Select the WAN RemoteAccess Networks address object.
|
|
5
|
Click the Right Arrow button.
|
|
6
|
Click OK.
|
|
1
|
|
2
|
|
3
|
Click the Client Routes tab.
|

|
4
|
From the Networks list, select the address object to which you want to allow SSL VPN access.
|
|
5
|
|
6
|
Creating client routes causes access rules allowing this access to be created automatically. Alternatively, you can manually configure access rules for the SSL VPN zone on the Firewall > Access Rules page. For more information, see Firewall > Access Rules .
|
NOTE: After configuring Client Routes for SSL VPN, you must also configure all SSL VPN NetExtender users and user groups to be able to access the Client Routes on the Users > Local Users or Users > Local Groups pages.
|
|
1
|
|
2
|
Click on the Configure button for an SSL VPN NetExtender user or group.
|
|
3
|
Click on the VPN Access tab.
|
|
5
|
Click the Right Arrow button.
|
|
6
|
Click OK.
|
NetExtender client settings are configured in the Edit Device Profile dialog.
|
1
|
|
2
|
|
3
|
Click the Client Settings tab.
|

|
4
|
In the DNS Server 1 field, either:
|
|
•
|
Click the Default DNS Settings to use the default settings for both the DNS Server 1 and DNS Server 2 fields. The fields are populated automatically.
|
|
5
|
(Optional) In the DNS Server 2 field, if you did not click Default DNS Settings, enter the IP address of the backup DNS server.
|
|
6
|
(Optional) In the DNS Search List field, type in the IP address for a DNS server
|
|
a
|
Click Add to add it to the list below.
|
|
7
|
(Optional) In the WINS Server 1 field, enter the IP address of the primary WINS server.
|
|
NOTE: Only IPv4 is supported.
|
|
8
|
(Optional) In the WINS Server 2 field, enter the IP address of the backup WINS server.
|
|
9
|
To customize the behavior of NetExtender when users connect and disconnect, select Enabled or Disabled for each of the following settings under NetExtender Client Settings. By default, all have been set to Disabled.
|
|
•
|
Enable Client Autoupdate - The NetExtender client checks for updates every time it is launched.
|
|
•
|
Exit Client After Disconnect - The NetExtender client exits when it becomes disconnected from the SSL VPN server. To reconnect, users have to either return to the SSL VPN portal or launch NetExtender from their Programs menu.
|
|
•
|
Uninstall Client After Exit - The NetExtender client uninstalls v when it becomes disconnected from the SSL VPN server. To reconnect, users have to return to the SSL VPN portal.
|
|
•
|
Create Client Connection Profile - The NetExtender client createa a connection profile recording the SSL VPN Server name, the Domain name, and optionally the username and password.
|
|
10
|
To provide flexibility in allowing users to cache their usernames and passwords in the NetExtender client, select one of these actions from the User Name & Password Caching field. These options enable you to balance security needs against ease of use for users.
|