|
1
|
|
2
|
|
3
|
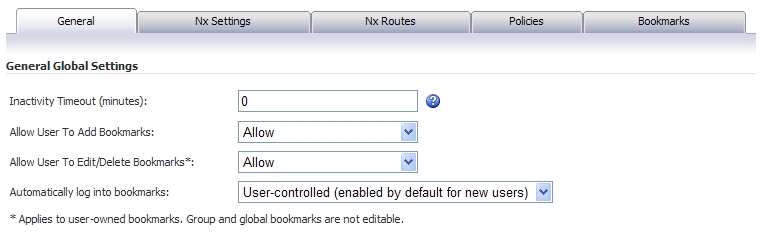
On the General tab, to set the inactivity timeout for all users or groups, meaning that users will be signed out of the Virtual Office after the specified time period, enter the number of minutes of inactivity to allow in the Inactivity Timeout field.
|
|
4
|
To allow users to add new bookmarks, select Allow from the Allow User to Add Bookmarks drop-down menu. To prevent users from adding new bookmarks, select Deny.
|
|
5
|
To allow users to edit or delete user-owned bookmarks, select Allow from the Allow User to Edit/Delete Bookmarks drop-down menu. To prevent users from editing or deleting user-owned bookmarks, select Deny.
|
|
6
|
In the Automatically log into bookmarks drop-down list, select one of the following options:
|
|
•
|
User-controlled (enabled by default for new users): Select this option to allow users to enable or disable single sign-on (SSO) automatic login for bookmarks. This setting enables automatic login by default for new users.
|
|
•
|
User-controlled (disabled by default for new users): Select this option to allow users to enable or disable single sign-on (SSO) automatic login for bookmarks. This setting disables automatic login by default for new users.
|
|
•
|
Enabled: Select this option to enable automatic login for bookmarks.
|
|
•
|
Disabled: Select this option to disable automatic login for bookmarks.
|
|
7
|
Click Accept to save the configuration changes.
|
|
8
|
Navigate to the Nx Settings tab.
|
|
9
|
To set a client address range, enter a beginning address in the Client Address Range Begin field and an ending address in the Client Address Range End field.
|
|
10
|
To set a client IPv6 address range, enter a beginning IPv6 address in the Client IPv6 Address Range Begin field and an ending IPv6 address in the Client IPv6 Address Range End field.
|
|
11
|
|
12
|
|
13
|
|
14
|
In the User Name & Password Caching drop-down list, select one of the following:
|
|
•
|
Allow saving of user name only - Allow caching of the user name on the client. Users will only need to enter their password when starting NetExtender.
|
|
•
|
Allow saving of user name & password - Allow caching of the user name and password on the client. Users will be automatically logged in when starting NetExtender, after the first login.
|
|
•
|
Prohibit saving of user name & password - Do not allow caching of the user name and password on the client. Users will be required to enter both user name and password when starting NetExtender.
|
|
15
|
Navigate to the Nx Routes tab.
|
|
16
|
In the Tunnel All Mode drop-down list, select Enabled to force all traffic for the user, including traffic destined to the remote user’s local network, over the SRA NetExtender tunnel. Tunnel All Mode is disabled by default.
|
|
17
|
To add a client route, click Add Client Route...
|
|
18
|
In the Add Client Route window, enter a destination network in the Destination Network field. For example, enter the IPv4 network address 10.202.0.0. For IPv6, enter the IPv6 network address in the form 2007::1:2:3:0.
|
|
19
|
For an IPv4 destination network, type the subnet mask in the Subnet Mask/Prefix field using decimal format (255.0.0.0, 255.255.0.0, or 255.255.255.0). For an IPv6 destination network, type the prefix, such as 112.
|
|
20
|
Click Add.
|
|
21
|
Click Accept to save the configuration changes.
|
|
22
|
Navigate to the Policies tab.
|
|
23
|
To add a policy, click Add Policy...
|
|
24
|
In the Apply Policy To drop-down list, select one of the following: IP Address, IP Address Range, All Addresses, Network Object, Server Path, URL Object, All IPv6 Address, IPv6 Address, or IPv6 Address Range.
|
|
25
|
Enter a name for the policy in the Policy Name field.
|
|
26
|
In the fields that appear based on your Apply Policy To settings, fill in the appropriate information. For example, if you select IP Address in the Apply Policy To drop-down list, you will need to supply the IP Address in the IP Address field and the service in the Service drop-down list. If you select IPv6 Address Range, enter the beginning IPv6 address in the IPv6 Network Address field and the prefix that defines the IPv6 address range in the IPv6 Prefix field. Optionally enter a port range (80-443) or a single port number into the Port Range/Port Number field. This field is available when you select IP Address, IP Address Range, IPv6 Address, or IPv6 Address Range in the Apply Policy To drop-down list.
|
|
27
|
Click Accept to save the configuration changes.
|
|
28
|
Click the Bookmarks tab.
|
|
29
|
To add a bookmark, click Add Bookmark...
|
|
30
|
Enter a bookmark name in the Bookmark Name field.
|
|
31
|
Enter the bookmark name or IP address in the Name or IP Address field.
|
|
32
|
Select one of the following services from the Service drop-down list: Terminal Services (RDP - ActiveX), Terminal Services (RDP - Java), Virtual Network Computing (VNC), Citrix Portal (Citrix), Web (HTTP), Secure Web (HTTPS), File Shares (CIFS), File Transfer Protocol (FTP), Telnet, Telnet (HTML5), Secure Shell Version 1 (SSHv1), or Secure Shell Version 2(SSHv2).
|
|
33
|
In the fields that appear based on your Service settings, fill in the appropriate information. For example, if you select Terminal Services (RDP - ActiveX), you will need to select the desired screen size from the Screen Size drop-down list.
|
|
34
|
Click Accept to save the configuration changes.
|