|
1
|
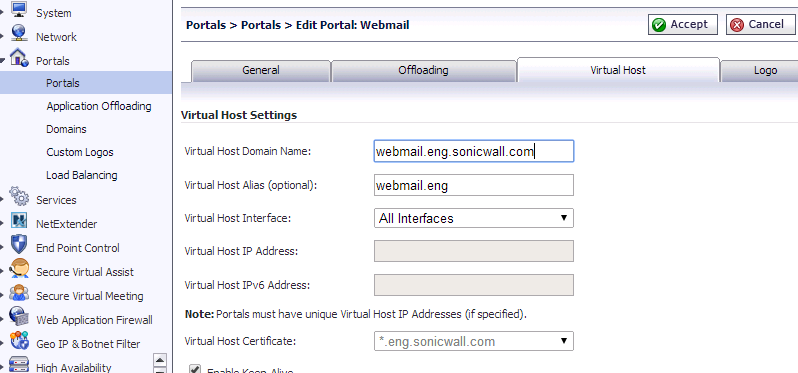
Navigate to Portals > Portals and click the Virtual Host tab. The Virtual Host Settings screen opens. This allows you to access the Portal directly.
|
|
2
|
Enter a descriptive name in the Virtual Host Domain Name field.
|
|
3
|
On the Offloading tab, select the Enable Load Balancing check box for load balancing among offloaded application servers.
|
|
4
|
Select one of the following from the Scheme drop-down list:
|
|
•
|
Web (HTTP) – access the Web application using HTTP (default scheme)
|
|
•
|
Secure Web (HTTPS) – access the Web application using HTTPS
|
|
•
|
Auto (HTTP/HTTPS) – allows the user to determine the actual scheme used to talk to the backend server when accessing an offloading portal. Access is still under the control of the access policy.
|
When using the Auto scheme, users can type http://www.example.virtual.host.com or https://www.example.virtual.host.com in browser’s address bar to test this feature. Even scheme set to Auto, it’s still under the control of the access policy.
|
•
|
Generic (SSL Offloading) – use SSL offloading to access custom SSL applications
(non-HTTP(S) applications) |
For more information about the Generic (SSL Offloading) option, see Configuring Generic SSL Offloading .
|
5
|
Enter the host name or private IP address of the backend host into the Application Server Host field.
|
|
6
|
Optionally enter the IPv6 address of the backend host into the Application Server IPv6 Address field.
|
|
7
|
In the Port Number (optional) field, optionally enter a custom port number to use for accessing the application.
|
|
8
|
In the Homepage URI (optional) field, optionally enter a URI to a specific resource on the Web server to which the user will be forwarded the first time the user tries to access the Application Offloading Portal. This is a string in the form of: /exch/test.cgi?key1=value1&key2=value2
|
|
a
|
Under Security Settings, select the Enable Web Application Firewall button to enable the feature.
|
|
b
|
Select the Disable Authentication Controls, Access Policies, and CSRF Protection (if enabled) check box if you need no authentication, access policies, or CSRF protection enforced. This is useful for publicly hosted Web sites.
|
|
a
|
To configure ActiveSync authentication, clear the Disable Authentication Controls check box to display the authentication fields. Select the Enable ActiveSync authentication check box and then type the default domain name. The default domain name will not be used when the domain name is set in the email client’s setting.
|
|
9
|
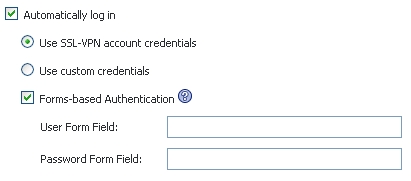
Select the Automatically Login check box to configure Single Sign-On settings.
|
|
•
|
Use SSL-VPN account credentials – allow login to the offloaded application using the credentials configured on the SRA appliance
|
|
•
|
Use custom credentials – displays Username, Password, and Domain fields where you can enter the custom credentials for the application or use dynamic variables. For the Password field, enter the custom password to be passed, or leave the field blank to pass the current user’s password to the offloaded application portal. For the other fields, dynamic variables can be used, such as those shown below:
|
|
11
|
If you selected Automatically Login, select the Forms-based Authentication check box to configure Single Sign-On for forms-based authentication.
|
|
•
|
Configure the User Form Field to be the same as the ‘name’ and ‘id’ attribute of the HTML element representing User Name in the Login form, for example:
|
<input type=text name=’userid’>
|
•
|
Configure the Password Form Field to be the same as the ‘name’ or ‘id’ attribute of the HTML element representing Password in the Login form, for example:
|
<input type=password name=’PASSWORD’ id=’PASSWORD’ maxlength=128>
|
12
|
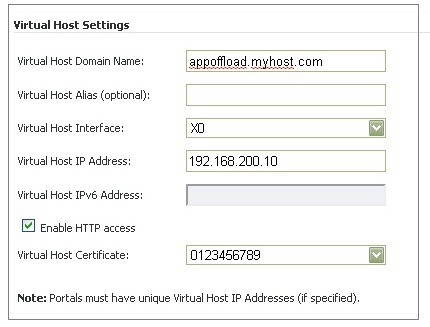
On the Virtual Host tab, set a host name for the application in the Virtual Host Domain Name field, and optionally enter a descriptive alias in the Virtual Host Alias field.
|
See Configuring Virtual Meeting Settings for more instructions on configuring the fields on this tab.
|
13
|
If authentication is disabled for this portal, you have the option to Enable HTTP access for this Application Offloaded Portal. This feature is useful for setting up offloading in trial deployments.
|
|
14
|
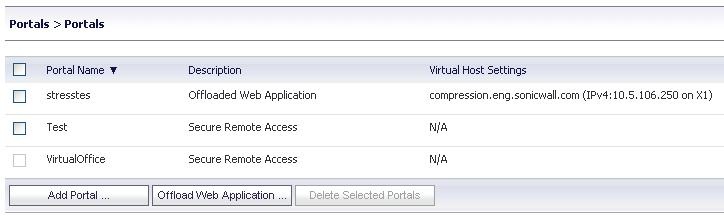
Click Accept. You are returned to the Portals > Portals page where you will see the Web application listed as an Offloaded Web Application under Description.
|
|
15
|
If you have not disabled authentication, navigate to the Portals > Domains page and create a domain for this portal. See Portals > Domains for information about creating a domain.
|