|
1
|
Click Add Domain or the Configure icon for the domain to edit. The Add Domain or Edit Domain window is displayed.
|
|
2
|
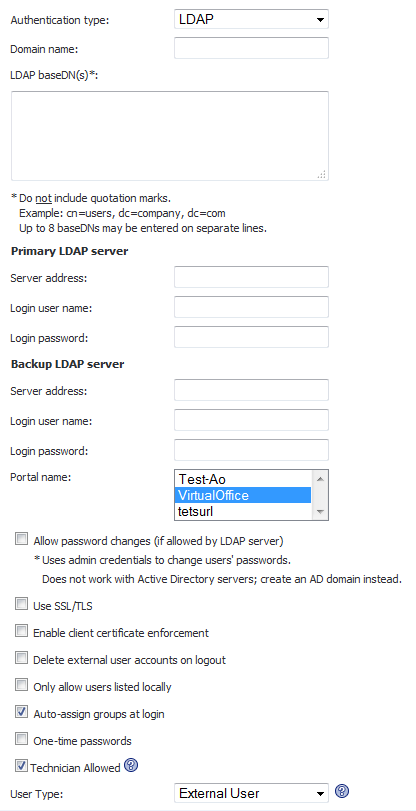
If adding the domain, select LDAP from the Authentication Type menu. The LDAP domain configuration fields are displayed.
|
|
3
|
If adding the domain, enter a descriptive name for the authentication domain in the Domain Name field. This is the domain name users will select in order to log into the SRA appliance user portal. It can be the same value as the Primary LDAP Server Address field.
|
|
4
|
Enter the search base for LDAP queries in the LDAP baseDN field. An example of a search base string is CN=Users,DC=yourdomain,DC=com.
|
|
TIP: It is possible for multiple OUs to be configured for a single domain by entering each OU on a separate line in the LDAP baseDN field. In addition, any sub-OUs will be automatically included when parents are added to this field.
|
|
5
|
Enter the IP address or domain name of the Primary LDAP server in the Server Address field.
|
|
6
|
Enter the common name and password of a user that has been delegated control of the primary server in the Login Username and Login Password fields.
|
|
NOTE: When entering Login Username and Login Password, remember that the SRA appliance binds to the LDAP tree with these credentials and users can log in with their sAMAccountName.
|
|
7
|
Optionally enter the IP address or domain name of a backup LDAP server in the Server Address field, under the Backup LDAP server section.
|
|
8
|
Optionally enter the common name and password of a user that has been delegated control of the backup server in the Login User Name and Login Password fields, under the Backup LDAP server section.
|
|
9
|
Enter the name of the layout in the Portal Name field. Additional layouts may be defined in the Portals > Portals page.
|
|
10
|
Optionally select the Allow password changes (if allowed by LDAP server) check box. This option, if allowed by your LDAP server, will enable users to change their LDAP password during an SRA session.
|
|
11
|
Optionally select the Use SSL/TLS check box. This option allows for the SSL/TLS encryption to be used for LDAP password exchanges. This option is disabled by default as not all LDAP servers are configured for SSL/TLS.
|
|
12
|
Optionally select the Enable client certificate enforcement check box to require the use of client certificates for login. By checking this box, you require the client to present a client certificate for strong mutual authentication. Two additional fields will appear:
|
|
•
|
Verify user name matches Common Name (CN) of client certificate - Select this check box to require that the user’s account name match their client certificate.
|
|
•
|
Verify partial DN in subject - Use the following variables to configure a partial DN that will match the client certificate:
|
|
13
|
Select the Auto-assign groups at login check box to assign users to a group when they log in.
|
|
14
|
Optionally select the One-time passwords check box to enable the One Time Password feature. A drop-down list will appear, in which you can select if configured, required for all users, or using domain name. These are defined as:
|
|
•
|
if configured - Only users who have a One Time Password email address configured will use the One Time Password feature.
|
|
•
|
required for all users - All users must use the One Time Password feature. Users who do not have a One Time Password email address configured will not be allowed to login.
|
|
•
|
using domain name - Users in the domain will use the One Time Password feature. One Time Password emails for all users in the domain will be sent to username@domain.com.
|
If you selected if configured or required for all users in the One-time passwords drop-down list, the LDAP e-mail attribute drop-down list will appear, in which you can select mail, userPrincipalName, or custom. These are defined as:
|
•
|
mail - If your LDAP server is configured to store email addresses using the “mail” attribute, select mail.
|
|
•
|
mobile or pager - If your AD server is configured to store mobile or pager numbers using either of these attributes, select mobile or pager, respectively. Raw numbers cannot be used, however, SMS addresses can.
|
|
•
|
userPrincipalName - If your LDAP server is configured to store email addresses using the “userPrincipalName” attribute, select userPrincipalName.
|
|
•
|
custom - If your LDAP server is configured to store email addresses using a custom attribute, select custom. If the specified attribute cannot be found for a user, the email address assigned in the individual user policy settings will be used. If you select custom, the Custom attribute field will appear. Type the custom attribute that your LDAP server uses to store email addresses. If the specified attribute cannot be found for a user, the email address will be taken from their individual policy settings.
|
If using domain name is selected in the One-time passwords drop-down list, the E-mail domain field will appear instead of the LDAP e-mail attribute drop-down list. Type in the domain name where one-time password emails will be sent (for example, abc.com).
|
15
|
Select the type of user from the User Type drop-down list. All users logging in through this domain will be treated as this user type. The choices depend on user types defined already. Some possible choices are:
|
|
•
|
External User – Users logging into this domain are treated as normal users without administrative privileges.
|
|
•
|
External Administrator – Users logging into this domain are treated as administrators, with local SRA admin credentials. These users are presented with the admin login page.
|
|
•
|
Read-only Administrator – Users logging into this domain are treated as read-only administrators and can view all information and settings, but cannot apply any changes to the configuration. These users are presented with the admin login page.
|
|
16
|
Click Accept to update the configuration. Once the domain has been added, the domain will be added to the table on the Portals > Domains page.
|