|
1
|
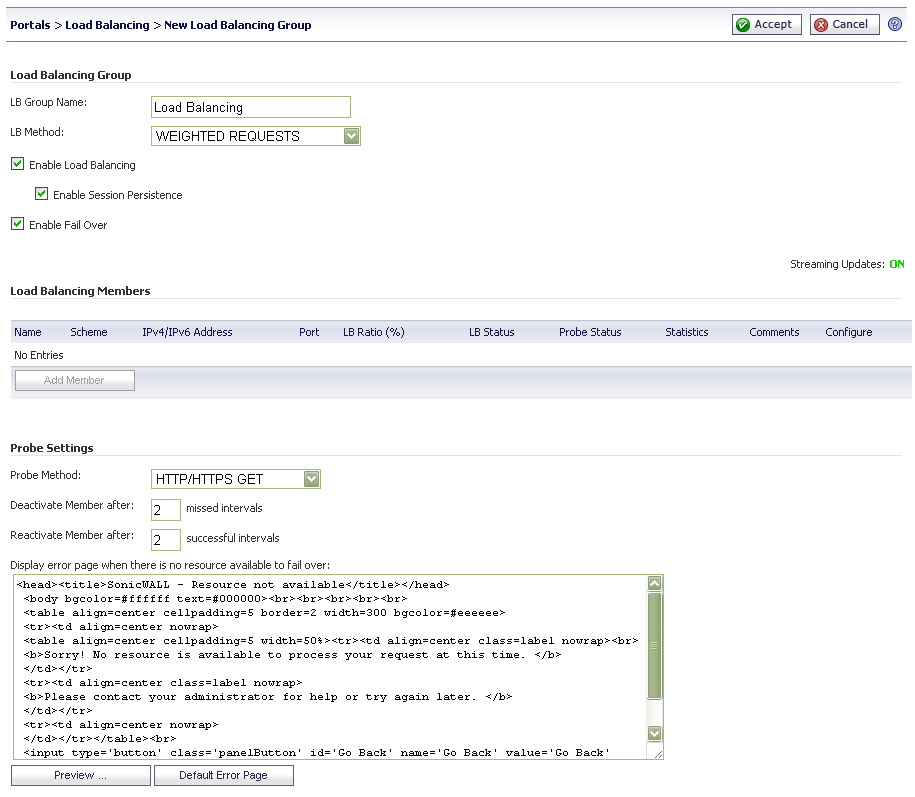
In the Portals > Load Balancing page, click the Add Group button. The New Load Balancing Group configuration information displays.
|
|
2
|
Enter a friendly LB Group Name for this load balancing group.
|
|
3
|
Select a load balancing method from the LB Method drop-down list. Options include:
|
|
•
|
Weighted Requests – Keeps track of the number of incoming requests (including successfully completed requests) to decide which member should handle the next incoming request. The LB Ratio will decide the percentage distribution.
|
|
•
|
Weighted Traffic – Keeps track of the number of bytes of inbound/outbound data to decide which member should handle the next incoming request.
|
|
•
|
Least Requests – Keeps track of the number of incoming requests (excluding successfully completed requests) that are currently being serviced to decide which Member should handle the next incoming request.
|
|
4
|
Select Enable Load Balancing to enable this group for load balancing.
|
|
5
|
The Enable Session Persistence option is automatically selected when the group is enabled. This option allows the administrator to enable continuous user sessions by forwarding the “requests” part of the same session to the same backend member.
|
|
6
|
Select Enable Failover to enable probing, monitoring, and failover features.
|
To configure probe settings for this load balancing group in the Probe Settings section of the Portals > Load Balancing screen:
|
1
|
Select a Probe Method from the drop-down list. Options include:
|
|
•
|
HTTP/HTTPS GET – The Load Balancer sends a HTTP(S) GET request periodically (based on the configured Probe interval) to see if the HTTP response status code is not greater than or equal to 500 to ensure there are no Web server errors. This is the most reliable method to determine if a Web server is alive. This method ignores SSL Certificate warnings while probing.
|
|
•
|
TCP Connect – The Load Balancer completes a 3-way TCP handshake periodically to monitor the health of a backend node.
|
|
•
|
ICMP Ping – The Load Balancer sends a simple ICMP Ping request to monitor if a backend node is alive.
|
|
2
|
In the Deactivate Member after field, enter the number of missed intervals required to fail the node. The default value is 2.
|
|
3
|
In the Reactivate Member after field, enter the number of successful intervals required to reinstate the node as functional. The default value is 2.
|
|
4
|
In the Display error page when there is no resource available to fail over text box, enter a custom message or Web page to display in the event that all of the configured backend nodes have failed. HTML formatting is allowed in this field.
|
|
1
|
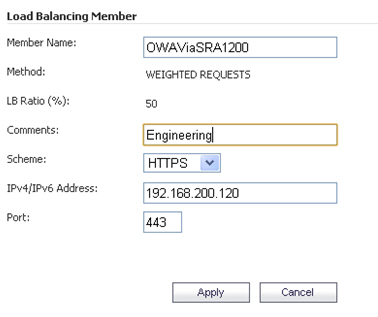
When editing or adding a group from the Portals > Load Balancing page, click the Add Member button. The Load Balancing Member screen displays.
|
|
2
|
Enter a Member Name to uniquely identify this member within the Load Balancing Group.
|
|
3
|
Enter a friendly name or description in the Comment field to identify this group by mousing over the group’s page.
|
|
4
|
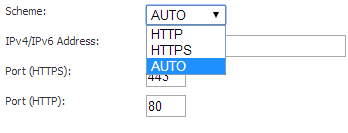
Select a Scheme to connect to the backend server. Select one of the following options from the drop down list: HTTP, HTTPS, or AUTO. The default value is HTTPS.
|
If AUTO is selected, specify two port numbers for HTTPS and HTTP.
|
NOTE: To enable HTTP access for the App Offloading Portal, select the Enable HTTP access check box, located on the Virtual Host tab of the portal.
|
|
5
|
Enter the back end HTTP(S) server IP address in the IPv4/IPv6 Address field.
|
|
6
|
Enter the Port for the backend server. The default value for an HTTPS connection is 443. For Auto schemes, enter the port numbers for HTTPS and HTTP.
|
|
7
|
Click the Accept button to add this member to the group.
|