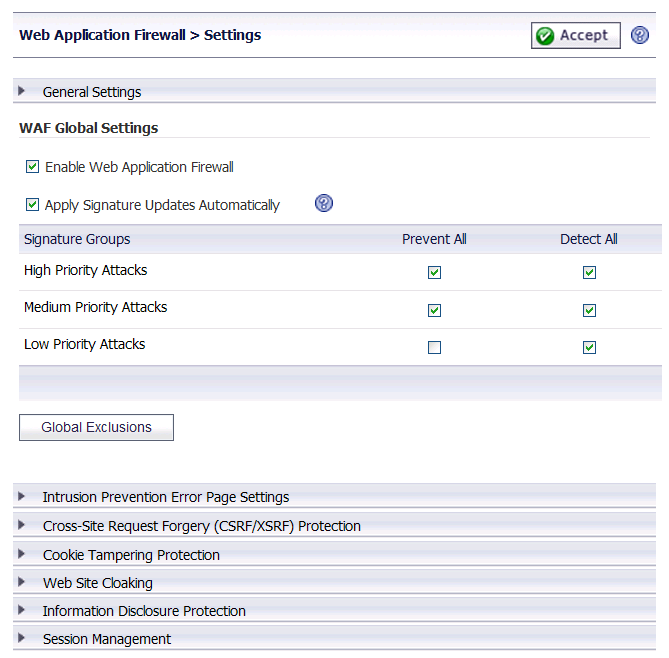
To enable and activate Web Application Firewall, you must select the check box to globally enable it and select at least one of the check boxes in the Signature Groups table. The settings in the General Settings section on this page allow you to globally manage your network protection against attacks by selecting the level of protection for high, medium, or low priority attacks. You can also clear the global Enable Web Application Firewall check box to temporarily disable Web Application Firewall without losing any of your custom configuration settings.
You can enable automatic signature updates in the General Settings section, so that new signatures are automatically downloaded and applied when available. A log entry is generated for each automatic signature update. If a signature is deleted during automatic updating, its associated Exclusion List is also removed. A log entry is generated to record the removal. You can view the log entries on the Web Application Firewall > Log page.
Cross-Site Request Forgery protection settings are also available on this page. When a CSRF attack is detected, log entries are created in both the WAF > Logs and Logs > View pages. For more information about CSRF/XSRF attacks, see How is Cross-Site Request Forgery Prevented? .
|
1
|
On the Web Application Firewall > Settings page, expand the General Settings section.
|
|
2
|
Select the Enable Web Application Firewall check box.
|
|
3
|
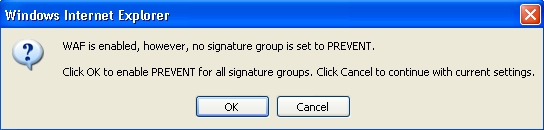
A warning dialog box is displayed if none of the signature groups have Prevent All already selected. Click OK in the dialog box to set all signature groups to Prevent All, or click Cancel to leave the settings as they are or to manually continue the configuration.
|
|
4
|
Select the Apply Signature Updates Automatically check box to enable new signatures to be automatically downloaded and applied when available. You do not have to click the Apply button on the Web Application Firewall > Status page to apply the new signatures.
|
|
5
|
Select the desired level of protection for High Priority Attacks in the Signature Groups table. Select one of the following options:
|
|
•
|
Select the Prevent All check box to block access to a resource when an attack is detected. Selecting Prevent All automatically selects Detect All, turning on logging.
|
|
•
|
Clear the Prevent All check box and select the Detect All check box to log attacks while allowing access to the resource.
|
|
6
|
Select the desired level of protection for Medium Priority Attacks in the Signature Groups table.
|
|
7
|
Select the desired level of protection for Low Priority Attacks in the Signature Groups table.
|
|
8
|
When finished, click Accept.
|
|
1
|
On the Web Application Firewall > Settings page, expand the General Settings section.
|
|
2
|
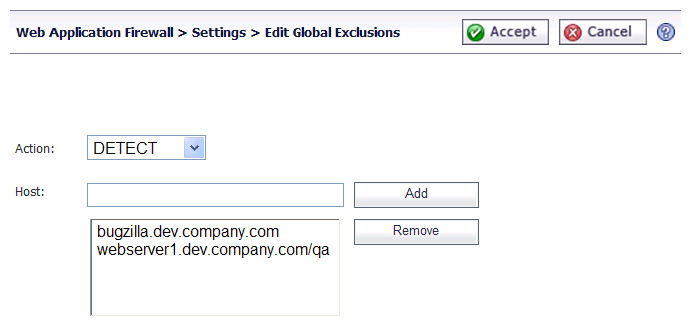
Click the Global Exclusions button.
|
|
3
|
|
•
|
Disable – Disables Web Application Firewall inspection for the host.
|
|
•
|
Detect – Lowers the action level from prevention to only detection and logging for the host.
|
|
•
|
No Action – Web Application Firewall inspects host traffic, but takes no action.
|
|
4
|
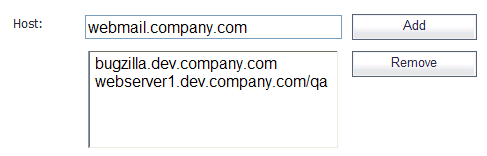
In the Host field, type in the host entry as it appears in the bookmark or offloaded application. This can be a host name or an IP address. Up to 32 characters are allowed. To determine the correct host entry for this exclusion, see Determining the Host Entry for Exclusions .
|
You can configure a path to a particular folder or file along with the host. The protocol, port, and the request parameters are simply ignored in the URL. If a path is configured, then the exclusion is recursively applied to all subfolders and files. For instance, if Host is set to webmail.company.com/exchange, then all files and folders under exchange are also excluded.
|
5
|
Click Add to move the host name into the list box.
|
|
7
|
When finished, click Accept.
|
|
1
|
Expand the Intrusion Prevention Error Page Settings section.
|
|
2
|
In the Intrusion Prevention Response drop-down list, select the type of error page to be displayed when blocking an intrusion attempt.
|

|
3
|
To create a custom page, select Custom Intrusion Prevention Page and modify the sample HTML in the text box.
|
|
4
|
To view the resulting page, click the Preview button.
|
|
5
|
To reset the current customized error page to the default error page, click the Default Blocked Page button and then click OK in the confirmation dialog box.
|
|
6
|
|
7
|
When finished, click Accept.
|
When a CSRF attack is detected, log entries are created in both the Web Application Firewall > Logs and Logs > View pages. For more information about CSRF/XSRF attacks, see How is Cross-Site Request Forgery Prevented? .
|
1
|
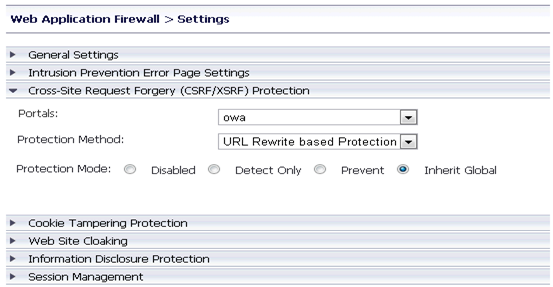
Expand the Cross-Site Request Forgery (CSRF/XSRF) Protection section.
|
|
2
|
In the Portals drop down list, select the Portal to which these CSRF protection settings will apply. To make these CSRF settings the default for all portals, select Global.
|
|
3
|
|
4
|
For Protection Mode, select the desired level of protection against CSRF attacks. You can select Detect Only to log these attacks, or Prevent to log and block them. Select Disabled to disable CSRF protection on the portal.
|
|
5
|
When finished, click Accept.
|
|
1
|
Expand the Cross-Site Request Forgery (CSRF/XSRF) Protection section.
|
|
2
|
In the Portals drop down list, select the Portal to which these CSRF protection settings will apply. To make these CSRF settings the default for all portals, select Global.
|
|
3
|
|
4
|
For Content Types, select the types of content you want to be profiled by CSRF. You can select All, HTML/XML, Javascript, or CSS.
|
|
5
|
Click the Begin Profiling button to start the CSRF Form-based Protection. If you wish to stop profiling, click End Profiling.
|
|
6
|
When finished, click Accept.
|

|
NOTE: If you are upgrading from a previous firmware version and switch the Protection Method to Form-based Protection, the controls may appear grayed and disabled. Simply click the Accept button to activate the controls.
|
Cookie tampering protection is configured independently for each Application Offloading portal.
|
1
|
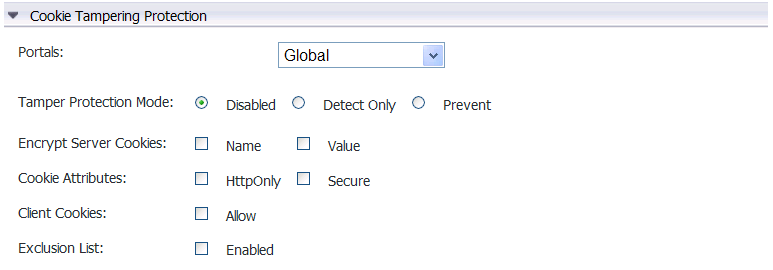
Expand the Cookie Tampering Protection section.
|
|
2
|
In the Portals drop-down list, select the Application Offloading portal to which these cookie tampering protection settings will apply. To make these cookie tampering settings the default for all portals, select Global.
|
|
3
|
For Tamper Protection Mode, select the desired level of protection against cookie tampering. You can select Detect Only to log these attacks, or Prevent to log and block them. Select Disabled to disable cookie tampering protection on the portal.
|
|
4
|
For Encrypt Server Cookies, select the Name check box to encrypt cookie names, and/or select the Value check box to encrypt cookie values. This affects client-side script behavior because it makes cookie names or values unreadable. Only server-side cookies are encrypted by these options.
|
|
5
|
For Cookie Attributes, select the HttpOnly check box to append the HttpOnly attribute to server-side cookies, and/or select the Secure check box to append the Secure attribute to server-side cookies. The attribute HttpOnly prevents the client-side scripts from accessing the cookies, which is important in mitigating attacks such as Cross Site Scripting and session hijacking. The attribute Secure ensures that the cookies are transported only in HTTPS connections. Both together add a strong layer of security for the server-side cookies.
|
|
6
|
For Client Cookies, select the Allow check box if an application on the portal needs all of the client cookies. When disabled, client-side cookies are not allowed to be sent to the backend systems. This option does not affect server-side cookies.
|
|
7
|
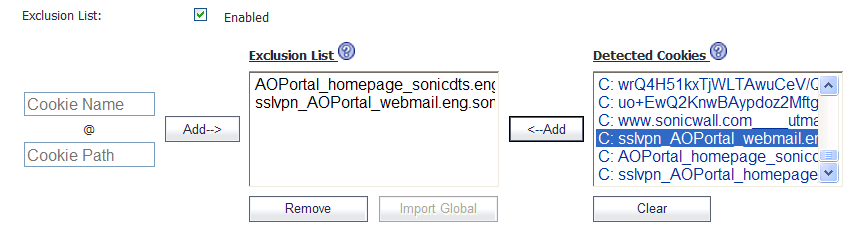
For the Exclusion List, select the Enabled check box to display additional fields for configuration.
|
|
8
|
To enter a custom cookie name and path to the Exclusion List, click in the Cookie Name field to type in the name of the cookie, and click in the Cookie Path field to type in the path. Then click the Add > button.
|
|
9
|
To add one or more already-detected cookies to the Exclusion List, select the desired cookies in the Detected Cookies list, holding the Ctrl key while clicking multiple cookies, and then click the < Add button to add them to the Exclusion List.
|
|
10
|
To remove cookies from the Exclusion List, select the cookies to be removed and then click the Remove button.
|
|
11
|
|
12
|
When finished, click Accept.
|
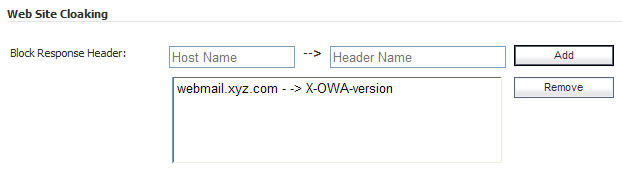
Under Web Site Cloaking, you can filter out headers in response messages that could provide information to clients about the backend Web server, which could possibly be used to find a vulnerability.
|
1
|
Expand the Web Site Cloaking section.
|
|
2
|
In the Block Response Header fields, type the server host name into the first field and type the header name into the second field, then click Add.
|
|
3
|
|
4
|
When finished, click Accept.
|
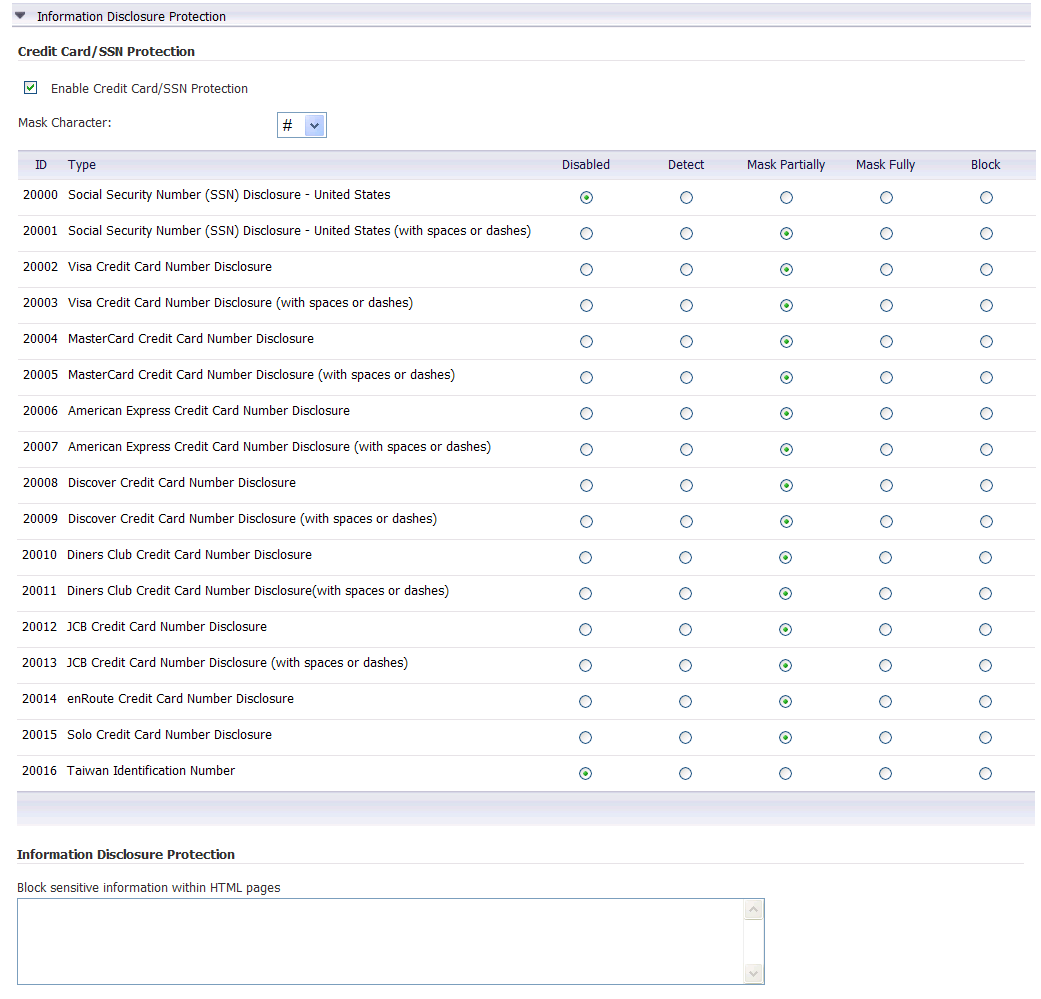
Under Information Disclosure Protection, you can protect against inadvertent disclosure of credit card and Social Security numbers (SSN) in HTML Web pages. You can also enter confidential text strings that should not be revealed on any Web site protected by Web Application Firewall.
|
1
|
Expand the Information Disclosure Protection section. The table contains a row for each possible pattern or representation of a social security number or credit card number that Web Application Firewall can detect in the HTML response.
|
|
2
|
Select the Enable Credit Card/SSN Protection check box.
|
|
3
|
In the Mask Character drop-down list, select the character to be substituted when masking the SSN or credit card number.
|
|
•
|
Disabled – Do not match numbers in this format. No logging or masking is performed.
|
|
•
|
Detect – Detect numbers in this format and create a log entry when detected.
|
|
•
|
Mask Partially – Substitute the masking character for the all digits in the number, except the last few digits such that the confidentiality of the number is still preserved.
|
|
•
|
Mask Fully – Substitute the masking character for all digits in the number.
|
|
•
|
Block – Do not transmit or display the number at all, even in masked format.
|
|
5
|
Below the table, in the Block sensitive information within HTML pages text box, type confidential text strings that should not be revealed on any Web site protected by Web Application Firewall. This text is case insensitive, can include any number of spaces between the words, but cannot include wildcard characters. Add new phrases on separate lines. Each line is pattern matched within any HTML response.
|
|
6
|
When finished, click Accept.
|
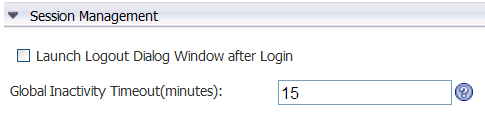
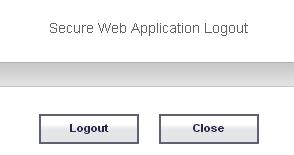
Under Session Management, you can control whether the logout dialog window is displayed when a user logs into the user portal or into an application offloaded portal. You can also set the inactivity timeout for users in this section.
|
1
|
Expand the Session Management section.
|
|
2
|
Select the Launch Logout Dialog Window after Login check box to display the session logout popup dialog box when the user portal is launched or when a user logs into an application offloaded portal.
|
|
3
|
In the Global Inactivity Timeout field, type the number of inactive minutes allowed before the user is logged out. This setting can be overridden by Group or User settings.
|
|
4
|
When finished, click Accept.
|