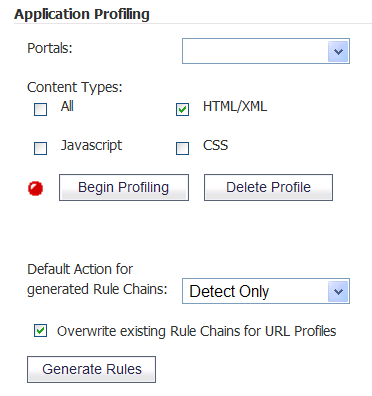
Application profiling allows you to generate custom rules in an automated manner based on a trusted set of inputs used to develop a profile of what inputs are acceptable by an application. Other inputs are denied, providing positive security enforcement. When you place the SRA appliance in learning mode in a staging environment, it learns valid inputs for each URL accessed by the trusted users. At any point during or after the learning process, custom rules can be generated based on the “learned” profiles. For more information about application profiling, see How Does Application Profiling Work? .
Custom rules created on this page have all the same properties as the signatures that Dell SonicWALL pushes out to Web Application Firewall-enabled appliances. Figure 44 shows the Rules page.
Figure 44. Web Application Firewall > Rules Page

To add a rule manually, you create a rule chain and then add rules within it. A rule chain is a collection of rules and includes additional attributes such as the severity rating, name, description, hit counters for rate limiting, and the action to take when the rule chain matches some traffic. Figure 45 shows all rule chain fields.
Rules in the Web Application Firewall > Rules page can be divided into pages and filtered by searching for a key word. To display only rules containing a key word in all fields or a specific field, type the key word in the Search field, select All Fields or a specific field to search, and click Search. Or, click Exclude to display only rules that do not contain the key word. Click Reset to display all rules. All matches are highlighted. The default is 50 rules per page.
Figure 45. Rule Chains
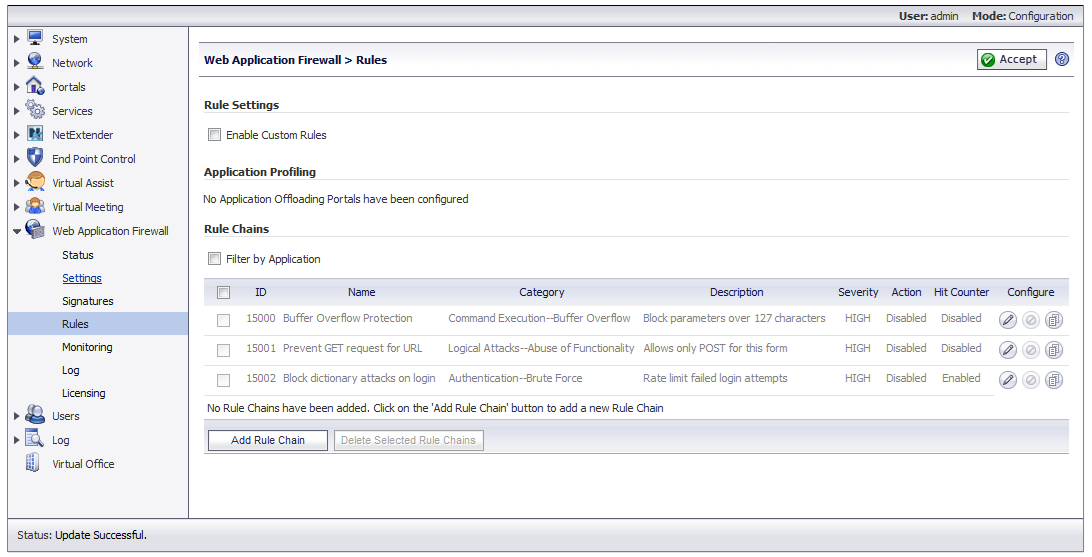
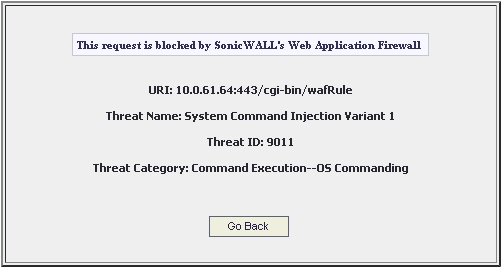
Custom rules and rule chains can be used to distinguish between legitimate and illegitimate traffic as defined by a Web application that is using a certain URI or running on a certain portal. One rule in the chain is configured to match the URI or portal host name, while another rule is created that matches an undesirable value for another element of the HTTP(S) traffic. When the rule chain (both rules) matches some traffic, the configured action is performed to block or log the bad traffic from that URI or portal. When the request is blocked, the user sees a custom block page such as that in Figure 46.
Figure 46. Block Page
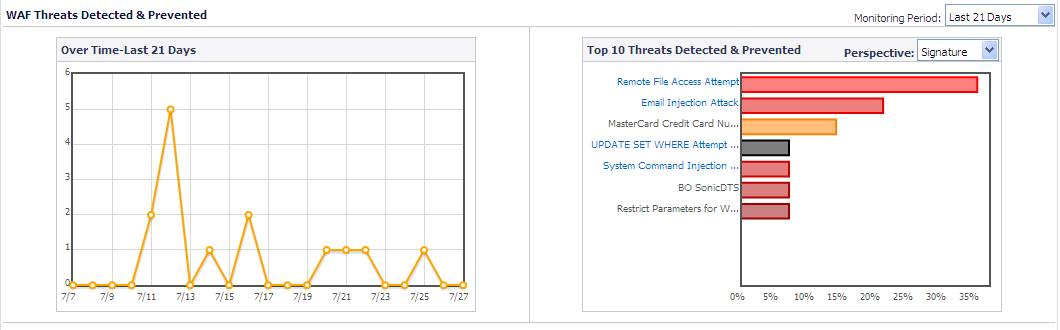
The Web Application Firewall > Monitoring page also shows the activity in the graphs. <Blue XRef>Figure 47. shows several detected and prevented threats during a 12 hour period. For more information about the Monitoring page, see Using Web Application Firewall Monitoring .
Figure 47. Monitoring Page After Blocking
Rules are matched against both inbound and outbound HTTP(S) traffic. When all rules in a rule chain find a match, the action defined in the rule chain is performed. You can also enable rate limiting in rule chains to trigger an action only after the number of matching attacks exceeds a threshold within a certain time period. You can configure the action to block the traffic and log the match, or to simply log it. You can also set the action to Disabled to remove the rule chain from active status and stop comparing traffic against those rules.
The Custom Rules feature can be enabled or disabled using the Enable Custom Rules global setting.
|
2
|
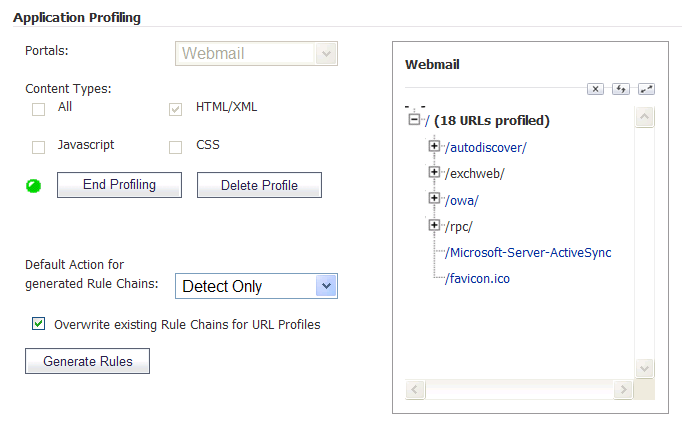
Under Application Profiling, select one or more portals with the application(s) to be profiled from the Portals drop-down list. Use Shift+click or CTRL+click to select multiple portals.
|
|
3
|
For Content Types, select the type of content to be profiled:
|
|
•
|
All – Includes all content types such as images, HTML, and CSS.
|
|
•
|
HTML/XML – Selected by default, this is the most important from a security standpoint, because it typically covers the more sensitive Web transactions.
|
|
•
|
Javascript – Appropriate for an application written in Javascript.
|
|
•
|
CSS – Select CSS to profile the cascading style sheet content used to control the formatting of Web pages written in HTML, XHTML, or XML variants.
|
|
4
|
Click Begin Profiling to start the “learning” process. Trusted users should be using the relevant applications on the selected portal during the active profiling period. The Begin Profiling button changes to End Profiling. Profiling continues until you click End Profiling.
|
|
5
|
After a period of time adequate to record inputs from normal application use, click End Profiling to stop the profiling process.
|
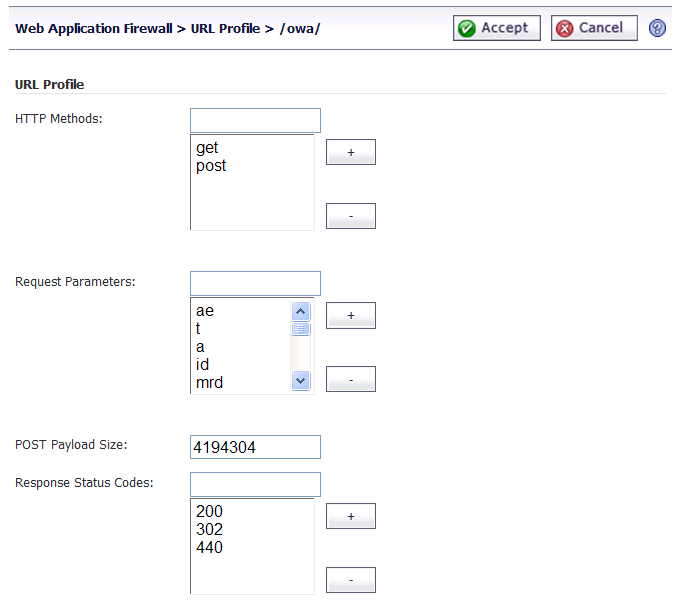
The editing page for the clicked URL is displayed.
|
8
|
Click Accept when finished editing. Repeat for other URLs as needed.
|
|
9
|
Before generating the rules from the URL profiles, select one of the following actions from the Default Action for generated Rule Chains drop-down list:
|
|
•
|
Disabled – The generated rules will be disabled rather than active.
|
|
•
|
Detect Only – Content triggering the generated rule will be detected and logged.
|
|
•
|
Prevent – Content triggering the generated rule will be blocked and logged.
|
|
10
|
Select the Overwrite existing Rule Chains for URL Profiles check box to overwrite rule chains that have already been generated from a URL profile.
|
|
11
|
Click the Generate Rules button to generate rules from the URL profiles. If a URL profile has been modified, those changes are incorporated.
|
|
12
|
If you do not want to accept the generated rule chains, click the Delete Selected Rule Chains button, which is available below the rule chain list. All of the automatically added rule chains are pre-selected right after generation for easy deletion of the group.
|
|
13
|
Click Accept to apply the generated rule chains to the SRA configuration.
|
|
1
|
On the Web Application Firewall > Rules page, click the Add Rule Chain button to add a new rule chain.
|
To edit an existing rule chain, click its Edit Rule Chain icon ![]() under Configure.
under Configure.
The New Rule Chain screen or the screen for the existing rule chain displays. Both screens have the same configurable fields in the Rule Chain section.

|
3
|
|
4
|
|
•
|
Prevent – Block traffic that matches the rule and log it.
|
|
•
|
Detect – Allow the traffic, but log it.
|
|
•
|
Disabled – The rule chain should not take effect.
|
The Disabled option allows you to temporarily deactivate a rule chain without deleting its configuration.
|
5
|
In the Description field, type a short description of what the rule chain will match or other information.
|
|
6
|
Select a category for this threat type from the Category drop-down list. This field is for informational purposes, and does not change the way the rule chain is applied.
|
|
7
|
Under Counter Settings, to enable tracking the rate at which the rule chain is being matched and to configure rate limiting, select the Enable Hit Counters check box. Additional fields are displayed.
|
|
8
|
In the Max Allowed Hits field, enter the number of matches for this rule chain that must occur before the selected action is triggered.
|
|
9
|
In the Reset Hit Counter Period field, enter the number of seconds allowed to reach the Max Allowed Hits number. If Max Allowed Hits is not reached within this time period, the selected action is not triggered and the hits counter is reset to zero.
|
|
10
|
Select the Track Per Remote Address check box to enforce rate limiting against rule chain matches coming from the same IP address. Tracking per remote address uses the remote address as seen by the SRA appliance. This covers the case where different clients sit behind a firewall with NAT enabled, causing them to effectively send packets with the same source IP.
|
|
11
|
Select the Track Per Session check box to enable rate limiting based on an attacker’s browser session. This method sets a cookie for each browser session. Tracking by user session is not as effective as tracking by remote IP if the attacker initiates a new user session for each attack.
|
|
12
|
|
13
|
Next, add one or more rules to the rule chain. See Configuring Rules in a Rule Chain for detailed information.
|
|
2
|
Click OK in the confirmation dialog box.
|
You can now edit the rule chain to customize it. See Adding or Editing a Rule Chain .
|
1
|
On the Web Application Firewall > Rules page, click the Delete Rule Chain icon
|
|
2
|
Click OK in the confirmation dialog box.
|
|
3
|
Click Accept.
|
For this, the administrator needs to create two rules:
|
1
|
Point your browser to https://<SRA IP>/cgi-bin/welcome.
|
If you try to reach the welcome page by simply using the URL https://<SRA IP>/, the usual redirect to https://<SRA IP>/cgi-bin/welcome may not work. To repair misconfigured rules, you need to explicitly go to https://<SRA IP>/cgi-bin/welcome, where <SRA IP> is the host name or IP address of your SRA appliance.
|
2
|
Log in as admin.
|
|
5
|
Click Accept.
|
You can add, edit, delete and clone rules. A rule is a condition that is checked against inbound or outbound HTTP(S) traffic. Each rule chain can have one or more rules configured, and must have at least one rule before it can be used. Figure 48 shows the Add Rule page.
Figure 48. Add Rule Page
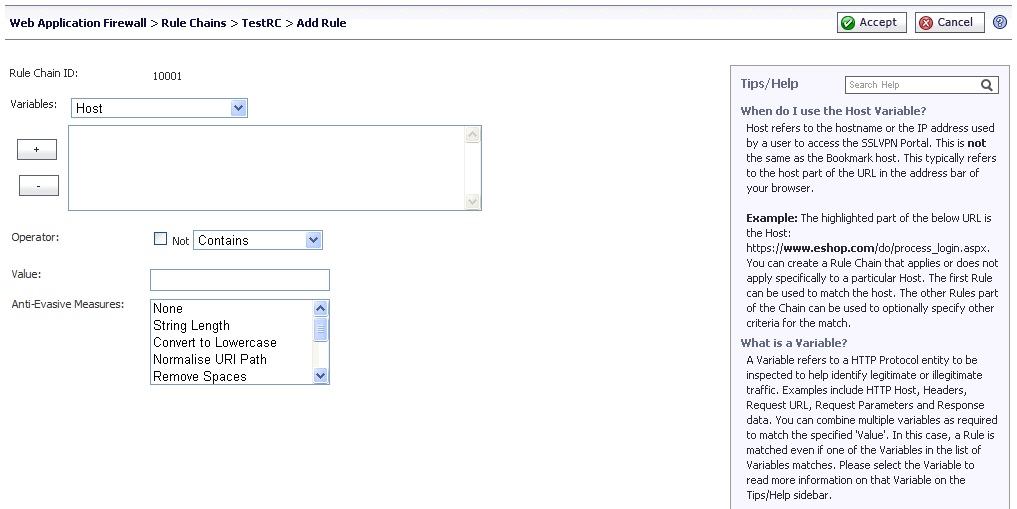
A rule has several components:
|
•
|
Variables – These are HTTP protocol entities that are scanned by Web Application Firewall to help identify legitimate or illegitimate traffic. Multiple variables can be matched against the configured value in the Value field. The ‘+’ and ‘-’ buttons allow you to add variables from the Variables drop-down list or delete them from the list of selected variables. You can combine multiple variables as required to match the specified value. If multiple variables are configured, then the rule is matched if any one of the configured variables matches the target value. See About Variables for more information about variables.
|
|
•
|
Operators – These are arithmetic and string operators. The Not check box is an inversion operator used to match any value except the configured condition. See About Operators for more information about the operators.
|
|
•
|
Value – This entity can be a number, literal string, or a regular expression, which is compared with the scanned target. It is compared with the value of the configured variable(s) according to the specified operator.
|
To compare the variable(s) to more than one value, you can enter multiple values separated by spaces into the Value field, and select the Matches Keyword operator. Delimiting by spaces only works if the Matches Keyword operator is selected.
|
•
|
Anti-Evasive MEASUREs – This field allows you to apply measures beyond those supported by the Operators field, especially to enforce Anti-Evasive protection. See About Anti-Evasive Measures for more information about these measures.
|
The following sections provide detailed information about rules:
You can select a variable in the Variables drop-down list to display more information about that variable in the Tips/Help sidebar. The sidebar explains when each variable would be used and where it is found in the HTTP protocol. An example use case is provided for each variable.
You can also select an entry in the Anti-Evasive Measures drop-down list to display more information about it in the Tips/Help sidebar.
Variables are HTTP protocol entities that are scanned by Web Application Firewall to help identify legitimate or illegitimate traffic. Multiple variables can be matched against the configured value in the Value field. The ‘+’ and ‘-’ buttons allow you to add variables from the Variables drop-down list or delete them from the list of selected variables.
A variable can represent a single value or a collection. If a variable represents a collection, such as Parameter Values, then a specific variable within the collection can be configured by entering its name in the selection text box to the right of the colon (:). For example, the value for the URI or Host variable is unique in each HTTP(S) request. For such variables, the selection text box is not displayed. Other variables, such as Request Header Values and Response Header Names, represent a collection.
If you need to test the collection itself against an input, then you would leave the selection text box empty. However, if you need to retrieve the value of a specific item in the collection, you would specify that item in the selection text box. For example, if you need to test if the parameter password exists in the HTTP(S) request, then you would configure the variable Parameter Names and leave the selection text box empty. You would set the Operator to String equals and the Value to password. But, if you want to check whether the value of the password parameter matches a particular string, such as “foo”, then you would select the Parameter Values variable and specify password in the selection text box. In the Value field, you would enter foo.
Table 29 describes the available variables.
There are a number of arithmetic and string operators. The Not check box is an inversion operator, which results in a match for any value except the configured condition.
These operators can be used in conjunction with Anti-Evasive Measures. For example, you might use the Equals String operator with Convert to Lowercase or Normalize URI Path in Anti-Evasive Measures.
Table 30 describes the available operators for use with rules.
|
One or more of the scanned variables contains the content of the Value field. |
||
|
The scanned variable(s) match the alphanumeric string in the Value field exactly. |
||
|
The scanned variable is equal to the content of the Value field. |
||
|
The scanned variable is greater than the content of the Value field. |
||
|
The scanned variable is greater than or equal to the content of the Value field. |
||
|
The scanned variable is less than the content of the Value field. |
||
|
The scanned variable is less than or equal to the content of the Value field. |
||
|
One or more of the scanned variables matches one of the keywords in the Value field. If multiple keywords are specified, they should be separated by spaces. |
||
|
One or more of the scanned variables matches the regular expression in the Value field. An example of a regular expression that matches any four decimal numbers is \d{4}. |
Anti-evasive measures are applied to input identified by the selected variables before the input is matched against the specified value. For instance, the String Length measure is used to compute the length of the matched input and use it for comparison. Some of the anti-evasive measures are used to thwart attempts by hackers to encode inputs to bypass Web Application Firewall rules. You can click on an anti-evasive measure in the list to read more information on it in the Tips/Help sidebar.
The anti-evasive measures can be used in conjunction with regular operators. There are ten measures to choose from in the Anti-Evasive Measures field, including the None measure which leaves the input alone.
Multiple anti-evasive measures can be selected together and individually enforced. You can select multiple measures by holding the Ctrl key while clicking an additional measure. When the None measure is selected along with other measures in your rule, the input is compared as is and also compared after decoding it or converting it with another measure. <Blue XRef>Table 31. describes the anti-evasive measures available for use with rules.
|
Use the None measure when you want to compare the scanned input to the configured variable(s) and value(s) without changing the input. |
|
|
Use the String Length measure when the selected variable is a string and you want to compute the length of the string before applying the selected operator. |
|
|
Use the Convert to Lowercase measure when you want to make case-insensitive comparisons by converting the input to all lowercase before the comparison. When you use this measure, make sure that strings entered in the Value field are all in lowercase. This is an anti-evasive measure to prevent hackers from changing case to bypass the rule. |
|
|
Use the Normalise URI Path measure to remove invalid references, such as back-references (except at the beginning of the URI), consecutive slashes, and self-references in the URI. For example, the URI www.eshop.com/././//login.aspx is converted to www.eshop.com/login.aspx. |
|
|
Use the Remove Spaces measure to remove spaces within strings in the input before the comparison. Extra spaces can cause a rule to not match the input, but are interpreted by the backend Web application. |
|
|
Use the Base64 Decode measure to decode base64 encoded data before the comparison is made according to the rule. |
|
|
Use the Hexadecimal Decode measure to decode hexadecimal encoded data before the comparison is made according to the rule. |
|
|
Use the URL Decode measure to decode URL encoded strings in the input. Use the URL Decode (Unicode) measure to handle %uXXXX encoding. URL encoding is used to safely transmit data over the Internet when URLs contain characters outside the ASCII character set. NOTE: Do not use these measures against an input that has been decoded already. For example, the URI www.eshop.com/hack+URL%3B is converted to www.eshop.com/hack URL by this operator before the comparison is made. |
|
|
Use the Trim measure to remove spaces before and after the input data before the comparison. Extra spaces can cause a rule to not match the input, but are interpreted by the backend Web application. |
|
1
|
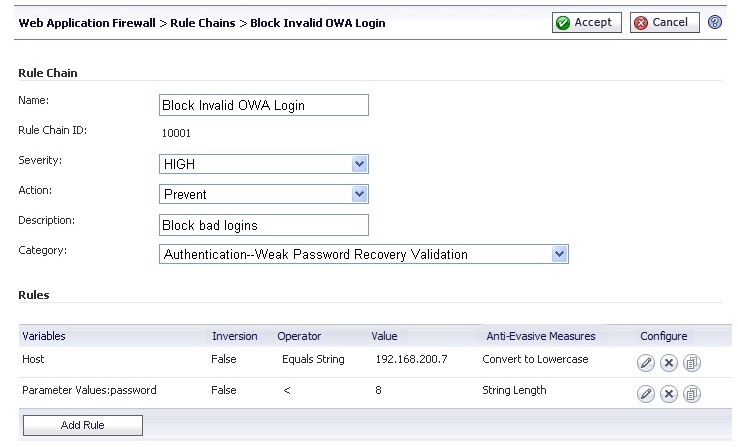
Select Host as the Variable and click + to add it, set the Operator to Equals String, and set Value to the Virtual Host name of the portal. This checks that the Host header of the login request matches the site you are trying to protect. In this case, the rule chain is only being applied to one site.
|
|
2
|
Select Parameter Value as the Variable and type password into the selection field, then click + to add the variable and selected item to the rule, set the Operator to < (less than), and set Value to 8. Select String Length in the Anti-Evasive Measures list to compute the length of the password form parameter.
|
The action for the rule chain would be set to Prevent. Figure 49 shows the rule chain for this example.
Figure 49. Example Rule Chain – Blocking Bad Logins
This rule chain blocks a form submission if the form has a request parameter other than formId or if the value of formId contains more than 4 digits. To accomplish this, you would need two rule chains:
|
•
|
The second rule checks if Parameter Names does not match the name of the valid parameter, formId. It uses the Equals String operator with the Not inversion check box selected.
|

|
•
|
The second rule checks if the value contained by the Parameter Value: formId variable matches the regular expression ^\d{1,4}$ which matches anything that consists of 1 to 4 digits. The Not inversion check box is selected to change the rule to match anything that does not consist of 1 to 4 digits.
|

|
2
|

If a hacker perceives that a Request URI is being scanned for CR and LF characters (carriage return and line feed), the hacker may attempt to sneak those characters into the request by performing URL encoding on the characters before adding them to the request. The URI will then contain %0D and %0A characters, which could be used to launch an HTTP response splitting attack. The URL Decode and/or URL Decode (Unicode) measures can be used to thwart this type of attack by decoding the scanned input before comparing it against the configured value(s) to check for a match.
Specifically, if a request is made to the URI http://www.host.com/foo%20bar/ and the URL Decode measure is selected, the scanned URI becomes http://www.host.com/foo bar/ after decoding, which can now be safely matched. To thwart a hacker who sends a non-encoded request in addition to the encoded one, the administrator can select the None and the URL Decode options in the rule.
An administrator wants to check whether the content of the variable Parameter Values matches the value foo bar in order to block such a request. Because the backend application accepts case-insensitive inputs (foo bar and FOO BAR), the hacker can pass foo BAR in the request and evade the rule. To prevent this evasion, the administrator specifies Convert to Lowercase as an anti-evasive measure and configures the value as foo bar in all lower case. This causes all request parameter values to be converted to lower case and compared against the value for a case-insensitive check.
Similarly, the hacker could pass foo%20BAR, which is the URL encoded version typically used by browsers. To prevent this evasion, the administrator specifies URL Decode as the anti-evasive measure to apply to the request entity. The input foo%20BAR is URL decoded to foo BAR. If the input is already foo BAR, then URL decoding is not applied.
Comparing against a decoded input allows the administrator to use the String Length measure to check the length of the input against the matching variable. For example, if a Web application ID parameter should not be more than four characters, the administrator could select Parameter Values in the Variable field, enter ID in the selection field, click + to add the variable and selected item to the rule, enter 4 in the Value field, select > in the Operator list, and select both URL Decode and String Length in the Anti-Evasive Measures list.
|
1
|
On the Web Application Firewall > Rules page, click the Edit Rule Chain icon
|
|
2
|
Click the Delete icon
|
|
3
|
Click OK in the confirmation dialog box.
|
|
4
|
Click Accept.
|
|
1
|
On the Web Application Firewall > Rules page, click the Edit Rule Chain icon
|
|
2
|
Click the Clone icon
|
|
3
|
Click OK in the confirmation dialog box.
|
You can now edit the rule to customize it. See Adding or Editing a Rule .
|
1
|
Click the Edit Rule Chain icon
|
|
2
|
Click the Add Rule button to add a new rule, or click the Edit icon under Configure for the rule you want to edit.
|
|
3
|
In the Add Rule page or the page for the edited rule, select a variable from the Variables drop-down list. See About Variables for information about the available variables.
|
|
4
|
If the chosen variable is a collection of variables, a selection field is displayed to the right of the Variables field, after the colon. If you wish to make a comparison against a particular member of the collection, type the name of that item into the selection field.
|
To test the collection itself against an input, leave the selection field blank. For example, to test whether a certain parameter exists in the request, you could select the Parameter Names variable and then type the specific parameter name into the Value field (but not into the variable selection field).
|
5
|
Click the Plus button
|
To delete a variable, select it in the large text box and click the Minus button ![]() .
.
|
6
|
Select a string or arithmetic operator from the Operators drop-down list. To perform the inverse operation, select the Not check box.
|
|
7
|
In the Value field, type in the value to be compared with the selected variable(s) in the scanned HTTP(S) input. If you selected the Matches Keyword operator, you can compare the input against multiple values by typing in each value separated by a space. Each value will be compared individually.
|
|
8
|
Select one or more measures from the Anti-Evasive Measures list. Hold the Ctrl button on your keyboard while clicking to select multiple measures.
|
|
9
|
Click the Accept button when finished.
|