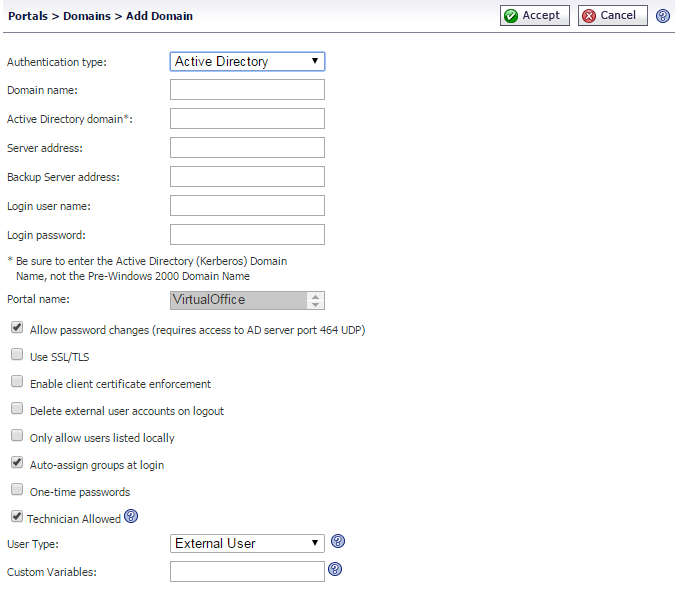
1
|
Click Add Domain or the Configure icon for the domain to edit. The Add Domain or Edit Domain window is displayed.
|
2
|
If adding the domain, select Active Directory from the Authentication type drop-down list. The Active Directory configuration fields will be displayed.
|
3
|
If adding the domain, enter a descriptive name for the authentication domain in the Domain Name field. This is the domain name users will select in order to log into the SRA appliance portal. It can be the same value as the Server Address field or the Active Directory Domain field, depending on your network configuration.
|
4
|
Enter the Active Directory domain name in the Active Directory Domain field.
|
5
|
Enter the IP address or host and domain name of the Active Directory server in the Server Address field.
|
6
|
Enter the IP address or host and domain name of the back up server in the Backup Server Address field.
|
7
|
Enter the user name for login in the Login user name field.
|
8
|
Enter the password for login in the Login password field.
|
9
|
Enter the name of the layout in the Portal Name field. Additional layouts may be defined in the Portals > Portals page.
|
10
|
Optionally select the Allow Password Changes Check Box. Enabling this feature allows a user to change their password through the Virtual Office portal by selecting the Options button on the top of the portal page. User must submit their old password, along with a new password and a re-verification of the newly selected password.
|
11
|
Optionally select the Use SSL/TLS check box. This option allows for the needed SSL/TLS encryption to be used for Active Directory password exchanges. This check box should be enabled when setting up a domain using Active Directory authentication.
|
12
|
Optionally select the Enable client certificate enforcement check box to require the use of client certificates for login. By checking this box, you require the client to present a client certificate for strong mutual authentication. Two additional fields will appear:
|
•
|
Verify user name matches Common Name (CN) of client certificate - Select this check box to require that the user’s account name match their client certificate.
|
•
|
Verify partial DN in subject - Use the following variables to configure a partial DN that will match the client certificate:
|
13
|
Select the Delete external user accounts on logout check box to delete users who are not logged into a domain account after they log out.
|
14
|
Check the Only allow users listed locally check box to allow only users with a local record in the Active Directory to login.
|
15
|
Select the Auto-assign groups at login check box to assign users to a group when they log in.
|
16
|
Optionally, select the One-time passwords check box to enable the One Time Password feature. A drop-down list will appear, in which you can select if configured, required for all users, or using domain name. These are defined as:
|
•
|
if configured - Only users who have a One Time Password email address configured will use the One Time Password feature.
|
•
|
required for all users - All users must use the One Time Password feature. Users who do not have a One Time Password email address configured will not be allowed to login.
|
•
|
using domain name - Users in the domain will use the One Time Password feature. One Time Password emails for all users in the domain will be sent to username@domain.com.
|
17
|
If you selected if configured or required for all users in the One-time passwords drop-down list, the Active Directory AD e-mail attribute drop-down list will appear, in which you can select mail, mobile, pager, userPrincipalName, or custom. These are defined as:
|
•
|
mail - If your AD server is configured to store email addresses using the “mail” attribute, select mail.
|
•
|
mobile or pager - If your AD server is configured to store mobile or pager numbers using either of these attributes, select mobile or pager, respectively. Raw numbers cannot be used, however, SMS addresses can.
|
•
|
userPrincipalName - If your AD server is configured to store email addresses using the “userPrincipalName” attribute, select userPrincipalName.
|
•
|
custom - If your AD server is configured to store email addresses using a custom attribute, select custom. If the specified attribute cannot be found for a user, the email address assigned in the individual user policy settings will be used. If you select custom, the Custom attribute field will appear. Type the custom attribute that your AD server uses to store email addresses. If the specified attribute cannot be found for a user, the email address will be taken from their individual policy settings.
|
If you select using domain name, an E-mail domain field appears below the drop-down list. Type in the domain name where one-time password emails will be sent (for example, abc.com).
18
|
If Technician Allowed is enabled, Secure Virtual Assist can log in as a technician role in this domain.
|
19
|
Select the type of user from the User Type drop-down list. All users logging in through this domain will be treated as this user type. The choices depend on user types defined already. Some possible choices are:
|
•
|
External User – Users logging into this domain are treated as normal users without administrative privileges.
|
•
|
External Administrator – Users logging into this domain are treated as administrators, with local SRA admin credentials. These users are presented with the admin login page.
|
•
|
Read-only Administrator – Users logging into this domain are treated as read-only administrators and can view all information and settings, but cannot apply any changes to the configuration. These users are presented with the admin login page.
|
20
|
Click Accept to update the configuration. Once the domain has been added, the domain will be added to the table on the Portals > Domains page.
|
If your users are unable to connect using Active Directory, verify the following configurations:
•
|
The time settings on the Active Directory server and the SRA appliance must be synchronized. Kerberos authentication, used by Active Directory to authenticate clients, permits a maximum 15-minute time difference between the Windows server and the client (the SRA appliance). The easiest way to solve this issue is to configure Network Time Protocol on the System > Time page of the SRA Web-based management interface and check that the Active Directory server has the correct time settings.
|