|
1
|
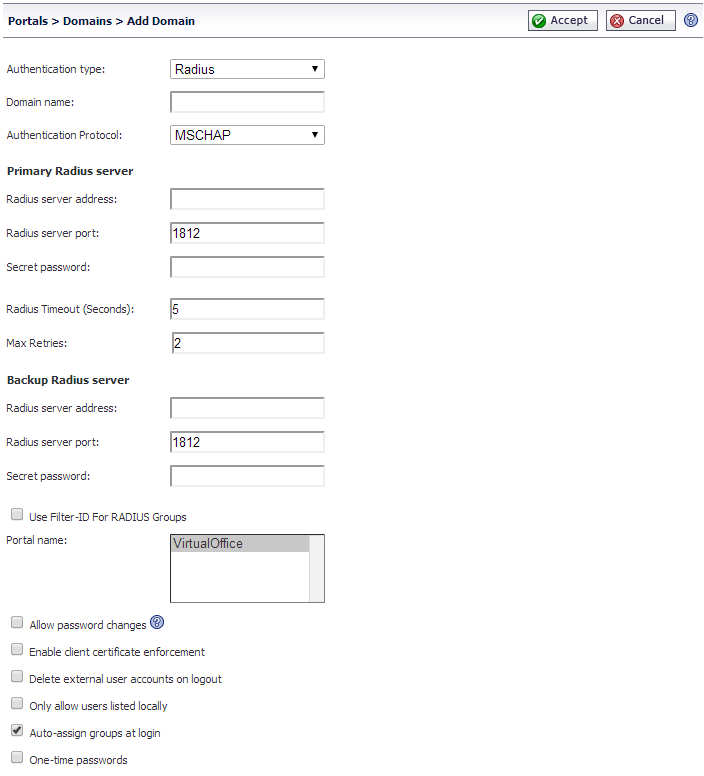
On the Portals > Domains page, click Add Domain or the Configure icon for the domain to edit. The Add Domain or Edit Domain window is displayed.
|
|
2
|
If adding the domain, select RADIUS from the Authentication Type menu. The RADIUS configuration field is displayed.
|
|
3
|
If adding the domain, enter a descriptive name for the authentication domain in the Domain Name field. This is the domain name users will select in order to log into the SRA appliance portal.
|
|
4
|
Select the proper Authentication Protocol for your RADIUS server. Choose from PAP, CHAP, MSCHAP, or MSCHAPV2.
|
|
5
|
Under Primary Radius Server, enter the IP address or domain name of the RADIUS server in the RADIUS Server Address field.
|
|
6
|
Enter the RADIUS server port in the RADIUS server port field.
|
|
7
|
If required by your RADIUS configuration, enter an authentication secret in the Secret Password field.
|
|
8
|
Enter a number (in seconds) for RADIUS timeout in the RADIUS Timeout (Seconds) field.
|
|
9
|
Enter the maximum number of retries in the Max Retries field.
|
|
10
|
Under Backup Radius Server, enter the IP address or domain name of the backup RADIUS server in the RADIUS Server Address field.
|
|
11
|
Enter the backup RADIUS server port in the RADIUS server port field.
|
|
12
|
|
13
|
Optionally, if using RADIUS for group-based access, select the Use Filter-ID for RADIUS Groups check box.
|
|
14
|
Click the name of the layout in the Portal Name drop-down list.
|
|
15
|
If you selected the Authentication Protocol for your RADIUS server as MSCHAP or MSCHAPV2, you have the option to Allow password changes by selecting the check box. Note that if you enable password changes, you must also deploy the LAN Manager authentication.
|
|
16
|
Optionally select the Enable client certificate enforcement check box to require the use of client certificates for login. By checking this box, you require the client to present a client certificate for strong mutual authentication. Two additional fields will appear:
|
|
•
|
Verify user name matches Common Name (CN) of client certificate - Select this check box to require that the user’s account name match their client certificate.
|
|
•
|
Verify partial DN in subject - Use the following variables to configure a partial DN that will match the client certificate:
|
|
17
|
Select the Delete external user accounts on logout check box to delete users who are not logged into a domain account after they log out.
|
|
18
|
Select the Auto-assign groups at login check box to assign users to a group when they log in.
|
|
19
|
Optionally select the One-time passwords check box to enable the One-time password feature. A drop-down list will appear, in which you can select if configured, required for all users, or using domain name. These are defined as:
|
|
•
|
if configured - Only users who have a One Time Password email address configured will use the One Time Password feature.
|
|
•
|
required for all users - All users must use the One Time Password feature. Users who do not have a One Time Password email address configured will not be allowed to login.
|
|
•
|
using domain name - Users in the domain will use the One Time Password feature. One Time Password emails for all users in the domain will be sent to username@domain.com.
|
|
20
|
If you select using domain name, an E-mail domain field appears below the drop-down list. Type in the domain name where one-time password emails will be sent (for example, abc.com).
|
|
21
|
Click Accept to update the configuration. Once the domain has been added, the domain will be added to the table on the Portals > Domains page.
|
|
22
|
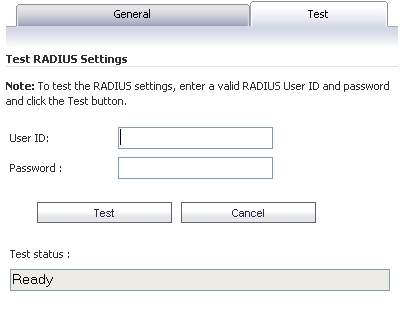
Click the configure button next to the RADIUS domain you added. The Test tab of the Edit Domain page displays.
|
|
23
|
|
24
|
Click Test. The SRA appliance will connect to your RADIUS server.
|
|
25
|
If you receive the message Server not responding, check your user ID and password and click the General tab to verify your RADIUS settings. Try running the test again.
|