NOTE: Alert emails are sent when the Send Log to E-mail Address option and the Send Alerts to E-mail Address option are configured on the Log > Automation page.
|
NOTE: Alert emails are sent when the Send Log to E-mail Address option and the Send Alerts to E-mail Address option are configured on the Log > Automation page.
|
The Logging Level allows you to filter events by priority. Events with equal or greater priority are passed. Events with a lower priority are dropped. This enables you to filter out lower-level priorities to prevent them being logged in the system.
On the Log > Settings page, you can set the baseline logging level to be displayed on the Log Monitor page. The following logging levels are available for selection, from highest to lowest:
|
•
|
|
•
|
|
•
|
|
•
|
|
•
|
|
•
|
|
•
|
|
1
|
|
2
|
From the Logging Level drop-down menu, select the logging level you want.
|
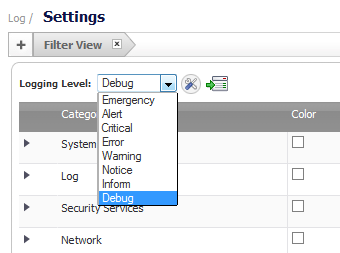
All events with a priority equal to or higher than the selected entry are also logged. For example, if you select Error as the logging level, all messages tagged as Error, as well as all messages with a higher priority such as Critical, Alert, and Emergency, are also displayed. The default value is Debug.
The Alert Level allows you to filter email alerts by alert level. Events with an equal or greater alert level are sent to the specified email address. Events with a lower alert level are ignored. This enables you to filter out lower-level email alerts to reduce the actual emails transmitted.
On the Log > Settings page, you can set the baseline alert level to be displayed on the Dashboard > Log Monitor page:
|
•
|
|
•
|
|
•
|
|
•
|
|
1
|
Go to the Log > Settings page.
|
|
2
|
From the Alert Level drop-down menu, select the logging level you want.
|
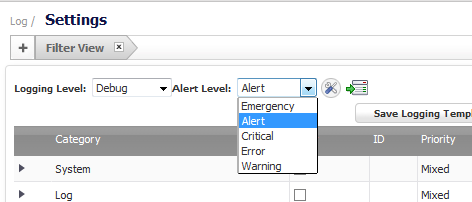
All events with a higher alert level than the selected entry are also logged. For example, if you select Error as the logging level, all messages tagged as Error, as well as all messages with a higher alert level, such as Critical, Alert, and Emergency, are also displayed. The default value is Alert.
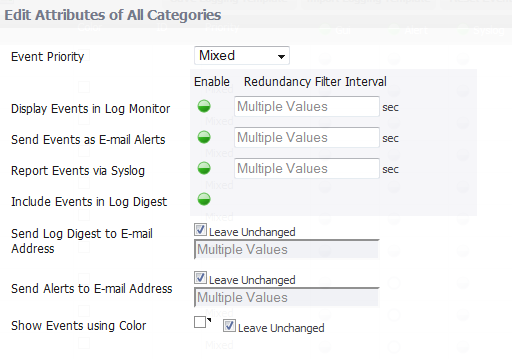
Clicking the Configure icon next to the Alert Level drop-down menu launches the Edit Attributes of All Categories dialog. This dialog enables you to set the attributes for all events in all categories and groups at once.
The following global attributes can be modified:
|
1
|

|
2
|
Click the Configure icon.
|
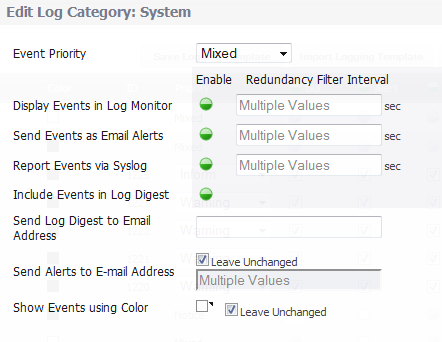
The Edit Attributes of All Categories pop-up dialog appears.
|
NOTE: The Enable buttons are solid green
When the fields say Multiple Values, different values have been specified for one or more category, group, or event. To view the individual settings, refer to Configuring Event Attributes Selectively . To change the setting from Multiple Values into one value for all categories, groups, or events while in the Edit Attributes of All Categories dialog, verify that the option was enabled so the field can be accessed for entering the new value. If the option is disabled, the field is dimmed and inaccessible. |
|
3
|
From the Event Priority drop-down menu, select the priority that you want.
|
|
NOTE: The following Redundancy Filter Interval fields enable you to enter time intervals (in seconds) to avoid duplication of a log message within an interval. The range for these intervals is 0 to 86400 seconds. For Syslog messages, the default interval is set to 90 seconds. For alert messages, the default interval is set to 900 seconds.
|
|
4
|
If you want to display the log events in the Log Monitor, select the Enable button for the Display Events in Log Monitor option.
|
|
5
|
In the Display Events in Log Monitor Redundancy Filter Interval field, enter the number of seconds that should elapse before allowing the same event to be logged and displayed by the Log Monitor again when that event occurs one after the other. The range is 0 to 86400.
|
|
6
|
If you want to send events as email alerts, select the Enable button for the Send Events as E-mail Alerts option.
|
|
7
|
In the Send Events as Email Alerts Redundancy Filter Interval field, enter the number of seconds that should elapse before allowing the same email event to be sent when that email alert occurs one after the other. The range is 0 to 86400.
|
|
8
|
If you want to report events via Syslog, select the Enable button for the Report Events via Syslog option.
|
|
9
|
In the Report Events via Syslog Redundancy Filter Interval field, enter the number of seconds that should elapse before allowing the same Syslog messages to be sent when that event occurs one after the other. The range is 0 to 86400.
|
|
10
|
If you want to send the global event log via email, select the Enable button for the Include Events in Log Digest option.
|
|
NOTE: If this option is enabled, it is important to verify the email address configured in the Send Log Digest to Email Address field is correct.
|
|
11
|
If you enabled Include Events in Log Digest, do one of the following for Send Log Digest to Email Address:
|
|
•
|
If you want to use the same email address that is entered in the Log > Automation page even when you change other values in this dialog, select the Leave Unchanged option. This option is enabled by default.
|
|
•
|
To change the email address, uncheck the Leave Unchanged option and enter a new address in the now-active field.
|
|
12
|
If you want to receive alerts via email based on the global settings in this dialog, do one of the following for Send Alerts to E-mail Address:
|
|
•
|
If you want to use the same email address that is entered in the Log > Automation page even when you change other values in this dialog, select the Leave Unchanged option. This option is enabled by default.
|
|
•
|
To change the email address, uncheck the Leave Unchanged option and enter a new address in the now-active field.
|
|
13
|
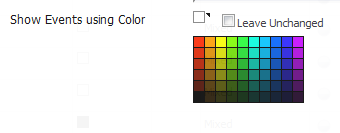
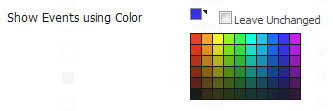
If you want to use a specific color for the global events log, uncheck the Leave Unchanged option, which is the default setting. The color selection matrix displays.
|
|
14
|
Select the color you want. The Show Events using Color square becomes the chosen color.
|
|
15
|
Click Apply.
|
On the Log > Settings page, the columns show the main event attributes that can be configured on different levels: category, group, or each event.

|
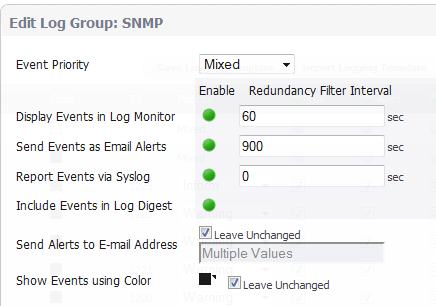
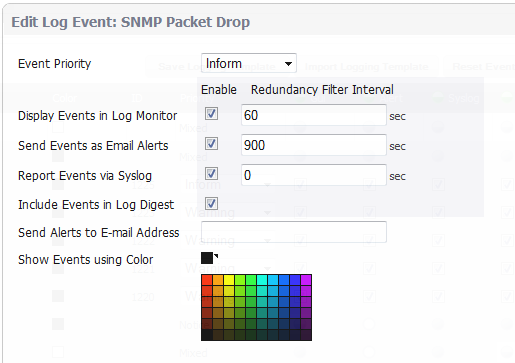
NOTE: The following Edit Log pop-up dialogs may look slightly similar, but the effect of each varies in scope. The Edit Log Category dialog modifies settings for all groups that belong to the same category and, consequently, all events in that category. The Edit Log Group dialog modifies setting for all events that belong to that group. The Edit Log Event dialog modifies settings for one specific event.
|
|
NOTE: The Enable buttons for the columns are green
You can enable or disable a column. In the rows for categories and groups, the enable indicators are grey ( The rows for events contain checkboxes for enabling ( |
|
2
|
|
2
|
Any changes done to the group apply to all events that belong only to the selected group.
|
2
|
Any changes done to the event apply to just that events that event within the selected group.