
When the appliance is successfully registered, go to the System > Licenses page and click Synchronize under Manage Security Services Online. This will contact the SonicWall licensing server and ensure that the appliance is properly licensed.
To check licensing status, go to the System > Status page and view the license status of all the firewall services (Gateway Anti-Virus, Anti-Spyware, and Intrusion Prevention).
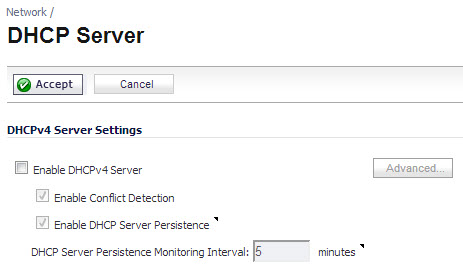
When using a SonicWall network security appliance in Layer 2 Bridge Mode in a network configuration where another device is acting as the DHCP server, you must first disable its internal DHCP engine, which is configured and running by default. On the Network > DHCP Server page, clear the Enable DHCPv4 Server check box, and then click on the Accept button at the top of the page.
On the System > SNMP page, make sure the check box next to Enable SNMP is checked, and then click on the Accept button at the top of the screen.

Then, click the Configure button. On the SNMP Settings page, enter all the relevant information for your firewall: the GET and TRAP SNMP community names that the SNMP server expects, and the IP address of the SNMP server. Click OK to save and activate the changes.

On the Network > Interfaces page, enable SNMP and HTTP/HTTPS on the interface through which you will be managing the appliance.

|
1
|

The Add Syslog Server dialog displays.

|
3
|
Click OK to save and activate the change.
|
On the Network > Zones page, for each zone you will be using, make sure that the firewall services are activated.

Then, on the Security Services page for each firewall service, activate and configure the settings that are most appropriate for your environment.
An example of the Gateway Anti-Virus settings is shown below:

An example of the Intrusion Prevention settings is shown below:

An example of the Anti-Spyware settings is shown below:

If you plan to manage the appliance from a different zone, or if you will be using a server such as the HP PCM+/NIM server for management, SNMP, or syslog services, create access rules for traffic between the zones. On the Firewall > Access Rules page, click on the Configure icon for the intersection of the zone of the server and the zone that has users and servers (your environment may have more than one of these intersections). Create a new rule to allow the server to communicate with all devices in that zone.

On the Log > Categories page, set the Logging Level to Informational and the Alert Level to Critical. Click Accept to save and activate the change.

Then, go to the Log > Name Resolution page and set the Name Resolution Method to DNS then NetBios. Click Accept to save and activate the change.

In the case where you are using a HP PCM+/NIM system, if it will be managing a HP ProCurve switch on an interface assigned to a WLAN/Wireless zone, you will need to deactivate two features, otherwise you will not be able to manage the switch. Go to the Network > Zones page and select your Wireless zone. On the Wireless tab, clear the check boxes next to Only allow traffic generated by a SonicPoint and WiFiSec Enforcement. Click OK to save and activate the change.
